Object detection using TensorFlow on Android

Hello everyone, this is Martin from the Mobile Development Group here at KINTO Technologies!
With this guide I hope to give you a quick overview on how to build your TFLite (TensorFlow Lite) models from scratch so let's dive straight into it.
This article is the entry for December 9th in the KINTO Technologies Advent Calendar 2024🎅🎄
Preparation
There are basically two ways to prepare your dataset. One is to do the annotation process locally and the other is to annotate your dataset online whilst collaborating and sharing the initial workload better with your team members.
This guide tries to emphasize the use of Roboflow (https://roboflow.com/).
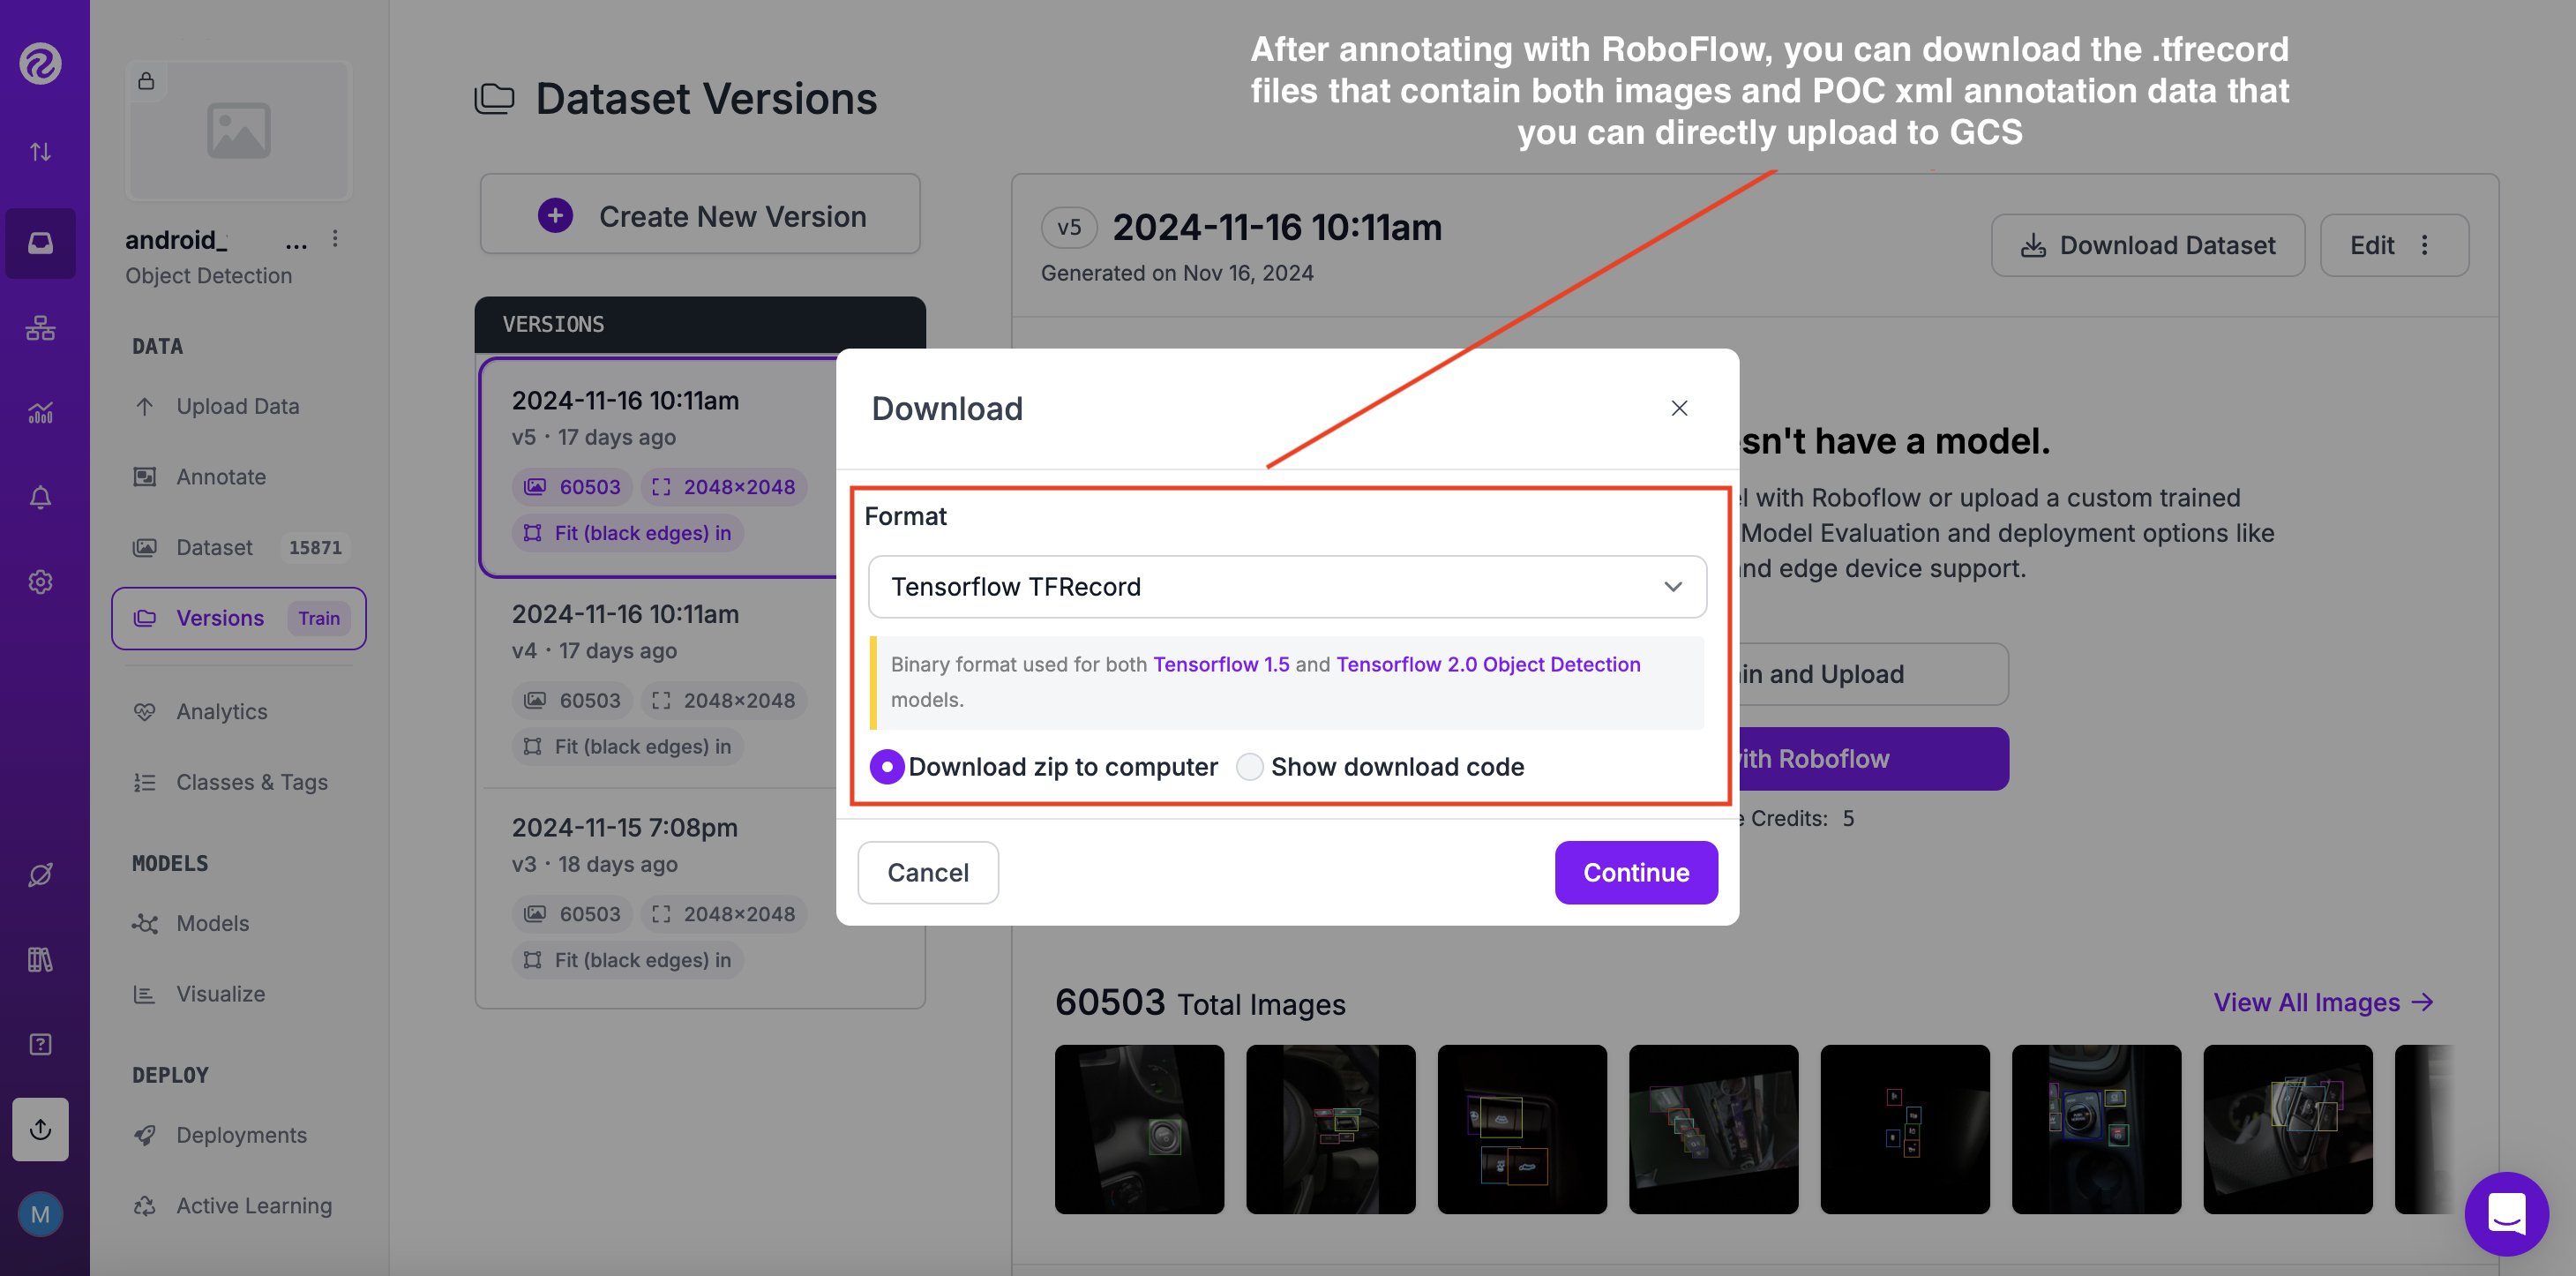
Roboflow's model export functionality allows you to export trained models in various formats, making it easy to deploy them in your own applications or further fine-tune them.
In our case we want to train TFlite models so we would want to export to the TFRecord format as shown in the image below.
- However, in case you are not using any third party online annotation tools such as Roboflow to annotate your images online and you want to annotate locally, you could try out the free Python library labelImg: https://github.com/HumanSignal/labelImg
- In general, either locally or online, first we need to collect the dataset of images and label them to get the corresponding bounding box classification meta data (xml) files. (in our case creating the VOC [Visual Object Classes] Pascal meta data)
- more information about Pascal VOC can be found here: https://roboflow.com/formats/pascal-voc-xml
- After creating a Google Cloud Platform standard runtime instance you will need to connect it to your Colab notebook. In essence, Google Colab provides a secure, scalable, and collaborative platform for data science and machine learning teams within organizations.
Once that is done we first need to import the necessary libraries to get Tensorflow going (Step 1)
Creation of GCP standard instance:
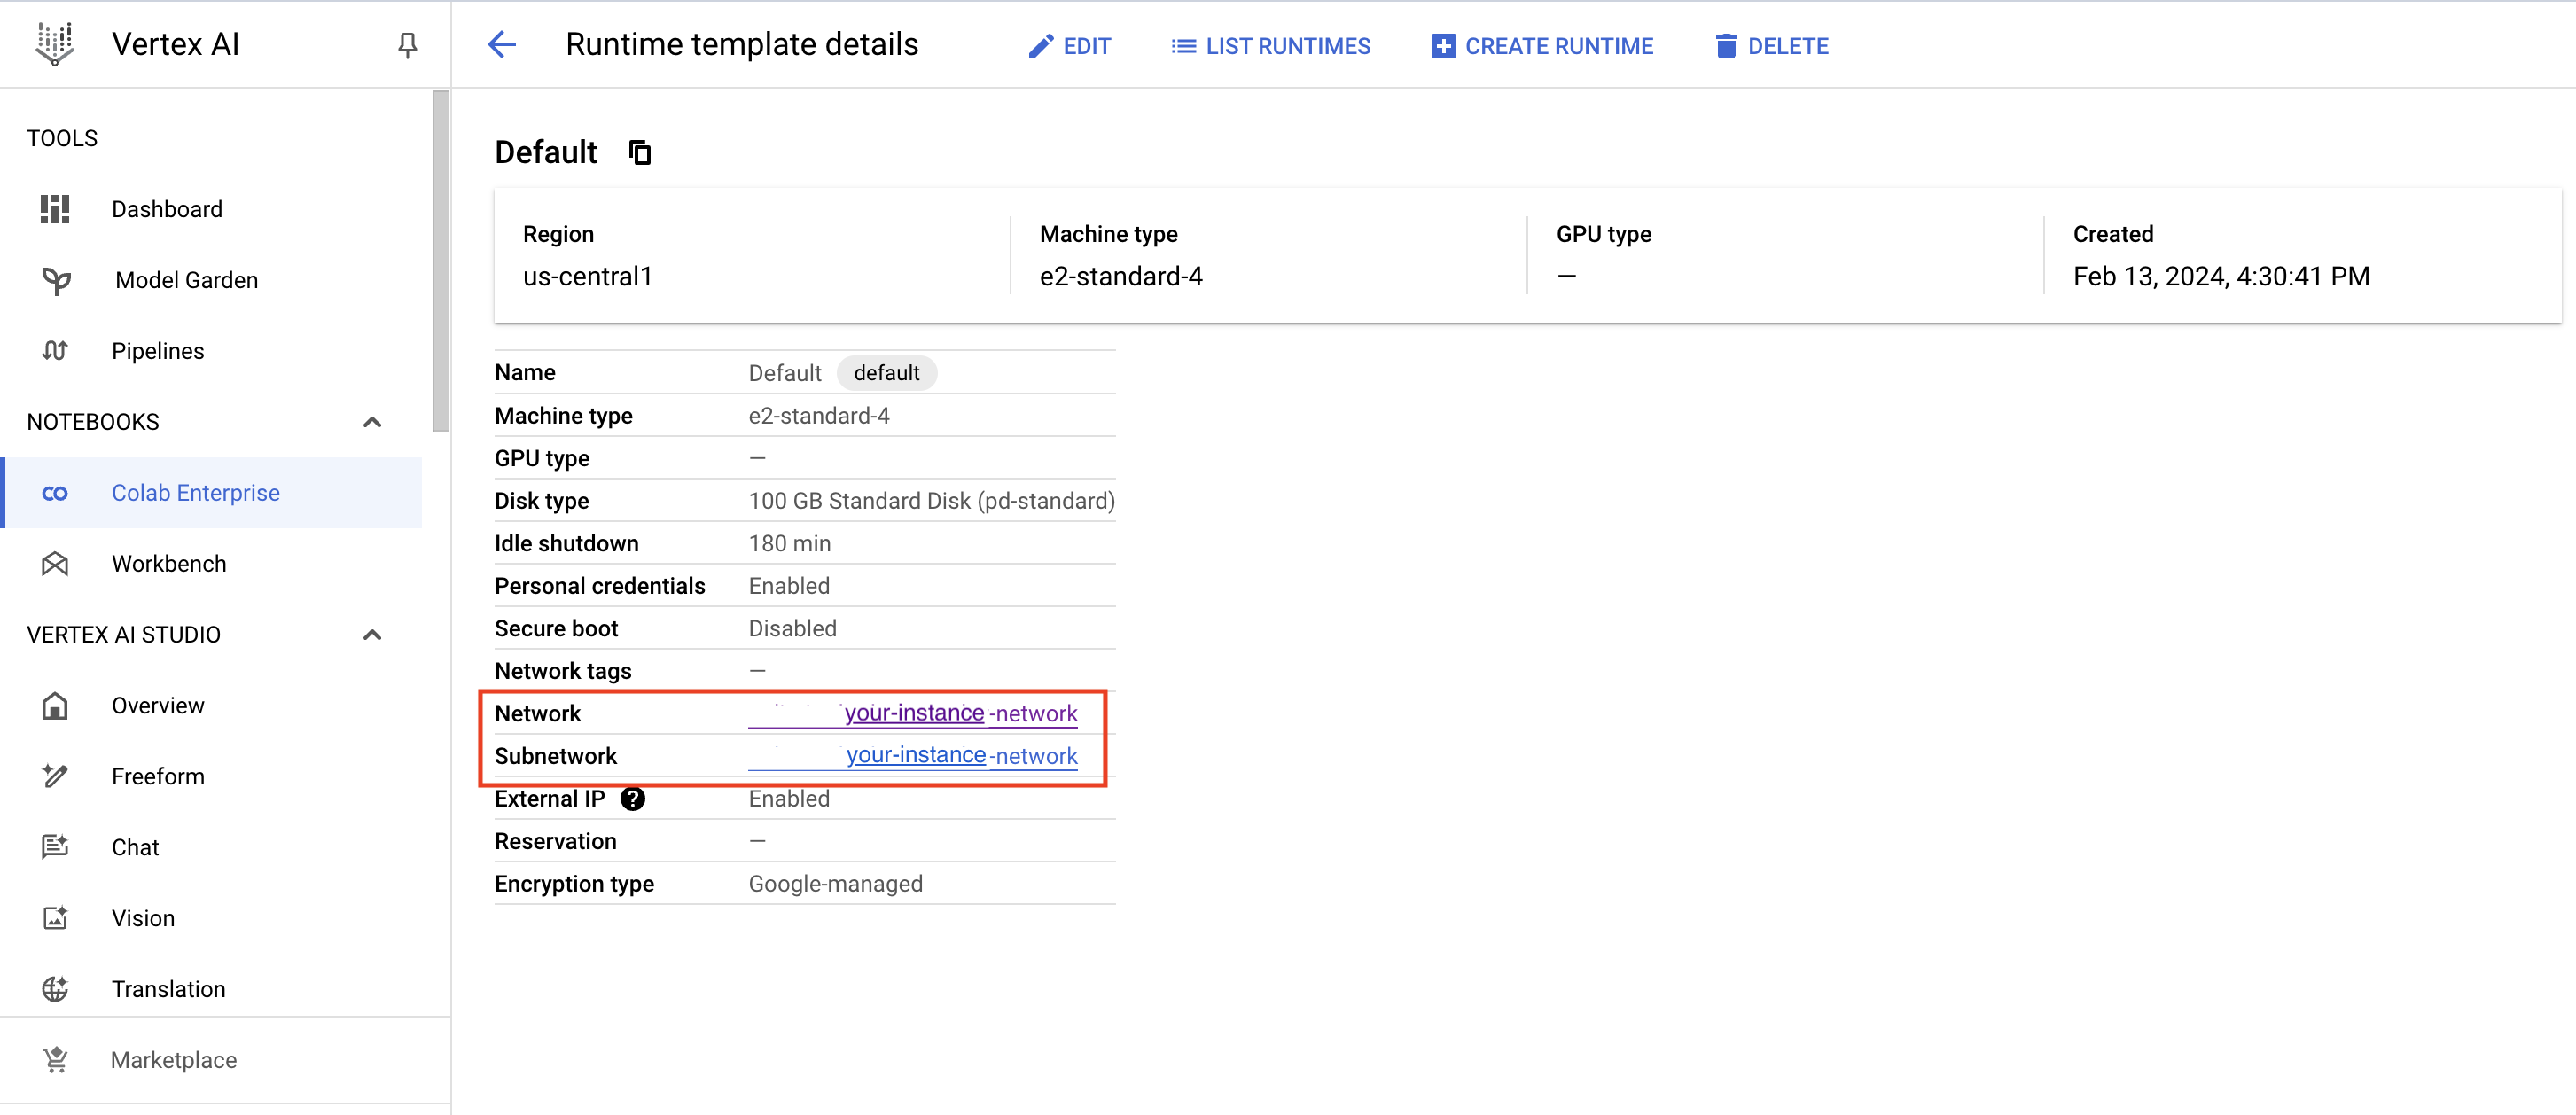
Creation of Colab Enterprise (https://cloud.google.com/colab/docs) notebook:

- Connect your Google Cloud bucket (Step 4)
Execution
- Install the TensorFlow Object Detection API (Step 5 in this guide)
- Generate the TFRecord files required for training. (need generate_tfrecord.py script to produce csv files for this)
- Edit the model pipeline config file and download the pre-trained model checkpoint
- Train and evaluate the model
- Export and convert the model into TFlite(TensorFlow Lite) format
Deployment
- Deploy the TFlite model on Android / iOS / IoT devices
So now get's started
Here are the steps that you should undergo within your Colab Enterprise notebook in detail:
1) Import Libraries
!pip install tensorflow==2.13.0

import os
import glob
import xml.etree.ElementTree as ET
import pandas as pd
import tensorflow as tf
print(tf.__version__)
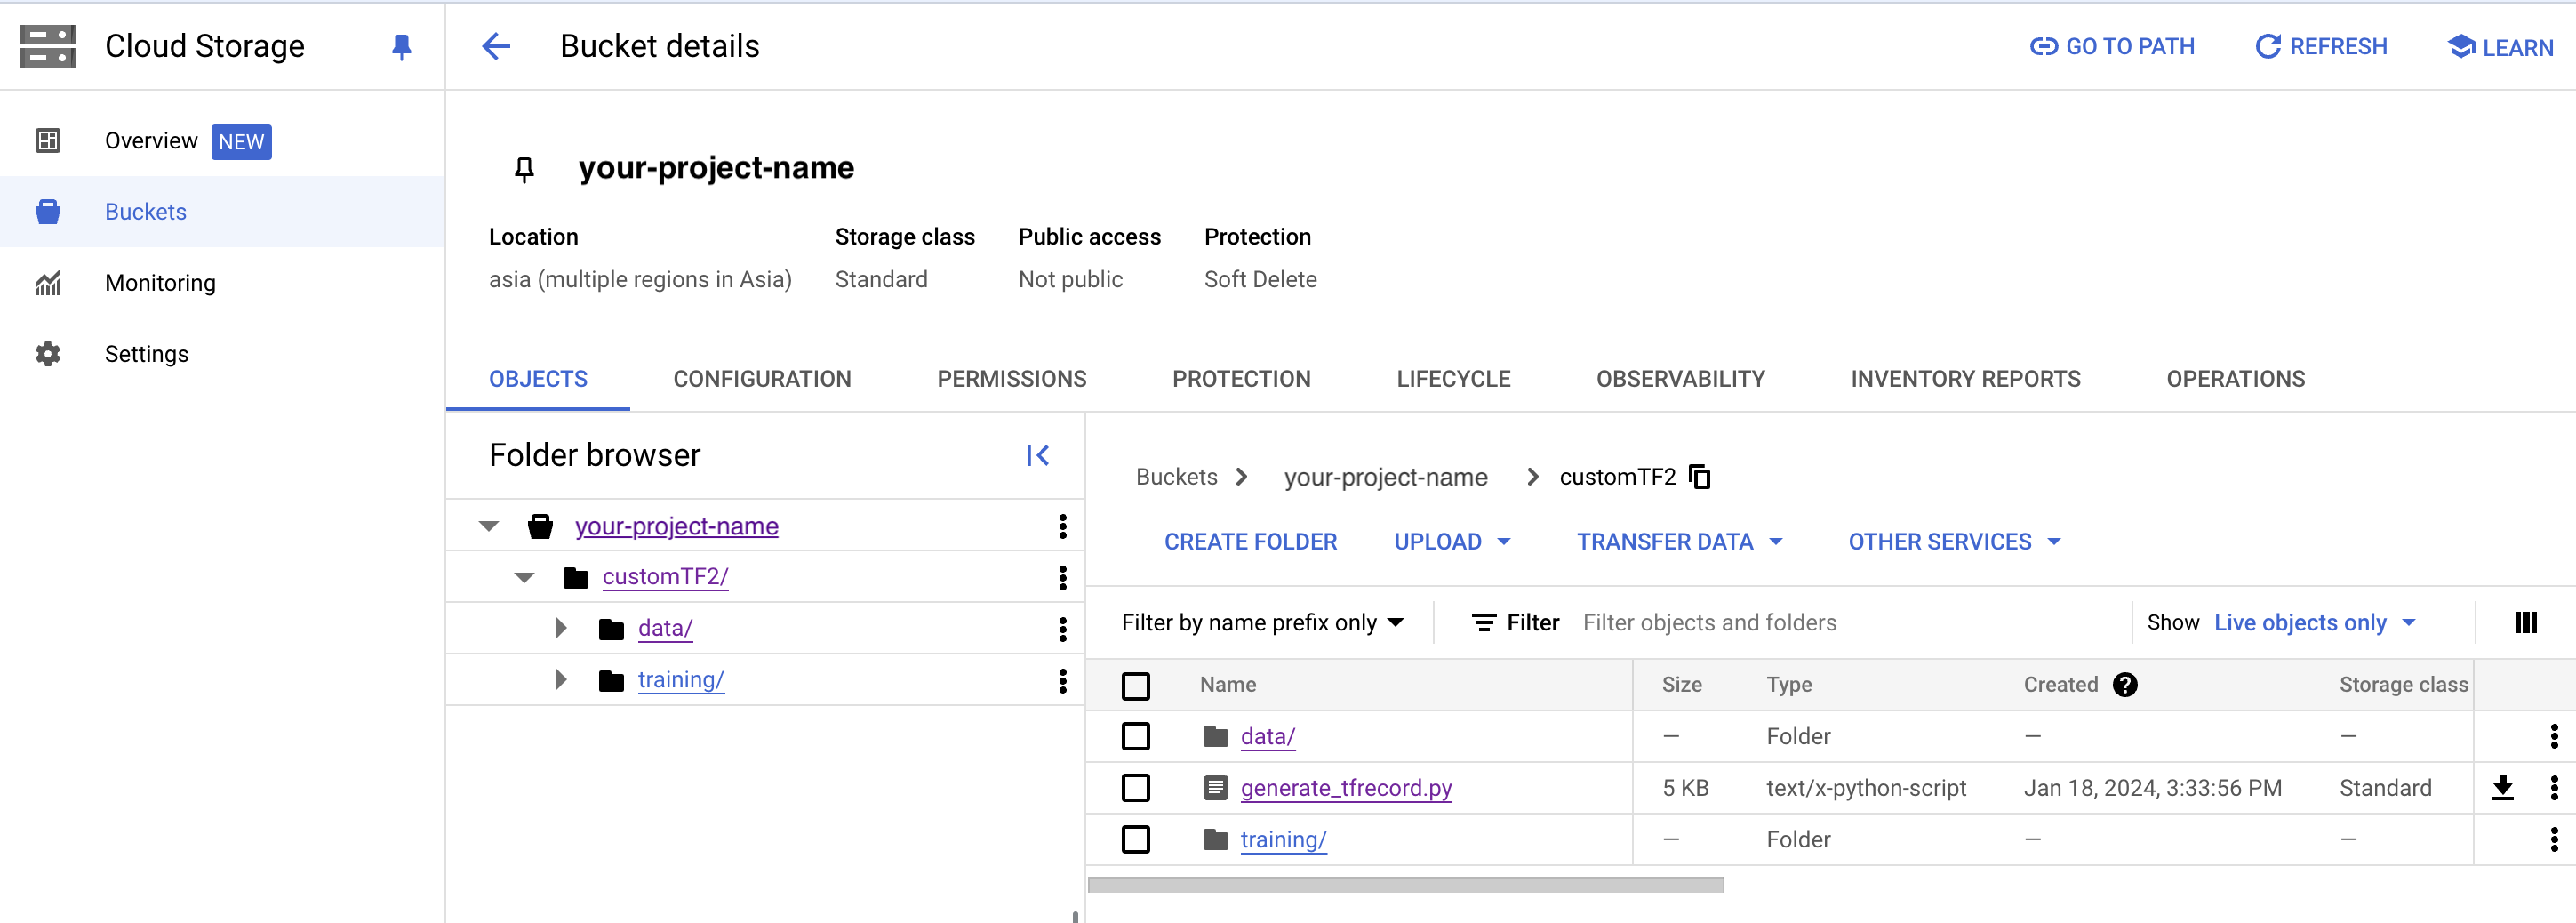
2) Create customTF2, training and data folders in your GCP cloud storage bucket (Necessary only the first time)
- Create a folder named customTF2 in your GCP cloud storage bucket
- Create two sub-folders called training and data inside the customTF2 folder
(The training folder is where the checkpoints will be saved during training)
Creation of folder structure in your GCS bucket:
3) Download, save and upload the following as generate_tfrecord.py file to the customTF2 folder to your bucket. (Necessary only for the first time)
from __future__ import division
from __future__ import print_function
from __future__ import absolute_import

import os
import io
import pandas as pd
import tensorflow as tf
import argparse

from PIL import Image
from tqdm import tqdm
from object_detection.utils import dataset_util
from collections import namedtuple, OrderedDict


def __split(df, group):
   data = namedtuple('data', ['filename', 'object'])
   gb = df.groupby(group)
   return [data(filename, gb.get_group(x)) for filename, x in zip(gb.groups.keys(), gb.groups)]


def create_tf_example(group, path, class_dict):
   with tf.io.gfile.GFile(os.path.join(path, '{}'.format(group.filename)), 'rb') as fid:
      encoded_jpg = fid.read()
   encoded_jpg_io = io.BytesIO(encoded_jpg)
   image = Image.open(encoded_jpg_io)
   width, height = image.size

   filename = group.filename.encode('utf8')
   image_format = b'jpg'
   xmins = []
   xmaxs = []
   ymins = []
   ymaxs = []
   classes_text = []
   classes = []

   for index, row in group.object.iterrows():
      if set(['xmin_rel', 'xmax_rel', 'ymin_rel', 'ymax_rel']).issubset(set(row.index)):
         xmin = row['xmin_rel']
         xmax = row['xmax_rel']
         ymin = row['ymin_rel']
         ymax = row['ymax_rel']

      elif set(['xmin', 'xmax', 'ymin', 'ymax']).issubset(set(row.index)):
         xmin = row['xmin'] / width
         xmax = row['xmax'] / width
         ymin = row['ymin'] / height
         ymax = row['ymax'] / height

      xmins.append(xmin)
      xmaxs.append(xmax)
      ymins.append(ymin)
      ymaxs.append(ymax)
      classes_text.append(str(row['class']).encode('utf8'))
      classes.append(class_dict[str(row['class'])])

   tf_example = tf.train.Example(features=tf.train.Features(
       feature={
           'image/height': dataset_util.int64_feature(height),
           'image/width': dataset_util.int64_feature(width),
           'image/filename': dataset_util.bytes_feature(filename),
           'image/source_id': dataset_util.bytes_feature(filename),
           'image/encoded': dataset_util.bytes_feature(encoded_jpg),
           'image/format': dataset_util.bytes_feature(image_format),
           'image/object/bbox/xmin': dataset_util.float_list_feature(xmins),
           'image/object/bbox/xmax': dataset_util.float_list_feature(xmaxs),
           'image/object/bbox/ymin': dataset_util.float_list_feature(ymins),
           'image/object/bbox/ymax': dataset_util.float_list_feature(ymaxs),
           'image/object/class/text': dataset_util.bytes_list_feature(classes_text),
           'image/object/class/label': dataset_util.int64_list_feature(classes), }))
   return tf_example


def class_dict_from_pbtxt(pbtxt_path):
   # open file, strip \n, trim lines and keep only
   # lines beginning with id or display_name

   with open(pbtxt_path, 'r', encoding='utf-8-sig') as f:
      data = f.readlines()

   name_key = None
   if any('display_name:' in s for s in data):
      name_key = 'display_name:'
   elif any('name:' in s for s in data):
      name_key = 'name:'

   if name_key is None:
      raise ValueError(
          "label map does not have class names, provided by values with the 'display_name' or 'name' keys in the contents of the file"
      )

   data = [l.rstrip('\n').strip() for l in data if 'id:' in l or name_key in l]

   ids = [int(l.replace('id:', '')) for l in data if l.startswith('id')]
   names = [
       l.replace(name_key, '').replace('"', '').replace("'", '').strip() for l in data
       if l.startswith(name_key)]

   # join ids and display_names into a single dictionary
   class_dict = {}
   for i in range(len(ids)):
      class_dict[names[i]] = ids[i]

   return class_dict


if __name__ == '__main__':
   parser = argparse.ArgumentParser(
       description='Create a TFRecord file for use with the TensorFlow Object Detection API.',
       formatter_class=argparse.RawDescriptionHelpFormatter)
   parser.add_argument('csv_input', metavar='csv_input', type=str, help='Path to the CSV input')
   parser.add_argument('pbtxt_input',
                       metavar='pbtxt_input',
                       type=str,
                       help='Path to a pbtxt file containing class ids and display names')
   parser.add_argument('image_dir',
                       metavar='image_dir',
                       type=str,
                       help='Path to the directory containing all images')
   parser.add_argument('output_path',
                       metavar='output_path',
                       type=str,
                       help='Path to output TFRecord')

   args = parser.parse_args()

   class_dict = class_dict_from_pbtxt(args.pbtxt_input)

   writer = tf.compat.v1.python_io.TFRecordWriter(args.output_path)
   path = os.path.join(args.image_dir)
   examples = pd.read_csv(args.csv_input)
   grouped = __split(examples, 'filename')

   for group in tqdm(grouped, desc='groups'):
      tf_example = create_tf_example(group, path, class_dict)
      writer.write(tf_example.SerializeToString())

   writer.close()
   output_path = os.path.join(os.getcwd(), args.output_path)
   print('Successfully created the TFRecords: {}'.format(output_path))
4) Mount your GCS bucket, install GCSFUSE and link your folder
from google.colab import auth
auth.authenticate_user()

!echo "deb https://packages.cloud.google.com/apt gcsfuse-bionic main" > /etc/apt/sources.list.d/gcsfuse.list
!curl https://packages.cloud.google.com/apt/doc/apt-key.gpg | apt-key add -
!apt -qq update
!apt -qq install gcsfuse

!gsutil ls -r gs://your-cloud-storage-bucket-name

!mkdir customTF2
!gcsfuse --implicit-dirs your-cloud-storage-bucket-name customTF2
5) Clone the tensorflow models git repository & Install TensorFlow Object Detection API
%cd /content

# clone the tensorflow models on the colab cloud vm
!git clone --q https://github.com/tensorflow/models.git

#navigate to /models/research folder to compile protos
%cd models/research

# Compile protos.
!protoc object_detection/protos/*.proto --python_out=.

# Install TensorFlow Object Detection API.
!cp object_detection/packages/tf2/setup.py .
!python -m pip install .
6) Test the model builder (Suggested)
%cd /content/models/research
# testing the model builder

!pip install 'tf-models-official >=2.5.1, <2.16.0'

!python object_detection/builders/model_builder_tf2_test.py
7) Download pre-trained model checkpoint (Necessary only for the first time)
Current working directory is /content/customTF2/customTF2/data/
Download ssd_mobilenet_v2_fpnlite_320x320_coco17_tpu-8.tar.gz into the data folder & unzip it.
A list of detection checkpoints for other tensorflow 2.x can be found here.
%cd /content/customTF2/customTF2/data/

#Download the pre-trained model ssd_mobilenet_v2_fpnlite_320x320_coco17_tpu-8.tar.gz into the data folder & unzip it.

!wget http://download.tensorflow.org/models/object_detection/tf2/20200711/ssd_mobilenet_v2_fpnlite_320x320_coco17_tpu-8.tar.gz
!tar -xzvf ssd_mobilenet_v2_fpnlite_320x320_coco17_tpu-8.tar.gz
8) Get the model pipeline config file, make changes to it and put it inside the data folder (Necessary every time and when you change the amount of class numbers)
Current working directory is /content/customTF2/customTF2/data/
Download ssd_mobilenet_v2_fpnlite_320x320_coco17_tpu-8.config from /content/models/research/object_detection/configs/tf2. Make the required changes to it and upload it to the /content/customTF2/customTF2/data/ folder.
OR
Edit the config file from /content/models/research/object_detection/configs/tf2 in colab and copy the edited config file to the /content/customTF2/customTF2/data folder.
You can also find the pipeline config file inside the model checkpoint folder we just downloaded in the previous step.
You need to make the following changes:
- change num_classes to the number of your classes
- change test.record path, train.record path & labelmap path to the paths where you have created these files (paths should be relative to your current working directory while training)
- change fine_tune_checkpoint to the path of the directory where the downloaded checkpoint from step 12 is
- change fine_tune_checkpoint_type with value classification or detection depending on your classification type
- change batch_size to any multiple of 8 depending upon the capability of your GPU
(eg:- 24,128,...,512) - usually 24 for smaller datasets and 32 for larger datasets works well with a standard colab enterprise instance - change num_steps to number of steps you want the detector to train.
#copy the edited config file from the configs/tf2 directory to the data/ folder in your GCP storage

!cp /content/models/research/object_detection/configs/tf2/ssd_mobilenet_v2_fpnlite_320x320_coco17_tpu-8.config /content/customTF2/customTF2/data
In the next step we want to make use of the official TensorBoard tool to visualize our runs and graphs to inspect learning and classification loss over time.
More information on how to read graphs and how to use the tool can be found here: https://www.tensorflow.org/tensorboard/get_started#:~:text=TensorBoard is a tool for,during the machine learning workflow.
9) Load TensorBoard (Recommended)
# cload tensorboard

%cd /content/customTF2/customTF2/training

# !pip install tensorboard
# tensorboard --inspect --logdir /content/customTF2/customTF2/training

# !gcloud init
# !gcloud auth application-default login

%reload_ext tensorboard
%tensorboard --logdir '/content/customTF2/customTF2/training'
10) Train the model
Navigate to the object_detection folder in colab vm
%cd /content/models/research/object_detection
10 (a) Training using model_main_tf2.py (Suggested method)
Here {PIPELINE_CONFIG_PATH} points to the pipeline config and {MODEL_DIR} points to the directory in which training checkpoints and events will be written.
For best results, you should stop the training when the loss is less than 0.1 if possible, else train the model until the loss does not show any significant change for a while. The ideal loss should be below 0.05 (Try to get the loss as low as possible without overfitting the model. Don’t go too high on training steps to try and lower the loss if the model has already converged viz. if it does not reduce loss significantly any further and takes a while to go down. )
!pip install tensorflow==2.13.0

# Run the command below from the content/models/research/object_detection directory
"""
PIPELINE_CONFIG_PATH=path/to/pipeline.config
MODEL_DIR=path to training checkpoints directory
NUM_TRAIN_STEPS=50000
SAMPLE_1_OF_N_EVAL_EXAMPLES=1

python model_main_tf2.py -- \
  --model_dir=$MODEL_DIR --num_train_steps=$NUM_TRAIN_STEPS \
  --sample_1_of_n_eval_examples=$SAMPLE_1_OF_N_EVAL_EXAMPLES \
  --pipeline_config_path=$PIPELINE_CONFIG_PATH \
  --alsologtostderr
"""

!python model_main_tf2.py --pipeline_config_path=/content/customTF2/customTF2/data/ssd_mobilenet_v2_fpnlite_320x320_coco17_tpu-8.config --model_dir=/content/customTF2/customTF2/training --alsologtostderr
10 (b) Evaluation using model_main_tf2.py (Optional, just if you want more customization)
You can run this in parallel by opening another colab notebook and running this command simultaneously along with the training command above (don't forget to mount your gcp storage, clone the TF git repo and install the TF2 object detection API there as well). This will give you validation loss, mAP, etc so you have a better idea of how your model is performing.
Here {CHECKPOINT_DIR} points to the directory with checkpoints produced by the training job. Evaluation events are written to {MODEL_DIR/eval}.
# Run the command below from the content/models/research/object_detection directory
"""
PIPELINE_CONFIG_PATH=path/to/pipeline.config
MODEL_DIR=path to training checkpoints directory
CHECKPOINT_DIR=${MODEL_DIR}
NUM_TRAIN_STEPS=50000
SAMPLE_1_OF_N_EVAL_EXAMPLES=1

python model_main_tf2.py -- \
  --model_dir=$MODEL_DIR --num_train_steps=$NUM_TRAIN_STEPS \
  --checkpoint_dir=${CHECKPOINT_DIR} \
  --sample_1_of_n_eval_examples=$SAMPLE_1_OF_N_EVAL_EXAMPLES \
  --pipeline_config_path=$PIPELINE_CONFIG_PATH \
  --alsologtostderr
"""

!python model_main_tf2.py --pipeline_config_path=/content/customTF2/customTF2/data/ssd_mobilenet_v2_fpnlite_320x320_coco17_tpu-8.config --model_dir=/content/customTF2/customTF2/training/ --checkpoint_dir=/content/customTF2/customTF2/training/ --alsologtostderr
Retraining your model (In case you get disconnected)
If you get disconnected or lose your session on colab vm, you can start your training where you left off as the checkpoint is saved on your cloud storage inside the training folder. To restart the training simply run steps 1, 4, 5, 6, 9 and 10.
Note that since we have all the files required for training like the record files, our edited pipeline config file, the label_map file and the model checkpoint folder, we do not need to create these again.
The model_main_tf2.py script saves the checkpoint every 1000 steps. The training automatically restarts from the last saved checkpoint itself.
However, if you see that it doesn't restart training from the last checkpoint you can make 1 change in the pipeline config file. Change fine_tune_checkpoint to where your latest trained checkpoints have been written and have it point to the latest checkpoint as shown below:
fine_tune_checkpoint: "/content/customTF2/customTF2/training/ckpt-X" (where ckpt-X is the latest checkpoint)
11) Test your trained model
Export inference graph
Current working directory is /content/models/research/object_detection
%cd /content/models/research/object_detection

!pip install tensorflow==2.13.0

##Export inference graph
!python exporter_main_v2.py --trained_checkpoint_dir=/content/customTF2/customTF2/training --pipeline_config_path=/content/customTF2/customTF2/data/ssd_mobilenet_v2_fpnlite_320x320_coco17_tpu-8.config --output_directory /content/customTF2/customTF2/data/inference_graph
Test your trained Object Detection model on images (Provide test image of your liking and adjust image_path)
Current working directory is /content/models/research/object_detection
%cd /content/models/research/object_detection

# Different font-type for labels text.(This step is optional)
!wget https://www.freefontspro.com/d/14454/arial.zip
!unzip arial.zip -d .

%cd utils/
!sed -i "s/font = ImageFont.truetype('arial.ttf', 24)/font = ImageFont.truetype('arial.ttf', 50)/" visualization_utils.py
%cd ..
%cd /content/models/research/object_detection

!pip install tensorflow=="2.12.0"

#Loading the saved_model
import tensorflow as tf
import time
import numpy as np
import warnings
warnings.filterwarnings('ignore')
from PIL import Image
from google.colab.patches import cv2_imshow
from object_detection.utils import label_map_util
from object_detection.utils import visualization_utils as viz_utils

IMAGE_SIZE = (12, 8) # Output display size as you want
import matplotlib.pyplot as plt
PATH_TO_SAVED_MODEL="/content/customTF2/customTF2/data/inference_graph/saved_model"
print('Loading model...', end='')

# Load saved model and build the detection function
detect_fn=tf.saved_model.load(PATH_TO_SAVED_MODEL)
print('Done!')

#Loading the label_map
category_index=label_map_util.create_category_index_from_labelmap("/content/customTF2/customTF2/data/label_map.pbtxt",use_display_name=True)

def load_image_into_numpy_array(path):

    return np.array(Image.open(path))

# Replace with your test image
image_path = "/content/customTF2/customTF2/data/images/your_test.jpg"
#print('Running inference for {}... '.format(image_path), end='')

image_np = load_image_into_numpy_array(image_path)

# The input needs to be a tensor, convert it using `tf.convert_to_tensor`.
input_tensor = tf.convert_to_tensor(image_np)
# The model expects a batch of images, so add an axis with `tf.newaxis`.
input_tensor = input_tensor[tf.newaxis, ...]

detections = detect_fn(input_tensor)

# All outputs are batches tensors.
# Convert to numpy arrays, and take index [0] to remove the batch dimension.
# We're only interested in the first num_detections.
num_detections = int(detections.pop('num_detections'))
detections = {key: value[0, :num_detections].numpy()
              for key, value in detections.items()}
detections['num_detections'] = num_detections

# detection_classes should be ints.
detections['detection_classes'] = detections['detection_classes'].astype(np.int64)

image_np_with_detections = image_np.copy()

viz_utils.visualize_boxes_and_labels_on_image_array(
      image_np_with_detections,
      detections['detection_boxes'],
      detections['detection_classes'],
      detections['detection_scores'],
      category_index,
      use_normalized_coordinates=True,
      max_boxes_to_draw=200,
      min_score_thresh=.8, # Adjust this value to set the minimum probability boxes to be classified as True
      agnostic_mode=False)
%matplotlib inline
plt.figure(figsize=IMAGE_SIZE, dpi=200)
plt.axis("off")
plt.imshow(image_np_with_detections)
plt.show()
Converting trained SSD (Single Shot Detector) model to TFLite model
12) Install tf-nightly
TFLite converter works better with tf-nightly.
%cd /content/models/research/object_detection

!pip install tensorflow=="2.12.0"
!pip install numpy==1.26.4
!pip install tf-nightly
13) Export SSD TFLite graph
Current working directory is /content/models/research/object_detection
# !pip3 uninstall keras
# !pip3 install keras==2.14.0

!pip3 install --upgrade tensorflow keras

!pip3 install tensorflow=="2.12.0"

# !pip3 install --upgrade tensorflow keras
# !pip3 install tensorflow=="2.13.1"
# !pip3 install numpy --upgrade
# !pip3 uninstall numpy
# !pip3 install numpy=="1.22.0"
# !pip3 install tensorflow --upgrade
#!python --version


%cd /content/models/research/object_detection

!python export_tflite_graph_tf2.py --pipeline_config_path /content/customTF2/customTF2/data/ssd_mobilenet_v2_fpnlite_320x320_coco17_tpu-8.config --trained_checkpoint_dir /content/customTF2/customTF2/training --output_directory /content/customTF2/customTF2/data/tflite
14) Convert TF saved model to TFLite model
Current working directory is /mydrive/customTF2/data/
%cd /content/customTF2/customTF2/data/
Check input and output tensor names
!saved_model_cli show --dir /content/customTF2/customTF2/data/tflite/saved_model --tag_set serve --all
Converting to TFlite:
Use either Method (a) or Method (b).
METHOD (a) Using command-line tool tflite_convert- (Basic model conversion)
# The default inference type is Floating-point.
%cd /content/customTF2/customTF2/data/

!tflite_convert --saved_model_dir=tflite/saved_model --output_file=tflite/detect.tflite
METHOD (b) Using Python API - (For advanced model conversion with optimizations etc)
%cd /mydrive/customTF2/data/

#'''********************************
#   FOR FLOATING-POINT INFERENCE
#*********************************'''

#import tensorflow as tf

saved_model_dir = '/content/customTF2/customTF2/data/tflite/saved_model'

#converter = tf.lite.TFLiteConverter.from_saved_model(saved_model_dir)
#tflite_model = converter.convert()
#open("/content/customTF2/customTF2/data/tflite/detect.tflite", "wb").write(tflite_model)


#'''**************************************************
#  FOR FLOATING-POINT INFERENCE WITH OPTIMIZATIONS
#***************************************************'''

import tensorflow as tf
converter = tf.lite.TFLiteConverter.from_saved_model(saved_model_dir,signature_keys=['serving_default'])
converter.optimizations = [tf.lite.Optimize.DEFAULT]
converter.experimental_new_converter = True
converter.target_spec.supported_ops = [tf.lite.OpsSet.TFLITE_BUILTINS,
                                       tf.lite.OpsSet.SELECT_TF_OPS]
tflite_model = converter.convert()

with tf.io.gfile.GFile('/mydrive/customTF2/data/tflite/detect.tflite', 'wb') as f:
   f.write(tflite_model)


#'''**********************************
#    FOR DYNAMIC RANGE QUANTIZATION
#*************************************
# The model is now a bit smaller with quantized weights, but other variable data is still in float format.'''

# import tensorflow as tf

# converter = tf.lite.TFLiteConverter.from_saved_model('/content/customTF2/customTF2/data/tflite/saved_model',signature_keys=['serving_default'])
# converter.optimizations = [tf.lite.Optimize.DEFAULT]
# tflite_quant_model = converter.convert()

# with tf.io.gfile.GFile('/content/customTF2/customTF2/data/tflite/detect.tflite', 'wb') as f:
#   f.write(tflite_quant_model)


# '''***********************************************************************
#    FOR INTEGER WITH FLOAT FALLBACK QUANTIZATION WITH DEFAULT OPTMIZATIONS
# **************************************************************************
# Now all weights and variable data are quantized, and the model is significantly smaller compared to the original TensorFlow Lite model.
# However, to maintain compatibility with applications that traditionally use float model input and output tensors,
# the TensorFlow Lite Converter leaves the model input and output tensors in float'''

# import tensorflow as tf
# import numpy as np

# saved_model_dir = '/content/customTF2/customTF2/data/tflite/saved_model'

# def representative_dataset():
#     for _ in range(100):
#       data = np.random.rand(1, 320, 320, 3)
#       yield [data.astype(np.float32)]

# converter = tf.lite.TFLiteConverter.from_saved_model(saved_model_dir)
# converter.optimizations = [tf.lite.Optimize.DEFAULT]
# converter.representative_dataset = representative_dataset
# tflite_quant_model = converter.convert()

# with open('/content/customTF2/customTF2/data/tflite/detect.tflite', 'wb') as f:
#   f.write(tflite_quant_model)


# '''*********************************
#   FOR FULL INTEGER QUANTIZATION
# ************************************
# The internal quantization remains the same as previous float fallback quantization method,
# but you can see the input and output tensors here are also now integer format'''

# import tensorflow as tf
# import numpy as np

# saved_model_dir = '/content/customTF2/customTF2/data/tflite/saved_model'

# def representative_dataset():
#     for _ in range(100):
#       data = np.random.rand(1, 320, 320, 3)
#       yield [data.astype(np.float32)]

# converter = tf.lite.TFLiteConverter.from_saved_model(saved_model_dir)
# converter.optimizations = [tf.lite.Optimize.DEFAULT]
# converter.representative_dataset = representative_dataset
# converter.target_spec.supported_ops = [tf.lite.OpsSet.TFLITE_BUILTINS_INT8]
# converter.inference_input_type = tf.uint8
# converter.inference_output_type = tf.uint8
# tflite_quant_model_full_int = converter.convert()

# with open('/content/customTF2/customTF2/data/tflite/detect.tflite', 'wb') as f:
#   f.write(tflite_quant_model_full_int)
Read more about post-training quantization here.
You can also read about these in this colab notebook.
15) Create TFLite metadata
!pip install tflite_support_nightly
%cd /content/customTF2/customTF2/data/
%cd tflite/
!mkdir tflite_with_metadata
%cd ..
Create a labelmap.txt file with the names of the classes written in each line inside the data folder.
Finally run the following cell to create the detect.tflite model with metadata attached to it.
Current working directory is /content/customTF2/customTF2/data/
%cd /content/customTF2/customTF2/data/
!pip uninstall tensorflow
!pip install tensorflow=="2.13.1"


# Attach Metadata to TFLite
from tflite_support.metadata_writers import object_detector
from tflite_support.metadata_writers import writer_utils
import flatbuffers
import platform

from tensorflow_lite_support.metadata import metadata_schema_py_generated
from tensorflow_lite_support.metadata import schema_py_generated
from tensorflow_lite_support.metadata.python import metadata
from tensorflow_lite_support.metadata.python import metadata_writers

import flatbuffers
import os
from tensorflow_lite_support.metadata import metadata_schema_py_generated as _metadata_fb
from tensorflow_lite_support.metadata.python import metadata as _metadata
from tensorflow_lite_support.metadata.python.metadata_writers import metadata_info
from tensorflow_lite_support.metadata.python.metadata_writers import metadata_writer
from tensorflow_lite_support.metadata.python.metadata_writers import writer_utils

ObjectDetectorWriter = object_detector.MetadataWriter

_MODEL_PATH = "/content/customTF2/customTF2/data/tflite/detect.tflite"
_LABEL_FILE = "/content/customTF2/customTF2/data/labelmap.txt"
_SAVE_TO_PATH = "/content/customTF2/customTF2/data/tflite/tflite_with_metadata/detect.tflite"

writer = ObjectDetectorWriter.create_for_inference(
    writer_utils.load_file(_MODEL_PATH), [127.5], [127.5], [_LABEL_FILE])
writer_utils.save_file(writer.populate(), _SAVE_TO_PATH)

# Verify the populated metadata and associated files.
displayer = metadata.MetadataDisplayer.with_model_file(_SAVE_TO_PATH)
print("Metadata populated:")
print(displayer.get_metadata_json())
print("Associated file(s) populated:")
print(displayer.get_packed_associated_file_list())

model_meta = _metadata_fb.ModelMetadataT()
model_meta.name = "SSD_Detector"
model_meta.description = (
    "Identify which of a known set of objects might be present and provide "
    "information about their positions within the given image or a video "
    "stream.")

# Creates input info.
input_meta = _metadata_fb.TensorMetadataT()
input_meta.name = "image"
input_meta.content = _metadata_fb.ContentT()
input_meta.content.contentProperties = _metadata_fb.ImagePropertiesT()
input_meta.content.contentProperties.colorSpace = (
    _metadata_fb.ColorSpaceType.RGB)
input_meta.content.contentPropertiesType = (
    _metadata_fb.ContentProperties.ImageProperties)
input_normalization = _metadata_fb.ProcessUnitT()
input_normalization.optionsType = (
    _metadata_fb.ProcessUnitOptions.NormalizationOptions)
input_normalization.options = _metadata_fb.NormalizationOptionsT()
input_normalization.options.mean = [127.5]
input_normalization.options.std = [127.5]
input_meta.processUnits = [input_normalization]
input_stats = _metadata_fb.StatsT()
input_stats.max = [255]
input_stats.min = [0]
input_meta.stats = input_stats

# Creates outputs info.
output_location_meta = _metadata_fb.TensorMetadataT()
output_location_meta.name = "location"
output_location_meta.description = "The locations of the detected boxes."
output_location_meta.content = _metadata_fb.ContentT()
output_location_meta.content.contentPropertiesType = (
    _metadata_fb.ContentProperties.BoundingBoxProperties)
output_location_meta.content.contentProperties = (
    _metadata_fb.BoundingBoxPropertiesT())
output_location_meta.content.contentProperties.index = [1, 0, 3, 2]
output_location_meta.content.contentProperties.type = (
    _metadata_fb.BoundingBoxType.BOUNDARIES)
output_location_meta.content.contentProperties.coordinateType = (
    _metadata_fb.CoordinateType.RATIO)
output_location_meta.content.range = _metadata_fb.ValueRangeT()
output_location_meta.content.range.min = 2
output_location_meta.content.range.max = 2

output_class_meta = _metadata_fb.TensorMetadataT()
output_class_meta.name = "category"
output_class_meta.description = "The categories of the detected boxes."
output_class_meta.content = _metadata_fb.ContentT()
output_class_meta.content.contentPropertiesType = (
    _metadata_fb.ContentProperties.FeatureProperties)
output_class_meta.content.contentProperties = (
    _metadata_fb.FeaturePropertiesT())
output_class_meta.content.range = _metadata_fb.ValueRangeT()
output_class_meta.content.range.min = 2
output_class_meta.content.range.max = 2
label_file = _metadata_fb.AssociatedFileT()
label_file.name = os.path.basename("labelmap.txt")
label_file.description = "Label of objects that this model can recognize."
label_file.type = _metadata_fb.AssociatedFileType.TENSOR_VALUE_LABELS
output_class_meta.associatedFiles = [label_file]

output_score_meta = _metadata_fb.TensorMetadataT()
output_score_meta.name = "score"
output_score_meta.description = "The scores of the detected boxes."
output_score_meta.content = _metadata_fb.ContentT()
output_score_meta.content.contentPropertiesType = (
    _metadata_fb.ContentProperties.FeatureProperties)
output_score_meta.content.contentProperties = (
    _metadata_fb.FeaturePropertiesT())
output_score_meta.content.range = _metadata_fb.ValueRangeT()
output_score_meta.content.range.min = 2
output_score_meta.content.range.max = 2

output_number_meta = _metadata_fb.TensorMetadataT()
output_number_meta.name = "number of detections"
output_number_meta.description = "The number of the detected boxes."
output_number_meta.content = _metadata_fb.ContentT()
output_number_meta.content.contentPropertiesType = (
    _metadata_fb.ContentProperties.FeatureProperties)
output_number_meta.content.contentProperties = (
    _metadata_fb.FeaturePropertiesT())

# Creates subgraph info.
group = _metadata_fb.TensorGroupT()
group.name = "detection result"
group.tensorNames = [
    output_location_meta.name, output_class_meta.name,
    output_score_meta.name
]
subgraph = _metadata_fb.SubGraphMetadataT()
subgraph.inputTensorMetadata = [input_meta]
subgraph.outputTensorMetadata = [
    output_location_meta, output_class_meta, output_score_meta,
    output_number_meta
]
subgraph.outputTensorGroups = [group]
model_meta.subgraphMetadata = [subgraph]

b = flatbuffers.Builder(0)
b.Finish(
    model_meta.Pack(b),
    _metadata.MetadataPopulator.METADATA_FILE_IDENTIFIER)
metadata_buf = b.Output()
When asked, proceed with 'Y'
16) Download the TFLite model
Congrats, you are done!
Final thoughts
Google Colab Enterprise is a powerful cloud-based platform for machine learning, making it an ideal environment for building TensorFlow Lite models. After over a year of using this platform, I've found that the most time-consuming part of the process is data preparation and the initial trial-and-error phase. This stage requires significant iteration and testing to identify challenges in recognizing specific parts of the dataset and to address false positives, where images are incorrectly classified.
*The Android robot header image was reproduced or modified from work created and shared by Google and used according to terms described in the Creative Commons 3.0 Attribution License.
関連記事 | Related Posts


We are hiring!
【データサイエンティスト】データサイエンスG/東京・名古屋・福岡
デジタル戦略部についてデジタル戦略部は、現在45名の組織です。
【クラウドエンジニア(クラウド活用の推進)】Cloud Infrastructure G/東京・名古屋・大阪・福岡
KINTO Tech BlogCloud InfrastructureグループについてAWSを主としたクラウドインフラの設計、構築、運用を主に担当しています。
イベント情報
![[Mirror]不確実な事業環境を突破した、成長企業6社独自のエンジニアリング](/assets/banners/thumb1.png)