SwiftPMでのプライベートリポジトリの資格情報設定

この記事はKINTOテクノロジーズアドベントカレンダー2024の10日目の記事です🎅🎄
背景
KINTOかんたん申し込みアプリの開発にあたっては、KMP (Kotlin Multiplatform)を利用して共有コードを実装し、Swift Packageとして公開しました。このアプローチではコードの重複を回避することで、プラットフォーム間でコードを効率的に共有できたり、開発プロセスをシンプルにすることができました。
当社のiOSチームは現在XcodeGenを使用して依存関係を管理しており、KMPコードのインポートはproject.ymlファイルに修正を4行加えるだけで簡単に行えます。このような変更例は次のとおりです。
packages:
+  Shared:
+    url: https://github.com/[your organization]/private-android-repository
+    minorVersion: 1.0.0
targets:
  App:
    dependencies:
+     - package: Shared
      - package: ...
ところが、コードがプライベートリポジトリにあるためにいくつかの設定を追加する必要があります。このブログではその手順をまとめて、どのようにプロセスを効率化したかを説明します。
Package.swiftについて
KMPコードをSwiftパッケージとして公開する方法を簡単に説明します:
- KMPコードを
.xcframeworkにコンパイルする。 .xcframeworkをzipファイルにパッケージ化し、チェックサムを計算する。- GitHubに新しいリリースページを作成し、リリースアセットの一部としてzipファイルをアップロードする。
- リリースページからzipファイルのURLを取得する。
- URLとチェックサムを基に
Package.swiftファイルを生成する。 Package.swiftファイルをコミットし、リリースをマークするgitタグを追加する。- そのgitタグをリリースページに関連付け、GitHubリリースを公式に公開する。
結果として生成されるPackage.swiftファイルは次のようになります。
// swift-tools-version: 5.10

import PackageDescription

let packageName = "Shared"

let package = Package(
    name: packageName,
    ...
    targets: [
        .binaryTarget(
            name: packageName,
            url: "https://api.github.com/repos/[your organization]/private-android-repository/releases/assets/<asset_id>.zip",
            checksum: "<checksum>"
        )
    ]
)
開発環境の権限設定
URLはプライベートリポジトリに存在するため、権限設定を行わないと次のエラーが発生します。

これを解決するために、2つのオプションを検討します。 1つ目は、.netrc ファイル、2つ目は Keychainを使います。
オプション1: .netrcファイルを使用する場合
GitHubの認証情報を.netrcファイルに保存すると、APIリクエストの認証を簡単に行うことができます。
#例: echo "machine api.github.com login username password ghp_AbCdEf1234567890" >> ~/.netrc
echo "machine api.github.com login <Your Github Username> password <Your Personal Access Token>" >> ~/.netrc
素早くできて効果的な方法ではあるものの、トークンがプレーンテキストで保存されるため、セキュリティリスクの恐れがあります。
オプション2: Keychainを使用する
トークンをプレーンテキストで保存したくない場合は、 Keychainを使用して資格情報を安全に保存することができます。

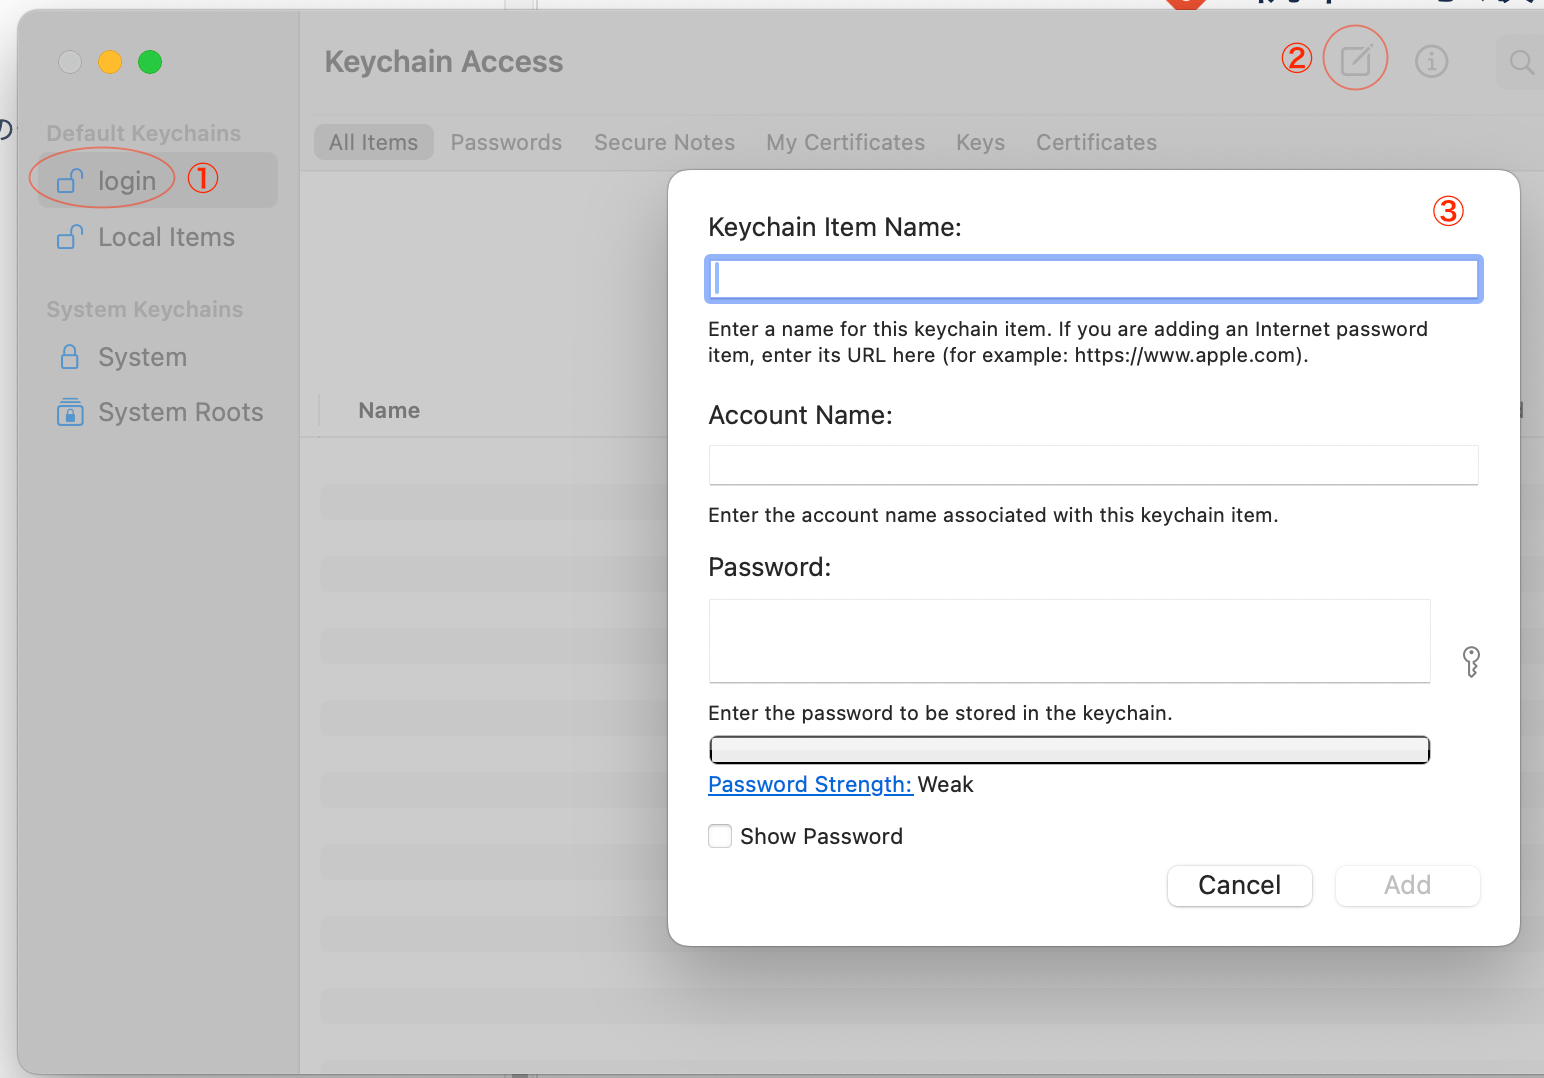
Keychain Access.appを開く。- ①
ログインKeychainを選択する。 - ②を選択して、新しいPassword項目を作成する。
ダイアログボックスで、次の情報を入力する。
- Keychain項目名:
https://api.github.com - アカウント名: GitHubユーザー名
- パスワード: パーソナルアクセストークン
このアプローチはより安全で、macOS認証メカニズムと円滑に統合します。
SSHユーザーの場合
上記の手順では、httpsプロトコルを使用してiOSリポジトリをクローンしたことを想定しています。この場合、github.comに対して必要な権限はすでに設定済みです。
しかし、sshプロトコルを使用してリポジトリのクローンした場合、github.comに対する権限が不足し、resolveDependenciesフェーズで権限に関連するエラーが発生する恐れがあります。
これを解決するには、.netrcファイルにドメインgithub.comのエントリを追加します。
#例: echo "machine github.com login username password ghp_AbCdEf1234567890" >> ~/.netrc
echo "machine github.com login <Your Github Username> password <Your Personal Access Token>" >> ~/.netrc
または、Keychain Accessを使用して、 https://github.comという名前の項目を追加します。どちらの方法でも、システムに必要な権限があることをしっかりと設定できます。
GitHubのアクション
ローカル開発環境の課題を解決した後は、 CI環境の権限への課題にも対応してビルド中の自動化をスムーズにする必要があります。
GitHubアクションでトークンを取得する
パーソナルトークンを使用する
簡単なアプローチの1つは、プライベートリポジトリにアクセス可能なパーソナルアクセストークン(PAT)を作成し、Actionsシークレットを介してCI環境に渡すことです。効果的な方法ではありますが、欠点がいくつかあります。
- トークンの有効期限
- 有効期限のあるトークンは定期的な更新が必要で、更新を忘れるとCIが失敗する恐れがあります。
- 有効期限のないトークンは、長期的なセキュリティリスクを引き起こします。
- 広範囲にわたる権限
- 通常、個人アカウントは複数のプライベートリポジトリにアクセスできるため、PATの権限を単一のリポジトリに制限することが困難となってしまいます。
- 属人化
- アカウント所有者がロール異動によってプライベートリポジトリへのアクセスを失うと、CIワークフローが失敗してしまいます。
GitHubアプリを使用する
より堅牢なソリューションにはGitHub Appの使用があり、次のようないくつかのメリットがあります。
- リポジトリに対するきめ細かい権限
- 個々のアカウントに依存しない
- セキュリティを強化する一時的なトークンが使用可能
GitHubアプリの設定
最終的にはGitHub Appを使ってアクセス許可を設定しました。手順は次のとおりです。
- 組織内にGitHubアプリを作成する。
- iOSとAndroid両方のプロジェクトにアプリをインストールし、リポジトリへのアクセスを管理する。
- iOSプロジェクトのActionsシークレットでアプリの
AppIDとPrivate Keyを設定する。 - ワークフローにコードを追加して一時的なアクセストークンを取得する。例を紹介します。
steps:
    - name: create app token
      uses: actions/create-github-app-token@v1
      id: app-token
      with:
        app-id: ${{ secrets.APP_ID }}
        private-key: ${{ secrets.APP_PRIVATE_KEY }}
        owner: "YourOrgName"

    - name: set access token for private repository
      shell: bash
      env:
        ACCESS_TOKEN: ${{ steps.app-token.outputs.token }}
      run: |
        git config --global url."https://x-access-token:$ACCESS_TOKEN@github.com/".insteadOf "https://github.com/"
        touch ~/.netrc
        echo "machine github.com login x-access-token password $ACCESS_TOKEN" >> ~/.netrc
        echo "machine api.github.com login x-access-token password $ACCESS_TOKEN" >> ~/.netrc
GitHub Appを使用することで、CIワークフローの安全性と効率性を確保して、個々のユーザーアカウントへの依存が解消できます。このアプローチでリスクが最小限に抑えられ、チーム間の開発がスムーズになります。
関連記事 | Related Posts
We are hiring!
【ソフトウェアエンジニア(リーダークラス)】共通サービス開発G/東京・大阪・福岡
共通サービス開発グループについてWebサービスやモバイルアプリの開発において、必要となる共通機能=会員プラットフォームや決済プラットフォームなどの企画・開発を手がけるグループです。KINTOの名前が付くサービスやKINTOに関わりのあるサービスを同一のユーザーアカウントに対して提供し、より良いユーザー体験を実現できるよう、様々な共通機能や顧客基盤を構築していくことを目的としています。
【ソフトウェアエンジニア(メンバークラス)】共通サービス開発G/東京・大阪・福岡
共通サービス開発グループについてWebサービスやモバイルアプリの開発において、必要となる共通機能=会員プラットフォームや決済プラットフォームなどの企画・開発を手がけるグループです。KINTOの名前が付くサービスやKINTOに関わりのあるサービスを同一のユーザーアカウントに対して提供し、より良いユーザー体験を実現できるよう、様々な共通機能や顧客基盤を構築していくことを目的としています。

![Cover Image for [iOS][CI/CD] Integrating a Private Repository as a Library in Xcode Cloud](/assets/blog/authors/HiroyaHinomori/xcode-cloud_x_private-repository_top.jpg)


