VSCode Dev Containerを使った開発環境構築
続編記事を投稿しました 🥳🎉 (2023/06/08)
CodeSpaces の紹介の他に実際の開発で活用している Dev Container 設定のサンプルも紹介します。
Dev Container で MySQL や LocalStack などのサービスを起動する方法や、ローカル環境と Dev Container 環境での開発の共存方法など実際の開発で活用しているものから抜粋したものを紹介しています。
[続!Dev Container] GitHub Codespaces でクラウド開発環境を構築
はじめに
こんにちは。共通サービス開発グループで複数のサービスが利用する決済プラットフォームの開発チーム[1][2]に所属している鳥居です。
この記事をご覧の皆さんは、ローカル開発環境の構築時にこんな経験ありませんか?IDE の設定を環境構築手順書に従って構築したが動かなかったり、プロダクト毎に異なるバージョンの SDK をどちらも動く方法を調べてインストールしたりなど、経験ある方は多いのではないかと思います。
ローカル開発環境構築は、新たに入ってきたプロダクト開発メンバーに襲いかかる、面倒な作業のひとつです。
本記事では Visual Studio Code (以下 VS Code)の Dev Container で開発環境の構築と簡略化・共通化をした事例を紹介します。
VS Code の Dev Container とは
Dev Container 環境とは VS Code の拡張機能 Dev Containersを使って構築する開発環境で VS Code と Docker が使うことが出来れば利用可能です。(Windows / Mac / Linux)
次の図のように、Dev Container を立ち上げると VS Code から Docker コンテナをフル機能の開発環境として使用できます。
ホストマシンからソースコードをマウントし、VS Code の拡張機能は コンテナ内にインストールされます。
そのためすでに入っているライブラリとの競合の考慮の必要がありません。
例えばホストマシンで開発をする場合、別のプロジェクトのnode.jsの指定バージョンが違う場合はn packageでnode.jsのバージョン管理、状況に応じてバージョンの切り替えが必要となるかもしれません。
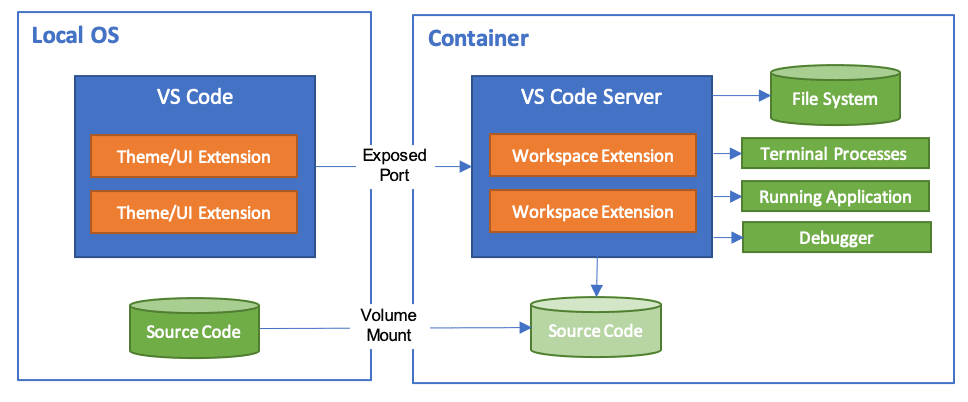
Developing inside a Containerより引用
Dev Container 環境の VS Code の設定や拡張機能、インストールするライブラリや起動するサービスなどは devcontainer.json、Dockerfile、docker-compose.ymlに定義することが出来ます。
Dev Container 環境をビルドする際はこれらの設定を利用して自動的に行わるので、別個にインストールするのに比べ大幅に手順が簡略化されます。
環境構築手順書も Dev Container のビルドまでの手順のみとなります。複数人で開発する際の OS の差異の考慮も不要です。
Dev Container 環境構築手順
今回は Create React App で新しい React アプリケーションの構築を目指します。
今回使用した環境
- PC: Surface Laptop4
- Windows10: 21H2 (WSL2)
- WSL2: Ubuntu 20.04
- VS Code: 1.73.0
前提
- VS Code のインストール
- Docker のインストール (Windows の場合は WSL2 上にインストール)
- Docker Desktop for Windows/Mac のインストール
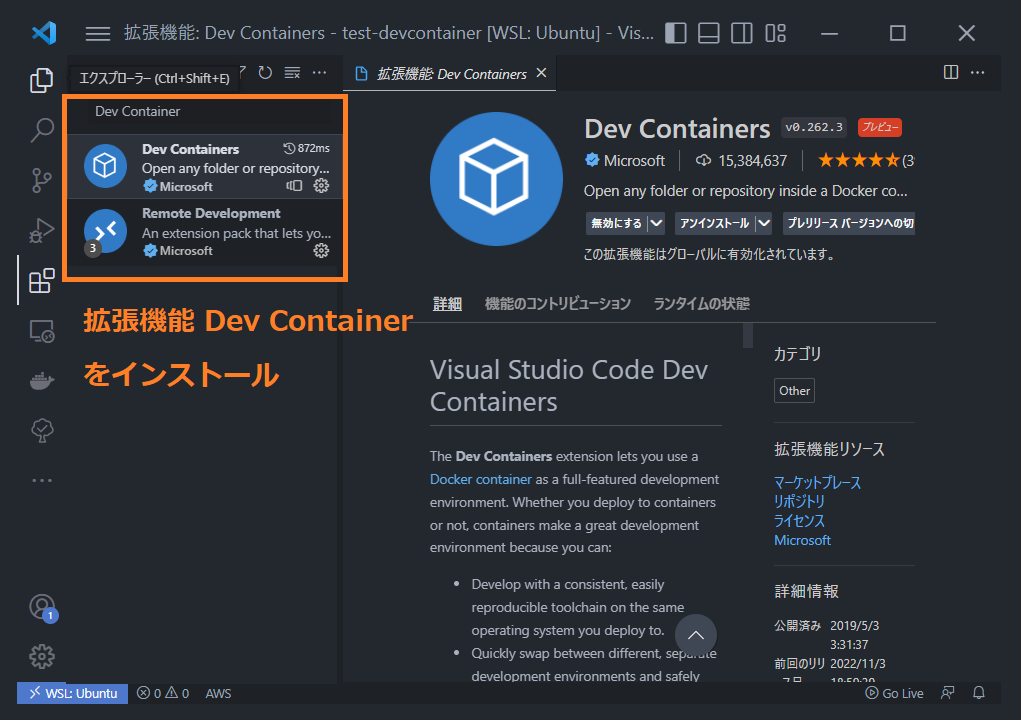
1. 拡張機能 - Dev Containers のインストール
まずは Workspace としたいディレクトリで VS Code を開きます。
そして VS Code の拡張機能 Dev Containersをインストールします。
Dev Containers が含まれている Remote Development でも OK です。
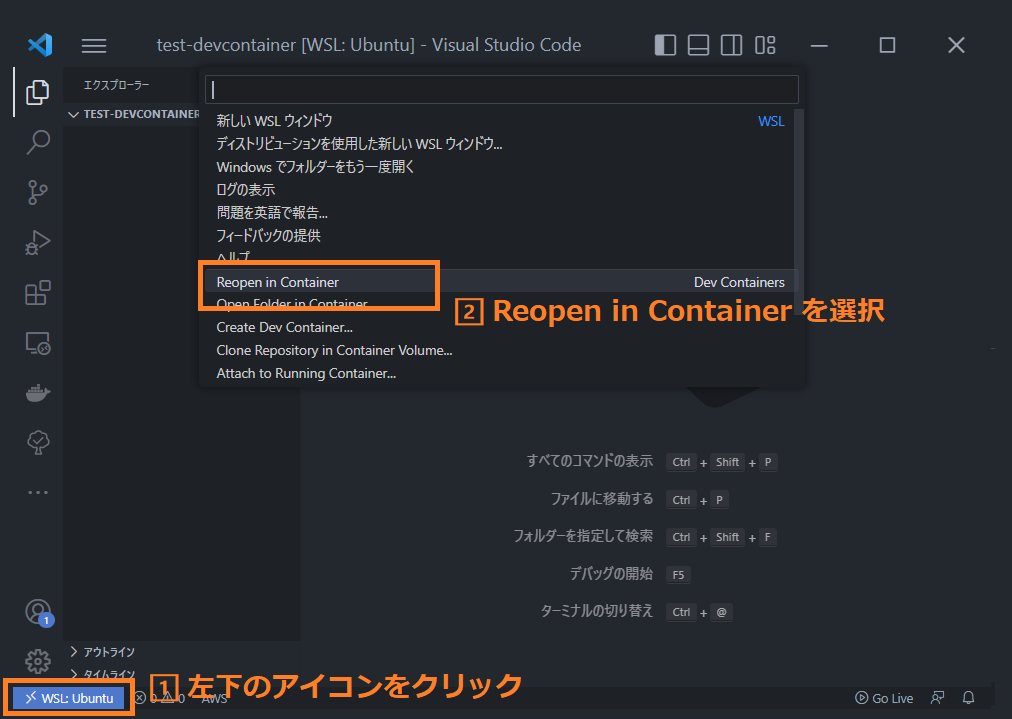
2. Reopen in Container でセットアップ開始
左下のアイコンをクリックし、画面上部のメニューから Reopen in Container を選択
(Create Dev Container は別のディレクトリに Dev Container を構築してしまいます)
3. 作成したい Dev Container 環境の設定を選択
今回は Ubuntu を選択しました。

4. Docker コンテナイメージのバージョンを選択

5. 追加する機能を選択
今回は React アプリケーションの作成に必要なNode.js (via nvm) and yarnを選択しました。
追加する機能を選択し 🆗 をクリックすると、Dev Container のビルドが開始されます。

6. Dev Container のビルド完了
ビルドが完了すると、自動で Dev Container に接続された VS Code が起動します。.devcontainer/devcontainer.jsonというファイルが生成されており、左下の表記がDev Containerとなっていることがわかります。
(以前は.devcontainer/Dockerfileも生成されていました。)
VS Code 内のターミナルを開き(ctrl + shift + @)、次のコマンドを実行すると必要なライブラリがインストールされていることがわかります。
$ node -v
v18.12.1
$ yarn -v
1.22.19
次に Create React Appを実行します。
$ npx create-react-app typesript
プロンプトが表示され、このまま構築できることがわかります。
(React アプリケーションの構築と起動確認は本題からそれるため割愛します。)
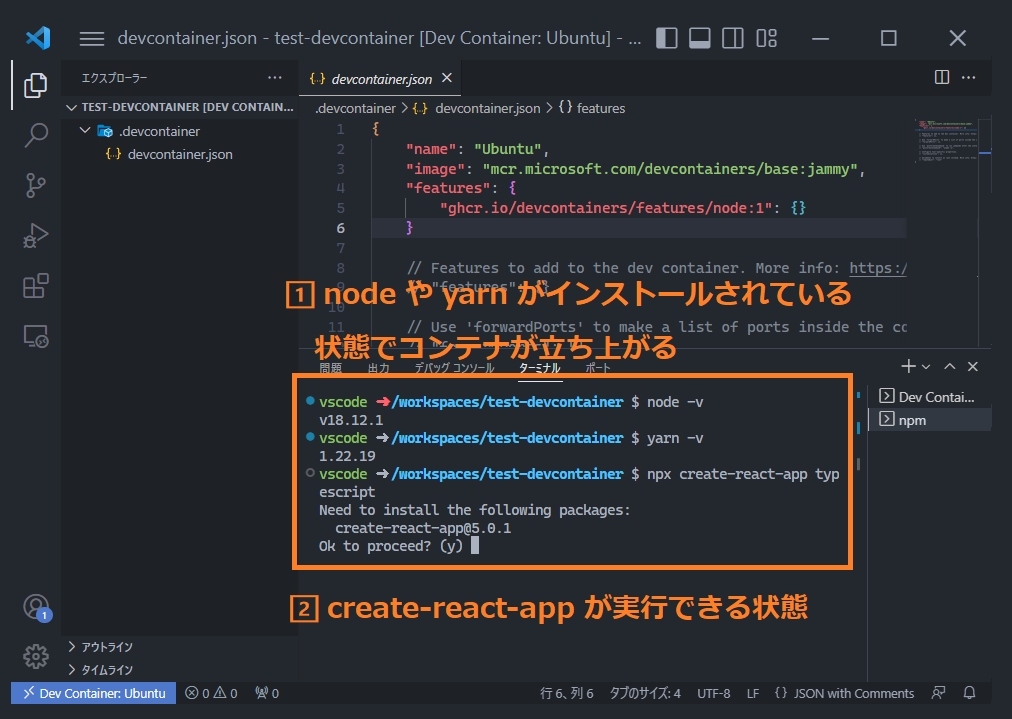
いかがでしょうか。手動でnode.js yarnをインストールしてcreate-react-appをしたことがある方には如何に簡略されているかおわかりいただけるかと思います。
次は今回構築した Dev Container 環境をビルドしてみましょう。
既存の Dev Container 環境のビルド
前提
前提条件は環境構築手順と同様とします。
- VS Code のインストール
- Docker のインストール (Windows の場合は WSL2 上にインストール)
- Docker Desktop for Windows/Mac のインストール
1. Dev Container の Workspace をホストマシンで開く
まずはホストマシンの VS Code で先程作成した Workspace を開きます。
* 拡張機能 Dev Containers がインストールされていない場合
拡張機能 Dev Containersがインストールされていない場合は、次の図のように拡張機能のインストールを推奨されるので、表示に従いインストールしてください。
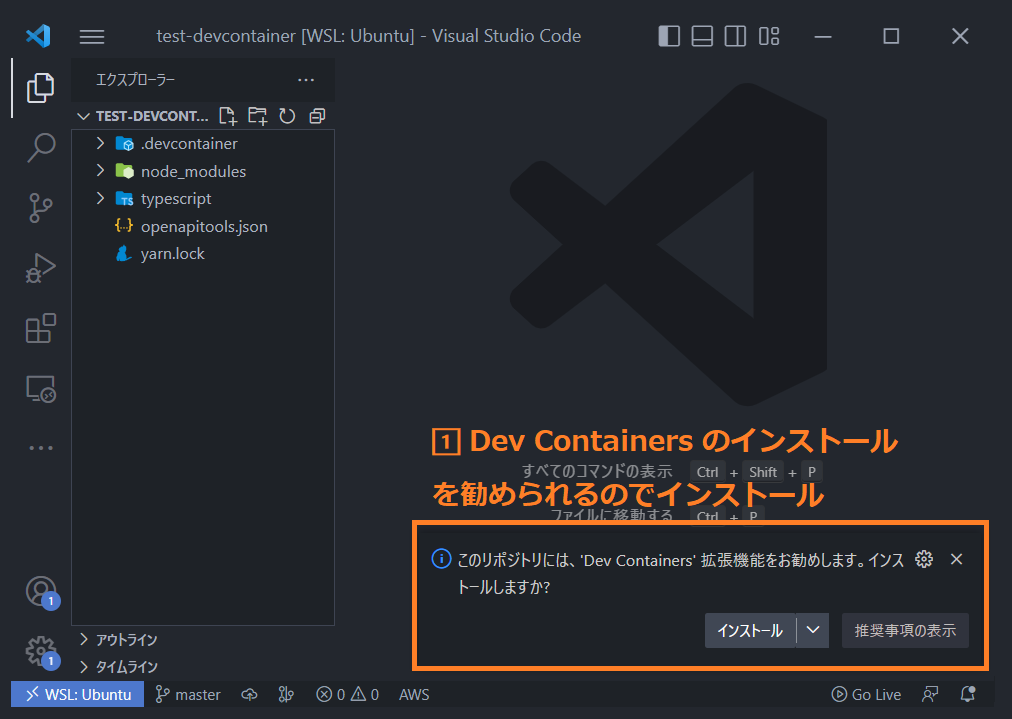
2. Reopen in Container を選択
拡張機能 Dev Containersをインストール済みの場合は、次の図のように Dev Container の設定ファイルがあるので Dev Container で開き直すかを聞かれます。
Reopen in Containerを選択すると Dev Container のビルドが開始されます。
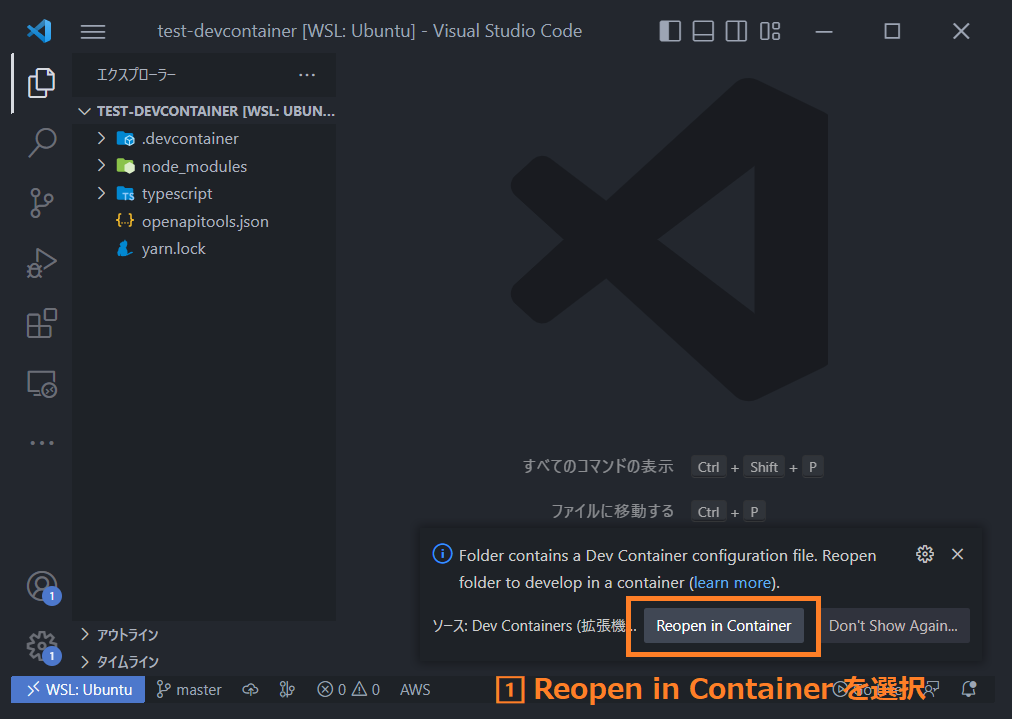
2. 環境構築完了!
構築済みの Dev Container 環境をビルドする際は以上だけです。
2 回目以降の起動も同様にReopen in Containerの選択で開くことが出来ます。Windows の場合は次の図のようにタスクバーの VS Code コンテキストメニュー から直接開くことも出来ます。
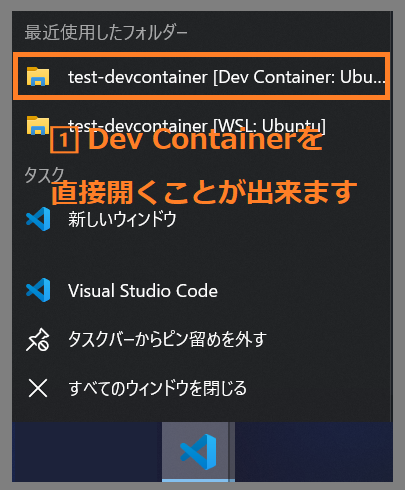
React アプリケーションの起動を構築完了とする場合は以下のようなコマンドが必要ですが、そちらについての設定は後述いたします。
// node.js packageのインストール
$ yarn install
このように構築済みの環境構築は非常に少ない手順で構築出来ます。
devcontainer.json のサンプル
次に私の Dev Container の設定の例を紹介します。
VS Code の設定や拡張機能は linter や formatter などを定義しています。
その他開発支援の機能も設定していますので興味がありましたら調べてみてください。
{
    // Dev Container の名称設定
    "name": "test-devcontainer",
    // コンテナ立ち上げ時のオプションの指定
    // --name ビルドするDocker containerの名称の指定
    // これを指定しないとランダムに生成される
    "runArgs": ["--name=test-devcontainer"],
    // Docker コンテナイメージ
    "image": "mcr.microsoft.com/devcontainers/base:jammy",
    // VS Codeの設定
    "settings": {
        "stylelint.validate": ["css", "scss"],
        "scss.validate": false,
        "css.validate": false,
        "editor.formatOnSave": true,
        "editor.defaultFormatter": "esbenp.prettier-vscode",
        "editor.codeActionsOnSave": {
            "source.fixAll.eslint": true,
            "source.fixAll.stylelint": true
        },
        // sticky scrollの設定
        "editor.stickyScroll.enabled": true,
        "editor.stickyScroll.maxLineCount": 5,
        "workbench.colorCustomizations": {
            "editorStickyScroll.background": "#00708D",
            "editorStickyScrollHover.background": "#59A2B5"
        },
        // typescript で絶対パスで import する設定
        "typescript.preferences.importModuleSpecifier": "non-relative"
    },
    // 追加する VS Code の拡張機能
    "extensions": [
        "ms-vscode.live-server",
        "dbaeumer.vscode-eslint",
        "stylelint.vscode-stylelint",
        "Syler.sass-indented",
        "esbenp.prettier-vscode",
        "ms-python.python",
        "streetsidesoftware.code-spell-checker",
        "naumovs.color-highlight",
        "burkeholland.simple-react-snippets",
        "formulahendry.auto-rename-tag",
        "MariusAlchimavicius.json-to-ts",
        "dsznajder.es7-react-js-snippets",
        "styled-components.vscode-styled-components",
        "Gruntfuggly.todo-tree",
        "42Crunch.vscode-openapi",
        "mhutchie.git-graph"
    ],
    // コンテナ内の実行ユーザーの設定 (推奨設定)
    "remoteUser": "vscode",
    // インストールするライブラリ
    "features": {
        "ghcr.io/devcontainers/features/node:1": { "version": "lts" },
        "ghcr.io/devcontainers/features/python:1": { "version": "3.9" }
    },
    // Dev Container 作成時に実行するコマンド
    "postCreateCommand": "sh .devcontainer/post-create.sh"
}
先程の構築済み環境で別途yarn installを実行しなかった件は、postCreateCommandオプションに定義することで環境構築時に自動で実行できます。
私の場合は別途スクリプトを作成しコンテナ構築後に実行する必要がある一連のコマンドを実行しています。
.devcontainer/post-create.sh
#!/usr/bin/env sh

# bashのgitコマンド補完の追加
echo 'source /usr/share/bash-completion/completions/git' >> ~/.bashrc

# yarn global のpathを通す設定
echo 'export PATH="$HOME/.yarn/bin:$PATH"' >> ~/.bashrc
# openapi-generator-cliのインストール
yarn global add @openapitools/openapi-generator-cli

yarn install
導入してみて感じたメリット・デメリット
Dev Container 環境で開発をしていて感じたメリット・デメリットを記載します。
メリット
-
環境構築の手順が単純化出来る
- 複数人で開発する際にホストマシンの OS を気にしなくて良い
- 各種ライブラリ、パッケージの手順が不要
- バックエンドの場合 mysql や redis を利用することが多いのでより強力
-
環境構築を宣言的に定義して、共通化出来るので個人によるばらつきが出ない
- VS Code の設定や拡張機能も定義できる
- バージョン違いによる思わぬバグの遭遇が起きない
- ローカル環境を汚さない、別 Workspace との競合が発生しない
デメリット
- VS Code 以外の IDE を使いたい人の要望に応えられない
- 好みのターミナルが使えない
- そこそこのマシンスペックが要求される
- Zoom の画面共有しながらだと厳しい
- Windows は WSL2 がなんだかんだ重い
- Mac はファイル I/O に問題を抱えている
devcontainer.jsonの Named Volume の設定で解決できるようです[3]
さいごに
いかがでしたでしょうか。Dev Container の便利さが少しでも伝わっていれば幸いです。
私自身、過去には長い環境構築手順書に沿って環境構築をしていた記憶もあり非常に楽な時代になったなと感じています。
また、実際にモブプロに別プロダクトを担当しているメンバーをゲストに迎えた際もすぐに実装に取り組んでもらうことが出来たので Dev Container の利便性を実感しました。
今後の試行錯誤としては以下のようなことを実践してみたいと考えています。
- 公式記事を参考に Dev Container のパフォーマンスチューニング
- Amazon EC2 上に Docker を入れて Remote Development using SSH経由で Dev Container を利用してみたい
- 応用で IntelliJ IDEA のRemote Developmentでの開発
- GitHub Codespaces 上での環境構築
決済プラットフォームの他の取り組みその1、[ グローバル展開も視野に入れた決済プラットフォームにドメイン駆動設計(DDD)を取り入れた ] ↩︎
決済プラットフォームの他の取り組みその2、[入社 1 年未満メンバーだけのチームによる新システム開発をリモートモブプログラミングで成功させた話] ↩︎
関連記事 | Related Posts

VSCode Dev Containerを使った開発環境構築
![Cover Image for [Sequel! Dev Container] Creating a cloud development environment with GitHub Codespaces](/assets/blog/authors/torii/codespaces/codespaces_banner.webp)
[Sequel! Dev Container] Creating a cloud development environment with GitHub Codespaces
![Cover Image for [続!Dev Container] GitHub Codespacesでクラウド開発環境を構築](/assets/blog/authors/torii/codespaces/codespaces_banner.webp)
[続!Dev Container] GitHub Codespacesでクラウド開発環境を構築

Debugging my React project with VS Code
Guide to Building an S3 Local Development Environment Using MinIO (AWS SDK for Java 2.x) with Docker Compose and Health Checks
Achieving Auto Provisioning in ECS Environments
We are hiring!
【クラウドエンジニア】Cloud Infrastructure G/東京・大阪・福岡
KINTO Tech BlogWantedlyストーリーCloud InfrastructureグループについてAWSを主としたクラウドインフラの設計、構築、運用を主に担当しています。
【クラウドエンジニア(クラウド活用の推進)】Cloud Infrastructure G/東京・名古屋・大阪・福岡
KINTO Tech BlogCloud InfrastructureグループについてAWSを主としたクラウドインフラの設計、構築、運用を主に担当しています。

