スクリプトを使用した手動での論理データベースのバックアップとロールバック

こんにちは、Shweta Oza です。
2022年4月に、KINTOグローバル開発グループに加わりました。アプリケーション開発担当で、最近は DevOps に興味を感じています。現在の所属はクーポンチームです。
私たちのチームは、世界中のお客様/取引先向けにクーポン API の開発・管理を行っています。各種機能の開発と展開を継続的に進めています。どのプロジェクトにおいても、データのバックアップやロールバックを含むデータベースのメンテナンスは重要です。メンテナンスしておけば、新バージョンのリリース時に問題が発生しても、変更を安全にロールバックし、バックアップを復元することができます。
オープンソースのデータベース移行ツールとして、当社では Flyway などのソリューションを使用しています。Flywayは、コンフィギュレーションよりもシンプルさと規則性を重視しています。基本のコマンドは7つあります:Migrate、Clean、Info、Validate、Undo、Baseline、Repair
以下に、スクリプトを使用してデータベースを手動でバックアップする方法について、いくつかの概念と簡略化した手順を示します。
概要
クーポンシステムは、KINTO のサービスや提携先のサービスで利用できるクーポンを簡単に発行・管理できるツールです。クーポンシステムでは、新しい機能を継続的に開発することで改善やアップグレードを行っています変更が発生するたびに、クーポンシステムで使用するデータベースを管理する必要があります。これはソフトウェアプロジェクトにおいて非常に重要な作業です。私たちの場合は MySQL を使用しています。
クーポンシステムの新しいリリースがある場合は、毎回次の手順を踏んでいます:
- 機能を開発する。
- ローカルでテストしてから AWS テスト環境でテストを行う。
- リリース前に DB のバックアップを取る。
- 新機能をリリースする。
- 問題があれば、リリース前のバージョンにロールバックする。
これらを実施するため、バックアップとロールバックのスクリプトを用意し、CLI でのインストラクション数を減らしています。これで時間の節約にもなりますし、バックアップやロールバックで構造の一貫性も維持できます。
基本を知る
データベースのバックアップとは?
データベースのバックアップとは、サーバーに保存したデータのコピーのことです。
データベースのバックアップは何のため?
**バックアップを取るのは、予期せぬデータ損失を防ぐためです。**障害が発生した場合、元データが失われたり破損したりしても、バックアップがあれば簡単にデータを復元することができます。
データベースのバックアップにはどんなタイプがあるの?
物理バックアップ [1]
物理バックアップは、物理的なファイルのバックアップで、データベースの保存と復元に使用されます。これらには、様々なデータファイル、コントロールファイル、アーカイブ REDO ログなどが含まれます。通常、物理バックアップのデータは、クラウド、オフラインストレージ、磁気テープ、ディスクに保存されます。
物理バックアップには方法が2つあります:
- オペレーティング・システム・ユーティリティ
- リカバリマネージャー
メリット:
- データの完全管理。
- 保管コストが低い。
- バックアップデータの迅速な取得。
デメリット:
- どんなデバイスに保存してもデータは破損する可能性があり、データ復旧が困難になることがある。
- 自然災害でデータが破壊される可能性がある。
- 記憶装置自体の紛失。
論理バックアップ [2]
論理バックアップには、データベースから取得した論理データが含まれます。ビュー、プロシージャ、ファンクション、テーブルなどです。 これは、ユーザーがデータベースのコピーを復元したり、別の場所に転送したりする場合に便利です。
論理バックアップは、データ損失の防止では物理バックアップほど安全ではありません。構造の詳細を提供するだけです。そのため毎週、完全な論理バックアップを実行しなければなりません。
論理バックアップは物理バックアップの補助として使用されます。
メリット:
- データベース全体を以前のインスタンスに復元する必要がある場合に便利。
- より複雑で、細かなリカバリ機能を備えている。
デメリット:
- 特別なコンポーネントのリカバリには利用できない可能性がある。
- 物理バックアップに比べて安全性が低い。
- 構造の詳細を提供するのみ
論理データベースのバックアップについてローカル及び AWS CLI の両方で見ていきます。DB でのデータ操作は、開発者の観点でも重要なステップだからです。
AWS CLI を使用して Amazon RDS(リレーショナルデータベースサービス)を管理する
Amazon RDS[3]
Amazon RDS はサーバーを用意することなく、クラウド上の RDB を安全に利用できるサービスです。Amazon RDSは、オープンソースで広く使われているMySQLやMariaDB, PostgreSQLをはじめ、Oracle Database, microsoft SQL serverなどもサポートしています。支払いは使った分だけです。
Amazon CLI [4]
AWS CLI は、AWS サービスを管理するための統合ツールで、Linux や macOS ではターミナルから、Windows ではコマンドプロンプトから実行します。
基本的には専用ツールからコマンド入力で実行しますが、スクリプトに記述することで処理の自動化もできます。
AWS CLI から Amazon RDS を管理する場合は、コマンドを実行してもすぐ反映されるとは限らない点に注意が必要です。
というのも、Amazon RDS には複数の障害対策が施されており、設定変更がすべての対策に反映されるまでに時間がかかるからです。
同様に簡単なスクリプトを各種環境で書くことで、バックアップとロールバックのタスクを実行することができるでしょう。
開発者レベルで CLI から DB のバックアップやロールバックを行うにはどうすればいい?
SQL フォーマットで mysqldump の使用
mysqldump とは [5]
mysqldump クライアントは、 Igor Romanenko が最初に書いた論理バックアッププログラムです。データベースは通常、バックアップや別のデータベースサーバー(MariaDB や MySQL とは限りません)に転送するための SQL ステートメントのリスト(「SQL ダンプ」)の形をしています。ダンプには通常、テーブル作成やテーブル入力を行うための SQL ステートメントが含まれています。
ダンプファイルの使用
ダンプファイル [6] とは
ダンプファイルは、リリース後のアップグレードの際にも便利です。アップグレードの際に、古いリリースを使用しているデータベースをダンプし、新しいリリースでロードすることができます。
ハイライト
データありの状態(つまり DDL 及び DML の両方)で DB ダンプを取得する場合
mysqldump -u root -p  DB_Name > backup.sql

# AWS CLI
mysqldump -u $user -p$password -h $rds_endpoint > backup.dump

# To avoid warnings like below you can use the following options and add the login credentials in a CNF file.

# mysqldump: [Warning] Using a password on the command line interface can be insecure.
# --set-gtid-purged=OFF

# Warning:A partial dump from a server that has GTIDs will by default include the GTIDs of all transactions, even those that changed suppressed parts of the database.If you don't want to restore GTIDs, pass --set-gtid-purged=OFF.To make a complete dump, pass --all-databases --triggers --routines --events.
# --defaults-extra-file=path/to/extra.cnf

# cat << EOF > path/to/extra.cnf
# [client]
# user=${MYSQL_USER}
# password=${MYSQL_PASSWORD}
# host=${RDS_ENDPOINT}
# EOF

mysqldump --defaults-extra-file=path/to/extra.cnf --skip-column-statistics --single-transaction --set-gtid-purged=OFF --databases $DB > backup.dump
データなし(つまり DDL のみ)で DB ダンプを取る場合
mysqldump -d -u root -p  DB_Name > backup.sql

# AWS CLI
mysqldump -d -u $user -p$password -h $rds_endpoint > backup.dump

# Below are some useful options to consider

# --no-data, -d
# Do not write any table row information (that is, do not dump table contents).This is useful if you want to dump only the CREATE TABLE statement for the table.For example, when you want to create an empty copy of the table by loading the dump file.

# --defaults-extra-file=file_name
# Read this option file after the global option file but (on Unix) before the user option file.If the file does not exist or is otherwise inaccessible, an error occurs.If file_name is not an absolute path name, it is interpreted relative to the current directory.

# The --single-transaction option and the --lock-tables option are mutually exclusive because LOCK TABLES causes any pending transactions to be committed implicitly.
mysqldump --no-data --defaults-extra-file=path/to/extra.cnf --skip-column-statistics --single-transaction --set-gtid-purged=OFF --databases $DB > backup.dump
以前のバージョンにロールバックするには
mysql -u root -p  DB_Name < backup.dump

# AWS CLI
mysql -u $user -p$password -h $rds_endpoint < backup.dump
バックアップ用スクリプト
ディレクトリを使用する前にスクリプトを編集する必要があるもの:
- pathToParameterStoreKeyValueMYSQL_USER
- pathToParameterStoreKeyValueMYSQL_PASSWORD
- pathToParameterStoreKeyValueRDS_ENDPOINT
- DB_Name
#########################################################################
#########################################################################
#####
#####       Description:Shell Script to take backup of existing data AWS
#####       1.Choose the env and switch the db connection
#####       2.Create backup directory with today's date
#####       3.Create dump file to backup folder with current db
#####       4.Check dump file size
#####
#########################################################################
#########################################################################

read -p "Enter Your Env(env): " x
echo "Welcome to ${x} Env!"

# MySQL server credentials
MYSQL_USER=$(aws ssm get-parameter --with-decryption --name /${x}/pathToParameterStoreKeyValueMYSQL_USER | jq -r .Parameter.Value)
MYSQL_PASSWORD=$(aws ssm get-parameter --with-decryption --name /${x}/pathToParameterStoreKeyValueMYSQL_PASSWORD | jq -r .Parameter.Value)
RDS_ENDPOINT=$(aws ssm get-parameter --with-decryption --name /${x}/pathToParameterStoreKeyValueRDS_ENDPOINT | jq -r .Parameter.Value)

# Create a configuration file to maintain MySQL login details
cat << EOF > mysql-dbaccess.cnf
[client]
user=$MYSQL_USER
password=$MYSQL_PASSWORD
host=$RDS_ENDPOINT
EOF

# Set the folder name with date format (example:2022-08-15)
DATE_FORMAT=$(date +"%Y-%m-%d")
TIMESTAMP=$(date +%H%M%s)

# Path to local backup directory
BACKUP_DIR="tmp/release/backup/${x}/dbbackup/${DATE_FORMAT}"

# Use database's names
DB="DB_Name"
echo "########################################DATABASE########################################"
echo "Using Database (DB_Name)"
echo "########################################DATABASE########################################"

# Create backup directory with today's date
mkdir -p ${BACKUP_DIR}
FILENAME_PREFIX="backup_${x}_DDL_DML_${TIMESTAMP}_"
FILENAME_POSTFIX=".dump"

read -p "Enter version eg: v0.0.1: " d
FILENAME=$FILENAME_PREFIX${d}$FILENAME_POSTFIX
echo "########################################FILEPATH########################################"
echo "Created directory" ${BACKUP_DIR}
echo "File will be saved as ${FILENAME} "

mysqldump --defaults-extra-file=mysql-dbaccess.cnf --single-transaction --set-gtid-purged=OFF --databases $DB > ${BACKUP_DIR}/${FILENAME}

echo "File saved at ${BACKUP_DIR}/${FILENAME}"
echo "########################################FILESPATH########################################"

# check File size
file=${BACKUP_DIR}/${FILENAME}
filesize=$(ls -lh $file )
echo "########################################FILESIZE########################################"
echo "$file has a size of $filesize"
echo "########################################FILESIZE########################################"

# Remove the file after executing shell
rm mysql-dbaccess.cnf
バックアップの手順
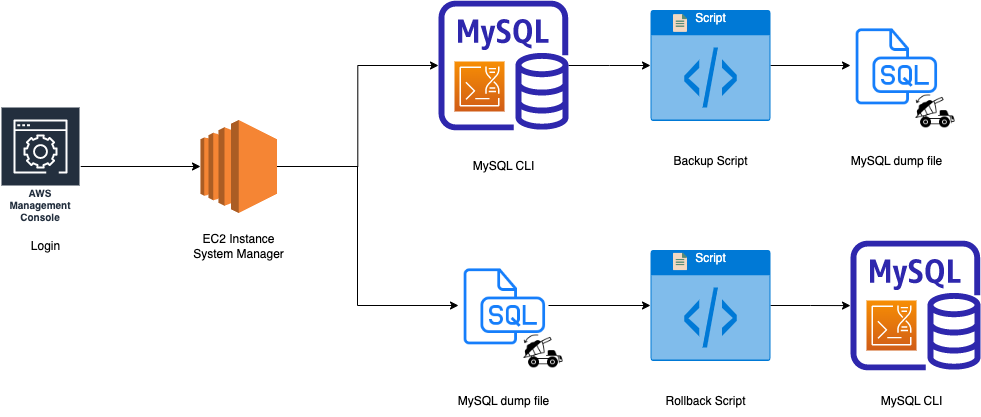
AWS CLI にシェルスクリプトを配置する
- AWS にログイン
- AWSマネジメントコンソール → AWSシステムマネージャー→ セッションマネージャー →セッション開始の順にクリックする
- バックアップを取りたい env を入力する 例:
{env}-{project_name}-{maintenance_server_name} - セッション開始
dbbackupDDL_DML.shファイルが存在するかチェックする- ファイルが存在しない場合は、AWS CLI に
dbbackupDDL_DML.shファイルを配置する - ファイルを実行する
sh-4.2$ ls
dbbackupDDL_DML.sh  mysql.sh  tmp
sh-4.2$ sh dbbackupDDL_DML.sh
Enter Your Env(env): env
Welcome to env Env!
########################################DATABASE########################################
Using Database (db_name)
########################################DATABASE########################################
Enter version eg: v0.0.1: v0.0.1
########################################FILEPATH########################################
Created directory tmp/release/backup/env/dbbackup/2022-08-12
File will be saved as backup_env_DDL_DML_06311660285870_v0.0.1.dump
File saved at tmp/release/backup/env/dbbackup/2022-08-12/backup_env_DDL_DML_06311660285870_v0.0.1.dump
########################################FILESPATH########################################
#######################################FILESIZE########################################
tmp/release/backup/env/dbbackup/2022-08-12/backup_env_DDL_DML_06311660285870_v0.0.1.dump has a size of -rw-r--r-- 1 ssm-user ssm-user 1.7M Aug 12 06:31 tmp/release/backup/env/dbbackup/2022-08-12/backup_env_DDL_DML_06311660285870_v0.0.1.dump
########################################FILESIZE########################################
sh-4.2$
ダンプファイルの内容を確認するには
sh-4.2$ less tmp/release/backup/env/dbbackup/2022-08-12/backup_env_DDL_DML_06311660285870_v0.0.1.dump
sh-4.2$
バックアップは tmp/release/backup/env/dbbackup/{currentDate}/{FileNameWithTimestamp&Version} のフォルダに入ります。
同じ日に複数回、同一フォルダへダンプしたい場合、タイムスタンプ付きのファイルを準備します。
sh-4.2$ cd tmp/release/backup/env/dbbackup/
sh-4.2$ ls
2022-08-09  2022-08-10  2022-08-12
sh-4.2$ cd tmp/release/backup/env/dbbackup/2022-08-12/
sh-4.2$ ls
backup_env_DDL_DML_06311660285870_v0.0.1.dump  backup_env_DDL_DML_06371660286257_v0.0.1.dump
sh-4.2$
ロールバック用スクリプト
ディレクトリを使用する前にスクリプトを編集する必要があるもの:
- pathToParameterStoreKeyValueMYSQL_USER
- pathToParameterStoreKeyValueMYSQL_PASSWORD
- pathToParameterStoreKeyValueRDS_ENDPOINT
- DB_Name
#########################################################################
#########################################################################
#####
#####       Description:Shell Script to rollback to target SQL
#####       1.Choose the env and switch the db connection
#####       2.Create rollback directory with today's date
#####       3.Choose and input the backup file
#####       4.Input the version of dump file
#####       5.Copy backup dump file to ROLLBACK folder
#####       6.Create dump file to ROLLBACK folder with current db
#####       7.Rollback db with backup dump file
#####       8.Comparison....
#####
#########################################################################
#########################################################################

read -p "Enter Your Env(env): " x
echo "Welcome to ${x} Env!"

# MySQL server credentials
MYSQL_USER=$(aws ssm get-parameter --with-decryption --name /${x}/pathToParameterStoreKeyValueMYSQL_USER | jq -r .Parameter.Value)
MYSQL_PASSWORD=$(aws ssm get-parameter --with-decryption --name /${x}/pathToParameterStoreKeyValueMYSQL_PASSWORD | jq -r .Parameter.Value)
RDS_ENDPOINT=$(aws ssm get-parameter --with-decryption --name /${x}/pathToParameterStoreKeyValueRDS_ENDPOINT | jq -r .Parameter.Value)

# Set the folder name with date format(eg:2022-08-15)
DATE_FORMAT=$(date +"%Y-%m-%d")
TIMESTAMP=$(date +%H%M%s)

# Path to local rollback directory history
ROLLBACK_DIR="tmp/release/rollback/${x}/dbRollback/${DATE_FORMAT}"

# Use database's names
DB="DB_Name"
echo "########################################DATABASE########################################"
echo "Using Database (DB_Name)"
echo "########################################DATABASE########################################"

# Create rollback directory with today's date
mkdir -p ${ROLLBACK_DIR}

read -p "Enter full dumpFile Path to which you want to rollback: " df
echo "dumpFile ${df} selected!"

FILENAME_ROLLBACK_PREFIX="rollback_${x}_DDL_DML_${TIMESTAMP}_"
FILENAME_BACKUP_PREFIX="backup_${x}_DDL_DML_${TIMESTAMP}_"
FILENAME_POSTFIX=".dump"
read -p "Enter version eg: v0.0.1: " d
FILENAME_ROLLBACK=FILENAME_ROLLBACK_PREFIX${d}$FILENAME_POSTFIX
FILENAME_BACKUP=FILENAME_BACKUP_PREFIX${d}$FILENAME_POSTFIX
echo "########################################FILEPATH########################################"
echo "Created directory" ${ROLLBACK_DIR}

# copy dump file to backup folder
cp ${df} ${ROLLBACK_DIR}/${FILENAME_ROLLBACK}

ROLLBACK_FILE=${ROLLBACK_DIR}/${FILENAME_ROLLBACK}
BEFORE_ROLLBACK_DUMP=${ROLLBACK_DIR}/"BeforeRollback_${FILENAME_BACKUP}"
AFTER_ROLLBACK_DUMP=${ROLLBACK_DIR}/"AfterRollback_${FILENAME_BACKUP}"

mysqldump -u $MYSQL_USER -p$MYSQL_PASSWORD -h $RDS_ENDPOINT --databases $DB > ${BEFORE_ROLLBACK_DUMP}
echo "Dump Before Rollback ${BEFORE_ROLLBACK_DUMP}"

echo "Rollback to DDL_DML of sql file located at ${ROLLBACK_FILE} "
mysql -u $MYSQL_USER -p$MYSQL_PASSWORD -h $RDS_ENDPOINT --databases $DB < ${ROLLBACK_FILE}
echo "Rollback successfully done with ${ROLLBACK_FILE}"

mysqldump -u $MYSQL_USER -p$MYSQL_PASSWORD -h $RDS_ENDPOINT --databases $DB > ${AFTER_ROLLBACK_DUMP}
echo "Dump After Rollback ${AFTER_ROLLBACK_DUMP}"

echo "########################################FILESPATH########################################"

# check File size before Rollback
fileBeforeRollback=${ROLLBACK_DIR}/${BEFORE_ROLLBACK_DUMP}
filesizeBeforeRollback=$(ls -lh fileBeforeRollback )
echo "########################################FILESIZE BEFORE ROLLBACK########################################"
echo "$fileBeforeRollback has a size of $filesizeBeforeRollback"
echo "########################################FILESIZE BEFORE ROLLBACK########################################"

# check File size after Rollback
fileAfterRollback=${ROLLBACK_DIR}/${AFTER_ROLLBACK_DUMP}
filesizeAfterRollback=$(ls -lh fileAfterRollback )
echo "########################################FILESIZE AFTER ROLLBACK########################################"
echo "$fileAfterRollback has a size of $filesizeAfterRollback"
echo "########################################FILESIZE AFTER ROLLBACK########################################"
Footer
ロールバックの手順
AWS CLI にシェルスクリプトを配置する
- AWS にログイン
- AWSマネジメントコンソール → AWSシステムマネージャー→ セッションマネージャー →セッション開始の順にクリックする
- ロールバックしたい env を入力する 例:
{env}-{project_name}-{maintenance_server_name} - セッション開始
dbRollbackDDL_DML.shファイルが存在するかチェックする- ファイルが存在しない場合は、AWS CLI に
dbRollbackDDL_DML.shファイルを配置する - ファイルを実行する
sh-4.2$ ls
dbRollbackDDL_DML.sh  mysql.sh  tmp
sh-4.2$ sh dbRollbackDDL_DML.sh
Enter Your Env: env
Welcome to env Env!
########################################DATABASE########################################
Using Database (DB_Name)
########################################DATABASE########################################
Enter full dumpFile Path to which you want to rollback: tmp/release/backup/env/dbbackup/2022-08-12
Enter version eg: v0.0.1: v0.0.1
########################################FILEPATH########################################
Created directory tmp/release/rollback/env/dbRollback/2022-08-13
Dump Before Rollback tmp/release/rollback/env/dbRollback/2022-08-13/BeforeRollback_backup_env_DDL_DML_06311660285870_2022-08-13.dump
Rollback to DDL_DML of sql file located at tmp/release/rollback/env/dbRollback/2022-08-13/backup_env_DDL_DML_06311660285870_2022-08-13.dump
Rollback successfully done with tmp/release/rollback/env/dbRollback/2022-08-13/backup_env_DDL_DML_06311660285870_2022-08-13.dump
Dump After Rollback tmp/release/rollback/env/dbRollback/2022-08-13/AfterRollback_backup_env_DDL_DML_063116602859099_2022-08-13.dump
########################################FILESPATH########################################
########################################FILESIZE BEFORE ROLLBACK########################################
tmp/release/rollback/env/dbRollback/2022-08-13/BeforeRollback_backup_env_DDL_DML_06311660285870_2022-08-13.dump has a size of -rw-r--r-- 1 ssm-user ssm-user 1.7M Aug 13 06:31 tmp/release/rollback/env/dbRollback/2022-08-13/BeforeRollback_backup_env_DDL_DML_06311660285870_2022-08-13.dump
########################################FILESIZE BEFORE ROLLBACK########################################
########################################FILESIZE AFTER ROLLBACK########################################
tmp/release/rollback/env/dbRollback/2022-08-13/AfterRollback_backup_env_DDL_DML_063116602859099_2022-08-13.dump has a size of -rw-r--r-- 1 ssm-user ssm-user 1.6M Aug 13 06:31 tmp/release/rollback/env/dbRollback/2022-08-13/AfterRollback_backup_env_DDL_DML_063116602859099_2022-08-13.dump
########################################FILESIZE AFTER ROLLBACK########################################
sh-4.2$
普段の業務でどう活かすか?
- 上記のようなスクリプトやコマンドを使用することで、入力やログインの手間を減らし、また多くのドキュメントを何度も参照する必要がなくなります。これにより、迅速なバックアップの取得が可能になります。
- コマンドを手入力する際の時間とエラーを削減できます。
- 必要なときにいつでも参照できる、体系的で整ったフォルダ構造が提供されます。
- DB のアップグレードの際にデータの不整合が発生した場合や、次のバージョンのシステムをリリースする必要がある場合、障害が発生しデータをロールバックする必要がある場合など、これらの手順が必要になります。
関連記事 | Related Posts
スクリプトを使用した手動での論理データベースのバックアップとロールバック
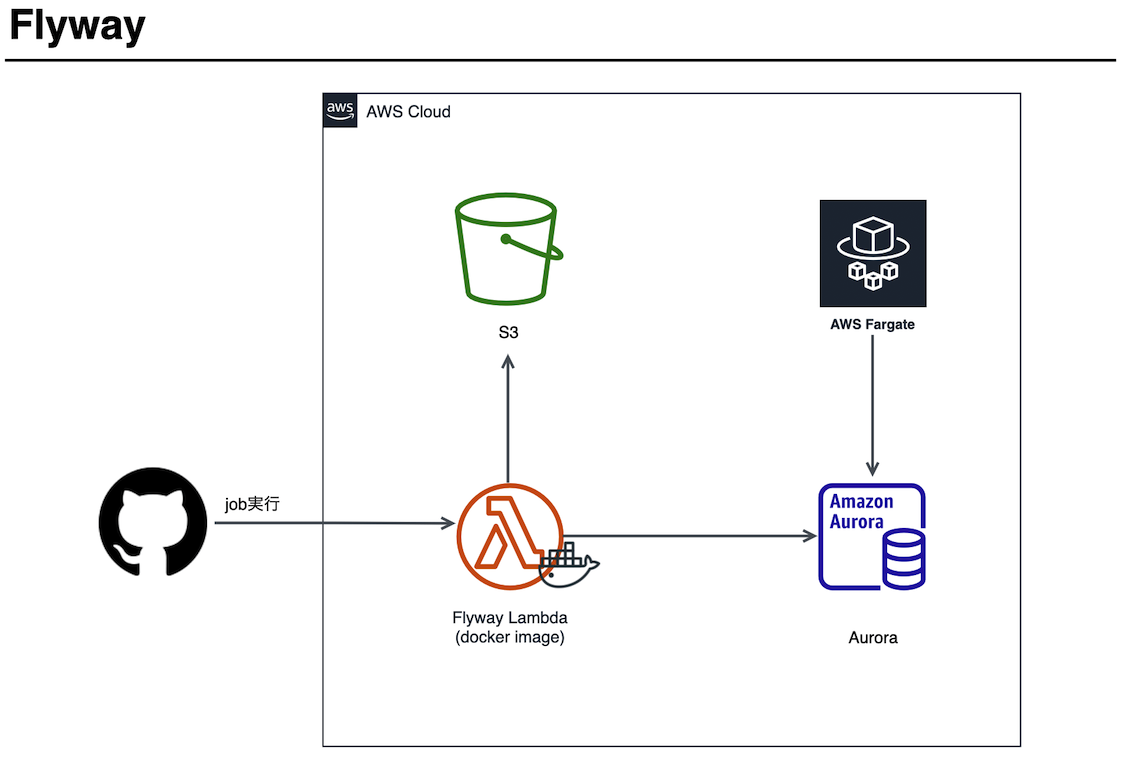
Flyway導入

見えないエラーの原因とは? Amazon Aurora MySQL 2で発生したDatabase Collationによるmysqldumpコマンドがエラーメッセージなしで処理が終了する現象について
Streamlining SQL Creation Using GitHub Copilot Agent!
What is the cause of invisible errors? Concerning the issue observed in Amazon Aurora MySQL 2, where the mysqldump command unexpectedly terminates without displaying an error message, attributed to the database collation.
Room Migration
We are hiring!
【シニアデータサイエンティスト(Python)】データサイエンスG/東京・大阪・名古屋・福岡
募集背景KINTOでは、事業成長とともに、データを活用したマーケティング分析の重要性が高まっています。市場やお客様の変化を捉え、より良い顧客体験を提供するため、施策の評価や課題発見、改善提案を推進できる体制強化が必要となりました。
Cloud Engineer(トヨタグループ内製化支援)/Cloud Infrastructure G/東京・名古屋・大阪・福岡
トヨタグループのクラウド活用を、最前線で支える。1社にとどまらないスケールで、移行・生成AI・内製化まで幅広く挑戦できるポジションです。