Kotlin / Ktorで作るクラウドネイティブなマイクロサービス(オブザーバビリティ編)

Kotlin / Ktorで作るクラウドネイティブなマイクロサービス(オブザーバビリティ編)
こんにちは。Woven Payment Solution開発グループの楢崎と申します。
我々は、Woven by ToyotaでToyota Woven Cityで利用される決済基盤のバックエンド開発に携わっており、KtorというKotlin製のWebフレームワークを用いて開発しています。
これらのバックエンドアプリケーションは、Woven Cityで利用される、KubernetesをベースにしたCity Platformという基盤で動作し、マイクロサービスを構成しています。
今回は、マイクロサービスアーキテクチャを構成する上でマイクロサービスのペインポイントと、それらを解消する上で必要不可欠となる、オブザーバビリティ(Observability)を向上させるためのtipsを、
我々が利用しているKtorというWebフレームワークと、マイクロサービスをホストするプラットフォームとしてKubernetesを例にいくつかご紹介したいと思います。
またKubernatesと合わせて、いわゆる「クラウドネイティブ」な技術スタックも合わせてご紹介したいと思います。ログ収集ツールとしてLoki, メトリクス収集ツールとしてPrometheus、可視化ツールとしてGrafanaを今回は用いています。
実際にJavaやKotlinを使ってマイクロサービスを開発している方々はもちろん、プログラミング言語を問わず、マイクロサービスやKubernetesをこれから導入しようとしている開発者の皆さんの参考になれば幸いです。
この手順を再現する方法とサンプルコードはまとめて記事の最後に記載していますので、お時間ある方は是非手を動かしてみてください!
最初に: マイクロサービスのつらみ
一般的に、マイクロサービス化することによって、モノリシックなアプリケーションの諸問題は解消することができますが、一方でアプリケーションの複雑性が増して、問題が発生した際の切り分けが非常に難しくなってしまいます。今回は以下の3つの問題を考えてみます。
ペインポイントその1: エラーがどのタイミングでどのサービスが起因となって起こったのかよくわからない
ペインポイントその2: 依存性のあるサービスの稼働状況を常に考慮しないといけない
ペインポイントその3: リソース起因のパフォーマンス低下切り分けが難しい
オブザーバビリティを向上させることによって、それらの問題をどのように解消できるのか、今回はKtorを例に、わずか3つのプラグインの導入と、数行のコードの追加 でペインポイントごとに解決策を実装してみてみたいと思います。
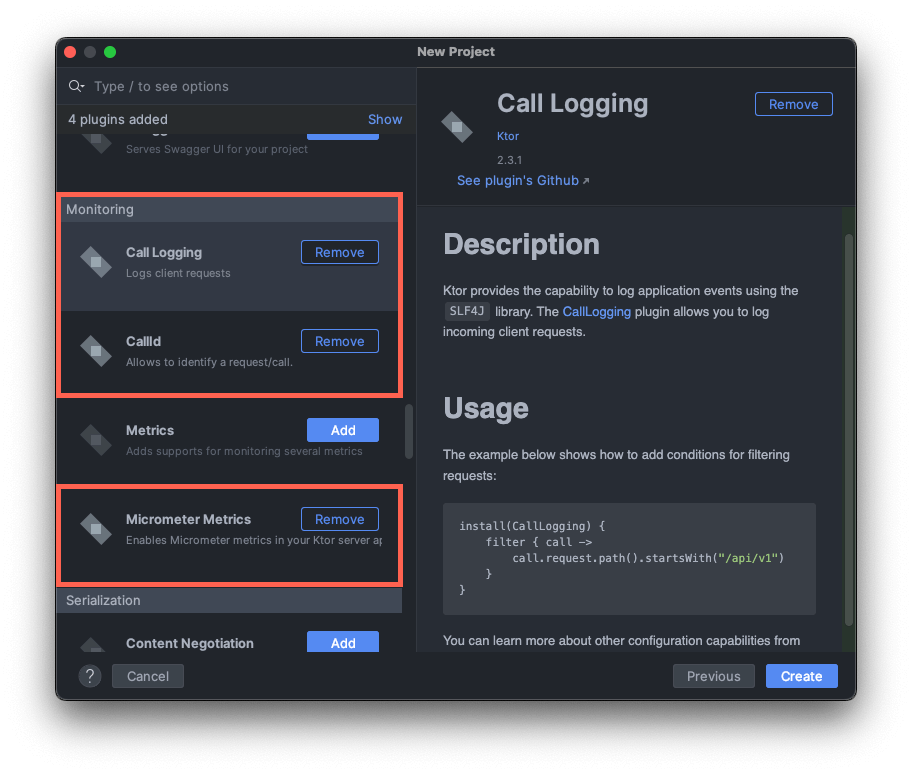
今回導入する3つのKtorプラグイン
施策1. CallIdの導入
今回以下のような、マイクロサービスでよくあるクラスタ内でAPIを呼び出すような2つのサービスを作成し、どのようにログが見えるか見てみたいと思います。
ログは標準出力へ出力し、Kubernetes上に別にデプロイしたログ収集ツール(今回はLoki)で収集することを前提とします。
サービスをそれぞれ、呼び出し元(frontend)と呼び出し先(backend)とします。
監視する時にそれぞれのサーバで起こっていることは、ロギングプラットフォームなどでポッド名などを指定して見ることができるかもしれませんが、サーバをまたいだリクエストは、お互い関連させて見ることはできません。
特にリクエスト数が増大した場合、時系列でログを表示するだけでは、どのアプリケーションログ同士が関連しているか切り分けるのは非常に難しくなってしまいます。

大量にリクエストが来ると、どのリクエストとレスポンスが関連があるかわからない...
別のサーバ上で起こった因果関係のあるイベントをネットワーク越しに関連させる仕組みを分散トレーシング(distributed tracing)と言います。
一般的には、Istio等サービスメッシュを利用すればZipkinやJaegerで関連しているリクエストの可視化は可能で、直感的にどこでエラーが発生したか理解することはできます。
一方で、ログからキーワードで検索するなどアプリケーションログを中心としたトラブルシュートの際の使い勝手はあまりいいとはいえません。
そこで、KtorのCallIdという機能を利用します。これでロギングプラットフォームで特定のCallIdのログを、キーワードとして検索して見ることができます。
またネットワークレイヤーの設定が不要なので、サービスメッシュなどを導入しなくてもアプリケーションエンジニア側で完結し融通が効きます。
実際にアプリケーションを動かしてGrafanaでログを確認してみましょう。
今回はフロントエンド、バックエンド共に同じコンテナイメージを用意するので、生成するプロジェクトは一つでOKです。こちらの手順にそってソースコードをテンプレートから生成します。
dependencies {
    implementation("io.ktor:ktor-server-call-logging-jvm:$ktor_version")
    implementation("io.ktor:ktor-server-call-id-jvm:$ktor_version")
    implementation("io.ktor:ktor-server-core-jvm:$ktor_version")
上記のような必要なライブラリが参照されています。
生成されたコードのうち、ログに関する部分を以下のように修正します。
(以下に各行が何を表すか、コメントとして付記しています、修正する必要はありません。)
fun Application.configureMonitoring() {
    install(CallLogging) {
        level = Level.INFO
        filter { call -> call.request.path().startsWith("/") } // ログを出力する条件を指定できる
        callIdMdc("call-id") // これを設定しておくことで、logback.xmlの %X{call-id} の部分に値を埋め込む事が可能
    }
    install(CallId) {
        header(HttpHeaders.XRequestId) //どのヘッダーにIDの値を格納するか
        verify { callId: String ->
            callId.isNotEmpty() //値が存在するか検証する
        }
+      generate {
+          UUID.randomUUID().toString() // なかったら値を生成して埋め込む
+      }
    }
HTTPクライアントの実装では、リクエストのヘッダーに値を入れて同じCallIdが伝搬するように設定しておくと良いでしょう。
以下のコードをそれぞれ追加して、実際にCallIdがサーバ間の通信で伝搬するか確認してみます。
dependencies {
...
+    implementation("io.ktor:ktor-client-core:$ktor_version")
+    implementation("io.ktor:ktor-client-cio:$ktor_version")
...
}
routing {
+    get("/call") {
+        application.log.info("Application is called")
+        val client = HttpClient(CIO) {
+            defaultRequest {
+                header(HttpHeaders.XRequestId, MDC.get("call-id"))
+            }
+        }
+        val response: HttpResponse = client.get("http://backend:8000/")
+        call.respond(HttpStatusCode.OK, response.bodyAsText())
+    }
サンプルコードを以下を参考にビルド、デプロイできる様になったら実際に以下のコマンドを実行してAPIを呼んでみてください。
curl -v localhost:8000/
curl -v -H "X-Request-Id: $(uuidgen)" localhost:8000/call
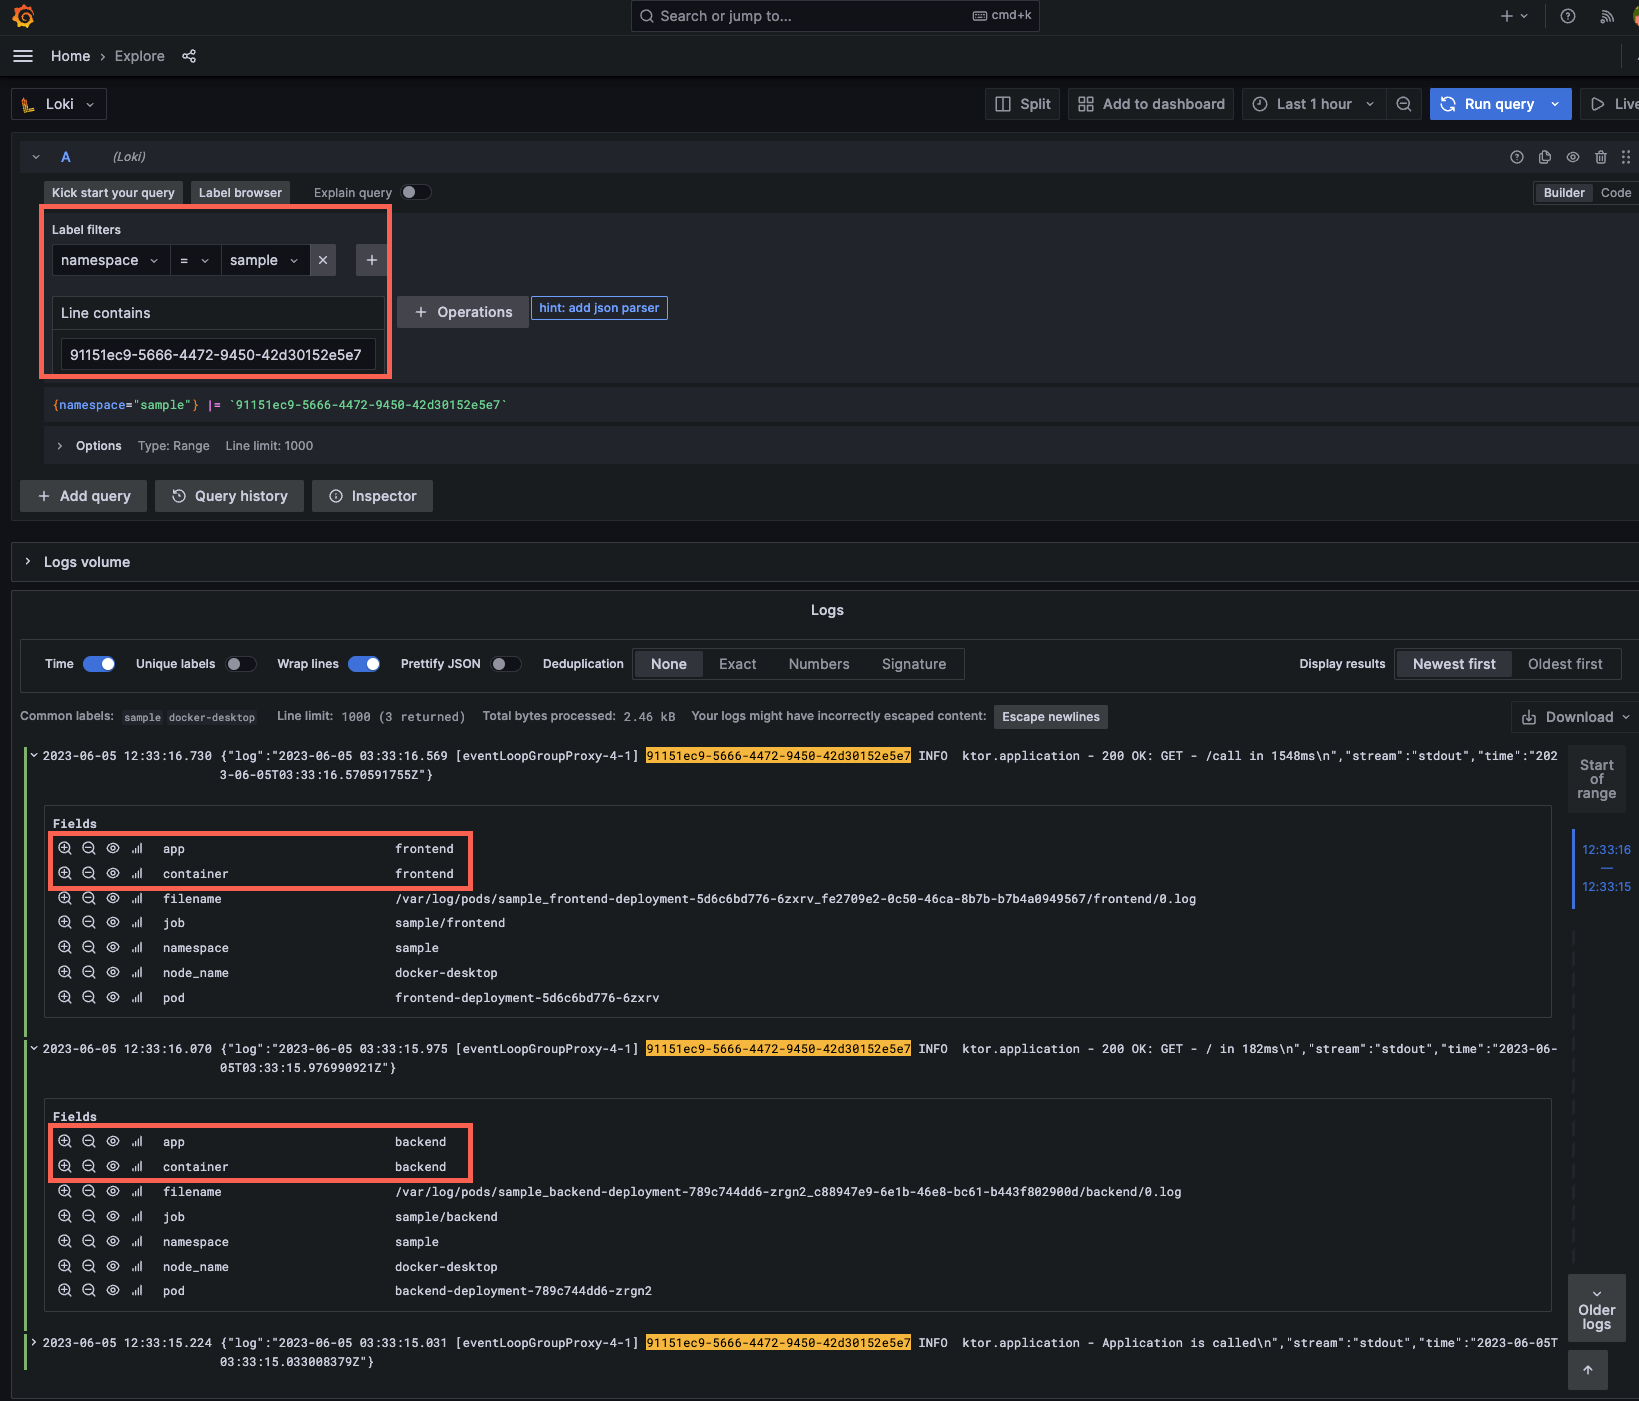
サーバー間でCallIdが伝播して検索キーワードとして検索できる様になった
ヘッダーに値を入れなくても、ログ上で、CallIdの値が追加されたかと思います。
またこちらのコマンドで生成されたUUIDの値を検索すると、一連の複数のサーバ上でのイベントを関連付けることができている事がわかります。。
施策2. Liveness Probe、Readiness Probeの設定
Kubernetesのコントロールプレーンにアプリケーションの死活状況を伝える仕組みとして、liveness probeとreadiness probeという仕組みがあります。
それぞれ何を表すのかは、こちらのGoogleの記事が参考になりますが
Liveness Probe: コンテナアプリケーション単体での死活状態
Readiness Probe: 依存関係のあるサービスへを含めたアプリケーションが稼働可能な状態
をそれぞれAPI経由で取得できるようにしたものを言います。
これらを設定することによって、起動に失敗したコンテナを効率的にリサイクルできたり、起動に失敗したコンテナにアクセスしないよう、トラフィックを制御できます。
Ktorでこれらを実装してみます。ここでは、特にライブラリは使用しません。
実装の方針としては、liveness probeは自分自身の死活状況をKubernetesに伝えるためなので、リクエストに対してOKを返すだけで大丈夫です。
Readiness probeの方に、依存しているサービスや接続しているデータベースなどにpingを送ります。
また期待できる時間までにレスポンスが得られなかった自体に備えて、リクエストタイムアウトもここで設定しておきましょう。
routing {
...
  get("/livez") {
      call.respond("OK") // Web serverが起動しているかどうかだけ伝えられればいいので、200をかえせばOK
  }

  get("/readyz") {
      // DBやその他の依存サービスに応じてpingを送る実装をアプリケーションの用途に応じて記述
     // SQL ClientやHTTP Clientにはリクエストタイムアウトが設定できるので、期待した時間内に接続できるか記述する
      call.respond("OK")
  }
}
これらのAPIのエンドポイントが存在することをKubernetesのコントロールプレーンに伝える必要があります。
Deploymentの定義に以下を追記します。
これらには、リクエストを処理可能になるまでの時間も設定できるので、初回起動に時間がかかる場合でも想定する経過時間を入れておけば誤検知しない様にできます。
...
livenessProbe:
  httpGet:
    path: /livez
    port: 8080
readinessProbe:
  httpGet:
    path: /readyz
    port: 8080
  initialDelaySeconds: 15 # コンテナが起動して15秒後にreadiness probeに聞きに来る、defaultは0
  periodSeconds: 20 # 20秒に一回
  timeoutSeconds: 5 # 5秒以内に結果が帰ってくることを期待
  successThreshold: 1 # 1回成功すれば起動成功と判定
  failureThreshold: 3 # 3回連続失敗すればpodが再起動される
...
以上で設定は完了です。エンドポイント内にsleepなどを入れたり、各種パラメータを変えて振る舞いを確認してみてください。
また、今回は言及までにとどめますが、異常を検知した場合、PrometheusのAlertmanagerなどを利用して、通知する仕組みを構築しておきましょう。
施策3. Micrometerの設定
上記の2つを導入する事によって、かなりオブザーバビリティは向上したかと思います。またKubernetesではPod, Nodeレベルで監視もできると思いますが、アプリケーションのランタイムレベルの監視が不十分です。
一般的にKotlinのアプリケーションはJVM上で動作していて、JVM上のCPUやメモリ等の使用量やガベージコレクションの挙動を監視することによって、ランタイムを外形監視することができます。
それによって、意図しないランタイム起因のパフォーマンスの低下などを捉える事ができます。
では、マイクロサービスアーキテクチャではどのように導入するのが良いでしょうか?
モノリスであれば、動作させるサーバにエージェントを入れることで比較的シンプルに導入できるはずです。一方でコンテナが生成、消滅を繰り返すKubernetesでエージェントの導入はあまり現実的ではありません。
KtorはMicrometerというJava界隈ではデファクトなメトリクス取得の仕組みを、Prometheusで収集できるプラグインがあります。
冒頭で説明した、プロジェクトをテンプレートから作成する際に以下のパッケージとソースコードがプロジェクトに追加されます。
    implementation("io.ktor:ktor-server-metrics-micrometer-jvm:$ktor_version")
    implementation("io.micrometer:micrometer-registry-prometheus:$prometeus_version")
    val appMicrometerRegistry = PrometheusMeterRegistry(PrometheusConfig.DEFAULT)

    install(MicrometerMetrics) {
        registry = appMicrometerRegistry
    }
    routing {
        get("/metrics-micrometer") {
            call.respond(appMicrometerRegistry.scrape())
        }
    }
これらをKubernetesの設定ファイル上で提示すれば、勝手にPrometheusがエンドポイントを叩いてデータを集積してくれます。
kind: Service
metadata:
  name: backend
  namespace: sample
+  annotations:
+    prometheus.io/scrape: 'true'
+    prometheus.io/path: '/metrics-micrometer'
+    prometheus.io/port: '8080'
更にマーケットプレイスに公開されているGrafanaにダッシュボードを追加する事によって非常に簡単にJVMのパフォーマンスを可視化することができ、アプリケーションの透明性を上げることができます。
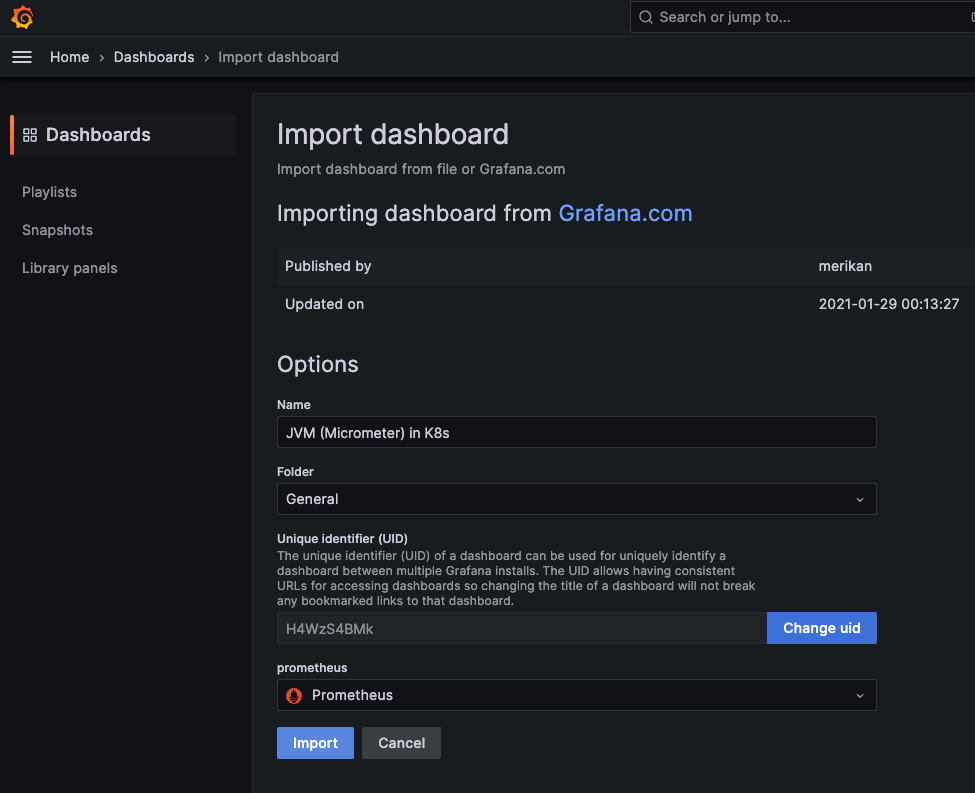
マーケットプレイスからIDをコピペして持ってくるだけで登録可能

メモリ、CPU、ガベコレなどがpod単位で表示する事が可能
またこれらのメトリクスからアプリケーションが常時どれくらいのCPUやメモリを利用するのかを監視して、コンテナのCPUリソースを設定することによってKubernetesクラスタ全体のリソース使用の効率化にも繋がります。
(これらのリソースの設定は、アプリケーションを正しくスケールアウトさせるためにも必要となってきます)
resources:
  requests:
    memory: "512Mi"
    cpu: "500m"
  limits:
    memory: "512Mi"
    cpu: "750m"
最後に
Ktorというwebフレームワークには、プラグインベースで、既存のアプリケーションの動作を大きく変更することなく、非機能要件を向上させる事がおわかりいただけたと思います。
複雑性が増したシステムでは、一箇所でも死角を作ってしまうと、バグの原因を検証するために立てた仮説が、検証できず迷宮入りしてしまいます。
どんなアーキテクチャであっても不具合が起こった時に備えて常に死角を減らす努力をすることが大事です。
今回取り上げた内容で、マイクロサービスアプリケーションのWebフレームワークのオブザーバビリティの機能に関してご紹介できたかと思います。
もし今後マイクロサービスを採用したいとお考えの方で、フレームワークの選定に迷われている方は、これらの機能があるかどうかも技術選定のポイントとして加えたいですね。
他にもマイクロサービスを構成し、円滑に運用する上でのベストプラクティスとしてGitOpsの実践, サービス間の認証認可、負荷分散などが必要になってきますが、それはまた別の機会にご紹介できたらと思います。
最後に当社では様々なポジションで採用していますので、ご興味あればまずはカジュアル面談からどうぞ。
(参考)環境設定とサンプルコード
上記の解説をお手元で再現するにあたって、Javaの実行環境と、Kubernetesを有効化したDocker Desktop、Helmが動作することを前提としています。
これらはMac / Linuxで動作を確認しております。(Windowsをお使いの方はWSL2をご利用ください。)
Kubernetesがお手元の端末の場合を想定しています。クラウド上にある場合は適宜読み替えてください。
この記事では、ログ収集ツールとしてLoki, メトリクス収集ツールとしてPrometheus、可視化ツールとしてGrafanaを利用しています。
ソースはテンプレートからゼロから作成し、Jibというツールを用いてビルドタスクを実行することでDockerイメージを作成することとします。
以下の例では、Kotlin Script(.kts)のGradleでビルドタスクを実行するものとします。
またコンテナをクラスタにデプロイするためのSkaffoldというツールもインストールしておくと、自動でDocker tagの設定からKubernetesへのデプロイを実行できます。
helm repo add grafana https://grafana.github.io/helm-charts
helm repo add prometheus-community https://prometheus-community.github.io/helm-charts
helm repo update
helm install prometheus prometheus-community/prometheus -n prometheus --create-namespace
helm install loki grafana/loki-stack -n grafana --create-namespace
helm install grafana grafana/grafana -n grafana
export POD_NAME=$(kubectl get pods --namespace grafana -l "app.kubernetes.io/name=grafana,app.kubernetes.io/instance=grafana" -o jsonpath="{.items[0].metadata.name}")
kubectl --namespace grafana port-forward $POD_NAME 3000
# 上記コマンドは実行後閉じないように別のターミナルを開いて
kubectl get secret --namespace grafana grafana -o jsonpath="{.data.admin-password}" | base64 --decode #| pbcopy # Macをお使いの方はこちらをコメントアウトするとクリップボードにパスワードがコピーされます
これでブラウザからhttp://localhost:3000のGrafanaにアクセスして、ユーザID: admin, パスワードは最後のコマンドの結果を入力してログインし、 データソースをそれぞれ設定します。
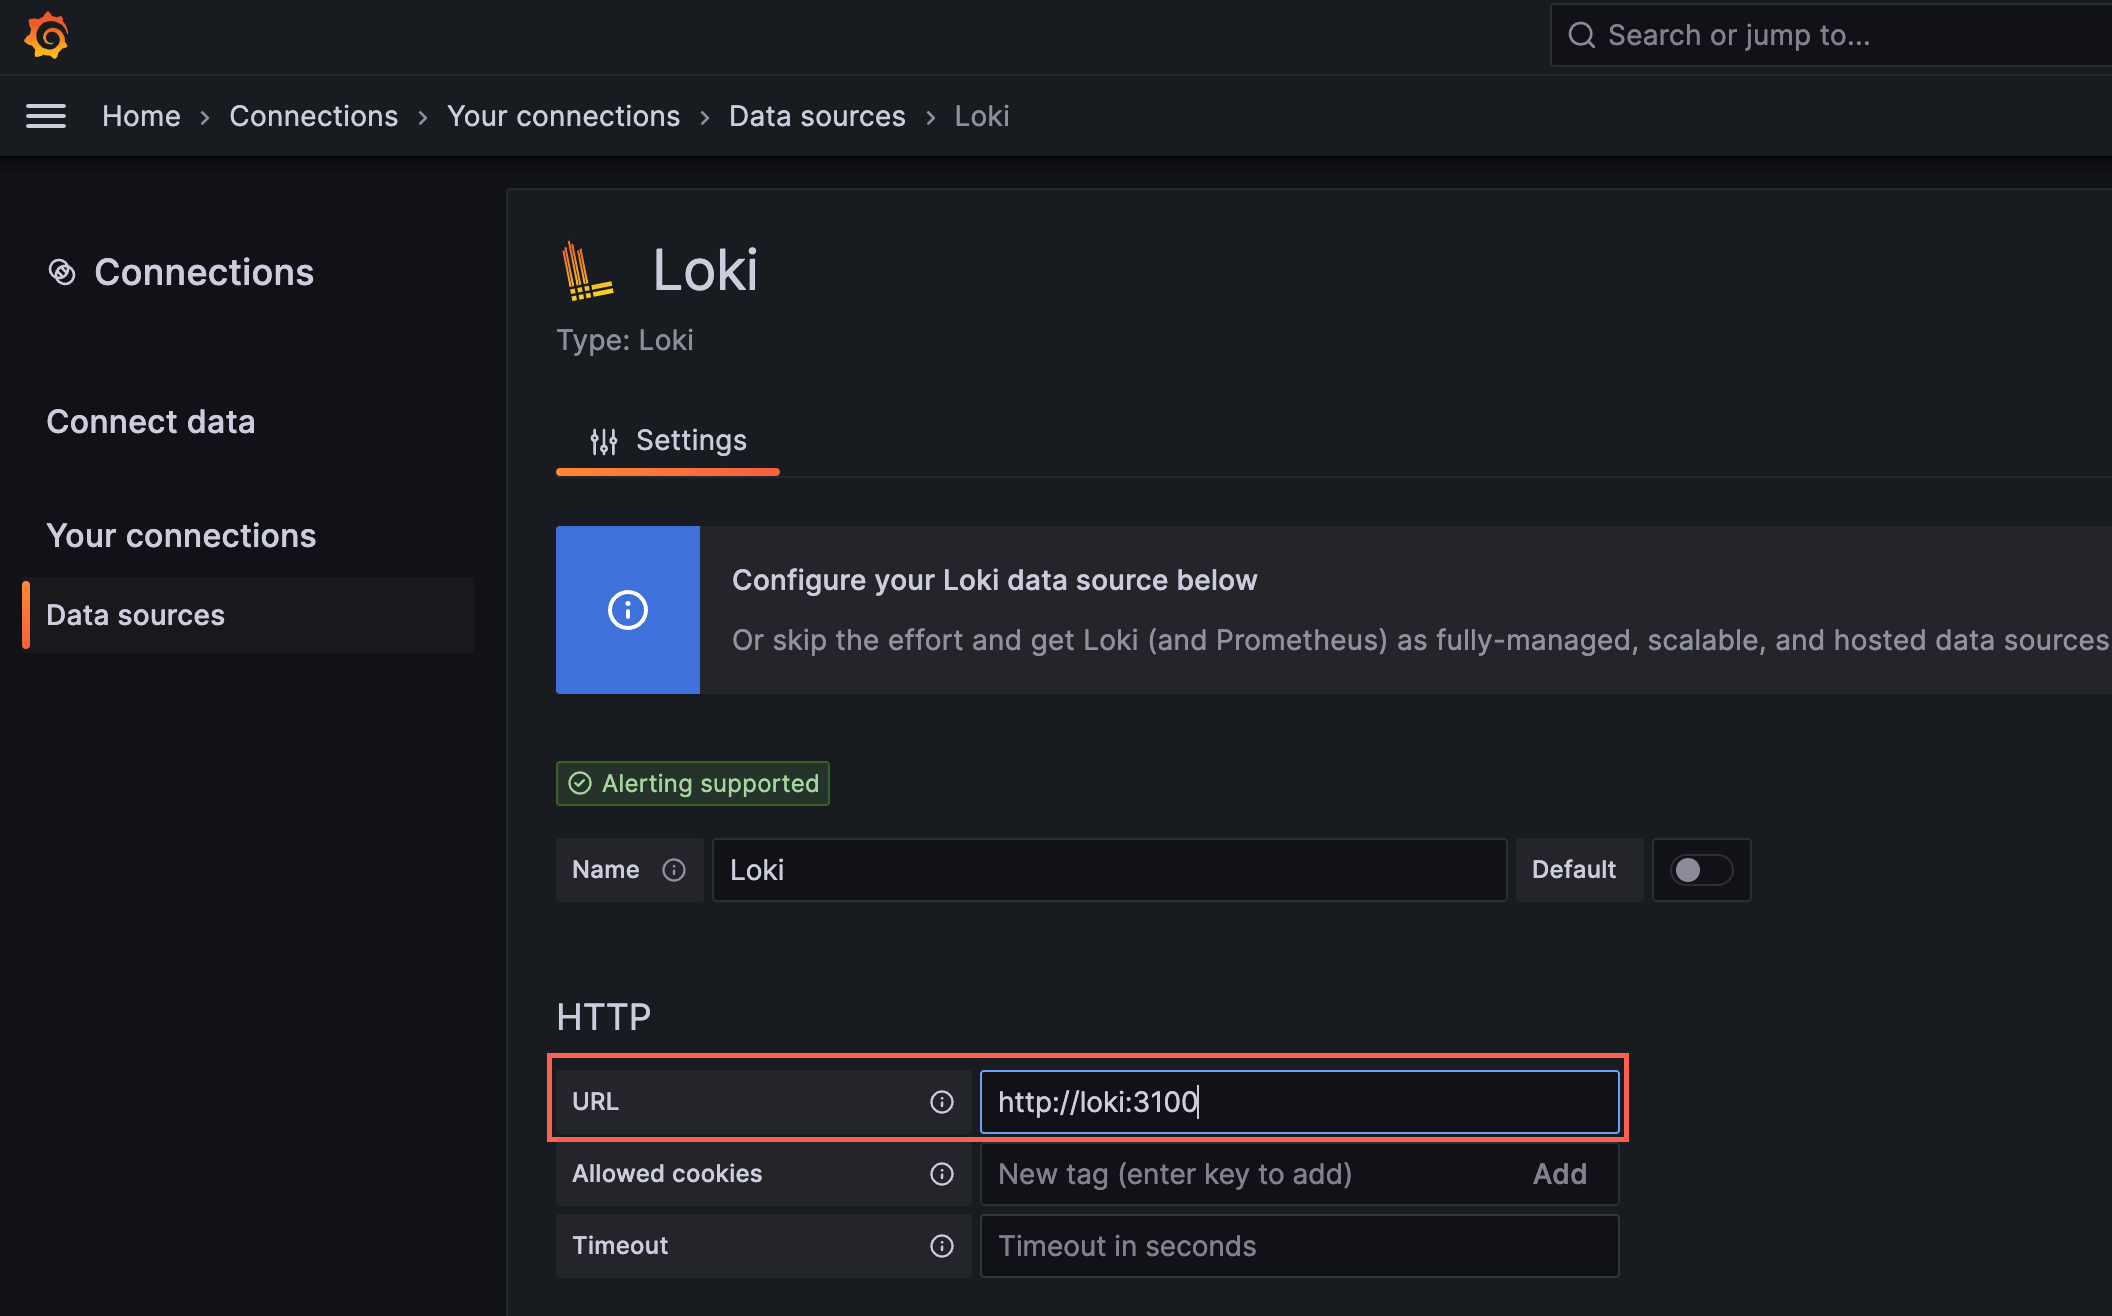
Loki: http://loki:3100
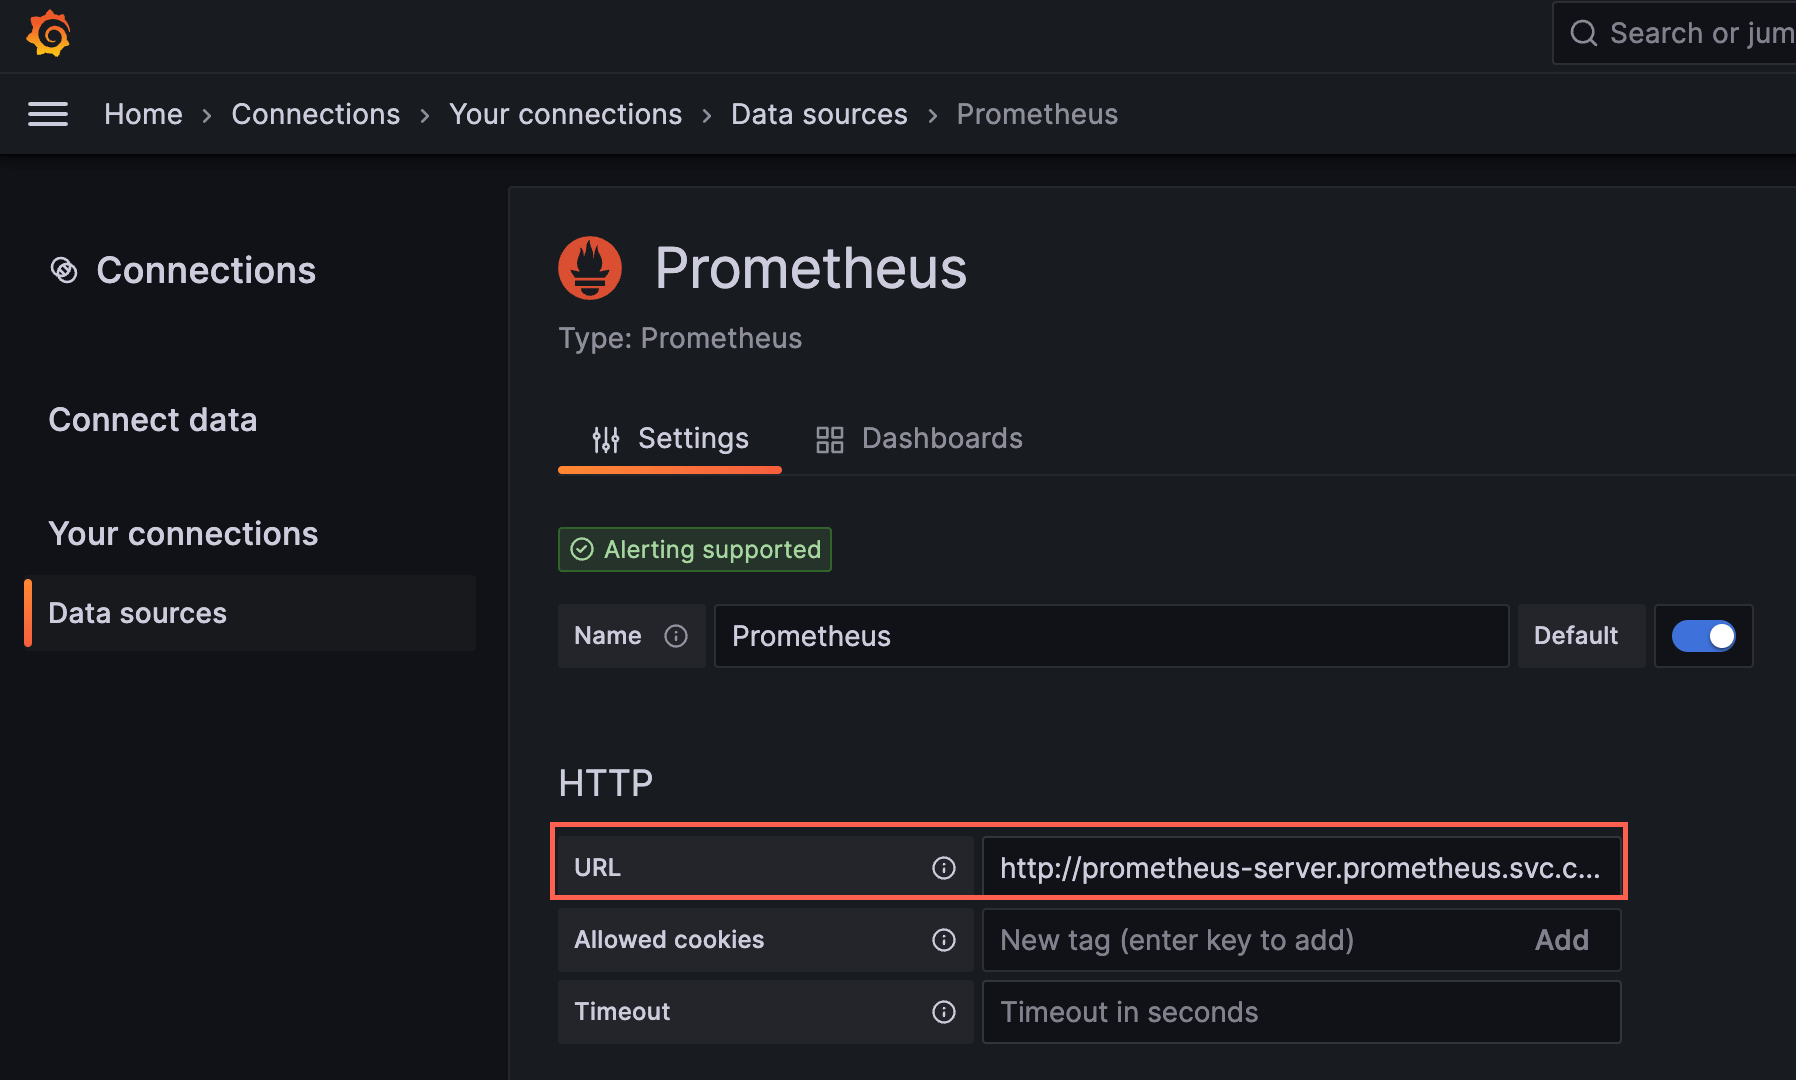
Prometheus: http://prometheus-server.prometheus.svc.cluster.local
これで監視ツールの方は完了です。
コードの方はInetelliJで新規のKtorのアプリケーションをテンプレートから新規作成します。IntelliJから以下を選びます。
VS Codeなどをお使いの方はこちらのサイトからダウンロード可能です。
今回はフロントエンド、バックエンド共に同じコンテナイメージを用意するので、生成するプロジェクトは一つでOKです。

以下のDockerでビルドするためのJibの設定をいれてJibのGradleタスク ./gradlew jibDockerBuild でビルドできることを確認してください。
plugins {
    application
    kotlin("jvm") version "1.8.21"
    id("io.ktor.plugin") version "2.3.1"
+   id("com.google.cloud.tools.jib") version "3.3.1"
}
...


+ jib {
+    from {
+        platforms {
+            platform {
+                architecture = "amd64"
+                os = "linux"
+            }
+        }
+    }
+    to {
+        image = "sample-jib-image"
+        tags = setOf("alpha")
+    }
+    container {
+        jvmFlags = listOf("-Xms512m", "-Xmx512m")
+        mainClass = "com.example.ApplicationKt"
+        ports = listOf("80", "8080")
+    }
+}
今回追加したログを注視できるよう、Logbackのログレベルを変更しておきましょう。また監視用に追加したエンドポイントはノイズになってしまうので、表示されないようにしてしまいます。
-    <root level="trace">
+    <root level="info">
    install(CallLogging) {
        level = Level.INFO
-       filter { call -> call.request.path().startsWith("/") }
+       filter { call -> !arrayOf("/livez", "/readyz", "/metrics-micrometer")
+            .any { it.equals(call.request.path(), ignoreCase = true) }}
        callIdMdc("call-id")
    }
ここまでソースに追記したら、以下のコマンドでコンテナイメージがKubernetes上にデプロイされてアプリケーションを実行されます。Grafana上にログやメトリクスが流れてくるか確認します。
services.yaml ファイルは少々長いので一番最後に記載しております。
./gradlew jibDockerBuild && kubectl apply -f services.yaml # Buildするたびにdocker tagを修正する
# Skaffoldをインストールしている方は以下のコマンドで
skaffold init # yamlファイルが生成される
skaffold run # 一回だけビルドデプロイ作業を実行
skaffold dev # ソースコード修正するたびに継続的にビルド、デプロイ作業が走る
SkaffoldファイルにportForwardを記述しておくと自動でlocalhost:8000にアクセスできるようになって便利です
apiVersion: skaffold/v4beta5
kind: Config
metadata:
  name: observability
build:
  artifacts:
    - image: sample-jib-image
-    buildpacks: # ビルドが遅いので消す
-        builder: gcr.io/buildpacks/builder:v1
+      jib: {} # JAVA_HOMEに正しいPATHが入っていないと実行エラーになる可能性あり
manifests:
  rawYaml:
    - service.yaml
+portForward:
+  - resourceType: service
+    resourceName: frontend
+    namespace: sample
+    port: 8000
+    localPort: 8000
apiVersion: v1
kind: Namespace
metadata:
  name: sample
---
apiVersion: apps/v1
kind: Deployment
metadata:
  name: backend-deployment
  namespace: sample
spec:
  replicas: 2
  selector:
    matchLabels:
      app: backend
  template:
    metadata:
      labels:
        app: backend
    spec:
      containers:
        - name: backend
          image: sample-jib-image:alpha
          imagePullPolicy: IfNotPresent
          ports:
            - containerPort: 8080
          # Liveness probe, readiness probeを実装するまでコメントアウトしておいてください
          # livenessProbe:
          #   httpGet:
          #     path: /livez
          #     port: 8080
          #   initialDelaySeconds: 15
          #   periodSeconds: 20
          #   timeoutSeconds: 5
          #   successThreshold: 1
          #   failureThreshold: 3
          # readinessProbe:
          #   httpGet:
          #     path: /readyz
          #     port: 8080
          resources:
            requests:
              memory: "512Mi"
              cpu: "500m"
            limits:
              memory: "512Mi"
              cpu: "750m"
---
apiVersion: v1
kind: Service
metadata:
  name: backend
  namespace: sample
  annotations:
    prometheus.io/scrape: 'true'
    prometheus.io/path: '/metrics-micrometer'
    prometheus.io/port: '8080'
spec:
  selector:
    app: backend
  ports:
    - protocol: TCP
      port: 8000
      targetPort: 8080
  type: ClusterIP
---
apiVersion: apps/v1
kind: Deployment
metadata:
  name: frontend-deployment
  namespace: sample
spec:
  replicas: 2
  selector:
    matchLabels:
      app: frontend
  template:
    metadata:
      labels:
        app: frontend
    spec:
      containers:
        - name: frontend
          image: sample-jib-image:alpha
          imagePullPolicy: IfNotPresent
          ports:
            - containerPort: 8080
          # Liveness probe, readiness probeを実装するまでコメントアウトしておいてください
          # livenessProbe:
          #   httpGet:
          #     path: /livez
          #     port: 8080
          #   initialDelaySeconds: 15
          #   periodSeconds: 20
          #   timeoutSeconds: 5
          #   successThreshold: 1
          #   failureThreshold: 3
          # readinessProbe:
          #   httpGet:
          #     path: /readyz
          #     port: 8080
          resources:
            requests:
              memory: "512Mi"
              cpu: "500m"
            limits:
              memory: "512Mi"
              cpu: "750m"
---
apiVersion: v1
kind: Service
metadata:
  name: frontend
  namespace: sample
  annotations:
    prometheus.io/scrape: 'true'
    prometheus.io/path: '/metrics-micrometer'
    prometheus.io/port: '8080'
spec:
  selector:
    app: frontend
  ports:
    - protocol: TCP
      port: 8000
      targetPort: 8080
  type: LoadBalancer
ここまでご覧いただきありがとうございました。以下のコマンドで今回作成したリソースを消しておきましょう。
skaffold delete
docker rmi $(docker images | grep 'sample-jib-image')
# kubectl delete all --all -n sample # skaffoldを実行していない場合
helm uninstall grafana -n grafana
helm uninstall loki -n grafana
helm uninstall prometheus -n prometheus
関連記事 | Related Posts

Kotlin / Ktorで作るクラウドネイティブなマイクロサービス(オブザーバビリティ編)

Introducing the Woven Payment Solution Development Group
![Cover Image for [Server-side Kotlin] Using Moshi for Ktor serializer](/assets/common/thumbnail_default_×2.png)
[Server-side Kotlin] Using Moshi for Ktor serializer

Introduction to Istio for Non-Infrastructure Engineers

Getting Started with Prometheus, Grafana, and X-Ray for Observability (O11y)

Kotlin Multiplatform Mobile (KMM)を使ったモバイルアプリ開発
We are hiring!
【クラウドエンジニア】Cloud Infrastructure G/東京・大阪・福岡
KINTO Tech BlogWantedlyストーリーCloud InfrastructureグループについてAWSを主としたクラウドインフラの設計、構築、運用を主に担当しています。
【ソフトウェアエンジニア(リーダークラス)】共通サービス開発G/東京・大阪・福岡
共通サービス開発グループについてWebサービスやモバイルアプリの開発において、必要となる共通機能=会員プラットフォームや決済プラットフォームなどの企画・開発を手がけるグループです。KINTOの名前が付くサービスやKINTOに関わりのあるサービスを同一のユーザーアカウントに対して提供し、より良いユーザー体験を実現できるよう、様々な共通機能や顧客基盤を構築していくことを目的としています。

