Hello Android Car App!

この記事は KINTOテクノロジーズアドベントカレンダー2024 の5日目の記事です🎅🎄
KINTOテクノロジーズ株式会社のモバイル開発グループでAndroidエンジニアをしています、大沼です。
普段はモビリティサービス「my route」アプリの開発に従事しています。
本記事では、Android Automotive OSをビルドする手順とAndroid AutomotiveアプリおよびAutoアプリなど車載向けアプリの開発方法をご紹介します。
Android Automotive OSをRaspberry Piに入れて起動する
Android Automotive OSとは
Android Automotive は AOSPの枠組みに含まれるAndroid ベースの車載用プラットフォームであり、プリインストールされた IVI システムの Android アプリに加えて、セカンドパーティとサードパーティの Android アプリも動作します。
詳しくは公式のドキュメントをご覧ください。→ https://developer.android.com/training/cars?hl=ja#automotive-os
AOSPとは
AOSPはAndroid Open Source Projectの略で、Android OSを構成するすべての要素がオープンソースで公開されています。
Googleの開発した最新のOSは一定の非公開期間を経たのち、オープンソースとして公開されます。この公開されたOSをベースに、デバイス開発元が用途に合わせた機能追加や修正を加え、自社のスマートフォンやタブレットなど各種端末にOSを搭載します。
Android Automotive OSをビルドするために準備するもの
- PC *後述のビルドするためのハードウェア要件を満たしている必要があります
- ディスプレイ *タッチモニターがベター
- RaspberryPi 4B
- MicroSD
16GBあればいいはず - MicroHDMI-HDMIケーブル
ビルドするためのハードウェア要件
- OS : Ubuntu 22.04
- Intel Gold 6226R (16コア、32スレッド)
- 16 GB 以上の RAM
- HD: 1TB
* 注意: Windows または MacOS 上でのビルドはサポートされていません。
AWS EC2で環境つくってビルドしようとしたけど無料枠で上記スペックは用意できないので諦めました。
ビルド環境の構築
ビルドに必要なツールをインストールします。
sudo apt-get install git-core gnupg flex bison build-essential zip curl zlib1g-dev libc6-dev-i386 libncurses5 lib32ncurses5-dev x11proto-core-dev libx11-dev lib32z1-dev libgl1-mesa-dev libxml2-utils xsltproc unzip fontconfig
Repoとlocal_manifestの追加
Android OSは多くのソースコードの群で構成されています。
RepoはAndroid ソースコードのチェックアウトに利用します。
コンポーネントの結合は疎結合で、それぞれが独立したGitレポジトリで管理・開発がされています。
これら多くのGitレポジトリをManifestファイルと呼ばれる管理ファイルをもとに管理するのがRepoというツールになります。
## Repo ランチャーをインストール
repo init -u [https://android.googlesource.com/platform/manifest](https://android.googlesource.com/platform/manifest) -b android-13.0.0\_r35 --depth=1
## local_manifestの追加
git clone [https://github.com/grapeup/aaos\_local\_manifest.git](https://github.com/grapeup/aaos_local_manifest.git) .repo/local\_manifests
.repo/local_manifests/manifest_brcm_rpi4.xmlの46行目<!-- FFmpeg -->以下にdav1dを追記
## local_manifestに不足しているdav1dライブラリを追加

<!-- FFmpeg -->
  <project path="external/dav1d" name="raspberry-vanilla/android_external_dav1d" remote="github" revision="android-13.0" />
コンパイル
. build/envsetup.sh
lunch aosp_rpi4-userdebug
make bootimage systemimage vendorimage -j$(nproc)
イメージの書き込みとデプロイ
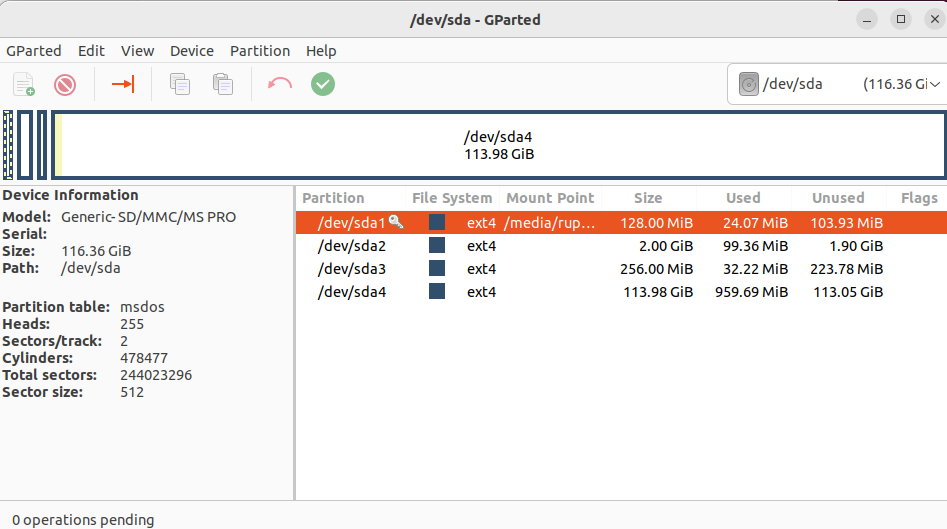
MicroSDをクリーンします。
sudo umount /dev/sdb*
sudo wipefs -a /dev/sdb*
sudo wipefs -a /dev/sdb
次にMicroSDに4つのパーティションテーブルを作成しイメージ書き込みします。
MicroSDに書き込むイメージはboot.img, system.img, vendor.imgの3つです。
sudo dd if=boot.img of=/dev/sdb1 bs=1Mというコマンドで書き込みできると思ってトライしましたが、手順が多く難しかったのでGPartedというパーティション編集ソフトを使いました。
Android Automotive OSの起動
MicroSDをRaspberry Piに刺して起動します。Raspberry Piにはタッチモニターを接続しておくとマウスがなくても操作が可能なので便利です。
私は手持ちのタッチモニターがなく、泣く泣くPC用モニターに繋げています。
Android Auto や Android Automotive OS で動く車載向けアプリを開発する
次にAndroidで車載アプリを実装、デバッグする上で基礎となるところをご紹介します。
Android Autoはスマートフォンと連携して車載ディスプレイにアプリを表示するのに対し、 Android Automotive OSは車載システム自体にAndroidが組み込まれており、アプリを直接インストールできます。
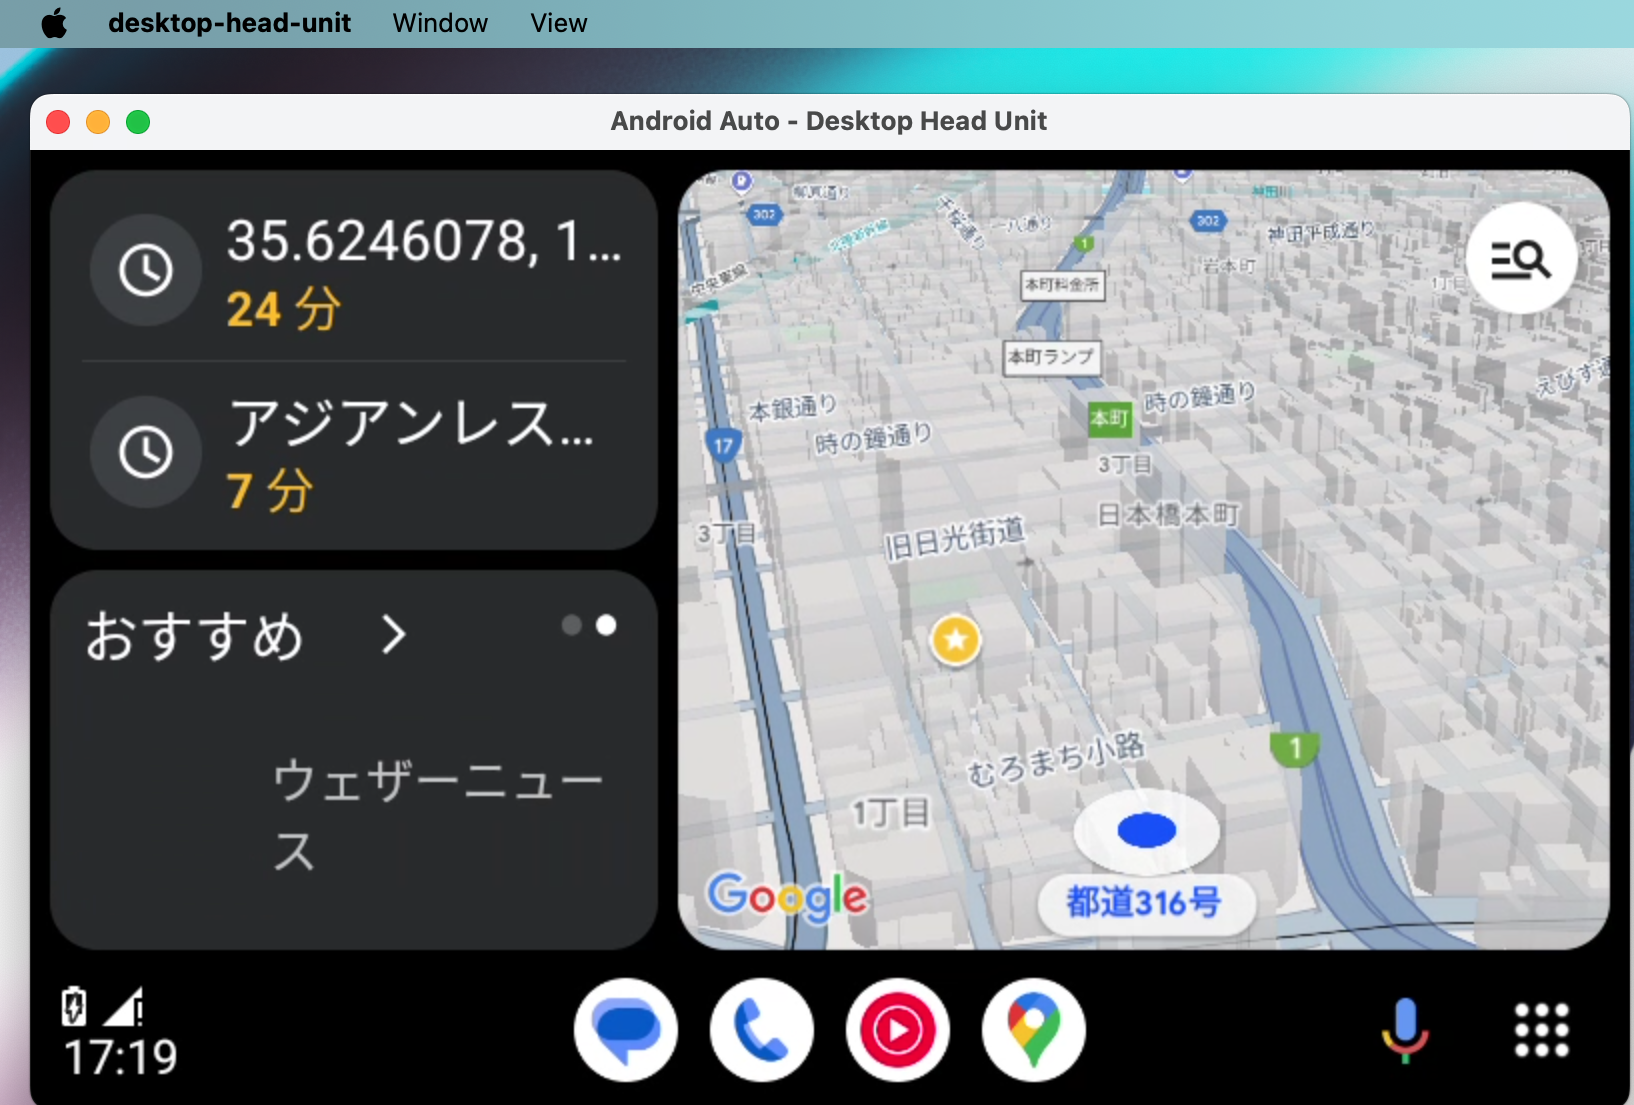
今回は経路案内アプリを試しに実装しました。
以下開発環境はMacです。
サポートされるアプリのカテゴリと対応するAndroidのAPI
| カテゴリ | 説明 | 対応する Android API |
|---|---|---|
| メディア | 音楽、ポッドキャスト、オーディオブック向けのアプリ | MediaBrowserService を使用して、コンテンツのブラウジングや再生制御を行います。 MediaSession を使用して、再生状態やメタデータをシステムに通知します。 |
| ナビゲーション | 音声案内や視覚ガイドによるターンバイターンの道案内 | CarAppLibrary の NavigationManager を使用して、ナビゲーションの開始、終了、 目的地設定、 ターンバイターンの案内などを制御します。 |
| ポイント・オブ・インタレスト (POI) | 駐車場、EV充電スポット、ガソリンスタンドなどの場所を見つけるアプリ | PlaceClient を使用して、場所の検索、詳細情報の取得、 プレイスオートコンプリートなどの機能を実装します。 CarAppLibrary の PlaceListMapTemplate を使用して、POI を地図上に表示します。 |
メッセージング(Android Autoのみ) |
音声入力によるハンズフリーメッセージの返信 | CarAppLibrary の MessagingManager を使用して、メッセージの送受信、音声入力、 テンプレートメッセージの送信などを制御します。 |
| ゲーム | 駐車時のエンターテイメント用アプリ | CarAppLibrary の ScreenManager を使用して、駐車時にゲーム画面を表示します。 InputManager を使用して、ゲームのコントロール入力を受け取ります。 |
| ブラウザ & ビデオ | ブラウザの統合やビデオ再生機能(AAOS特有、 駐車中に使用されることが多い) | CarAppLibrary の WebTemplate を使用して、Web コンテンツを表示します。VideoTemplate を使用して、ビデオコンテンツを再生します。 これらのテンプレートは、 駐車時にのみ使用することが推奨されます。 |
補足
- 公式ドキュメントの対応表の要点を抜粋しました。
- 毎年新しいカテゴリが追加されているため、まだアプリを広くリリースできない場合でも、将来的にはリリースできるようになる可能性があります。
- CarAppLibrary は、Android Auto および Android Automotive OS アプリ開発のための Jetpack ライブラリです。
- PlaceClient は、Google Places API を使用するクライアントです。
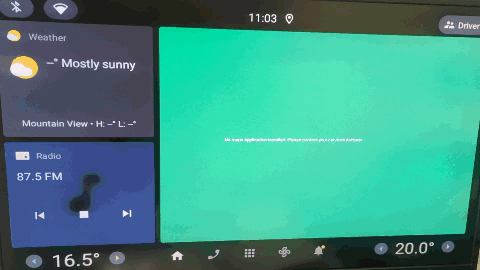
Desktop Head Unit (DHU)
-
DHUとは?
Android Autoの環境をデスクトップでエミュレートするツールです。
実際の車載端末を使わずに、車内体験をシミュレーションできます。 -
なぜDHUを使うのか?
アプリが車載環境でどのように動作し、表示されるかをテストできます。
UI/UXが運転者の注意を逸らさないようにガイドラインに準拠しているかをデバッグし確認できます。
DHUを起動する
DHUを起動する手順を行うために以下が必要です。
- Macbook
- Android デバイス
- SDK ManagerでAndroid Auto Desktop Head Unit Emulatorをインストールする
- Library/Android/sdk/extras/google/auto に desktop-head-unit があることを確認する
- desktop-head-unit に権限を与えます
chmod +x ./desktop-head-unit
- Android デバイスの同じポート番号にソケット接続を転送します。
adb forward tcp:5277 tcp:5277
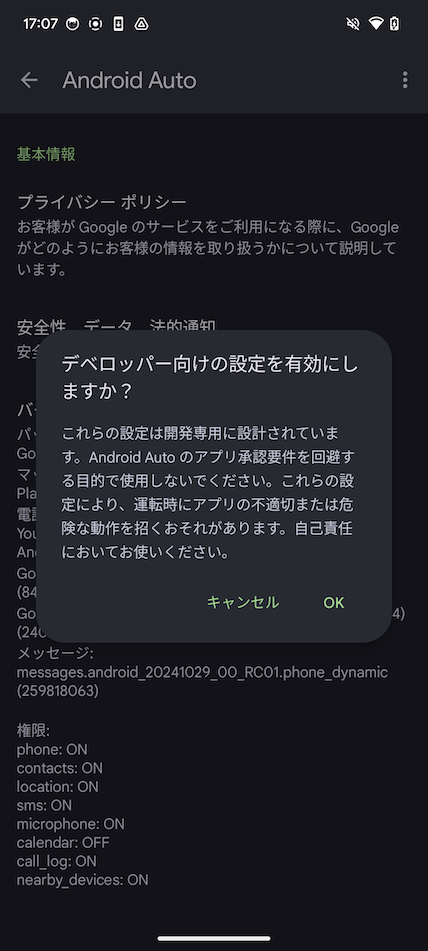
- Android デバイスでAutoの設定を開きます
[アプリ] > [Android Auto] > [詳細設定] > [アプリ内のその他の設定] をタップします。
バージョンと権限情報を10回ほどタップして開発モードにします。
- 起動します
./desktop-head-unit --usb
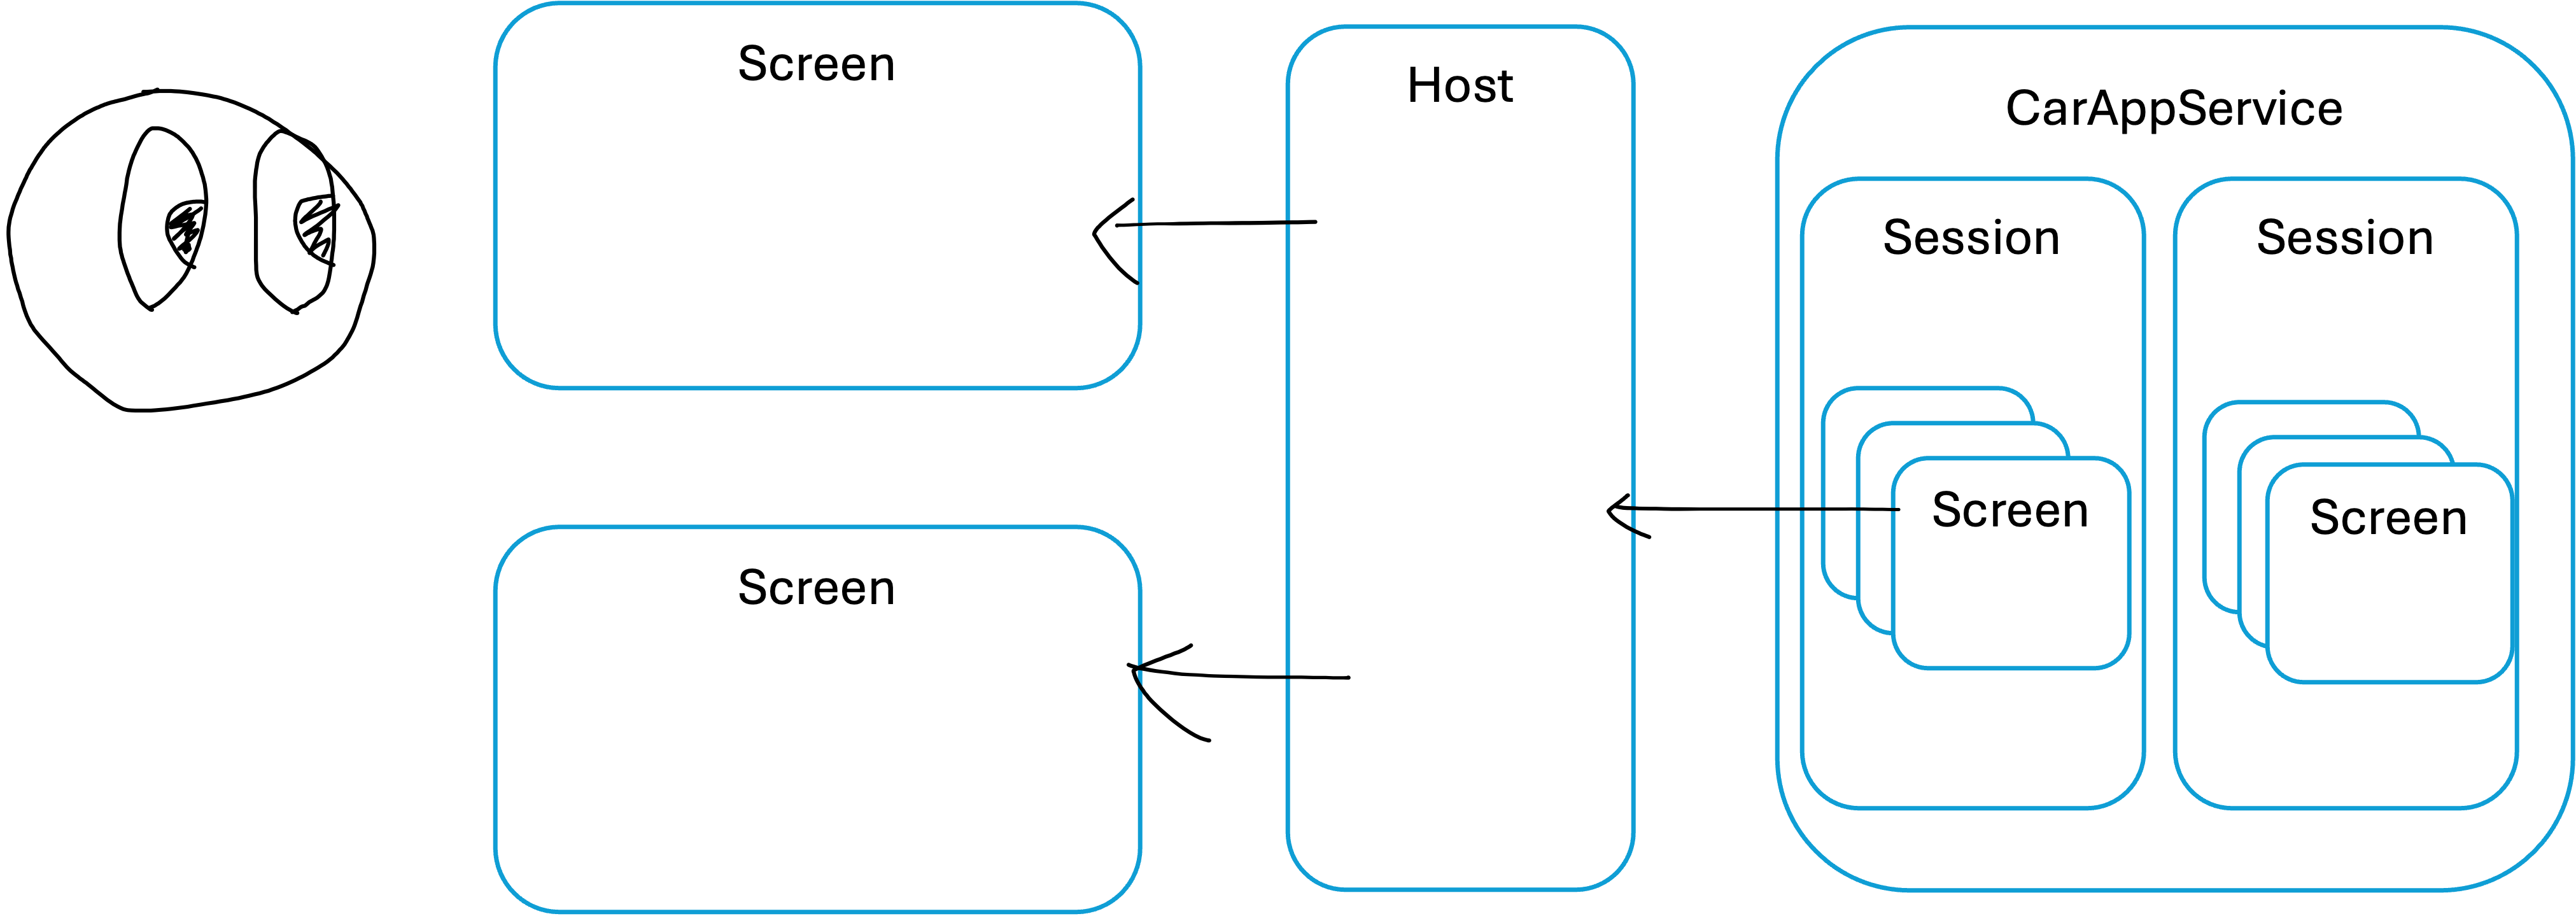
Hostについて
Android Auto や Android Automotive対応車で作成したアプリを動かすとき、アプリは車と直接やりとりする訳ではありません。このときの接続先はAndroid デバイスに入っている Android Auto アプリです。
DHUのインストール手順で、USB接続した実機と接続する必要があるのはこのホストの役割をする、Android Autoアプリと連携する必要があるからです。
Android Auto アプリはホストと呼ばれ、全ての Auto 対応アプリはこのホストとやりとりします。
もし Android Automotive 対応の車で動かす場合は車載器に OS が入っているので、Android Automotive がホストになります。
ライブラリ
CarAppLibrary は、Android Auto および Android Automotive OS アプリ開発のための Jetpack ライブラリです。
CarAppLibrary を使用して構築されたアプリは、Auto または Automotive 上で直接実行されるのではなく、ホストアプリを介して動作します。
プロジェクトレベルbuild.gradleにCarAppLibraryのバージョンを宣言します。
buildscript {
    ext {
        car_app_library_version = '1.4.0'
    }
}
dependencies {
  ...
  implementation "androidx.car.app:app:$car_app_library_version"
  ...
}
サービス、セッションの追加
CarAppServiceを継承したクラスを追加します。
ホストによってバインドされるCarAppServiceを拡張する必要があります。
インテントフィルターで、自動車アプリのカテゴリとして androidx.car.app.category.POI を宣言する必要があります。
        <service
            android:name="com.example.places.carappservice.PlacesCarAppService"
            android:exported="true">
            <intent-filter>
                <action android:name="androidx.car.app.CarAppService" />
                <category android:name="androidx.car.app.category.POI" />
            </intent-filter>
        </service>
CarAppService抽象クラスは、onBindや onUnbindなどのオーバーライドはできません。ホストアプリとの適切な相互の運用はライブラリがよしなにやってくれてます。
createHostValidatorとonCreateSession を実装するだけです。
createHostValidatorで返すHostValidatorは、CarAppServiceがバインドされるときに参照され、ホストが信頼されていることを確認し、ホストが定義したパラメータと一致しない場合にバインドが失敗するようにします。ALLOW_ALL_HOSTS_VALIDATORは検証でのみ使えるHostValidatorです。
class PlacesCarAppService : CarAppService() {

    override fun createHostValidator(): HostValidator {
        return HostValidator.ALLOW_ALL_HOSTS_VALIDATOR
    }

    override fun onCreateSession(): Session {
        return PlacesSession()
    }
}
PlacesSessionクラスを追加します。
class PlacesSession : Session() {
    override fun onCreateScreen(intent: Intent): Screen {
        return MainScreen(carContext)
    }
}
Template
決まったテンプレートの中から選んでガイドラインに沿って実装する必要があります。
自動車向けアプリはドライバーに最適なUIでなければいけないので、UI UXが限定的になってきます。
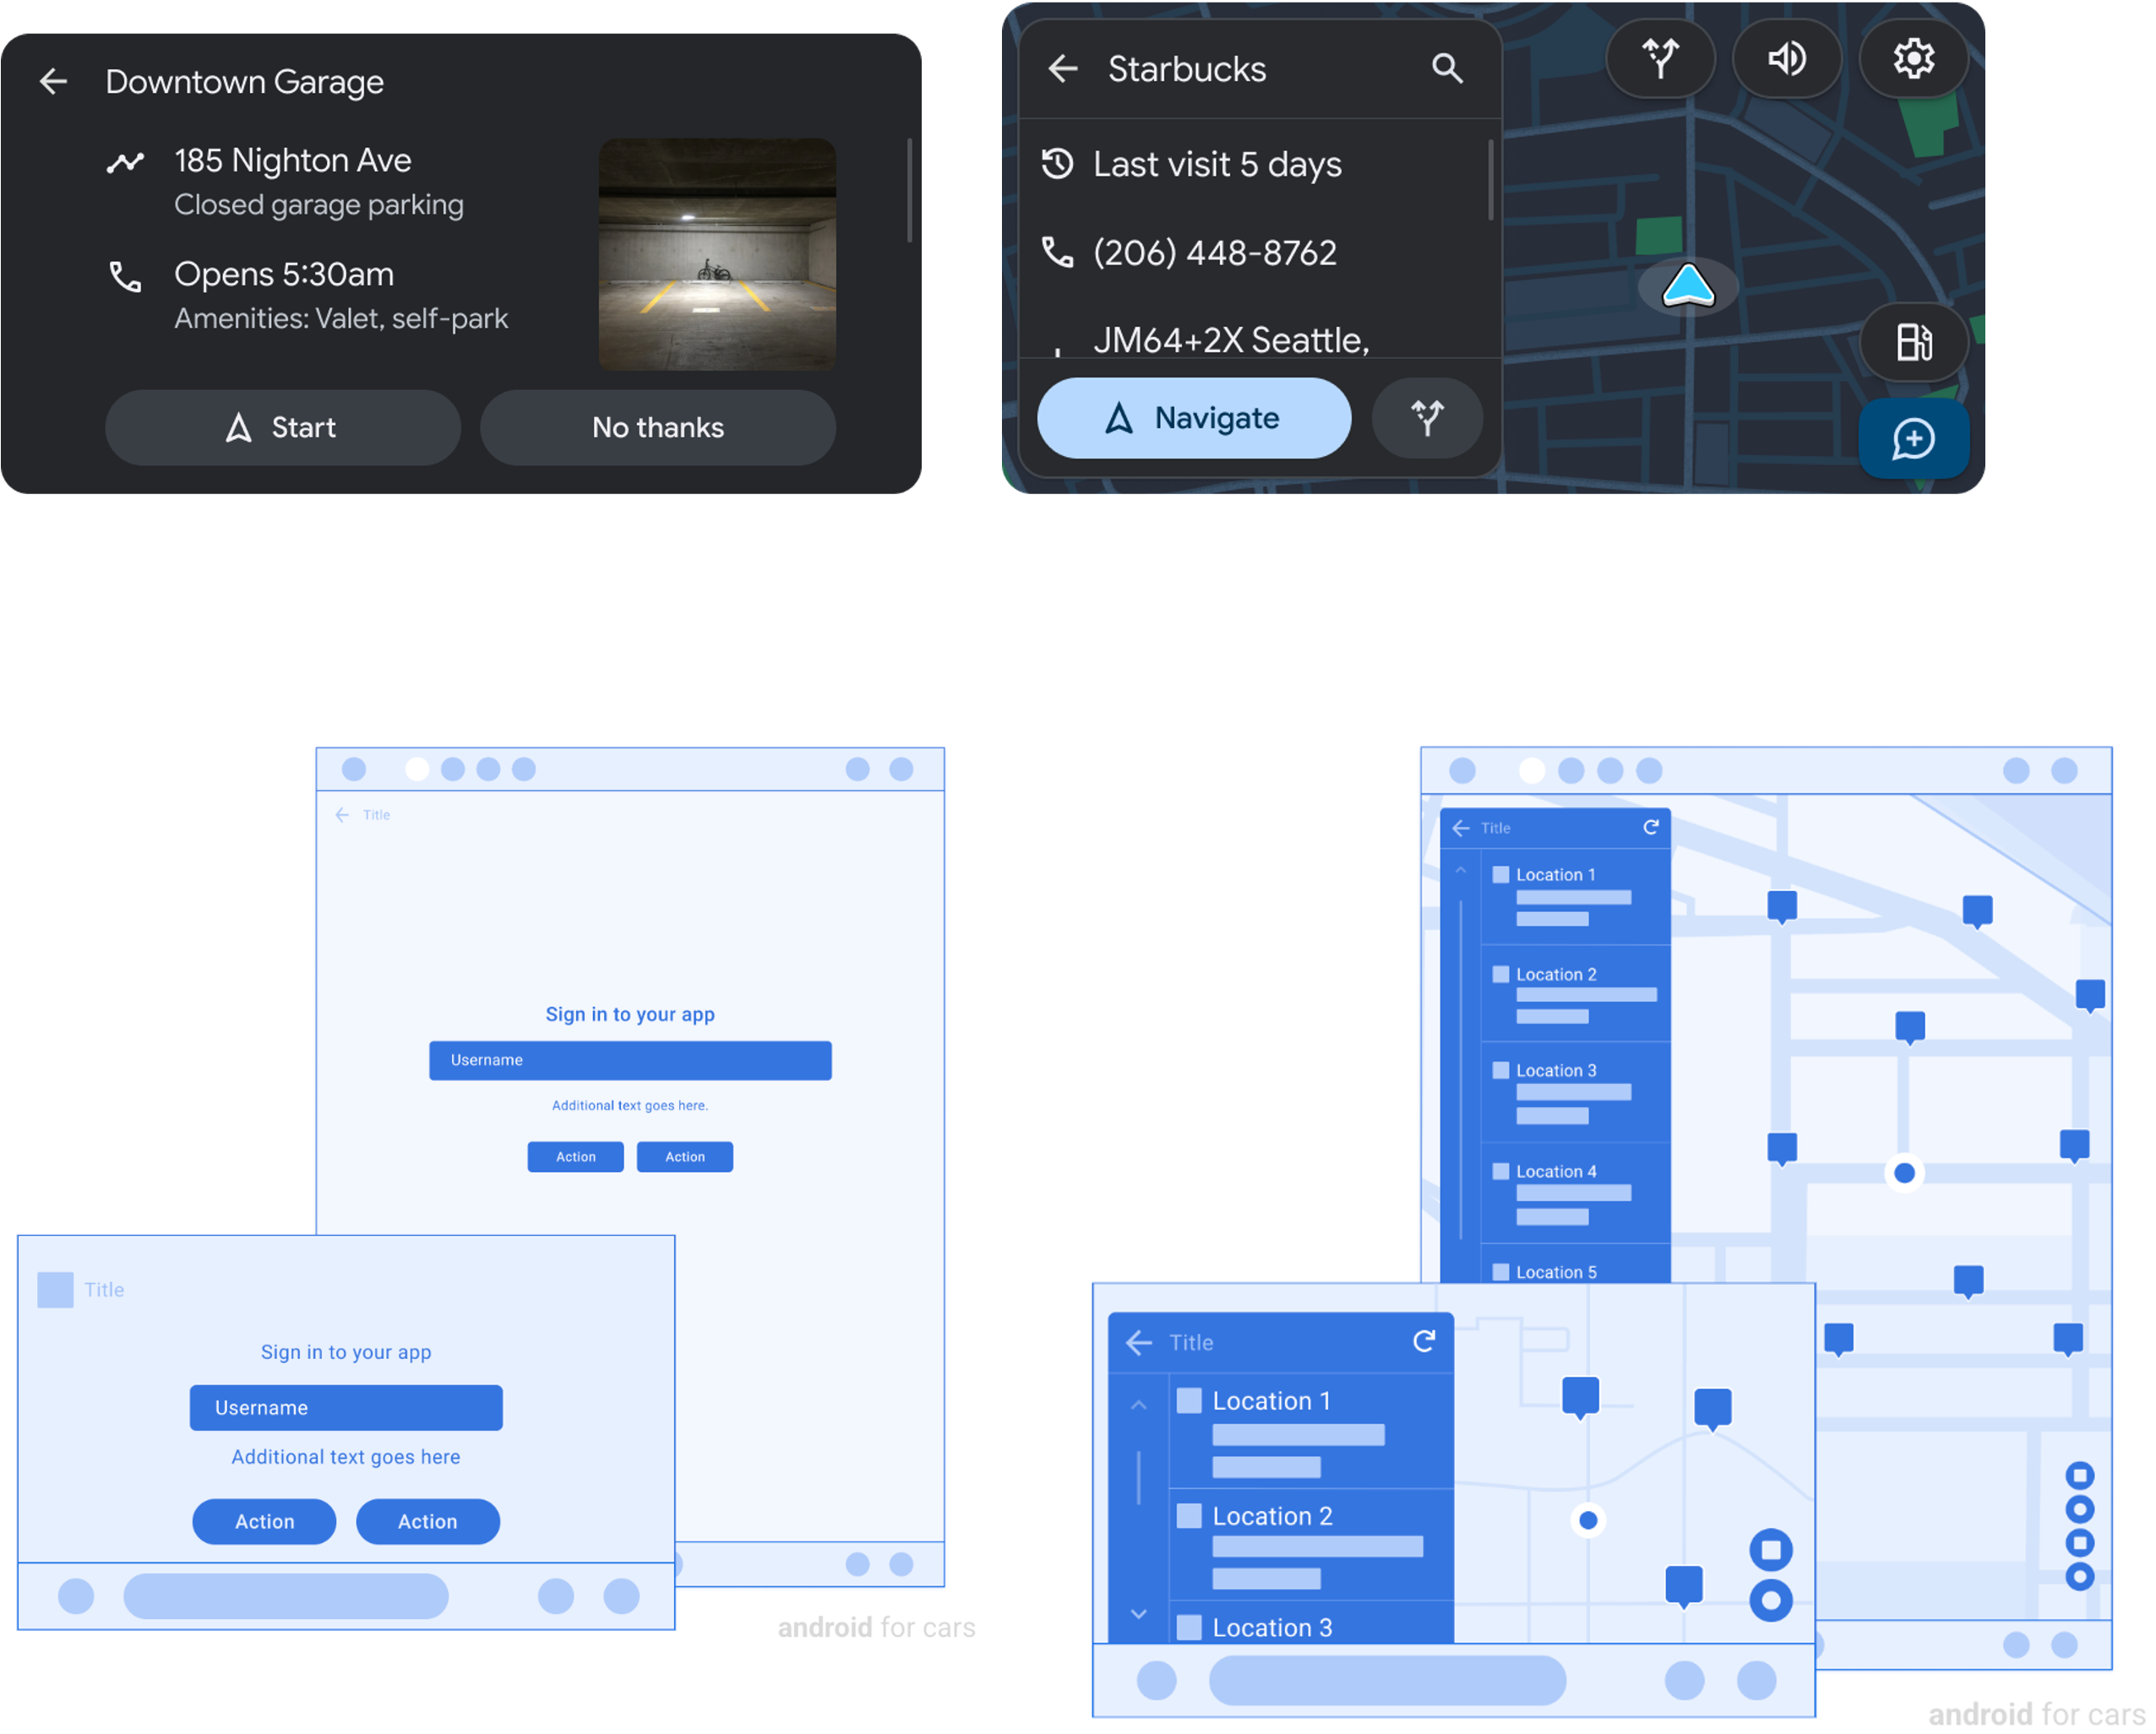
また、マップを表示するテンプレートにアクセスするために使用するパーミッションを追加します。
<uses-permission android:name="androidx.car.app.MAP_TEMPLATES" />
場所情報をリストアップする
起動したら場所のリストアップをします。
UIはComposableで実装可能です。
CarAppLibraryのScreenを継承したMainScreenを追加します。
場所の一覧とマップを表示するため、onGetTemplateでPlaceListMapTemplateを返します。TemplateはBuilderデザインパターンで実装されています。
一覧表示するアイテムをsetItemListにて渡しTemplateをビルドし返します。
一覧表示するアイテムの構築にはItemListBuilderを使います。
class MainScreen(
    carContext: CarContext,
) : Screen(carContext) {
    override fun onGetTemplate(): Template {
        val placesRepository = PlacesRepository()
        val itemListBuilder =
            ItemList.Builder()
                .setNoItemsMessage("No data")

        placesRepository.getPlaces()
            .forEach {
                itemListBuilder.addItem(
                    Row.Builder()
                        .setTitle(it.name)
                        // リスト内の各項目は、タイトルまたはテキスト行にDistanceSpanを追加する必要があります。
                        .addText(
                            SpannableString(" ").apply {
                                setSpan(
                                    DistanceSpan.create(
                                        Distance.create(Math.random() * 100, Distance.UNIT_KILOMETERS),
                                    ),
                                    0,
                                    1,
                                    Spannable.SPAN_INCLUSIVE_INCLUSIVE,
                                )
                            },
                        )
                        .setOnClickListener {
                            screenManager.push(DetailScreen(carContext = carContext, placeId = it.id))
                        }
                        .setMetadata(
                            Metadata.Builder()
                                .setPlace(
                                    Place.Builder(CarLocation.create(it.latitude, it.longitude))
                                        .setMarker(PlaceMarker.Builder().build())
                                        .build(),
                                )
                                .build(),
                        ).build(),
                )
            }

        return PlaceListMapTemplate.Builder()
            .setTitle("Places")
            .setItemList(itemListBuilder.build())
            .build()
    }
}
場所の詳細情報を表示する
PaneTemplateを使って詳細画面を実装します。
class DetailScreen(carContext: CarContext, private val placeId: Int) : Screen(carContext) {
    private var isFavorite = false

    override fun onGetTemplate(): Template {
        val place = PlacesRepository().getPlace(placeId)
            ?: return MessageTemplate.Builder("Place not found")
                .setHeaderAction(Action.BACK)
                .build()

        val navigateAction = Action.Builder()
            .setTitle("Navigate")
            .setIcon(
                CarIcon.Builder(
                    IconCompat.createWithResource(
                        carContext,
                        R.drawable.baseline_navigation_24
                    )
                ).build()
            )
            .setOnClickListener {  carContext.startCarApp(place.toIntent(CarContext.ACTION_NAVIGATE)) }
            .build()

        val actionStrip = ActionStrip.Builder()
            .addAction(
                Action.Builder()
                    .setIcon(
                        CarIcon.Builder(
                            IconCompat.createWithResource(
                                carContext,
                                R.drawable.baseline_favorite_24
                            )
                        ).setTint(
                            if (isFavorite) CarColor.RED else CarColor.createCustom(
                                Color.LTGRAY,
                                Color.DKGRAY
                            )
                        ).build()
                    )
                    .setOnClickListener {
                        isFavorite = !isFavorite
                        // 画面の状態の更新を拾えるように、`onGetTemplate`を再度呼び出すようにinvalidate()をコールする
                        invalidate()
                    }.build()
            )
            .build()

        return PaneTemplate.Builder(
            Pane.Builder()
                .addAction(navigateAction)
                .addRow(
                    Row.Builder()
                        .setTitle("Coordinates")
                        .addText("${place.latitude}, ${place.longitude}")
                        .build()
                ).addRow(
                    Row.Builder()
                        .setTitle("Description")
                        .addText(place.description)
                        .build()
                ).build()
        )
            .setTitle(place.name)
            .setHeaderAction(Action.BACK)
            .setActionStrip(actionStrip)
            .build()
    }
}
アプリの起動

他のアプリを起動しようとするとエラー
Caused by: androidx.car.app.HostException: Remote startCarApp call failed
ナビゲーションを開始しようとして(startCarAppをコールする場所)エラーが発生する可能性があります。
その場合、ナビゲーションアプリがインストールされていないことが原因です。
エミュレータ上のPlayストアで探してもらえたらナビゲーションアプリはすぐ見つかります。
アプリで得られる車両プロパティ
検証はまだしていませんが、以下が取得できるとのことです。エミュレータで設定値を変えることができるのかもしれません。
参照元
- 速度情報 (Vehicle Speed)
車両の現在の速度を取得できます。通常は km/h で提供され、速度制限や運転支援機能に基づいたアクションに使用されます。 - 燃料レベル (Fuel Level)
ガソリン車であれば、タンク内の燃料残量を取得できます。これはアプリで「燃料が少ない」警告や最寄りのガソリンスタンドの提案などに使用されることがあります。 - バッテリー残量 (Battery Level)
電気自動車(EV)やハイブリッド車の場合、車両バッテリーの状態をモニタリングできます。充電状況やバッテリー残量を表示するために利用されます。 - ドアステータス (Door Status)
各ドア(フロント、リア、トランク、フード)の開閉状況を取得できます。ドアが開いている場合に通知したり、閉じ忘れを防ぐアラートを設定できます。 - ライトの状態 (Light Status)
車両のライト(ヘッドライト、ハイビーム、フォグライトなど)のオンオフの状態を取得できます。これにより、夜間モードの切り替えやドライバーへのフィードバックが可能です。 - エンジンの状態 (Engine Status)
エンジンのオンオフやアイドリング状態を取得できます。アプリケーションは、エンジンがオフのときに特定の操作を制限できます。 - パーキングブレーキの状態 (Parking Brake Status)
パーキングブレーキがかかっているか、解除されているかの状態を取得できます。これにより、駐車中のインタラクションやアプリ機能を制御できます。 - ギアの位置 (Gear Position)
シフトレバーの位置(パーキング、リバース、ニュートラル、ドライブなど)を取得できます。これにより、バックカメラの自動起動やギアに基づいたインターフェースの切り替えを行うことが可能です。 - タイヤの状態 (Tire Pressure)
タイヤの空気圧などの情報を取得できます。これにより、低圧の警告やメンテナンスのアラートを通知できます。 - 外部温度 (External Temperature)
車外の温度を取得でき、天候や走行条件に基づいたインターフェースや運転者への通知に利用できます。 - 座席センサー (Seat Occupancy Status)
各座席の乗員の有無やシートベルトの装着状況を取得します。安全のため、シートベルト未装着の警告を表示する場合に使用されます。 - ウィンドウステータス (Window Status)
各窓の開閉状況をモニタリングできます。例えば、運転終了時にウィンドウが開いたままの場合、通知を出すことができます。 - HVAC(エアコン)の状態 (HVAC Status)
車両の空調システム(暖房、冷房、風量、風向)の設定や状態を取得できます。これにより、快適な車内環境をアプリで制御できます。 - 位置情報 (GPS Location)
車両の現在の GPS 位置情報を取得できます。これにより、ナビゲーションアプリや場所ベースのサービスが利用可能です。 - ワイパーの状態 (Wiper Status)
ワイパーの作動状態を取得できます。天候や視界状況に基づいたUIの調整に役立ちます。
最後に
最後まで読んでいただきありがとうございます。
Android Automotive OS
素人がクローンとビルドして起動できるくらいに、Androidのオープンソースは品質維持され、簡単でした。ですが、要求されるPCスペックは高いです。弊社エンジニアに世界には最初からAndroid Automotive OSがインストールされた基盤が売ってるよと教えてくれ、早く言ってよ〜と思いましたが、OSを起動できた時は感動しました。
AutoおよびAutomotiveアプリ開発について
自動車向けアプリの実装はどういったものか、概観を掴む目的のため大雑把な記事になってしまいましたが、手順が少なく実装できることがわかりました。
Hostアプリの概念やエミュレータ起動の手順がやや面倒なところがあります。
自動車向けアプリの開発はUIのカスタマイズ性が無いぶん、より「何ができるアプリなのか」を洗練することに醍醐味があるかもしれません。
今後、自動運転が普通に乗れる未来がくれば、運転者もゲームができたりカテゴリが増える未来が来るかもしれませんね。
おまけ
運転について幼い頃を振り返り、弊社の先輩の記事にインスパイアされ音楽生成AIで音楽を作ってみたのが以下ですが、エモくていい感じでした。
ここまで聴いてくれるのは同僚くらいかと思います。感想お待ちしております。
関連記事 | Related Posts

![Cover Image for [Android] Avoiding API Calls in the Application Class](/assets/blog/authors/10497_gota_hasegawa/2024-12-02/application_image.png)

We are hiring!
【シニアソフトウェアエンジニア】業務システムG/東京
業務システムグループについて TOYOTAのクルマのサブスクリプションサービスである『 KINTO 』を中心とした国内向けサービスのプロジェクト立ち上げから運用保守に至るまでの運営管理を行っています。
プロダクトマネージャー(Webプロダクト)/KINTOプロダクトマネジメントG/東京
KINTOプロダクトマネジメントグループについてTOYOTAのクルマのサブスクリプションサービスである『 KINTO 』のWebサイトの開発、運用をしています。