BottomSheetDialogFragmentの上にComposeを載っけると下部にボタンを固定するのが想像以上に難しかった件

この記事は KINTOテクノロジーズアドベントカレンダー2024 の6日目の記事です🎅🎄
はじめに
Merry Christmas🔔
モバイルアプリ開発Gでmy routeアプリのAndroid側の開発を担当しておりますOsaka Tech LabのRomie(@Romie_ktc)です。
現在、my routeのAndroidチームではxmlからJetpack Compose(以下Compose)へUIの実装を切り替えております。
ただ、一気に全てをリファクタリングできませんので、どうしてもxmlの上にCompose化したパーツが乗っかるということも出てきてしまいます。
今回は、BottomSheetのxmlの上にComposeを載っける形で実装したお話をします。
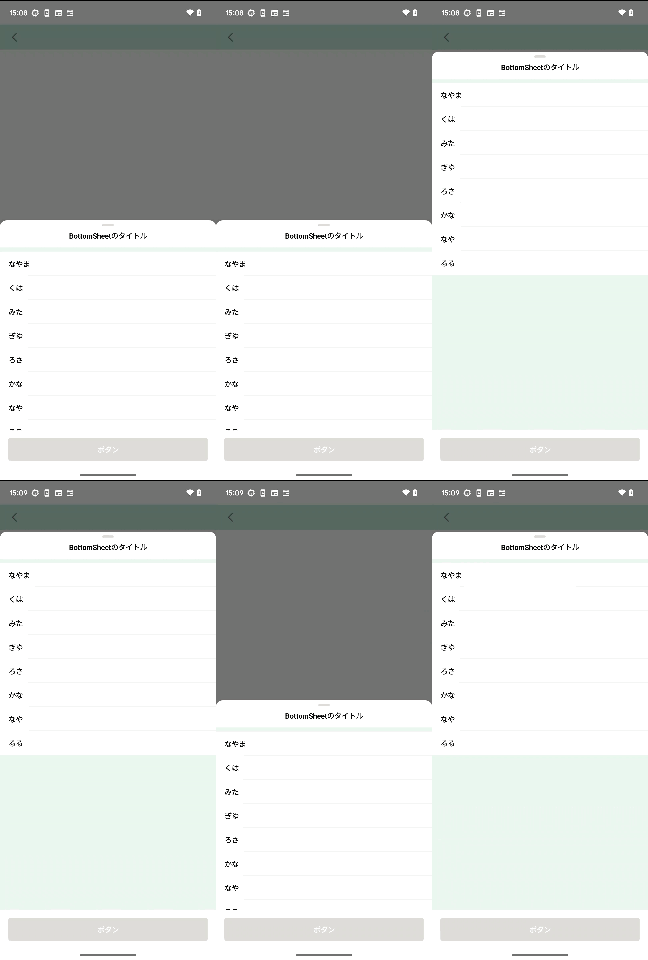
完成イメージ
基本編
BottomSheetDialogFragmentを継承した以下のクラスにて実装します。
class MixComposedBottomSheetDialog : BottomSheetDialogFragment()
BottomSheetの基本的な挙動を設定する
BottomSheetの挙動を設定します。
以下のコードをonCreateViewに記載します。
dialog?.setOnShowListener { dialogInterface ->
    val bottomSheetDialog = dialogInterface as BottomSheetDialog
    val bottomSheet = bottomSheetDialog.findViewById<View>(com.google.android.material.R.id.design_bottom_sheet)
    // 角丸や背景色を設定したい場合は以下で対応します
    context?.let { bottomSheet?.background = ContextCompat.getDrawable(it, R.drawable.background_map_bottom_sheet) }
    val bottomSheetBehavior = bottomSheet?.let { BottomSheetBehavior.from(it) }
    bottomSheetBehavior?.let { behavior ->
        // maxHeightやpeekHeightは任意の高さを設定してください。
        behavior.maxHeight = EXPANDED_HEIGHT // BottomSheetが最大限まで拡張されたときの高さを設定
        behavior.peekHeight = COLLAPSED_HEIGHT // BottomSheetが初期状態で表示される高さを設定
        behavior.isHideable = false
        behavior.isDraggable = true
    }
}
Compose
onCreateViewにてComposeViewをreturnすることによって、BottomSheetDialogFragmentの上にComposeを載せることができます。
return ComposeView(requireContext()).apply {
    setViewCompositionStrategy(ViewCompositionStrategy.DisposeOnViewTreeLifecycleDestroyed)
    setContent {
        BottomSheetContents()
    }
}
これだけならわかりやすいですが、ここにBottomSheet下部に常に固定されたButtonを追加するとなると難易度が上がります。
発展編
Button自体はComposeで実装します。
ただしこのようにButtonを追加しても、ContentsをスクロールしないとButtonは表示されません。
return ComposeView(requireContext()).apply {
    setViewCompositionStrategy(ViewCompositionStrategy.DisposeOnViewTreeLifecycleDestroyed)
    setContent {
        BottomSheetContents()
        ButtonOnBottomSheet()
    }
}
常にButtonをBottomSheetの下部に固定させ、Contentsをスクロールしても引っ張られることなく表示させるためには、以下のような実装が必要です。
val button =
    ComposeView(context ?: return@setOnShowListener).apply {
        setViewCompositionStrategy(ViewCompositionStrategy.DisposeOnViewTreeLifecycleDestroyed)
        setContent {
            ButtonOnBottomSheet()
        }
    }
BottomSheetの下部にButtonを固定させるためには、以下のコードを使います。
このコードを使用することで、BottomSheetDialogFragmentで実装されているレイアウトを直接取得できます。したがってより柔軟にViewの操作が可能になります。
val containerLayout = dialogInterface.findViewById<FrameLayout>(com.google.android.material.R.id.container)
val coordinatorLayout = dialogInterface.findViewById<CoordinatorLayout>(com.google.android.material.R.id.coordinator)
clipChildrenはViewGroupのプロパティで、子Viewが親Viewの範囲外に描画される場合に描画をクリップするかどうかを指定します。
BottomSheetの他の要素と重なる場合に用いられます。
// デフォルト値はtrueで、falseに設定すると子Viewが親の境界を超えてもそのまま表示できます。
button.clipChildren = false

button.layoutParams =
    FrameLayout.LayoutParams(
        FrameLayout.LayoutParams.MATCH_PARENT,
        FrameLayout.LayoutParams.WRAP_CONTENT,
    ).apply {
        gravity = Gravity.BOTTOM
    }
containerLayout?.addView(button)

button.post {
    val layoutParams = coordinatorLayout?.layoutParams as? ViewGroup.MarginLayoutParams
    layoutParams?.apply {
        button.measure(
            View.MeasureSpec.makeMeasureSpec(0, View.MeasureSpec.UNSPECIFIED),
            View.MeasureSpec.makeMeasureSpec(0, View.MeasureSpec.UNSPECIFIED),
        )
        this.bottomMargin = button.measuredHeight
        containerLayout?.requestLayout()
    }
}
まとめ
これまでの実装をまとめますと、以下の通りです。
override fun onCreateView(): View {
    dialog?.setOnShowListener { dialogInterface ->
        val bottomSheetDialog = dialogInterface as BottomSheetDialog

        val containerLayout = dialogInterface.findViewById<FrameLayout>(com.google.android.material.R.id.container)
        val coordinatorLayout = dialogInterface.findViewById<CoordinatorLayout>(com.google.android.material.R.id.coordinator)
        val bottomSheet = bottomSheetDialog.findViewById<View>(com.google.android.material.R.id.design_bottom_sheet)
        context?.let { bottomSheet?.background = ContextCompat.getDrawable(it, R.drawable.background_map_bottom_sheet) }

        val button =
            ComposeView(context ?: return@setOnShowListener).apply {
                setViewCompositionStrategy(ViewCompositionStrategy.DisposeOnViewTreeLifecycleDestroyed)
                setContent {
                    ButtonOnBottomSheet()
                }
            }
        button.clipChildren = false

        button.layoutParams =
            FrameLayout.LayoutParams(
                FrameLayout.LayoutParams.MATCH_PARENT,
                FrameLayout.LayoutParams.WRAP_CONTENT,
            ).apply {
                gravity = Gravity.BOTTOM
            }
        containerLayout?.addView(button)

        button.post {
            val layoutParams = coordinatorLayout?.layoutParams as? ViewGroup.MarginLayoutParams
            layoutParams?.apply {
                button.measure(
                    View.MeasureSpec.makeMeasureSpec(0, View.MeasureSpec.UNSPECIFIED),
                    View.MeasureSpec.makeMeasureSpec(0, View.MeasureSpec.UNSPECIFIED),
                )
                this.bottomMargin = button.measuredHeight
                containerLayout?.requestLayout()
                val bottomSheetBehavior = bottomSheet?.let { BottomSheetBehavior.from(it) }
                bottomSheetBehavior?.let { behavior ->
                    // maxHeightやpeekHeightは任意の高さを設定してください。
                    behavior.maxHeight = EXPANDED_HEIGHT // BottomSheetが最大限まで拡張されたときの高さを設定
                    behavior.peekHeight = COLLAPSED_HEIGHT // BottomSheetが初期状態で表示される高さを設定
                    behavior.isHideable = false
                    behavior.isDraggable = true
                }
            }
        }
    }

    return ComposeView(requireContext()).apply {
        setViewCompositionStrategy(ViewCompositionStrategy.DisposeOnViewTreeLifecycleDestroyed)
        setContent {
            BottomSheetContents()
        }
    }
}
つまりどうしたかと言いますと
- xmlでBottomSheetを作成し
- 高さなどのレイアウトを調整し
- BottomSheetの下部にButtonをくっつけるために更にレイアウトを用意し合体させ
- Compose化したコンテンツをBottomSheetに上乗せした
ということです。
ここまで読んでいただきありがとうございました!
関連記事 | Related Posts

BottomSheetDialogFragmentの上にComposeを載っけると下部にボタンを固定するのが想像以上に難しかった件

First Steps When Migrating From Android View to Jetpack Compose
Jetpack Compose Animation Techniques: Enhance App Impressions with Minimal Code Changes
Android Compose Object-Oriented Navigation

Jetpack Compose in myroute Android App

Android View から Jetpack Compose への移行の第一歩
We are hiring!
【ソフトウェアエンジニア(リーダークラス)】共通サービス開発G/東京・大阪・福岡
共通サービス開発グループについてWebサービスやモバイルアプリの開発において、必要となる共通機能=会員プラットフォームや決済プラットフォームなどの企画・開発を手がけるグループです。KINTOの名前が付くサービスやKINTOに関わりのあるサービスを同一のユーザーアカウントに対して提供し、より良いユーザー体験を実現できるよう、様々な共通機能や顧客基盤を構築していくことを目的としています。
【ソフトウェアエンジニア(メンバークラス)】共通サービス開発G/東京・大阪・福岡
共通サービス開発グループについてWebサービスやモバイルアプリの開発において、必要となる共通機能=会員プラットフォームや決済プラットフォームなどの企画・開発を手がけるグループです。KINTOの名前が付くサービスやKINTOに関わりのあるサービスを同一のユーザーアカウントに対して提供し、より良いユーザー体験を実現できるよう、様々な共通機能や顧客基盤を構築していくことを目的としています。

