Jetpack Compose in myroute Android App

Introduction
Nice to meet you, I am Somi, and I work on developing the my route app for Android at KINTO Technologies Corporation. my route is an app that enriches travel experiences by providing various functions such as "Odekake Information" (information on traffic and the outings you want to do), "Search by Map," and "Odekake Memo" (a notepad function).

The my route Android team is currently heavily using Jetpack Compose to improve the UI/UX. This UI toolkit improves code readability and lets us develop the UI quickly and flexibly. Also, the declarative UI approach simplifies the development process and makes UI components more reusable. With this information in mind, I will talk about some examples of Jetpack Compose features used in the my route Android app. In this article, I will talk about four features.
Functionalities
1. drawRect and drawRoundRect
Jetpack Compose uses Canvas to make it possible to draw in a specific range. drawRect and drawRoundRect are functions related to shapes that can be defined inside a Canvas. drawRect draws a rectangle with a specified offset and size, while drawRoundRect has all of the functions of the drawRect, plus the cornerRadius parameter which adjusts the roundness of the corners. my route has a function that reads coupon codes in text format with the device's camera. To accurately recognize codes, parts used to recognize text had to be transparent, and the rest had to be darkened. So, we implemented the UI with drawRect and drawRoundRect.
@Composable
fun TextScanCameraOverlayCanvas() {
val overlayColor = MaterialTheme.colors.onSurfaceHighEmphasis.copy(alpha = 0.7f)
  ...
    Canvas(
        modifier = Modifier.fillMaxSize()
    ) {
        with(drawContext.canvas.nativeCanvas) {
            val checkPoint = saveLayer(null, null)
            drawRect(color = overlayColor)

            drawRoundRect(
                color = Color.Transparent,
                size = Size(width = layoutWidth.toPx(), height = 79.dp.toPx()),
                blendMode = BlendMode.Clear,
                cornerRadius = CornerRadius(7.dp.toPx()),
                topLeft = Offset(x = screenWidth.toPx(), y = rectHeight.toPx())
            )
            restoreToCount(checkPoint)
        }
    }
}
The above code is implemented with the following UI.
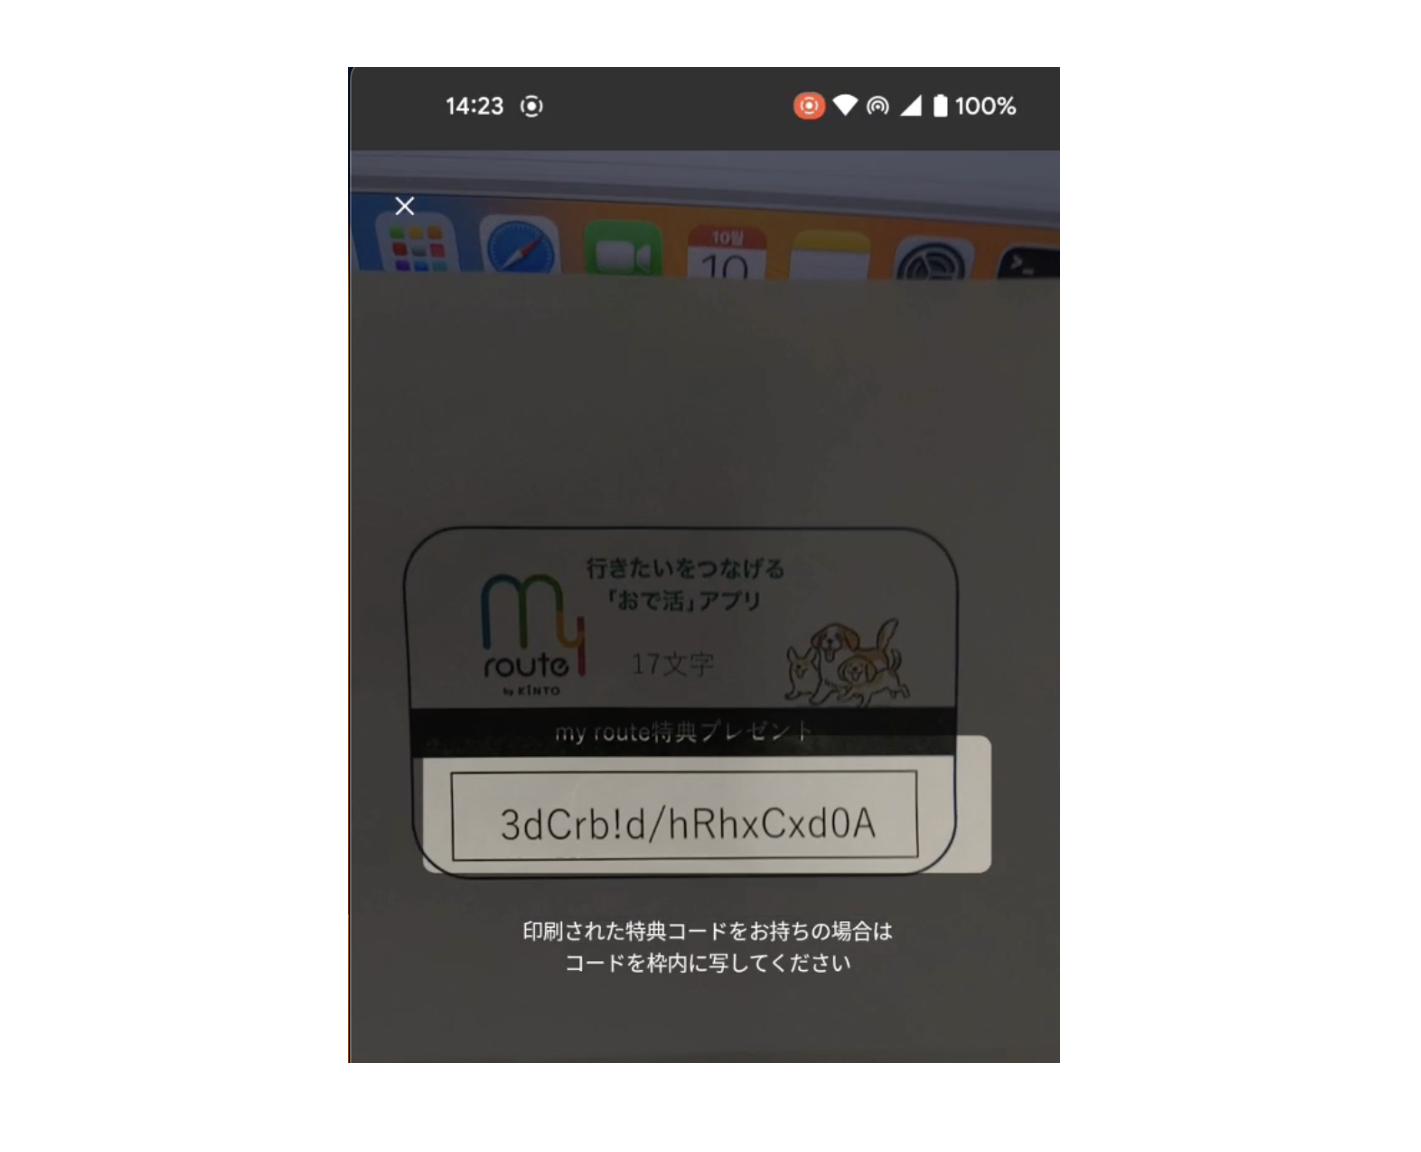
To explain the code, drawRect uses a color specified with overlayColor to darken the whole screen. In addition, we used drawRoundRect to create a transparent rectangle with rounded corners to make it clear that text inside the area would be recognized.
2. KeyboardActions and KeyboardOptions
KeyboardActions and KeyboardOptions are classes that belong to the TextField component. TextField is a UI element that handles inputs and allows you to set the type of keyboard characters that appear in the input field using KeyboardOptions. KeyboardActions can then define what happens when the Enter key is pressed. In the account screen in my route, there is a place where you store your credit card information for payments. Since the part where user enters the card number is related to the device's keyboard, we implemented it with KeyboardActions and KeyboardOptions.
@Composable
fun CreditCardNumberInputField(
    value: String,
    onValueChange: (String) -> Unit,
    placeholderText: String,
    onNextClick: () -> Unit = {}
) {
    ThinOutlinedTextField(
        ...
        singleLine = true,
        keyboardOptions = KeyboardOptions(
            keyboardType = KeyboardType.Number,
            imeAction = ImeAction.Next
        ),
        keyboardActions = KeyboardActions(
            onNext = { onNextClick() }
        )
    )
}
The above code is implemented with the following UI.
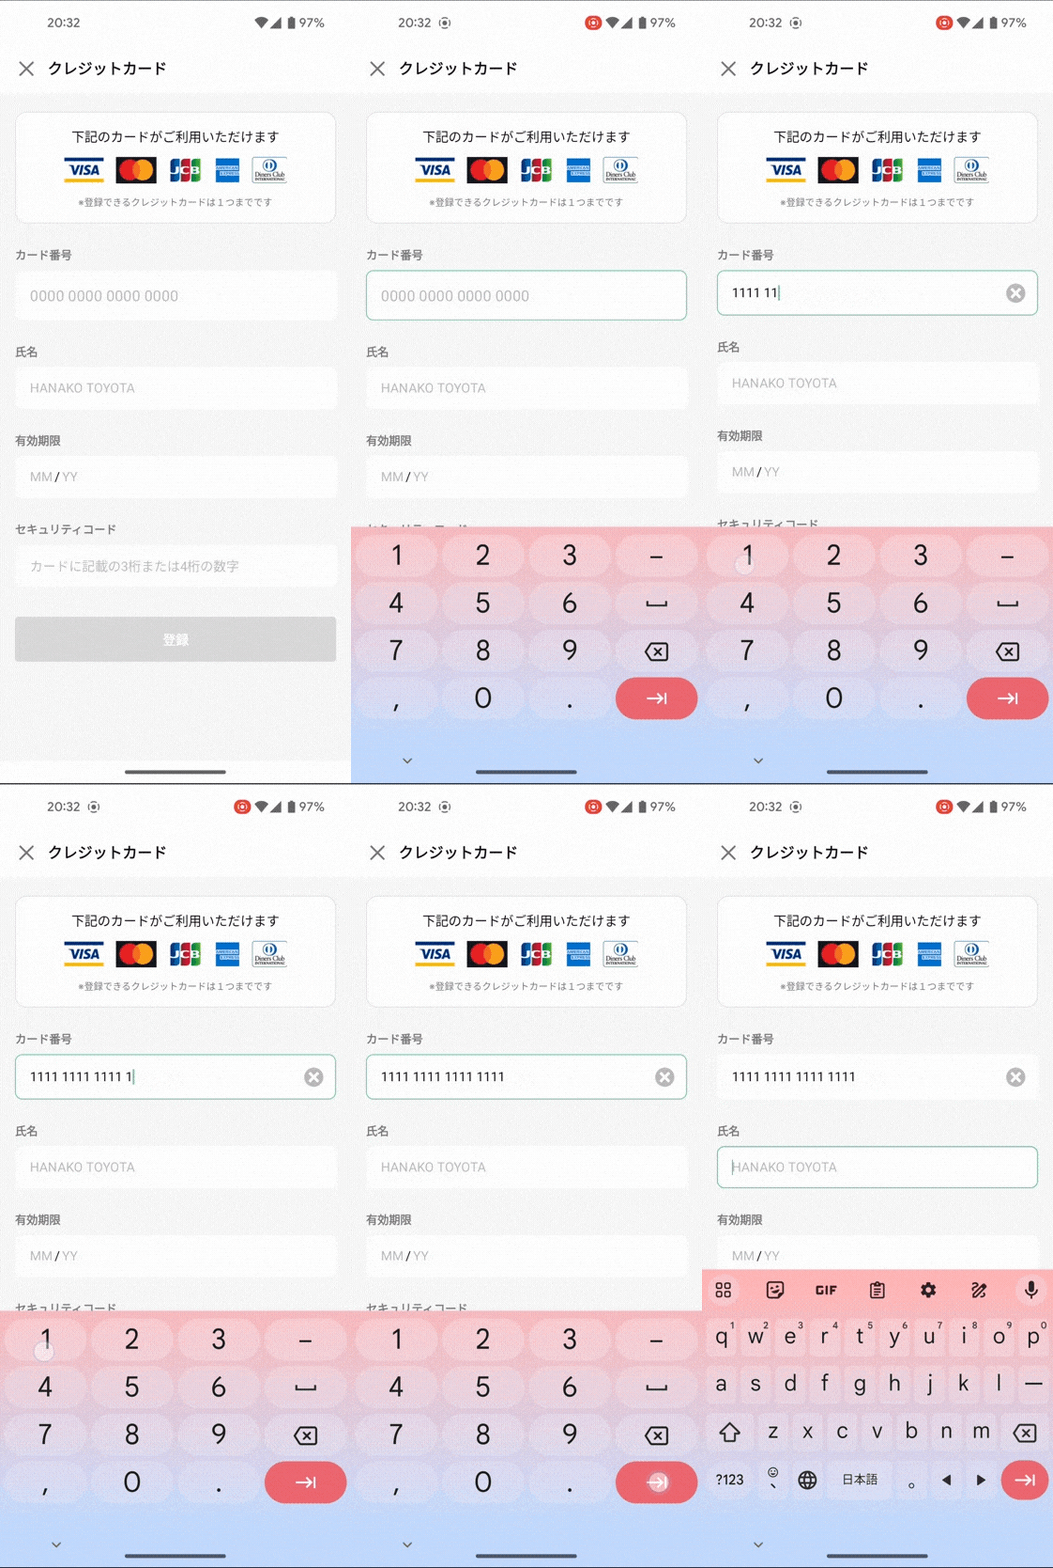
So that only credit card numbers could be entered, KeyboardActions sets the KeyboardType to Number, and ImeAction. Next is set so that the input moves as you type. KeyboardOptions also makes it so that the onNextClick() method is executed when the "Next" button on the keyboard is pressed. By the way, onNextClick() is set up in Fragments as follows.
CreditCardNumberInputField(
    ...
   onNextClick = {
        binding.creditCardHolderName.requestFocus()
    }
)
With these settings, when the "Next" button is pressed, you will go from entering the credit card number to the next step, entering your name.
3. LazyVerticalGrid
LazyVerticalGrid displays items in a grid format. This grid can be scrolled through vertically and displays many items (or lists of unknown length). Also, the number of columns is adjusted according to the size of the screen, so items can be displayed effectively on various screens. The "This month's events" section in my route provides information on many events happening in the area where you are currently located. There was too much event information to be implemented in columns (title, image, event period), so we used LazyVerticalGrid to display event items in containers that could be scrolled through up and down over several rows.
private const val COLUMNS = 2

LazyVerticalGrid(
    columns = GridCells.Fixed(COLUMNS),
    modifier = Modifier
        .padding(start = 16.dp, end = 16.dp),
    horizontalArrangement = Arrangement.spacedBy(16.dp),
    verticalArrangement = Arrangement.spacedBy(20.dp)
) {
    items(eventList.size) { index ->
        val item = eventList[index]
        EventItem(
            event = item,
            modifier = Modifier.singleClickable { onItemClicked(item) }
        )
    }
}
The above code is implemented with the following UI. The image and title have been removed due to copyright.
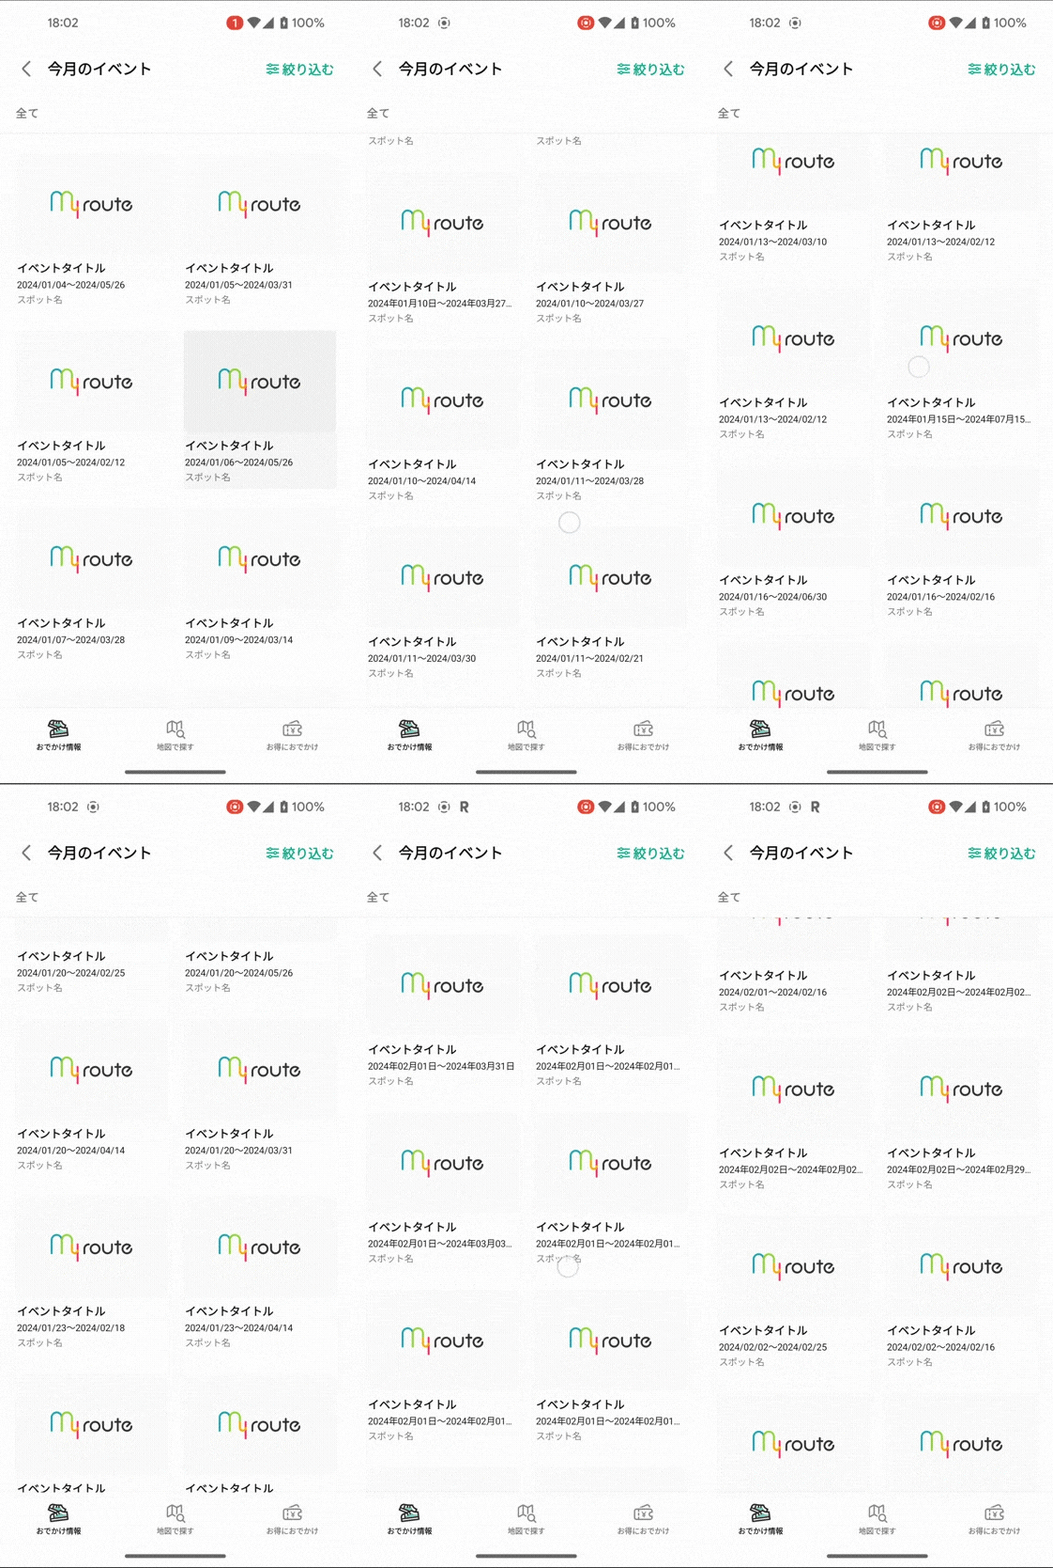
The items can now be displayed in a grid at regular intervals based on the size of the data in eventList, and the event information can be viewed constantly.
4. Drag And Drop
The draggable modifier lets the user drag and drop something inside a screen component. If you need to control an entire drag flow, you use pointerInput. In my route, there is a function called "my station" that allows you to register up to 12 stations or bus stops. They are displayed in a card list format, so you can see it at a glance. This card list can be reordered freely and requires drag-and-drop operation to be implemented.
itemsIndexed(stationList) { index, detail ->
    val isDragged = index == lazyColumnDragDropState.draggedItemIndex
    MyStationDraggableItem(
        detail = detail,
        draggableModifier = Modifier.pointerInput(Unit) {
            detectDragGestures(
                onDrag = { change, offset ->
                    lazyColumnDragDropState.onDrag(scrollAmount = offset.y)
                    lazyColumnDragDropState.scrollIfNeed()
                },
               onDragStart = { lazyColumnDragDropState.onDragStart(index) },
               onDragEnd = { lazyColumnDragDropState.onDragInterrupted() },
               onDragCancel = { lazyColumnDragDropState.onDragInterrupted() }
           )
       },
       modifier = Modifier.graphicsLayer {
           val offsetOrNull = lazyColumnDragDropState.draggedItemY.takeIf { isDragged }
           translationY = offsetOrNull ?: 0f
       }
           .zIndex(if (isDragged) 1f else 0f)
    )
    val isPinned = lazyColumnDragDropState.initialDraggedItem?.index == index
    if (isPinned) {
        val pinContainer = LocalPinnableContainer.current
        DisposableEffect(pinContainer) {
            val pinnedHandle = pinContainer?.pin()
            onDispose {
                pinnedHandle?.release()
            }
        }
    }
}
The above code is implemented with the following UI.
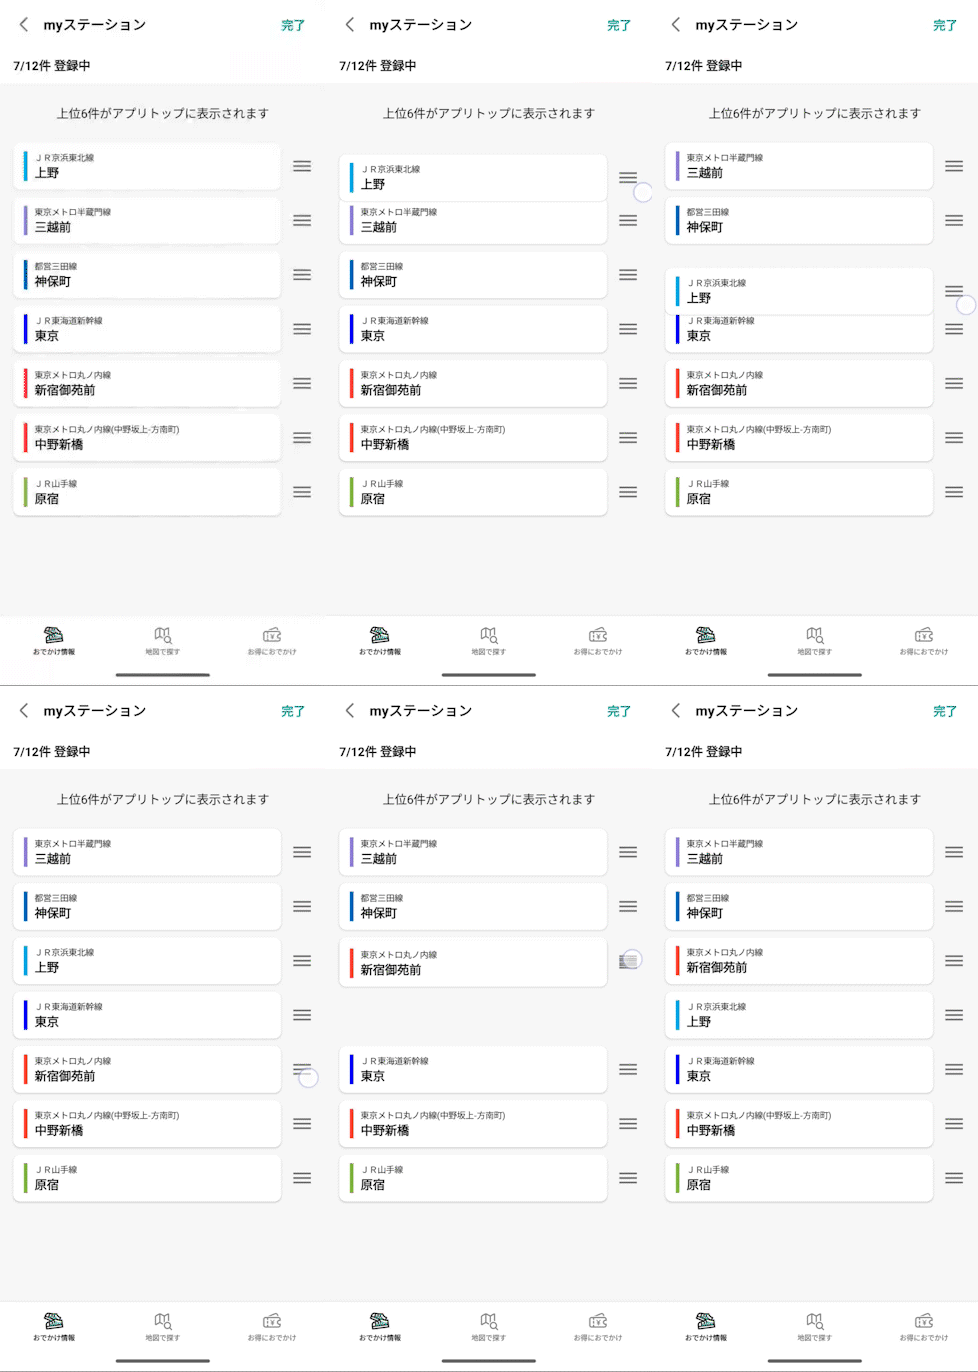
Drag operations are detected by pointerInput and the detectDragGestures function processes drag events. When an item is dragged, the onDrag, onDragStart, onDragEnd, and onDragCancel methods of the lazyColumnDragDropState object are called, and the drag state is managed. provides the effect of updating and visually moving the Y-axis position of an item in a drag. This code also uses the isPinned variable and the LocalPinnableContainer to prevent items being dragged leaving the screen when the user scrolls.
Summary
This was a simple explanation, and you might not understand some parts right away, but that is how you use my route. At first, I felt rewriting the my route UI from an XML layout a little complicated as I was not used to Jetpack Compose. But I could understand the code written in Jetpack Compose very quickly; I found it is a very efficient way in terms of readability and maintenance. We will continue to improve the UX in my route by using Jetpack Compose in different ways. Thank you for reading to the end.
関連記事 | Related Posts
We are hiring!
【モバイルアプリUI/UXデザイナー(リードクラス)】my route開発G/東京
my route開発グループについてmy route開発グループでは、グループ会社であるトヨタファイナンシャルサービス株式会社の事業メンバーと共に、my routeの開発・運用に取り組んでおります。現在はシステムの安定化を図りながら、サービス品質の向上とビジネスの伸長を目指しています。
プロダクトデザイナー/my route開発G/東京
my route開発グループについてmy route開発グループは、my routeに関わる開発・運用に取り組んでいます。my routeの概要 my routeは、移動需要を創出するために「魅力ある地域情報の発信」、「最適な移動手段の提案」、「交通機関や施設利用のスムーズな予約・決済」をワンストップで提供する、スマートフォン向けマルチモーダルモビリティサービスです。

