AndroidでTensorFlowを使用したオブジェクト検出

みなさん、こんにちは。KINTOテクノロジーズのモバイル開発グループのマーティンです!このガイドでは、TFLite(TensorFlow Lite)モデルをゼロから構築する方法を簡単に説明します。それでは、早速始めましょう。
この記事は KINTOテクノロジーズアドベントカレンダー2024の9日目の記事です🎅🎄
準備
データセットを準備する方法は基本的に2通りあります。1つは、ローカルでアノテーションプロセスを行う方法、もう1つは、オンラインでデータセットにアノテーションを行い、チームメンバーと初期の工数をより効率的に共有しながら進める方法です。このガイドでは、Roboflow (1) の使用に重点を置いています。
Roboflow のモデルエクスポート機能を使用すると、トレーニング済みのモデルをさまざまな形式でエクスポートできるため、独自のアプリケーションに簡単に展開したり、さらに微調整したりすることができます。今回の場合、TFlite モデルをトレーニングしたいので、下の画像に示すように TFRecord 形式にエクスポートする必要があります。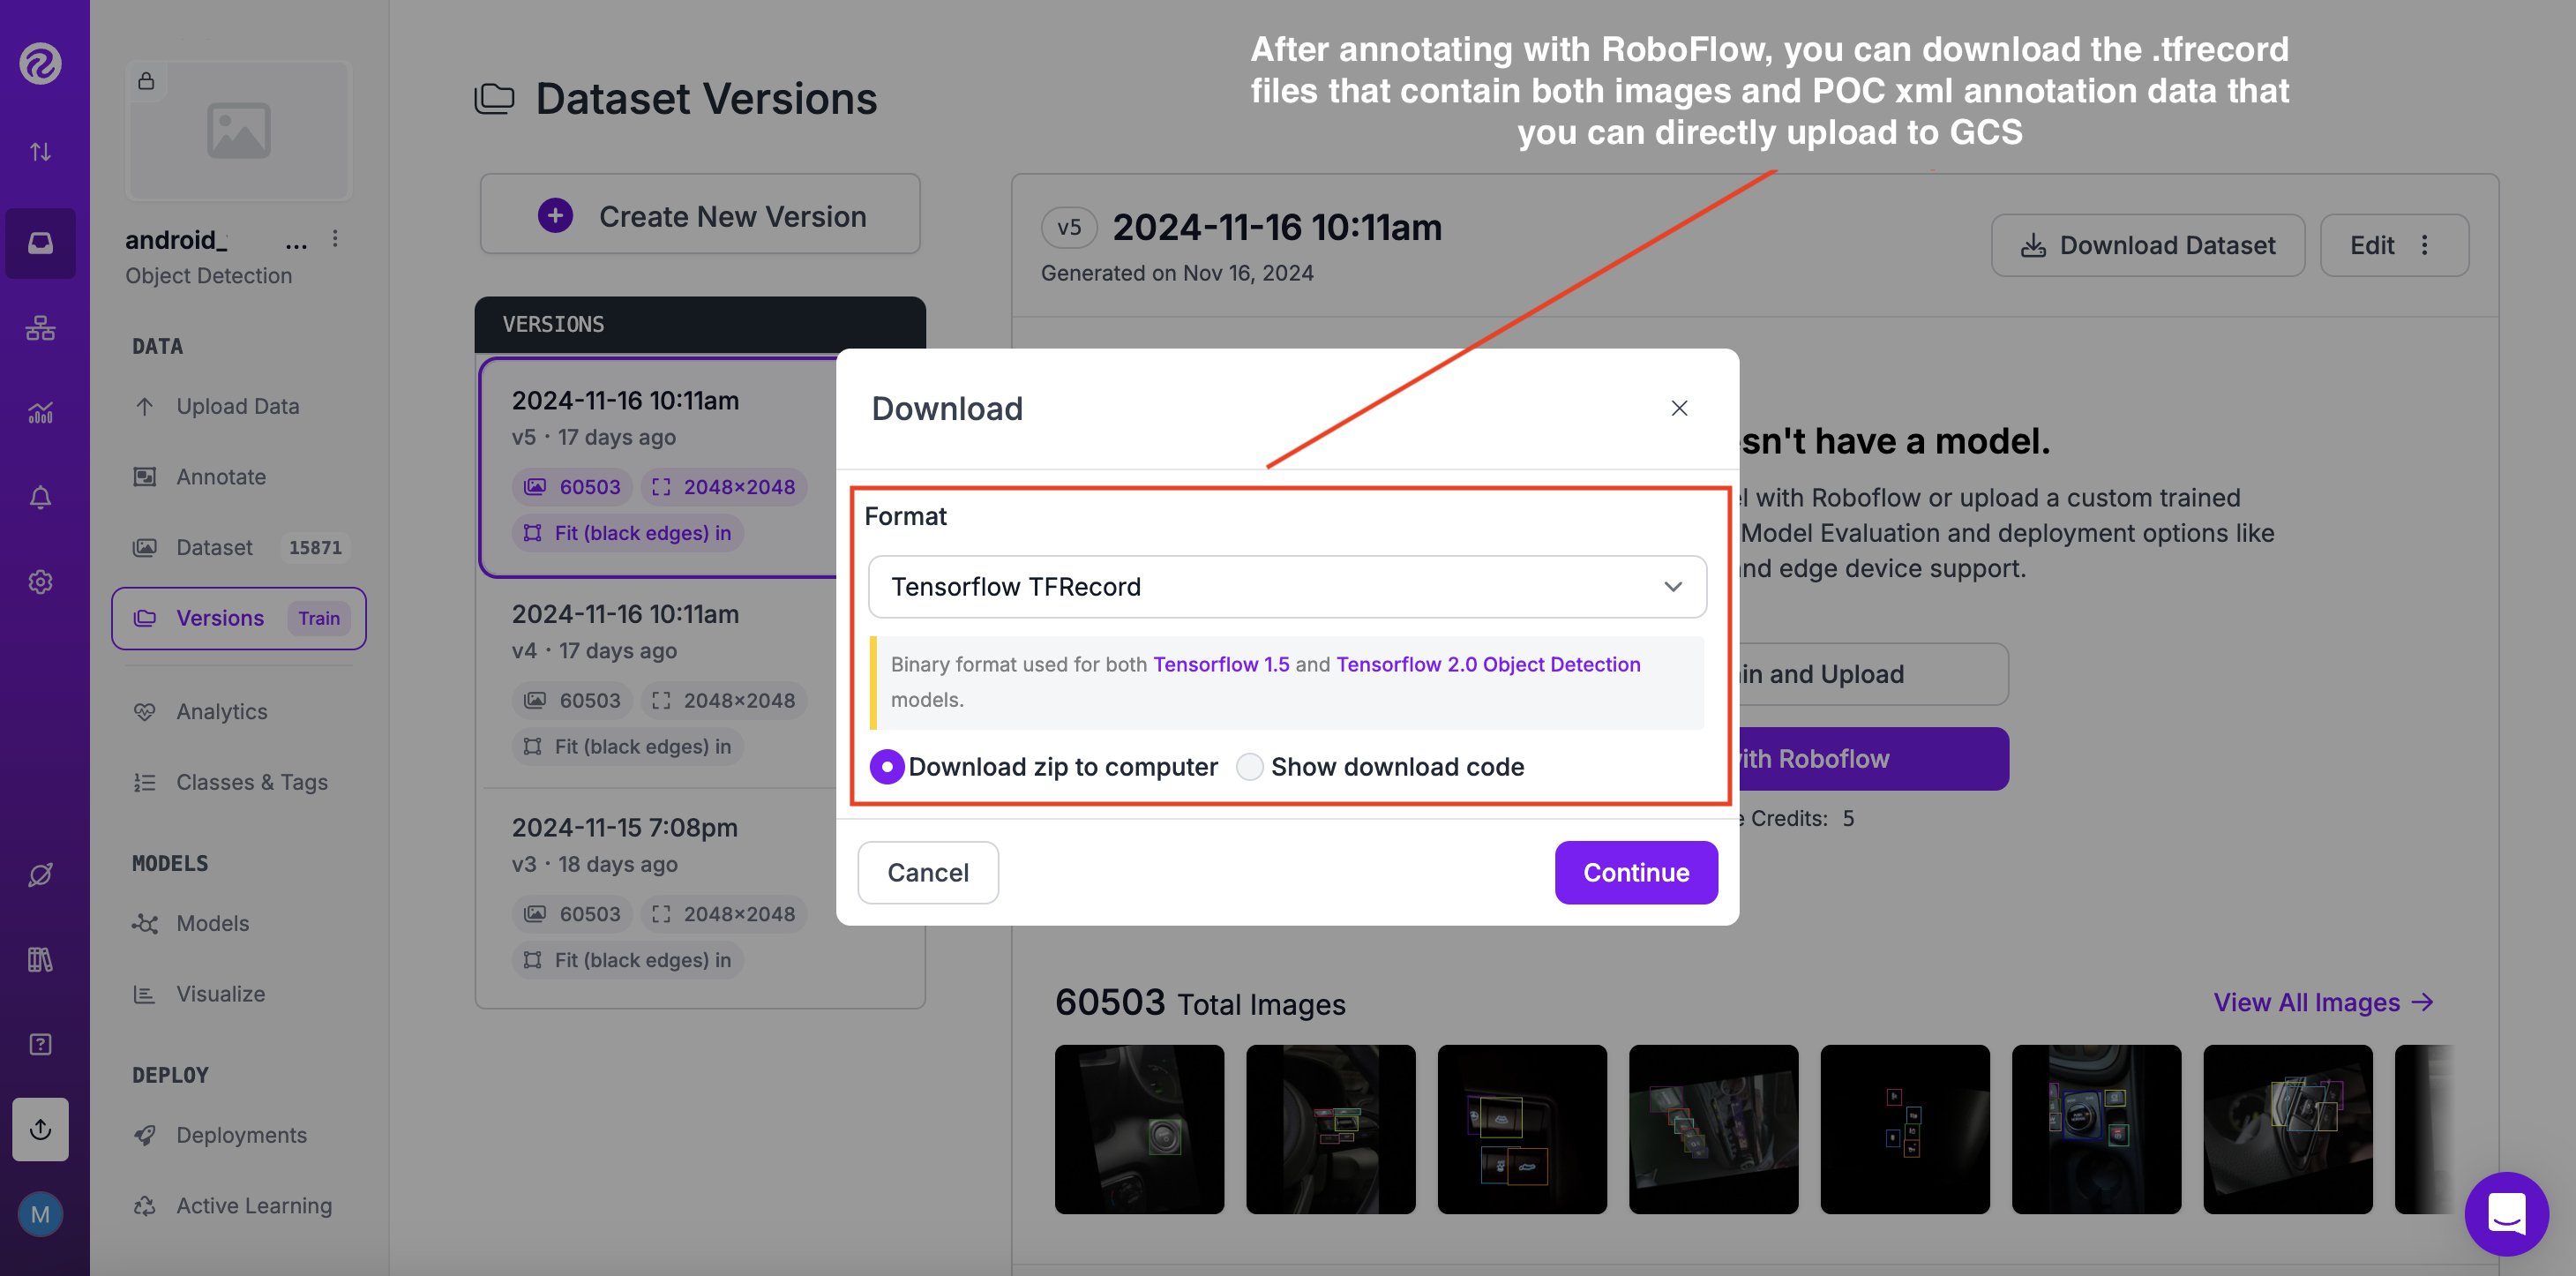
- ただし、Roboflowのようなサードパーティのオンラインアノテーションツールを用いずに、ローカルで画像にアノテーションを付けたい場合は、無料のPythonライブラリlabelImgを試してみてください: https://github.com/HumanSignal/labelImg
- 一般的に、ローカルでもオンラインでも、まず画像のデータセットを収集し、それらにラベルを付けて、対応する境界ボックス分類メタデータ (xml) ファイルを取得する必要があります。(この場合は、VOC [Visual Object Classes] Pascal メタデータを作成)
- Pascal VOCの詳細情報は、こちらで確認できます:https://roboflow.com/formats/pascal-voc-xml
- Google Cloud Platform の標準ランタイムインスタンスを作成したら、それを Colab ノートブックに接続する必要があります。基本的に、Google Colab は、組織内のデータサイエンスチームと機械学習チームに、安全でスケーラブルな共同作業プラットフォームを提供します。それが完了したら、まずTensorFlow(テンソルフロー)を動作させるために必要なライブラリをインポートする必要があります(ステップ1)
GCP標準インスタンスの作成: 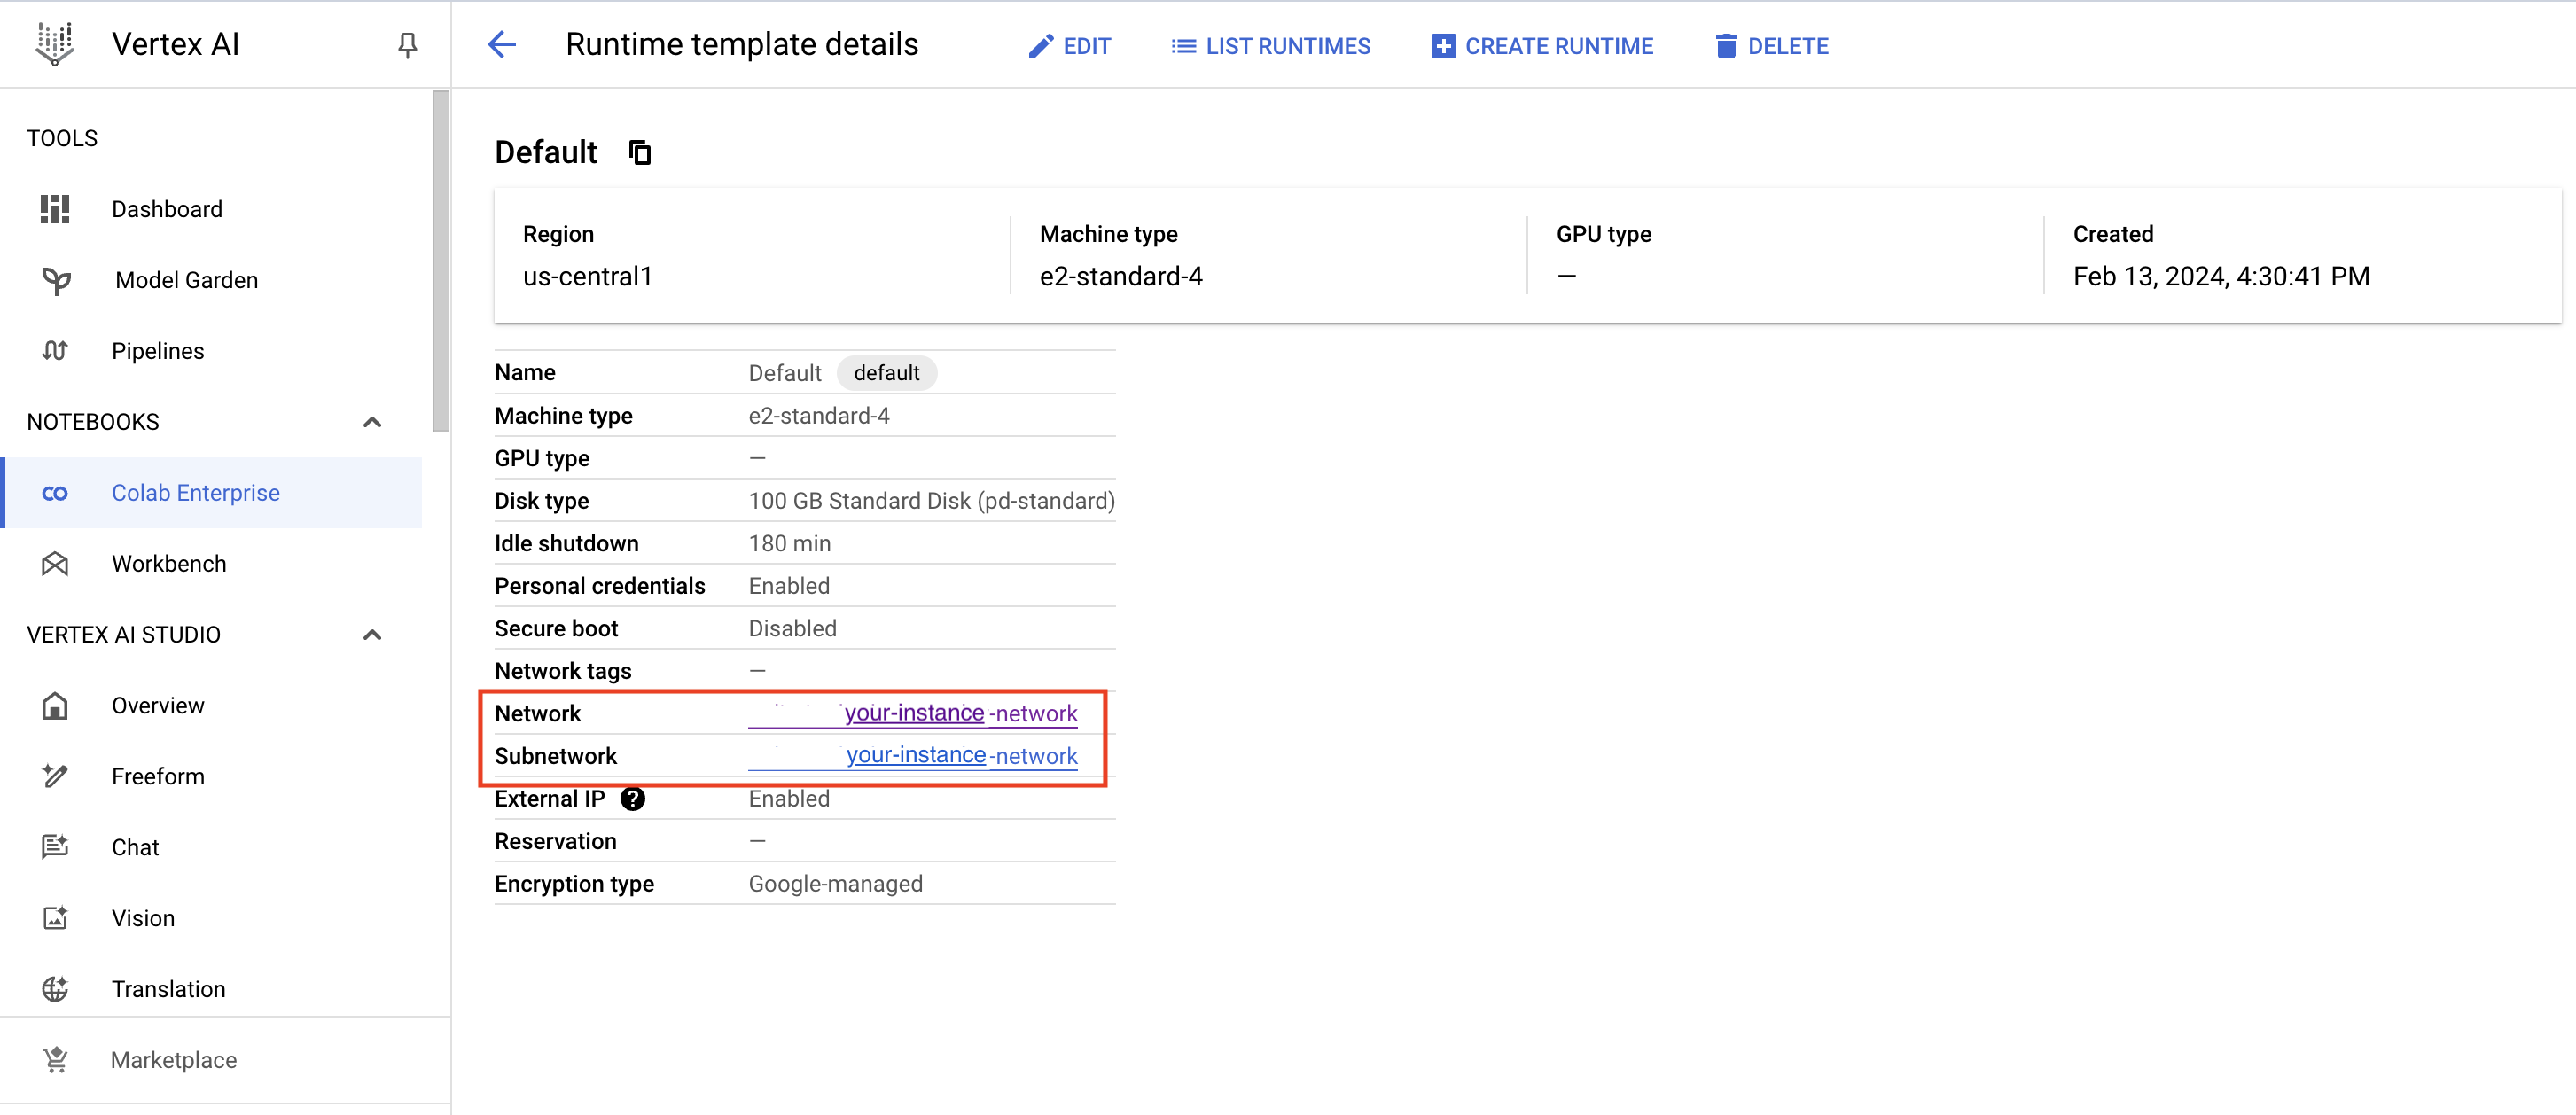
Colab Enterprise(https://cloud.google.com/colab/docs) ノートブックの作成:

- Google Cloud バケットを接続する(ステップ 4)
実行
- TensorFlow オブジェクト検出 API をインストールします(このガイドのステップ 5)
- トレーニングに必要な TFRecord ファイルを生成します。(これには、csv ファイルを生成するための generate_tfrecord.pyスクリプトが必要です)
- モデルパイプライン構成ファイルを編集し、事前にトレーニングされたモデルのチェックポイントをダウンロードします。
- モデルのトレーニングと評価
- モデルをエクスポートして、TFlite(TensorFlow Lite)形式に変換します。
展開
- TFlite モデルを Android / iOS / IoT デバイスに展開します。
それでは、始めましょう
Colab Enterprise ノートブック内で実行すべき手順を詳しく説明します:
1) ライブラリをインポートします
!pip install tensorflow==2.13.0

import os
import glob
import xml.etree.ElementTree as ET
import pandas as pd
import tensorflow as tf
print(tf.__version__)
2) GCPクラウドストレージバケットにcustomTF2、training、dataフォルダを作成します(初回のみ必要)
- GCPクラウドストレージバケットにcustomTF2という名前のフォルダを作成します。
- customTF2 フォルダ内に training と data という2つのサブフォルダを作成します(training フォルダはトレーニング中にチェックポイントが保存される場所です)
GCSバケット内のフォルダ構造の作成: 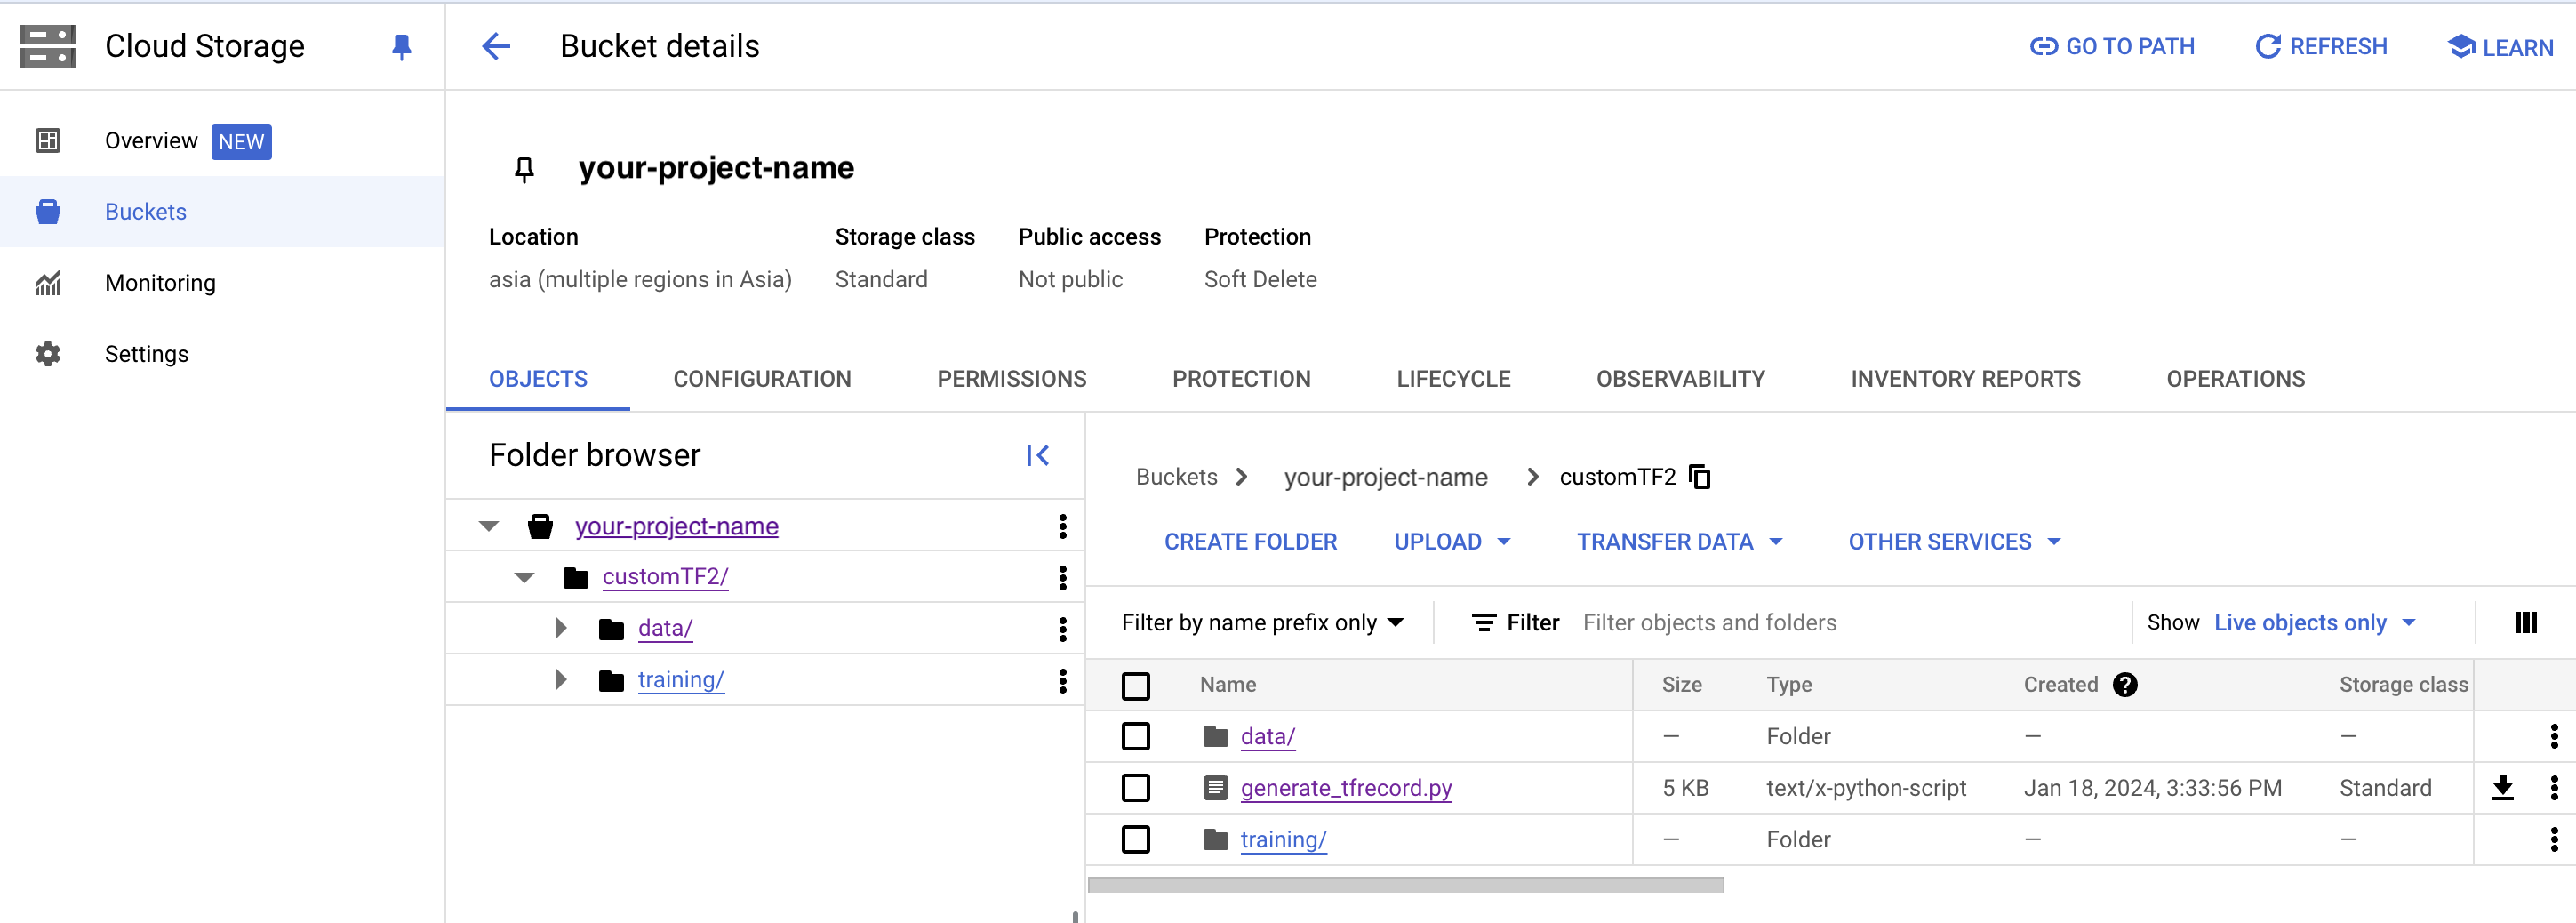
3) 以下を generate_tfrecord.py ファイルとしてダウンロードして保存し、バケットの CustomTF2 フォルダにアップロードします。(初回のみ必要)
from __future__ import division
from __future__ import print_function
from __future__ import absolute_import

import os
import io
import pandas as pd
import tensorflow as tf
import argparse

from PIL import Image
from tqdm import tqdm
from object_detection.utils import dataset_util
from collections import namedtuple, OrderedDict


def __split(df, group):
   data = namedtuple('data', ['filename', 'object'])
   gb = df.groupby(group)
   return [data(filename, gb.get_group(x)) for filename, x in zip(gb.groups.keys(), gb.groups)]


def create_tf_example(group, path, class_dict):
   with tf.io.gfile.GFile(os.path.join(path, '{}'.format(group.filename)), 'rb') as fid:
      encoded_jpg = fid.read()
   encoded_jpg_io = io.BytesIO(encoded_jpg)
   image = Image.open(encoded_jpg_io)
   幅、高さ = 画像.サイズ

   filename = group.filename.encode('utf8')
   image_format = b'jpg'
   xmins = []
   xmaxs = []
   ymins = []
   ymaxs = []
   classes_text = []
   classes = []

   for index, row in group.object.iterrows():
      if set(['xmin_rel', 'xmax_rel', 'ymin_rel', 'ymax_rel']).issubset(set(row.index)):
         xmin = row['xmin_rel']
         xmax = row['xmax_rel']
         ymin = row['ymin_rel']
         ymax = row['ymax_rel']

      elif set(['xmin', 'xmax', 'ymin', 'ymax']).issubset(set(row.index)):
         xmin = row['xmin'] / width
         xmax = row['xmax'] / width
         ymin = row['ymin'] / height
         ymax = row['ymax'] / height

      xmins.append(xmin)
      xmaxs.append(xmax)
      ymins.append(ymin)
      ymaxs.append(ymax)
      classes_text.append(str(row['class']).encode('utf8'))
      classes.append(class_dict[str(row['class'])])

   tf_example = tf.train.Example(features=tf.train.Features(
       feature={
           'image/height': dataset_util.int64_feature(height),
           'image/width': dataset_util.int64_feature(width),
           'image/filename': dataset_util.bytes_feature(filename),
           'image/source_id': dataset_util.bytes_feature(filename),
           'image/encoded': dataset_util.bytes_feature(encoded_jpg),
           'image/format': dataset_util.bytes_feature(image_format),
           'image/object/bbox/xmin': dataset_util.float_list_feature(xmins),
           'image/object/bbox/xmax': dataset_util.float_list_feature(xmaxs),
           'image/object/bbox/ymin': dataset_util.float_list_feature(ymins),
           'image/object/bbox/ymax': dataset_util.float_list_feature(ymaxs),
           'image/object/class/text': dataset_util.bytes_list_feature(classes_text),
           'image/object/class/label': dataset_util.int64_list_feature(classes), }))
   return tf_example


def class_dict_from_pbtxt(pbtxt_path):
   # open file, strip \n, trim lines and keep only
   # lines beginning with id or display_name

   with open(pbtxt_path, 'r', encoding='utf-8-sig') as f:
      data = f.readlines()

   name_key = None
   if any('display_name:' in s for s in data):
      name_key = 'display_name:'
   elif any('name:' in s for s in data):
      name_key = 'name:'

   if name_key is None:
      raise ValueError(
          "label map does not have class names, provided by values with the 'display_name' or 'name' keys in the contents of the file"
      )

   data = [l.rstrip('\n').strip() for l in data if 'id:' in l or name_key in l]

   ids = [int(l.replace('id:', '')) for l in data if l.startswith('id')]
   names = [
       l.replace(name_key, '').replace('"', '').replace("'", '').strip() for l in data
       if l.startswith(name_key)]

   # id と display_names を1つの辞書に結合します
   class_dict = {}
   for i in range(len(ids)):
      class_dict[names[i]] = ids[i]

   return class_dict


if __name__ == '__main__':
   parser = argparse.ArgumentParser(
       description='Create a TFRecord file for use with the TensorFlow Object Detection API.',
       formatter_class=argparse.RawDescriptionHelpFormatter)
   parser.add_argument('csv_input', metavar='csv_input', type=str, help='Path to the CSV input')
   parser.add_argument('pbtxt_input',
                       metavar='pbtxt_input',
                       type=str,
                       help='Path to a pbtxt file containing class ids and display names')
   parser.add_argument('image_dir',
                       metavar='image_dir',
                       type=str,
                       help='Path to the directory containing all images')
   parser.add_argument('output_path',
                       metavar='output_path',
                       type=str,
                       help='Path to output TFRecord')

   args = parser.parse_args()

   class_dict = class_dict_from_pbtxt(args.pbtxt_input)

   writer = tf.compat.v1.python_io.TFRecordWriter(args.output_path)
   path = os.path.join(args.image_dir)
   examples = pd.read_csv(args.csv_input)
   grouped = __split(examples, 'filename')

   for group in tqdm(grouped, desc='groups'):
      tf_example = create_tf_example(group, path, class_dict)
      writer.write(tf_example.SerializeToString())

   writer.close()
   output_path = os.path.join(os.getcwd(), args.output_path)
   print('Successfully created the TFRecords: {}'.format(output_path))
4) GCSバケットをマウントし、GCSFUSEをインストールしてフォルダをリンクします。
from google.colab import auth
auth.authenticate_user()

!echo「deb https://packages.cloud.google.com/apt gcsfuse-bionic main」> /etc/apt/sources.list.d/gcsfuse.list
!curl https://packages.cloud.google.com/apt/doc/apt-key.gpg | apt-key add -
!apt -qq update
!apt -qq install gcsfuse

!gsutil ls -r gs://your-cloud-storage-bucket-name

!mkdir customTF2
!gcsfuse --implicit-dirs your-cloud-storage-bucket-name customTF2
5) TensorFlow モデルのGitレポジトリをクローンし、TensroFlow オブジェクト検出APIをインストールします。
%cd /content

# colab クラウドvmに tensorflowモデルをクローンする
!git clone --q https://github.com/tensorflow/models.git

# protosをコンパイルするために/models/research フォルダにナビゲートします。
%cd models/research

# protosをコンパイルします。
!protoc object_detection/protos/*.proto --python_out=.

# TensorFlowオブジェクト検出 API をインストールします。
!cp object_detection/packages/tf2/setup.py .
!python -m pip install .
6) モデルビルダーをテストします (推奨)
%cd /content/models/research
# モデルビルダーのテスト

!pip install 'tf-models-official >=2.5.1, <2.16.0'

!python object_detection/builders/model_builder_tf2_test.py
7)事前にトレーニングされたモデルチェックポイントをダウンロードします(初めての場合のみ必要)
現在の作業ディレクトリは /content/customTF2/customTF2/data/
ssd_mobilenet_v2_fpnlite_320x320_coco17_tpu-8.tar.gz を データ フォルダにダウンロードして解凍します。
その他の Tensorflow 2.x の検出チェックポイントのリストはこちら。
%cd /content/customTF2/customTF2/data/

#事前トレーニング済みモデル ssd_mobilenet_v2_fpnlite_320x320_coco17_tpu-8.tar.gz をダウンロードしてデータフォルダに入れて解凍します。

!wget http://download.tensorflow.org/models/object_detection/tf2/20200711/ssd_mobilenet_v2_fpnlite_320x320_coco17_tpu-8.tar.gz
!tar -xzvf ssd_mobilenet_v2_fpnlite_320x320_coco17_tpu-8.tar.gz
8)モデルパイプライン構成ファイルを入手して変更を加え、データフォルダに入れます(クラス番号の量を変更するたびに必要)
現在の作業ディレクトリは /content/customTF2/customTF2/data/
ssd_mobilenet_v2_fpnlite_320x320_coco17_tpu-8.configを /content/models/research/object_detection/configs/tf2からダウンロードします。必要な変更を加え、 /content/customTF2/customTF2/data/ フォルダーにアップロードします。
または
colab内 で /content/models/research/object_detection/configs/tf2 からの構成ファイルを編集し、編集済みの構成ファイルを /content/customTF2/customTF2/data フォルダにコピーします。
パイプライン構成ファイルは、前のステップでダウンロードしたモデルチェックポイントフォルダ内にもあります。
次の変更を行う必要があります。
- num_classes を自分のクラス数に変更します。
- test.record パス、train.record パス、labelmap パスを、これらのファイルを作成した場所のパスに変更します(トレーニング中は現在の作業ディレクトリに対する相対パスである必要があります)
- fine_tune_checkpointを、ステップ 12 でダウンロードしたチェックポイントがあるディレクトリのパスに変更します。
- fine_tune_checkpoint_type を、分類タイプに応じて数値 classification または detection に変更します。
- batch_size を、使用する GPU の能力に応じて 8 の倍数に変更します(例:24、128、...、512) - 通常、標準的な colab enterprise インスタンスでは、小さなデータセットには 24、大きなデータセットには 32 が適しています。
- num_steps を、検出器にトレーニングさせたいステップ数に変更します。
#編集した構成ファイルを configs/tf2 ディレクトリから GCP ストレージの data/ フォルダにコピーします。

!cp /content/models/research/object_detection/configs/tf2/ssd_mobilenet_v2_fpnlite_320x320_coco17_tpu-8.config /content/customTF2/customTF2/data
次のステップでは、公式の TensorBoard ツールを使用して、実行状況やグラフを可視化し、学習と分類の損失を時間経過とともに確認したいと思います。グラフの読み方やツールの使い方に関する詳細情報は、こちらをご覧ください: https://www.tensorflow.org/tensorboard/get_started#:~:text=TensorBoard is a tool for,during the machine learning workflow。
9) TensorBoardをロードします (推奨)
# cload tensorboard

%cd /content/customTF2/customTF2/training

# !pip install tensorboard
# tensorboard --inspect --logdir /content/customTF2/customTF2/training

# !gcloud init
# !gcloud auth application-default login

%reload_ext tensorboard
%tensorboard --logdir '/content/customTF2/customTF2/training'
10) モデルをトレーニングします
colab vm の object_detection フォルダに移動します
%cd /content/models/research/object_detection
10 (a) model_main_tf2.py を使用したトレーニング(推奨方法)
ここで、PIPELINE_CONFIG_PATH はパイプライン構成ファイルを指し、MODEL_DIR はトレーニングのチェックポイントとイベントが書き込まれるディレクトリを指します。
最良の結果を得るためには、損失が0.1未満になった時点でトレーニングを停止してください。それが難しい場合は、損失がしばらくの間、顕著な変化を示さなくなるまでモデルをトレーニングしてください。理想的な損失は0.05未満です(モデルを過学習させずに、損失をできるだけ低く抑えるようにしてください)。モデルがすでに収束している場合(例えば、損失がそれ以上顕著に減少せず、減少に時間がかかる場合)、損失を下げようとしてトレーニングステップを高くしすぎないようにしてください。
!pip install tensorflow==2.13.0

以下のコマンドをcontent/models/research/object_detection ディレクトリから実行してください。
"""
PIPELINE_CONFIG_PATH=path/to/pipeline.config
MODEL_DIR=path to training checkpoints directory
NUM_TRAIN_STEPS=50000
SAMPLE_1_OF_N_EVAL_EXAMPLES=1

python model_main_tf2.py -- \
  --model_dir=$MODEL_DIR --num_train_steps=$NUM_TRAIN_STEPS \
  --sample_1_of_n_eval_examples=$SAMPLE_1_OF_N_EVAL_EXAMPLES \
  --pipeline_config_path=$PIPELINE_CONFIG_PATH \
  --alsologtostderr
"""

!python model_main_tf2.py --pipeline_config_path=/content/customTF2/customTF2/data/ssd_mobilenet_v2_fpnlite_320x320_coco17_tpu-8.config --model_dir=/content/customTF2/customTF2/training --alsologtostderr
10 (b) Evaluation using model_main_tf2.py (Optional, just if you want more customization)
これを並行して実行するには、別の Colab ノートブックを開き、上記のトレーニングコマンドと同時にこのコマンドを実行します(その際、gcpストレージをマウントし、TF gitリポジトリをクローンし、TF2オブジェクト検出 API をインストールするのを忘れないでください)。これにより、検証損失、mAP などが表示され、モデルのパフォーマンスがどのようになっているかをより良く把握できます。
ここで、{CHECKPOINT_DIR} はトレーニングジョブによって生成されたチェックポイントが格納されているディレクトリを指します。評価イベントは {MODEL_DIR/eval} に書き込まれます。
以下のコマンドをcontent/models/research/object_detection ディレクトリから実行してください。
"""
PIPELINE_CONFIG_PATH=path/to/pipeline.config
MODEL_DIR=path to training checkpoints directory
CHECKPOINT_DIR=${MODEL_DIR}
NUM_TRAIN_STEPS=50000
SAMPLE_1_OF_N_EVAL_EXAMPLES=1

python model_main_tf2.py -- \
  --model_dir=$MODEL_DIR --num_train_steps=$NUM_TRAIN_STEPS \
  --checkpoint_dir=${CHECKPOINT_DIR} \
  --sample_1_of_n_eval_examples=$SAMPLE_1_OF_N_EVAL_EXAMPLES \
  --pipeline_config_path=$PIPELINE_CONFIG_PATH \
  --alsologtostderr
"""

!python model_main_tf2.py --pipeline_config_path=/content/customTF2/customTF2/data/ssd_mobilenet_v2_fpnlite_320x320_coco17_tpu-8.config --model_dir=/content/customTF2/customTF2/training/ --checkpoint_dir=/content/customTF2/customTF2/training/ --alsologtostderr
モデルの再トレーニング (接続が切れた場合)
接続が切れたり、colab vmのセッションが失われた場合、トレーニングは中断した場所から再開できます。チェックポイントはtrainingフォルダ内のクラウドストレージに保存されています。トレーニングを再開するには、ステップ 1, 4, 5, 6, 9, 10 を実行してください。
トレーニングに必要なすべてのファイル(記録ファイル、編集済みpipeline configファイル、label_mapファイル、モデルチェックポイントフォルダなど)が揃っているため、これらを再作成する必要はありません。
model_main_tf2.pyスクリプトは、1000ステップごとにチェックポイントを保存します。 トレーニングは、最後に保存されたチェックポイントから自動的に再開されます。
ただし、最後のチェックポイントからトレーニングが再開されない場合は、パイプライン構成ファイルに1つの変更を加えることができます。fine_tune_checkpoint を、最新のトレーニング済みチェックポイントが書き込まれている場所に変更し、最新のチェックポイントを指すように以下のように設定します。
fine_tune_checkpoint: "/content/customTF2/customTF2/training/ckpt-X" (where ckpt-X is the latest checkpoint)
11) トレーニング済みモデルをテストします
推論グラフをエクスポート
現在の作業ディレクトリは /content/models/research/object_detection検出です
%cd /content/models/research/object_detection

!pip install tensorflow==2.13.0

# #推論グラフをエクスポート
!python exporter_main_v2.py --trained_checkpoint_dir=/content/customTF2/customTF2/training --pipeline_config_path=/content/customTF2/customTF2/data/ssd_mobilenet_v2_fpnlite_320x320_coco17_tpu-8.config --output_directory /content/customTF2/customTF2/data/inference_graph
訓練済みのオブジェクト検出モデルを画像でテストします(好みのテスト画像を提供して image_path を調整します)
現在の作業ディレクトリは /content/models/research/object_detection検出です
%cd /content/models/research/object_detection

# ラベルテキストの異なるフォントタイプ。(このステップはオプション)
!wget https://www.freefontspro.com/d/14454/arial.zip
!unzip arial.zip -d .

%cd utils/
!sed-i「s/font = ImageFont.TrueType ('arial.ttf', 24) /font = ImageFont.TrueType ('arial.ttf', 50)/」visualization_utils.py
%cd ..
%cd /content/models/research/object_detection

!pip install tensorflow=="2.12.0"

#保存された_モデルのローディング
import tensorflow as tf
import time
import numpy as np
import warnings
warnings.filterwarnings('ignore')
from PIL import Image
from google.colab.patches import cv2_imshow
from object_detection.utils import label_map_util
from object_detection.utils import visualization_utils as viz_utils

IMAGE_SIZE = (12, 8) # Output display size as you want
import matplotlib.pyplot as plt
PATH_TO_SAVED_MODEL="/content/customTF2/customTF2/data/inference_graph/saved_model"
print('Loading model...', end='')

# 保存したモデルを読み込み、検出機能を構築します。
detect_fn=tf.saved_model.load(PATH_TO_SAVED_MODEL)
print('Done!')

#ラベル_マップのローディング
category_index=label_map_util.create_category_index_from_labelmap("/content/customTF2/customTF2/data/label_map.pbtxt",use_display_name=True)

def load_image_into_numpy_array(path):

    return np.array(Image.open(path))

# テストイメージに置き換えます
image_path = "/content/customTF2/customTF2/data/images/your_test.jpg"
#print('Running inference for {}... '.format(image_path), end='')

image_np = load_image_into_numpy_array(image_path)

# 入力はテンソルでなければなりません。`tf.convert_to_tensor` を使用して変換します。
input_tensor = tf.convert_to_tensor(image_np)
# モデルは画像のバッチを想定しているため、`tf.newaxis` で軸を追加してください。
input_tensor = input_tensor[tf.newaxis, ...]

detections = detect_fn(input_tensor)

# すべての出力はバッチテンソルです。
# numpy 配列に変換し、インデックス [0] を使用してバッチディメンションを削除します。
# 対象とするのは最初の num_detections だけです。
num_detections = int(detections.pop('num_detections'))
detections = {key: value[0, :num_detections].numpy()
              for key, value in detections.items()}
detections['num_detections'] = num_detections

# 検出_クラスは整数でなければなりません。
detections['detection_classes'] = detections['detection_classes'].astype(np.int64)

image_np_with_detections = image_np.copy()

viz_utils.visualize_boxes_and_labels_on_image_array(
      image_np_with_detections,
      detections['detection_boxes'],
      detections['detection_classes'],
      detections['detection_scores'],
      category_index,
      use_normalized_coordinates=True,
      max_boxes_to_draw=200,
      min_score_thresh=.8, # この値を調整して True として分類される最小確率ボックスを設定します
      agnostic_mode=False)
%matplotlib inline
plt.figure(figsize=IMAGE_SIZE, dpi=200)
plt.axis("off")
plt.imshow(image_np_with_detections)
plt.show()
トレーニング済みの SSD (シングルショット検出器) モデルから TFLite モデルへの変換
12) tf-nightlyをインストールします
TFLiteコンバーターは、tf-nightlyでうまく機能します。
%cd /content/models/research/object_detection

!pip install tensorflow=="2.12.0"
!pip install numpy==1.26.4
!pip install tf-nightly
13) SSDTFLiteグラフをエクスポートします
現在の作業ディレクトリは /content/models/research/object_detection検出です
# !pip3 uninstall keras
# !pip3 install keras==2.14.0

!pip3 install --upgrade tensorflow keras

!pip3 install tensorflow=="2.12.0"

# !pip3 install --upgrade tensorflow keras
# !pip3 install tensorflow=="2.13.1"
# !pip3 install numpy --upgrade
# !pip3 uninstall numpy
# !pip3 install numpy=="1.22.0"
# !pip3 install tensorflow --upgrade
#!python --version


%cd /content/models/research/object_detection

!python export_tflite_graph_tf2.py --pipeline_config_path /content/customTF2/customTF2/data/ssd_mobilenet_v2_fpnlite_320x320_coco17_tpu-8.config --trained_checkpoint_dir /content/customTF2/customTF2/training --output_directory /content/customTF2/customTF2/data/tflite
14) TF 保存モデルを TFLite モデルに変換
現在の作業ディレクトリは /mydrive/customTF2/data/ です
%cd /content/customTF2/customTF2/data/
入力テンソル名と出力テンソル名を確認
!saved_model_cli show--dir /content/customTF2/customTF2/data/tflite/saved_model--tag_set serve—all
TFLite への変換:
方法 (a) または方法 (b) のいずれかを使用します。
方法 (a) コマンドラインツール tflite_convert を使用-(基本モデル変換)
# デフォルトの推論タイプは浮動小数点です。
%cd /content/customTF2/customTF2/data/

!tflite_convert --saved_model_dir=tflite/saved_model --output_file=tflite/detect.tflite
方法 (b) Python API を使用-(最適化などによる高度なモデル変換用)
%cd /mydrive/customTF2/data/

#'''********************************
# 浮動小数点推論用
#*********************************'''

#import tensorflow as tf

saved_model_dir = '/content/customTF2/customTF2/data/tflite/saved_model'

#converter = tf.lite.TFLiteConverter.from_saved_model(saved_model_dir)
#tflite_model = converter.convert()
#open("/content/customTF2/customTF2/data/tflite/detect.tflite", "wb").write(tflite_model)


#'''**************************************************
# 最適化による浮動小数点推論用
#***************************************************'''

import tensorflow as tf
converter = tf.lite.TFLiteConverter.from_saved_model(saved_model_dir,signature_keys=['serving_default'])
converter.optimizations = [tf.lite.Optimize.DEFAULT]
converter.experimental_new_converter = True
converter.target_spec.supported_ops = [tf.lite.OpsSet.TFLITE_BUILTINS,
                                       tf.lite.OpsSet.SELECT_TF_OPS]
tflite_model = converter.convert()

with tf.io.gfile.GFile('/mydrive/customTF2/data/tflite/detect.tflite', 'wb') as f:
   f.write(tflite_model)


#'''**********************************
# ダイナミックレンジ量子化用
#*************************************
# このモデルは重みが量子化され、少し小さくなりましたが、他の変数データはまだfloat形式です。'''

# import tensorflow as tf

# converter = tf.lite.TFLiteConverter.from_saved_model('/content/customTF2/customTF2/data/tflite/saved_model',signature_keys=['serving_default'])
# converter.optimizations = [tf.lite.Optimize.DEFAULT]
# tflite_quant_model = converter.convert()

# with tf.io.gfile.GFile('/content/customTF2/customTF2/data/tflite/detect.tflite', 'wb') as f:
#   f.write(tflite_quant_model)


# '''***********************************************************************
# 整数と浮動小数点のフォールバック量子化(デフォルトの最適化を使用)
# **************************************************************************
# これで、すべての重みと変数データが量子化され、元のTensorFlow Liteモデルと比較してモデルが大幅に小さくなりました。
# ただし、float形式のモデル入力および出力テンソルを従来使用しているアプリケーションとの互換性を維持するために、
# TensorFlow Lite コンバーターはモデルの入力テンソルと出力テンソルをフロートのままにします'''

# import tensorflow as tf
# import numpy as np

# saved_model_dir = '/content/customTF2/customTF2/data/tflite/saved_model'

# def representative_dataset():
#     for _ in range(100):
#       data = np.random.rand(1, 320, 320, 3)
#       yield [data.astype(np.float32)]

# converter = tf.lite.TFLiteConverter.from_saved_model(saved_model_dir)
# converter.optimizations = [tf.lite.Optimize.DEFAULT]
# converter.representative_dataset = representative_dataset
# tflite_quant_model = converter.convert()

# with open('/content/customTF2/customTF2/data/tflite/detect.tflite', 'wb') as f:
#   f.write(tflite_quant_model)


# '''*********************************
# 全整数量子化用
# ************************************
# 内部量子化は前の浮動小数点フォールバック量子化方法と同じままです。
# しかし、入力と出力のテンソルは、ここでも整数形式になっていることがわかります。'''

# import tensorflow as tf
# import numpy as np

# saved_model_dir = '/content/customTF2/customTF2/data/tflite/saved_model'

# def representative_dataset():
#     for _ in range(100):
#       data = np.random.rand(1, 320, 320, 3)
#       yield [data.astype(np.float32)]

# converter = tf.lite.TFLiteConverter.from_saved_model(saved_model_dir)
# converter.optimizations = [tf.lite.Optimize.DEFAULT]
# converter.representative_dataset = representative_dataset
# converter.target_spec.supported_ops = [tf.lite.OpsSet.TFLITE_BUILTINS_INT8]
# converter.inference_input_type = tf.uint8
# converter.inference_output_type = tf.uint8
# tflite_quant_model_full_int = converter.convert()

# with open('/content/customTF2/customTF2/data/tflite/detect.tflite', 'wb') as f:
#   f.write(tflite_quant_model_full_int)
トレーニング後の量子化の詳細は、 こちらをご覧ください。これらについては、こちらのColabノートブックでも読むことができます。
15) TFLite メタデータを作成します
!pip install tflite_support_nightly
%cd /content/customTF2/customTF2/data/
%d tflite/
!mkdir tflite_with_metadata
%cd ..
データフォルダ内の各行にクラスの名前が書き込まれたlabelmap.txt ファイルを作成します。
最後に、次のセルを実行して、メタデータが添付されたdetect.tfliteモデルを作成します。
現在の作業ディレクトリは /content/customTF2/customTF2/data/
%cd /content/customTF2/customTF2/data/
!pip uninstall tensorflow
!pip install tensorflow=="2.13.1"


# TFLite にメタデータを添付
from tflite_support.metadata_writers import object_detector
from tflite_support.metadata_writers import writer_utils
import flatbuffers
import platform

from tensorflow_lite_support.metadata import metadata_schema_py_generated
from tensorflow_lite_support.metadata import schema_py_generated
from tensorflow_lite_support.metadata.python import metadata
from tensorflow_lite_support.metadata.python import metadata_writers

import flatbuffers
import os
from tensorflow_lite_support.metadata import metadata_schema_py_generated as _metadata_fb
from tensorflow_lite_support.metadata.python import metadata as _metadata
from tensorflow_lite_support.metadata.python.metadata_writers import metadata_info
from tensorflow_lite_support.metadata.python.metadata_writers import metadata_writer
from tensorflow_lite_support.metadata.python.metadata_writers import writer_utils

ObjectDetectorWriter = object_detector.MetadataWriter

_MODEL_PATH = "/content/customTF2/customTF2/data/tflite/detect.tflite"
_LABEL_FILE = "/content/customTF2/customTF2/data/labelmap.txt"
_SAVE_TO_PATH = "/content/customTF2/customTF2/data/tflite/tflite_with_metadata/detect.tflite"

writer = ObjectDetectorWriter.create_for_inference(
    writer_utils.load_file(_MODEL_PATH), [127.5], [127.5], [_LABEL_FILE])
writer_utils.save_file(writer.populate(), _SAVE_TO_PATH)

# 入力されたメタデータと関連ファイルを確認します。
displayer = metadata.MetadataDisplayer.with_model_file(_SAVE_TO_PATH)
print("Metadata populated:")
print(displayer.get_metadata_json())
print("Associated file(s) populated:")
print(displayer.get_packed_associated_file_list())

model_meta = _metadata_fb.ModelMetadataT()
model_meta.name = "SSD_Detector"
model_meta.description = (
    "Identify which of a known set of objects might be present and provide "
    "information about their positions within the given image or a video "
    "stream.")

# 入力情報を作成します。
input_meta = _metadata_fb.TensorMetadataT()
input_meta.name = "image"
input_meta.content = _metadata_fb.ContentT()
input_meta.content.contentProperties = _metadata_fb.ImagePropertiesT()
input_meta.content.contentProperties.colorSpace = (
    _metadata_fb.ColorSpaceType.RGB)
input_meta.content.contentPropertiesType = (
    _metadata_fb.ContentProperties.ImageProperties)
input_normalization = _metadata_fb.ProcessUnitT()
input_normalization.optionsType = (
    _metadata_fb.ProcessUnitOptions.NormalizationOptions)
input_normalization.options = _metadata_fb.NormalizationOptionsT()
input_normalization.options.mean = [127.5]
input_normalization.options.std = [127.5]
input_meta.processUnits = [input_normalization]
input_stats = _metadata_fb.StatsT()
input_stats.max = [255]
input_stats.min = [0]
input_meta.stats = input_stats

# 出力情報を作成します。
output_location_meta = _metadata_fb.TensorMetadataT()
output_location_meta.name = "location"
output_location_meta.description = "The locations of the detected boxes."
output_location_meta.content = _metadata_fb.ContentT()
output_location_meta.content.contentPropertiesType = (
    _metadata_fb.ContentProperties.BoundingBoxProperties)
output_location_meta.content.contentProperties = (
    _metadata_fb.BoundingBoxPropertiesT())
output_location_meta.content.contentProperties.index = [1, 0, 3, 2]
output_location_meta.content.contentProperties.type = (
    _metadata_fb.BoundingBoxType.BOUNDARIES)
output_location_meta.content.contentProperties.coordinateType = (
    _metadata_fb.CoordinateType.RATIO)
output_location_meta.content.range = _metadata_fb.ValueRangeT()
output_location_meta.content.range.min = 2
output_location_meta.content.range.max = 2

output_class_meta = _metadata_fb.TensorMetadataT()
output_class_meta.name = "category"
output_class_meta.description = "The categories of the detected boxes."
output_class_meta.content = _metadata_fb.ContentT()
output_class_meta.content.contentPropertiesType = (
    _metadata_fb.ContentProperties.FeatureProperties)
output_class_meta.content.contentProperties = (
    _metadata_fb.FeaturePropertiesT())
output_class_meta.content.range = _metadata_fb.ValueRangeT()
output_class_meta.content.range.min = 2
output_class_meta.content.range.max = 2
label_file = _metadata_fb.AssociatedFileT()
label_file.name = os.path.basename("labelmap.txt")
label_file.description = "Label of objects that this model can recognize."
label_file.type = _metadata_fb.AssociatedFileType.TENSOR_VALUE_LABELS
output_class_meta.associatedFiles = [label_file]

output_score_meta = _metadata_fb.TensorMetadataT()
output_score_meta.name = "score"
output_score_meta.description = "The scores of the detected boxes."
output_score_meta.content = _metadata_fb.ContentT()
output_score_meta.content.contentPropertiesType = (
    _metadata_fb.ContentProperties.FeatureProperties)
output_score_meta.content.contentProperties = (
    _metadata_fb.FeaturePropertiesT())
output_score_meta.content.range = _metadata_fb.ValueRangeT()
output_score_meta.content.range.min = 2
output_score_meta.content.range.max = 2

output_number_meta = _metadata_fb.TensorMetadataT()
output_number_meta.name = "number of detections"
output_number_meta.description = "The number of the detected boxes."
output_number_meta.content = _metadata_fb.ContentT()
output_number_meta.content.contentPropertiesType = (
    _metadata_fb.ContentProperties.FeatureProperties)
output_number_meta.content.contentProperties = (
    _metadata_fb.FeaturePropertiesT())

# サブグラフ情報を作成します。
group = _metadata_fb.TensorGroupT()
group.name = "detection result"
group.tensorNames = [
    output_location_meta.name, output_class_meta.name,
    output_score_meta.name
]
subgraph = _metadata_fb.SubGraphMetadataT()
subgraph.inputTensorMetadata = [input_meta]
subgraph.outputTensorMetadata = [
    output_location_meta, output_class_meta, output_score_meta,
    output_number_meta
]
subgraph.outputTensorGroups = [group]
model_meta.subgraphMetadata = [subgraph]

b = flatbuffers.Builder(0)
b.Finish(
    model_meta.Pack(b),
    _metadata.MetadataPopulator.METADATA_FILE_IDENTIFIER)
metadata_buf = b.Output()
質問されたら、'Y'で進みます
16) TFLite モデルをダウンロードします
お疲れ様でした。これで完了です!
まとめ
Google Colab Enterpriseは、機械学習のための強力なクラウドベースのプラットフォームであり、TensorFlow Liteモデルを構築する上で理想的な環境です。このプラットフォームを1年以上使用してみて、最も時間がかかるのはデータ準備と初期の試行錯誤段階であることが分かりました。この段階では、データセットの特定の部分を認識する際の課題を特定し、画像が誤って分類される誤検知に対処するために、著しい反復とテストが必要です。
*Android ロボットのヘッダー画像は、Google が作成および共有した画像から複製または変更されたものであり、クリエイティブ コモンズ 3.0 帰属ライセンスに記載されている条件に従って使用されています。
関連記事 | Related Posts

AndroidでTensorFlowを使用したオブジェクト検出

Training and Prediction as Batch Pattern (2/4)

Expanding the Reach of Technical Documents! Automating Markdown Conversion with Generative AI
Calling Generative AI (Azure OpenAI) with Java

Metadata Management with SageMaker Experiments (3/4)

Advent Calendar 2023 Announcement
We are hiring!
【データサイエンティスト】データサイエンスG/東京・名古屋・福岡
デジタル戦略部についてデジタル戦略部は、現在45名の組織です。
生成AIエンジニア/AIファーストG/東京・名古屋・大阪・福岡
AIファーストGについて生成AIの活用を通じて、KINTO及びKINTOテクノロジーズへ事業貢献することをミッションに2024年1月に新設されたプロジェクトチームです。生成AI技術は生まれて日が浅く、その技術を業務活用する仕事には定説がありません。

![[Mirror]不確実な事業環境を突破した、成長企業6社独自のエンジニアリング](/assets/banners/thumb1.png)

