Android Composeオブジェクト指向ナビゲーション
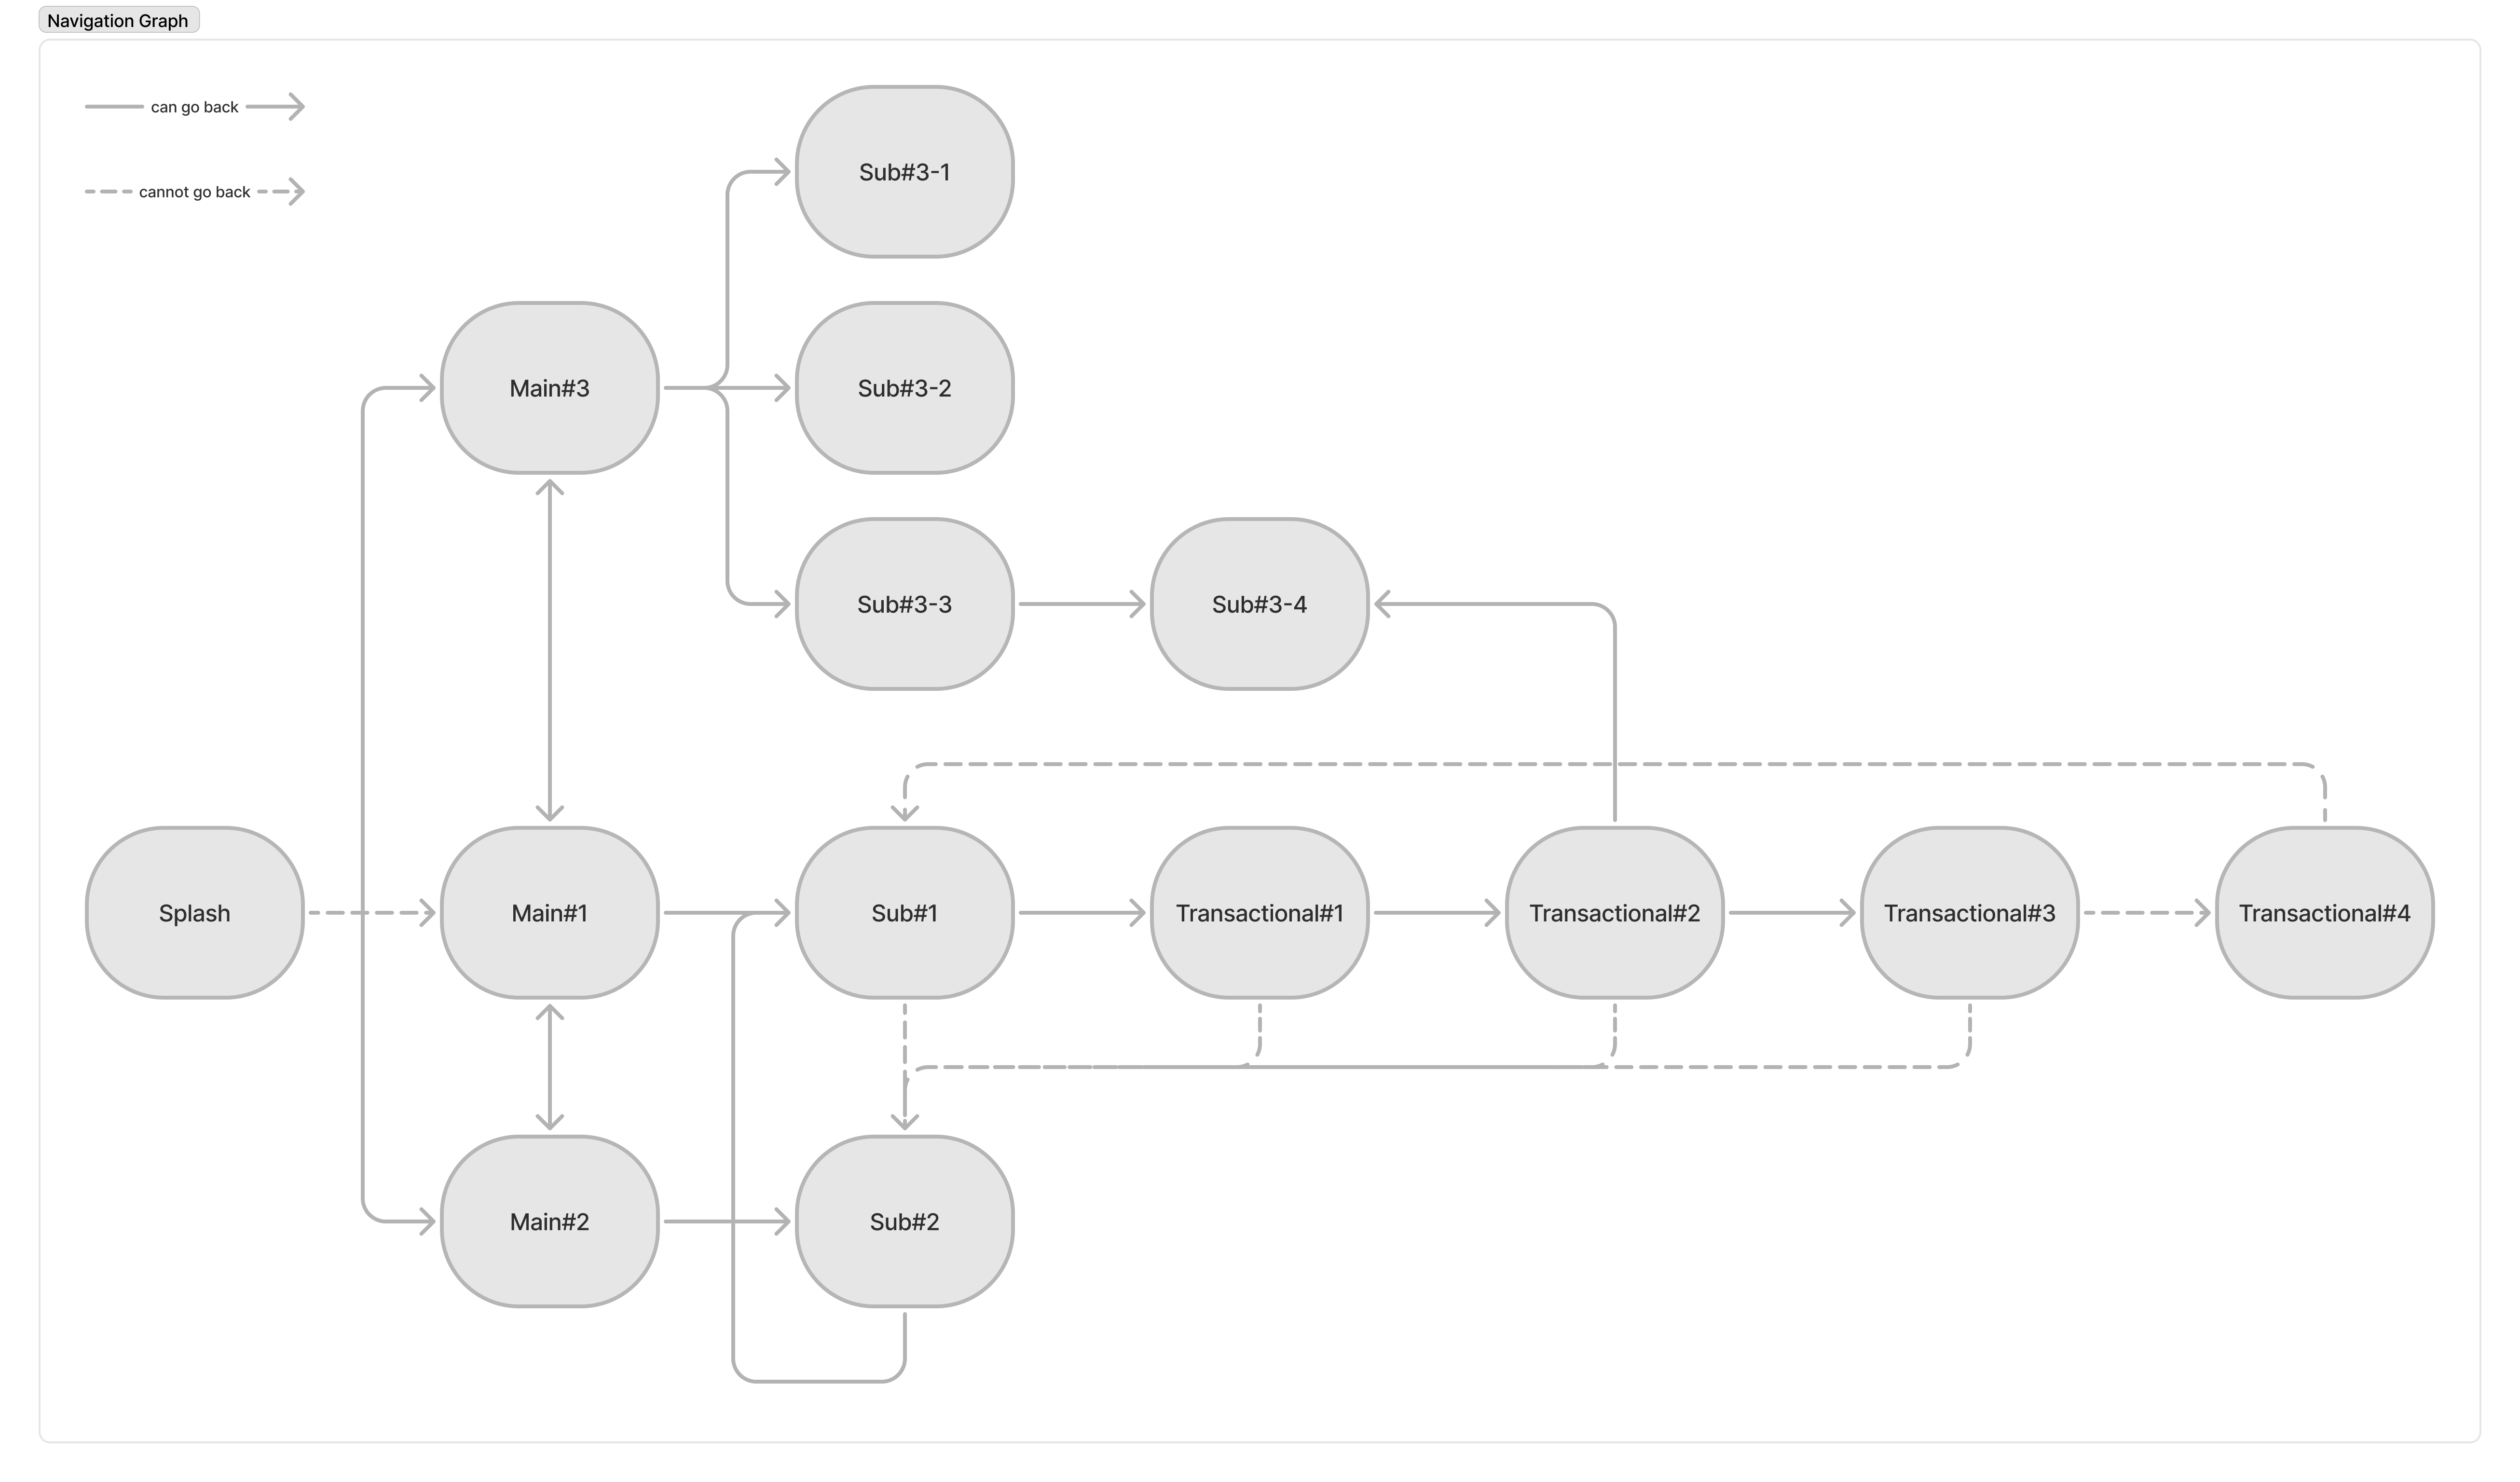
前提条件と範囲
本記事では、Android Composeのナビゲーションを、オブジェクト指向の観点から処理する方法について説明します。基盤となる技術をカプセル化し、開発の利便性を高め、特定の技術へのロックインを防止する機能を開発する方法を網羅します。
これにより、Android Composeアプリ向けの高品質なナビゲーションコードが書けるだけでなく、オブジェクト指向開発の考え方も身につけられます。
- 本記事では、Dagger/Hiltを使用したMVVMアーキテクチャを前提としています。
- ここでは、ナビゲーションルート→ViewModel→UIのパスのみを通じてデータを提供し、ナビゲーションルート→UIの直接的なデータ提供は行いません。
- Android Navigationバックスタックに関する事前知識が必要となります。
- ナビゲーションボタンの素早い連続クリックによるUXの問題などは考慮していません。
- ディープリンクには対応していません。
- Android OSレベルでサポートされているバックジェスチャの取り扱いについては説明していません。
- 厳密な引数の検証やパフォーマンスの最適化については触れていません。
- 本記事で使用している用語や名称は便宜的なものであり、一般的な技術用語や学術的な表現とは異なる場合があります。
この記事は、KINTOテクノロジーズ・アドベントカレンダー2024の16日目の記事です🎅🎄
ナビゲーションタイプ
詳細
詳細情報を提供する画面へ移動する際は、一般的にリスト画面から特定の項目画面へ遷移します。例えば、ニュースフィードからニュース詳細、メニューからメニュー項目への移動などが該当します。各ナビゲーションアクションによって、バックスタックが1つ増えます。前の画面に戻るには、バックスタックの一番上(pop)を削除します。
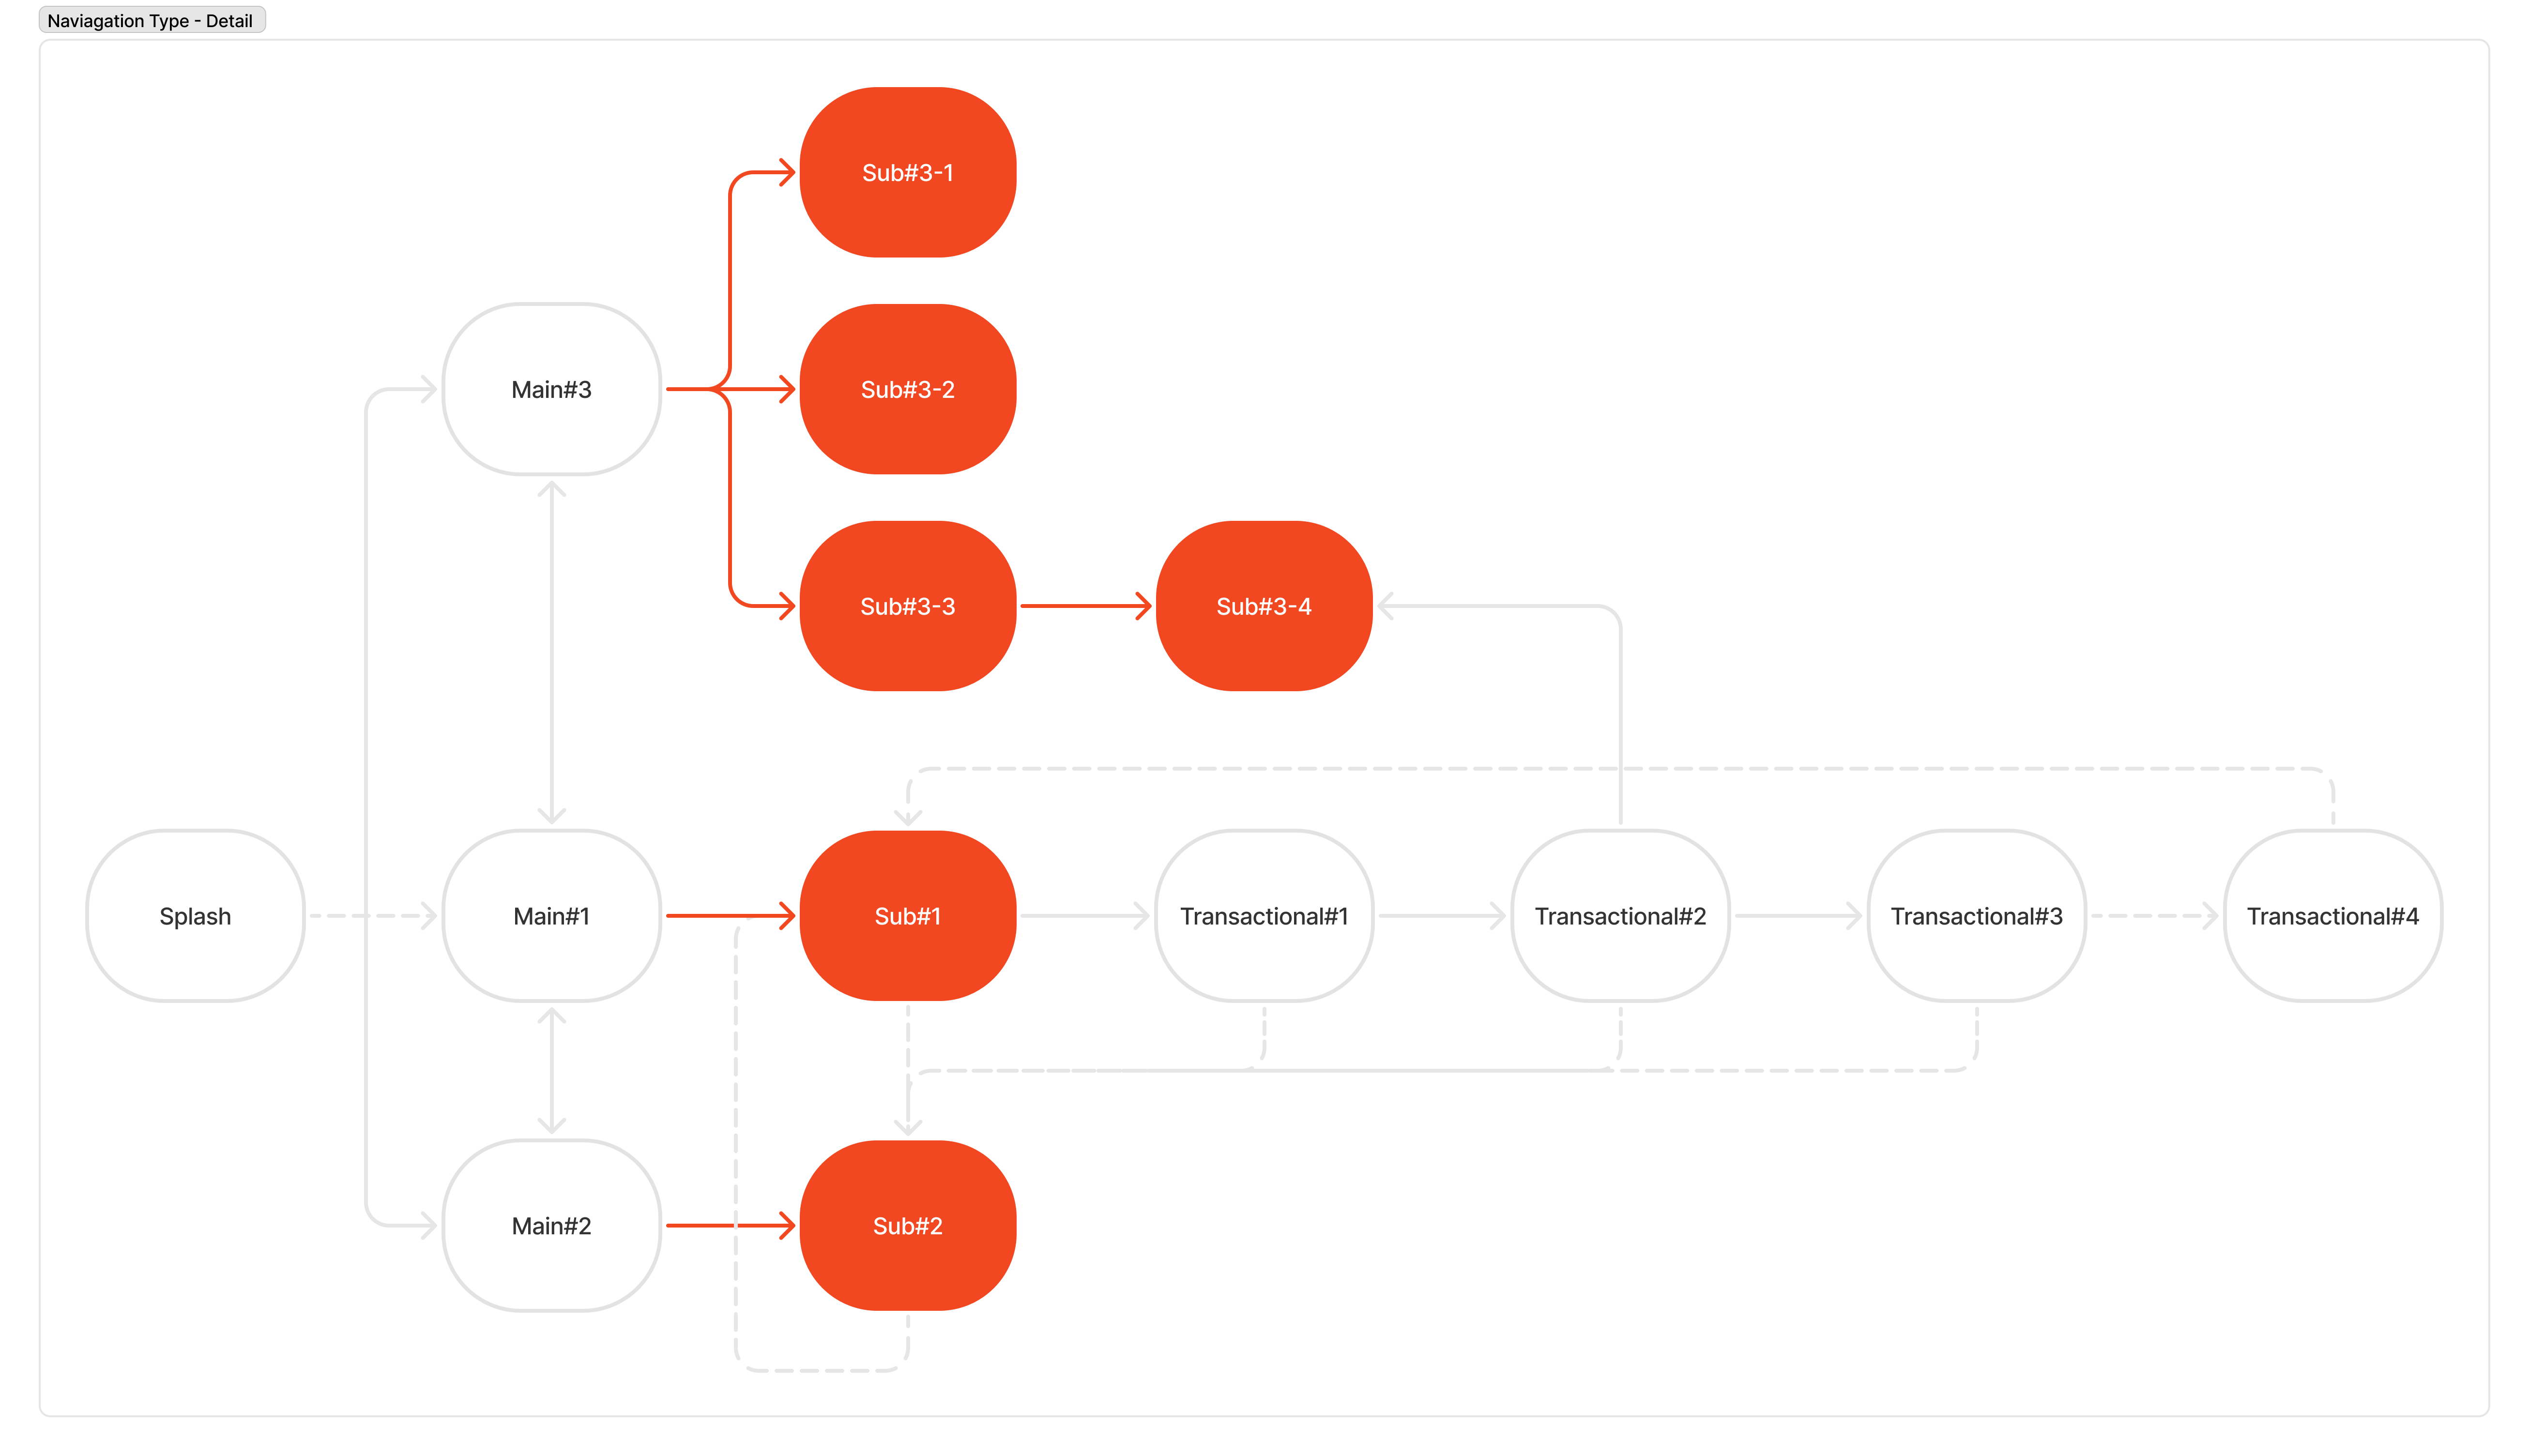
navController.navigate("sub3_1")のように、route stringを指定して NavController.navigate functionを呼び出せます。
@Composable
fun NavigationGraph() {
    val navController = rememberNavController()
    NavHost(navController, "splash") {
        composable("main3") {
            val viewModel: Main3ViewModel = hiltViewModel()
            Main3Screen(
                id = viewModel.id,
                navMain1 = { /* ... */ },
                navMain2 = { /* ... */ },
                navMain3 = { /* ... */ },
                navSub31 = { navController.navigate("sub3_1") },
                navSub32 = { navController.navigate("sub3_2") },
                navSub33 = { navController.navigate("sub3_3") }
            )
        }
    }
}
切り替え
このタイプのナビゲーションでは、ユーザーは別の画面に移動するのではなく、同じ画面内でコンテンツが変化したと認識します。通常、タブや下部のナビゲーションバーで使用されます。
下部ナビゲーションバーの場合、バックスタックの高さは変わりません。バックスタックの一番下は、 必ずMain#1、Main#2、またはMain#3のいずれかである必要があります。
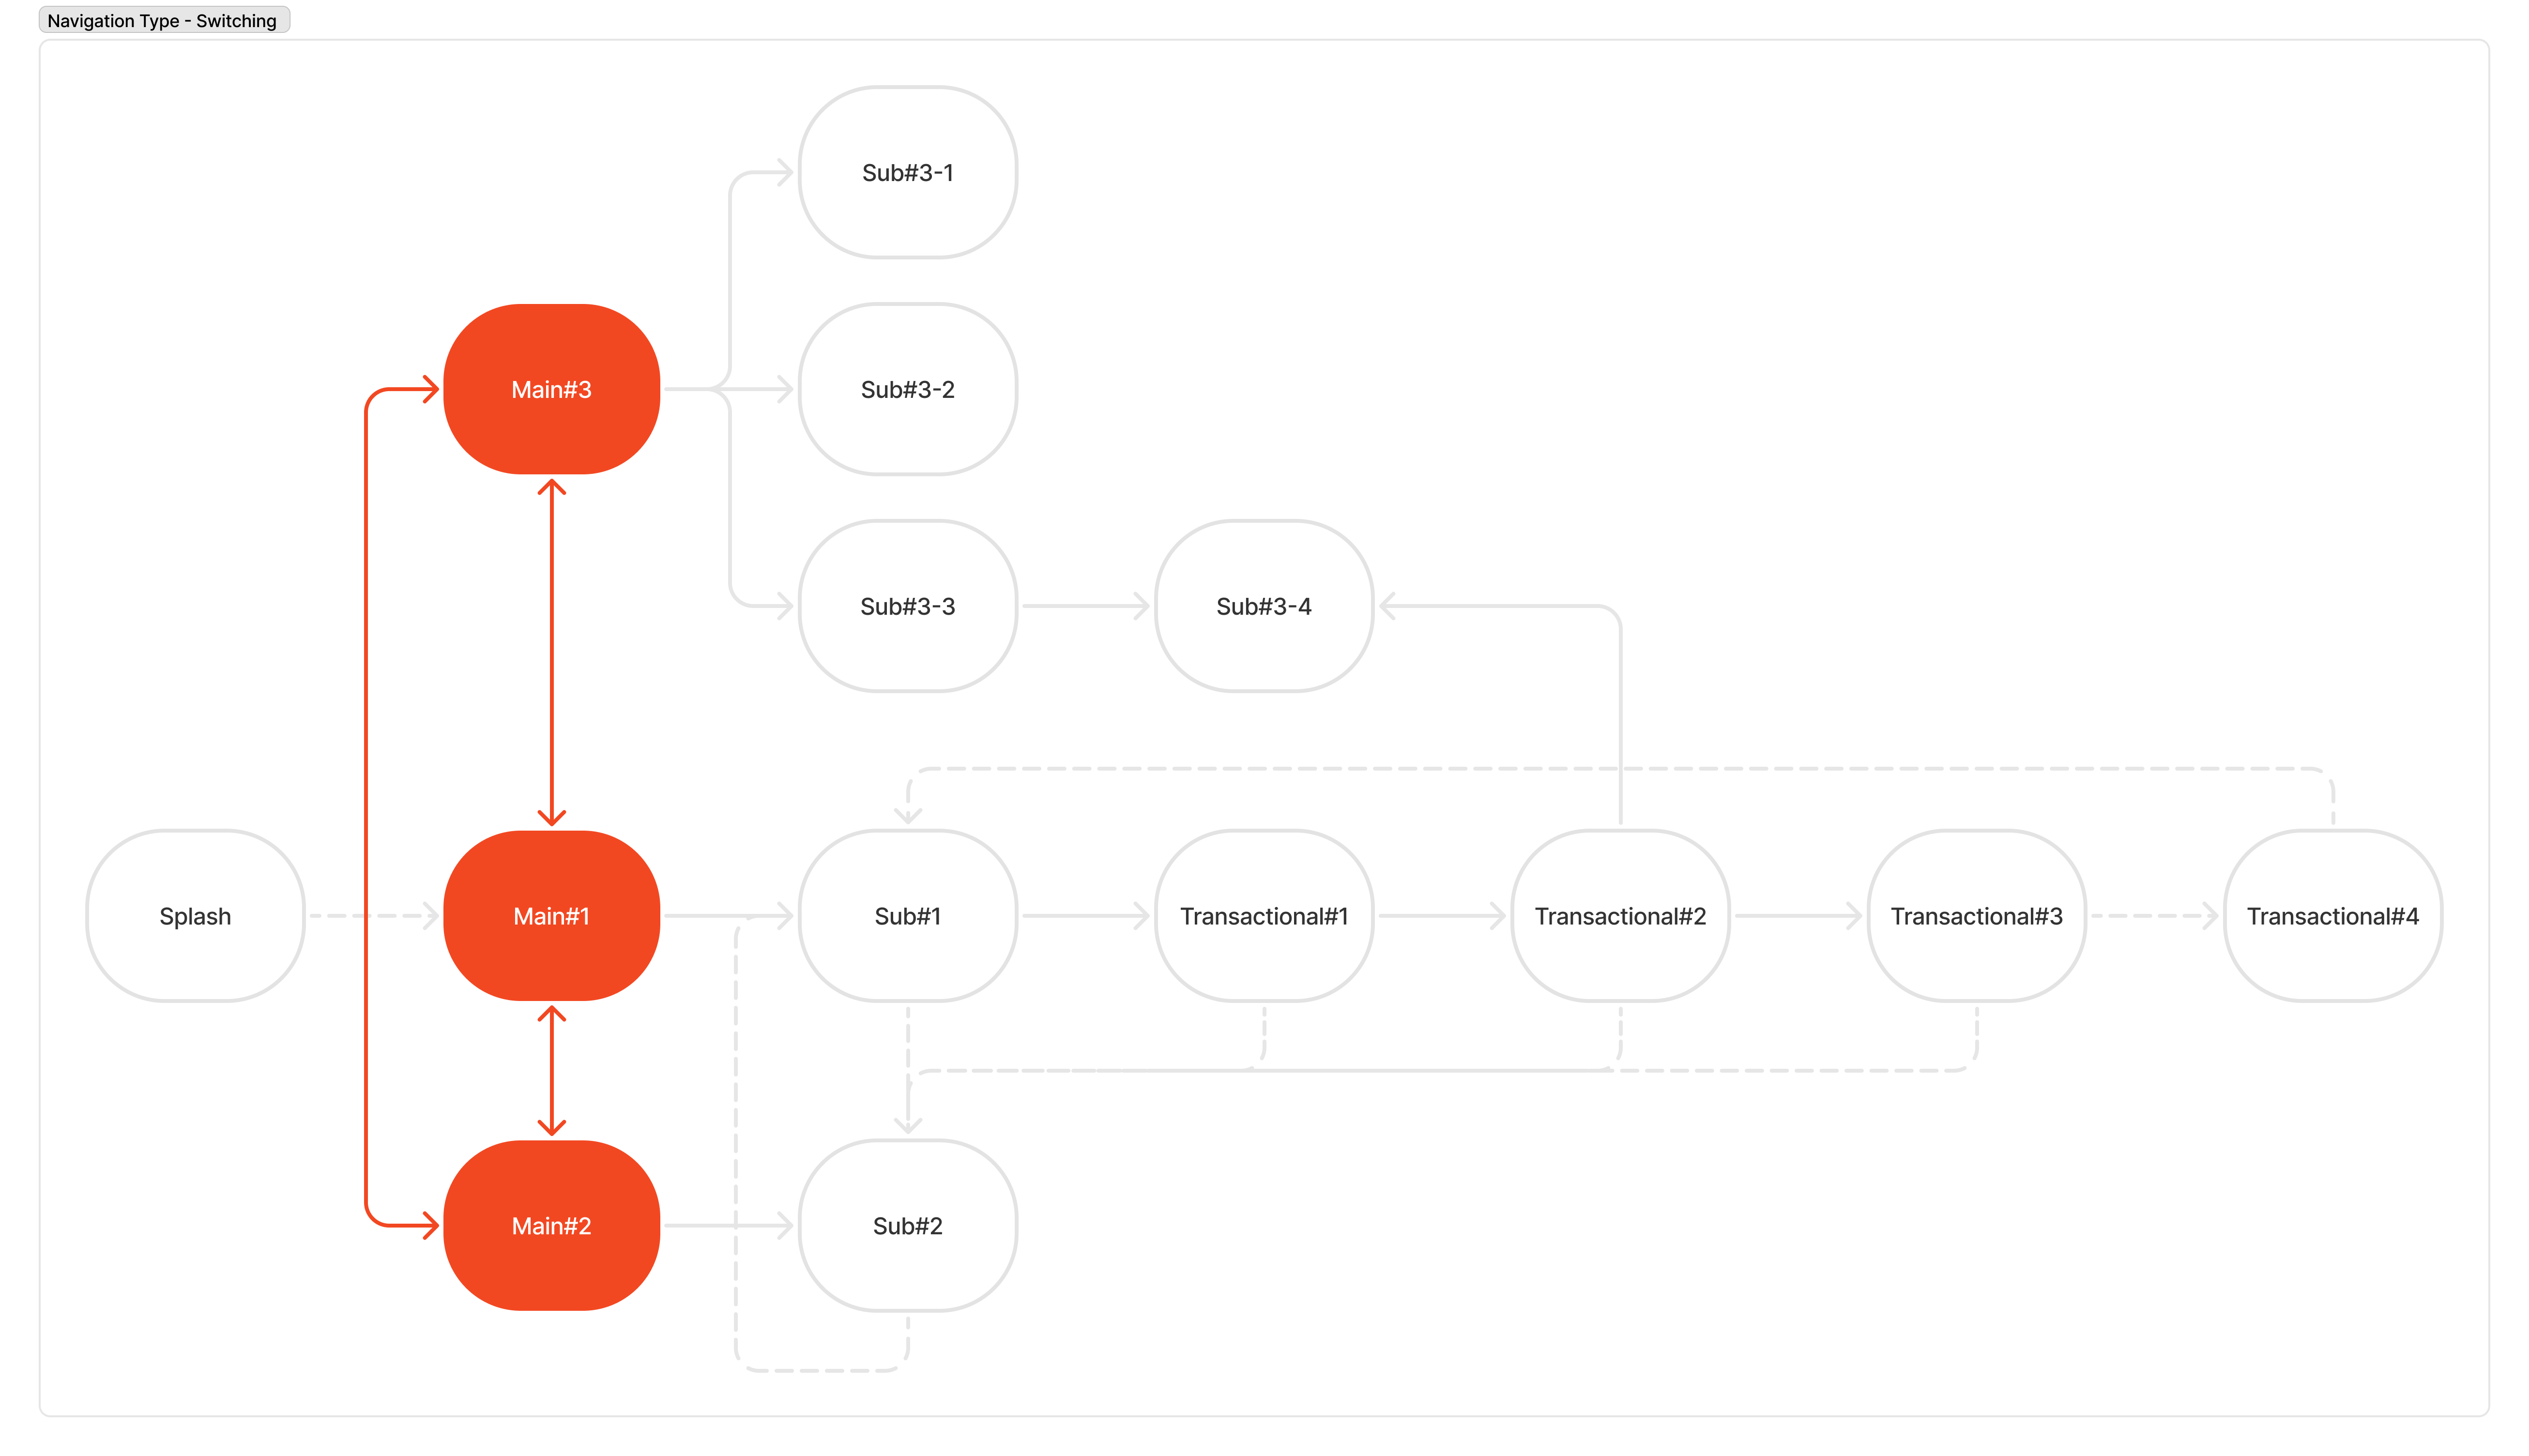
バックスタックから自身を削除するには、popUpTo の呼び出しが必要で、必要に応じて UI 状態の保存と復元が求められることがあります。
@Composable
fun NavigationGraph() {
    val navController = rememberNavController()
    NavHost(navController, "splash") {
        composable("main3") {
            val viewModel: Main3ViewModel = hiltViewModel()
            Main3Screen(
                id = viewModel.id,
                navMain1 = {
                    navController.navigate("main1") {
                        popUpTo("main1") {
                            inclusive = true
                            saveState = true
                        }
                        launchSingleTop = true
                        restoreState = true
                    }
                },
                navMain2 = {
                    navController.navigate("main2") {
                        popUpTo("main2") {
                            inclusive = true
                            saveState = true
                        }
                        launchSingleTop = true
                        restoreState = true
                    }
                },
                navMain3 = {
                    navController.navigate("main3") {
                        popUpTo("main3") {
                            inclusive = true
                            saveState = true
                        }
                        launchSingleTop = true
                        restoreState = true
                    }
                },
                navSub31 = { /* ... */ },
                navSub32 = { /* ... */ },
                navSub33 = { /* ... */ }
            )
        }
    }
}
一方向
このタイプのナビゲーションでは、前の画面に戻れない画面へ遷移します。バックスタックから自身を削除し(pop)、遷移先の画面を追加します (push)。例えば、フォームを送信した後やスプラッシュ画面から移動した後に、元の画面へ戻れないケースなどが該当します。
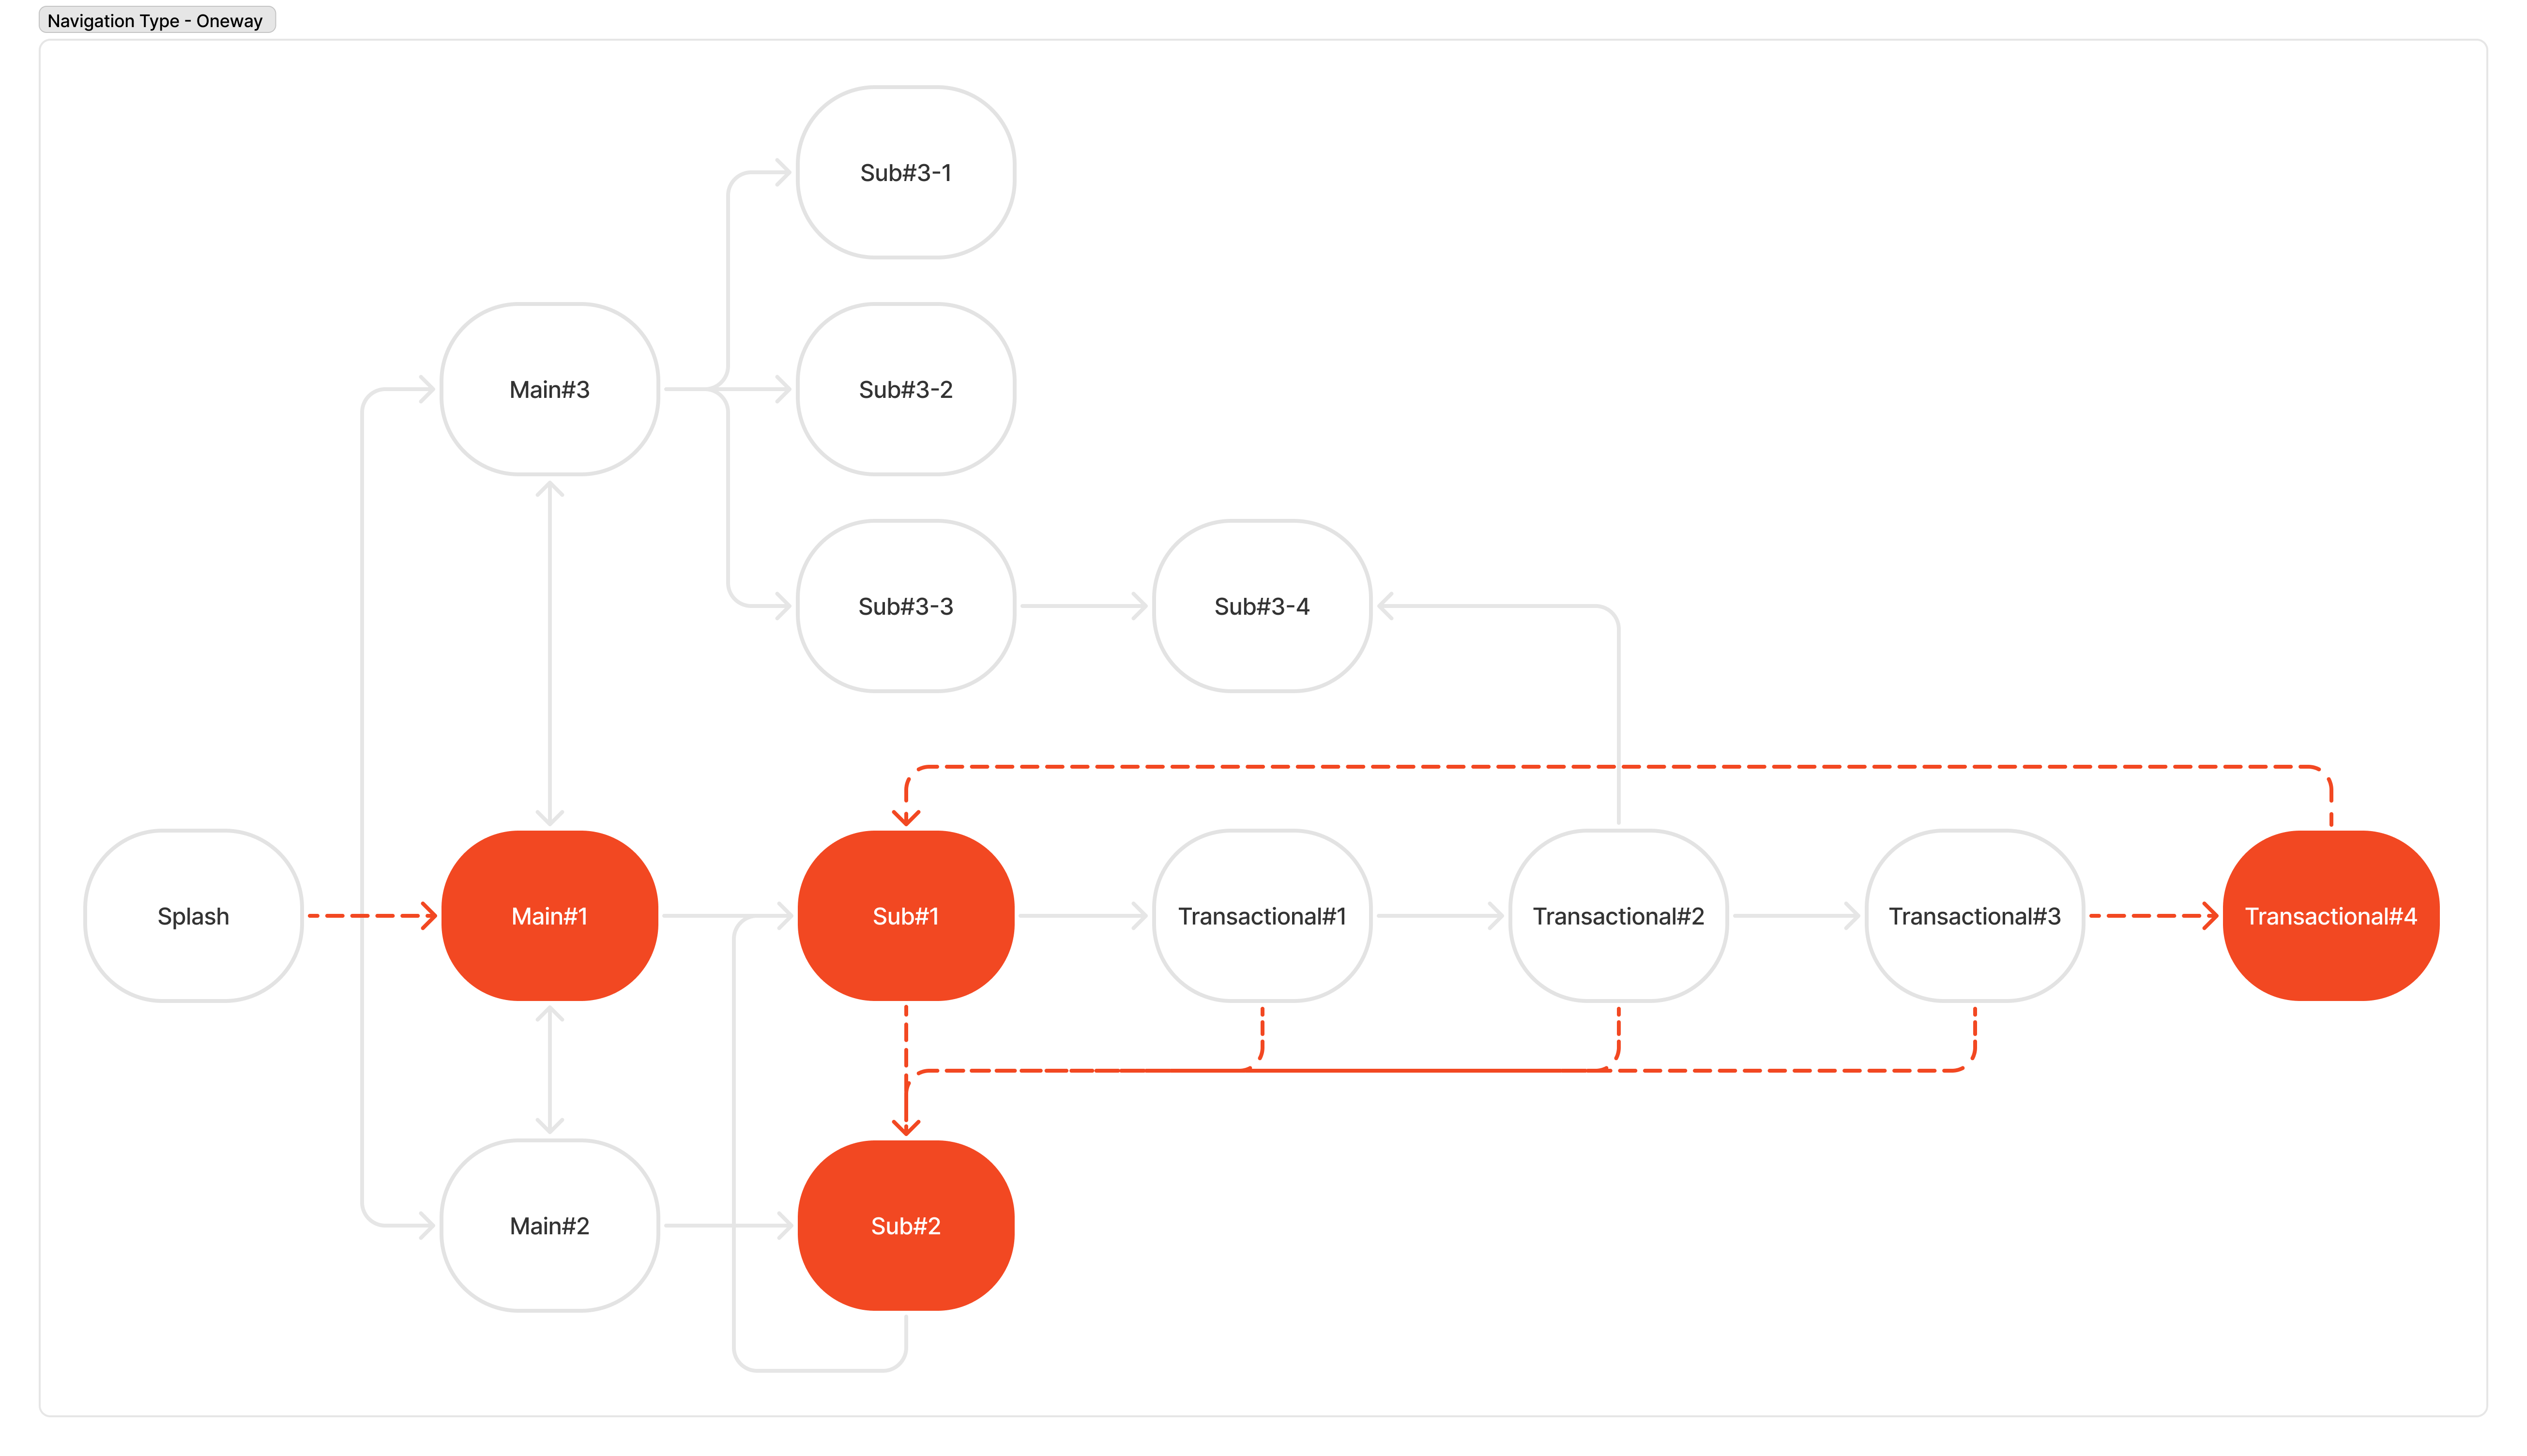
戻れないようにするだけならpopBackStack で対応できますが、 必要に応じてpopUpTo を使用し、バックスタックから複数の画面を削除することもできます。
@Composable
fun NavigationGraph() {
    val navController = rememberNavController()
    NavHost(navController, "splash") {
        composable("splash") {
            val viewModel: SplashViewModel = hiltViewModel()
            SplashScreen(
                timeout = viewModel.timeout,
                navMain1 = {
                    navController.popBackStack()
                    navController.navigate("main1")
                }
            )
        }

        composable("transactional3") {
            val viewModel: Transactional3ViewModel = hiltViewModel()
            Transactional3Screen(
                onClickSave = { /* ... */ },
                onClickSubmit = {
                    viewModel.onClickSubmit {
                        navController.navigate("transactional1") {
                            popUpTo("sub1") {
                                inclusive = true
                            }
                        }
                    }
                }
            )
        }
    }
}
トランザクション(分割)
このタイプのナビゲーションでは、非常に複雑または長い単一の画面を、複数のステップに分割します。伝える情報が多い場合や、ユーザーにアクションを求める場合に、ストレスを軽減してUXを向上させるために使用されます。ユーザーは途中でフローを終了できますが、再び入るときは最初から開始する必要があります。タスクを完了したり、フローから離れたりすると、フロー全体がバックスタックから削除されます。このアプローチは、フォームを含む複雑なUIの途中放棄を防ぐために、一方向ナビゲーションと組み合わせることができます。
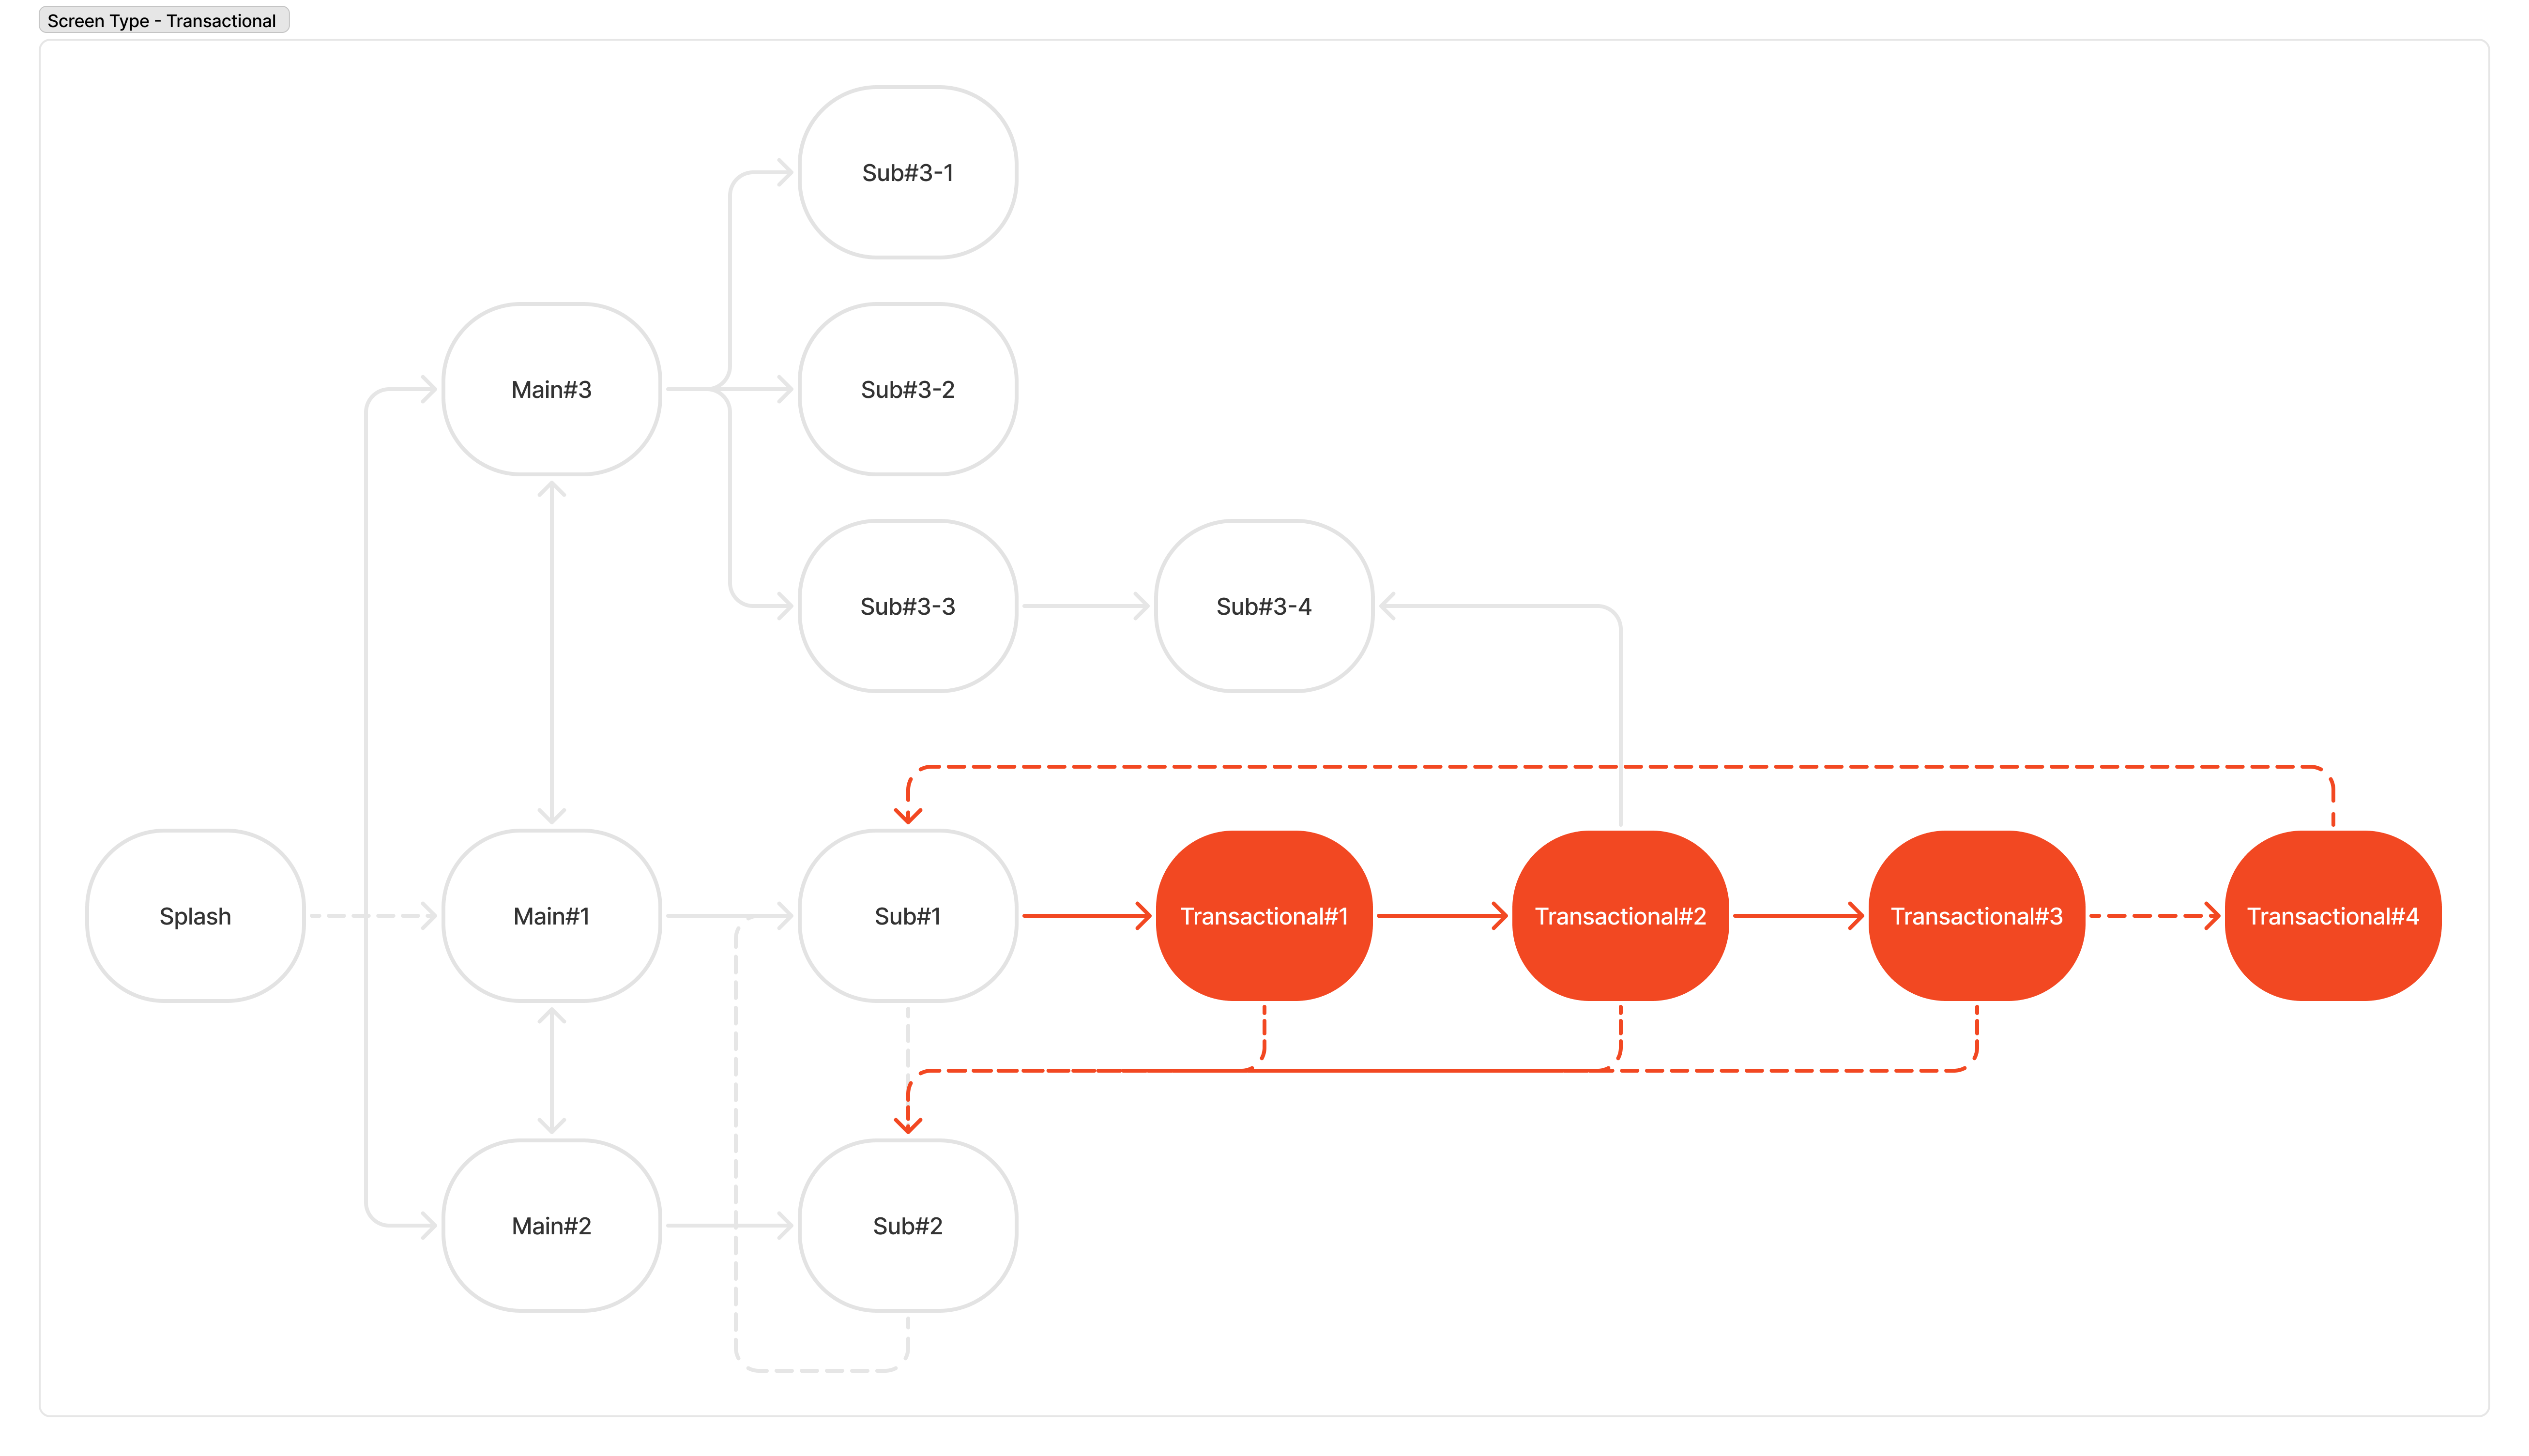
フロー内では前後に自由に移動できますが、フローを終了するときはpopUpTo を使ってバックスタックからフロー内のすべての画面を削除する必要があります。
@Composable
fun NavigationGraph() {
    val navController = rememberNavController()
    NavHost(navController, "splash") {
        composable(
            route = "transactional1",
            arguments = listOf(
                navArgument("draft") {
                    type = NavType.IntType
                }
            )
        ) {
            val viewModel: Transactional1ViewModel = hiltViewModel()
            Transactional1Screen(
                id = viewModel.id,
                onClickBack = {
                    viewModel.onClickBack {
                        navController.popBackStack()
                    }
                },
                onClickSave = {
                    viewModel.onClickSave {
                        navController.navigate("sub2") {
                            popUpTo("transactional1") {
                                inclusive = true
                            }
                        }
                    }
                },
                onClickNext = {
                    navController.navigate("transactional2")
                }
            )
        }
    }
}
ナビゲーション管理
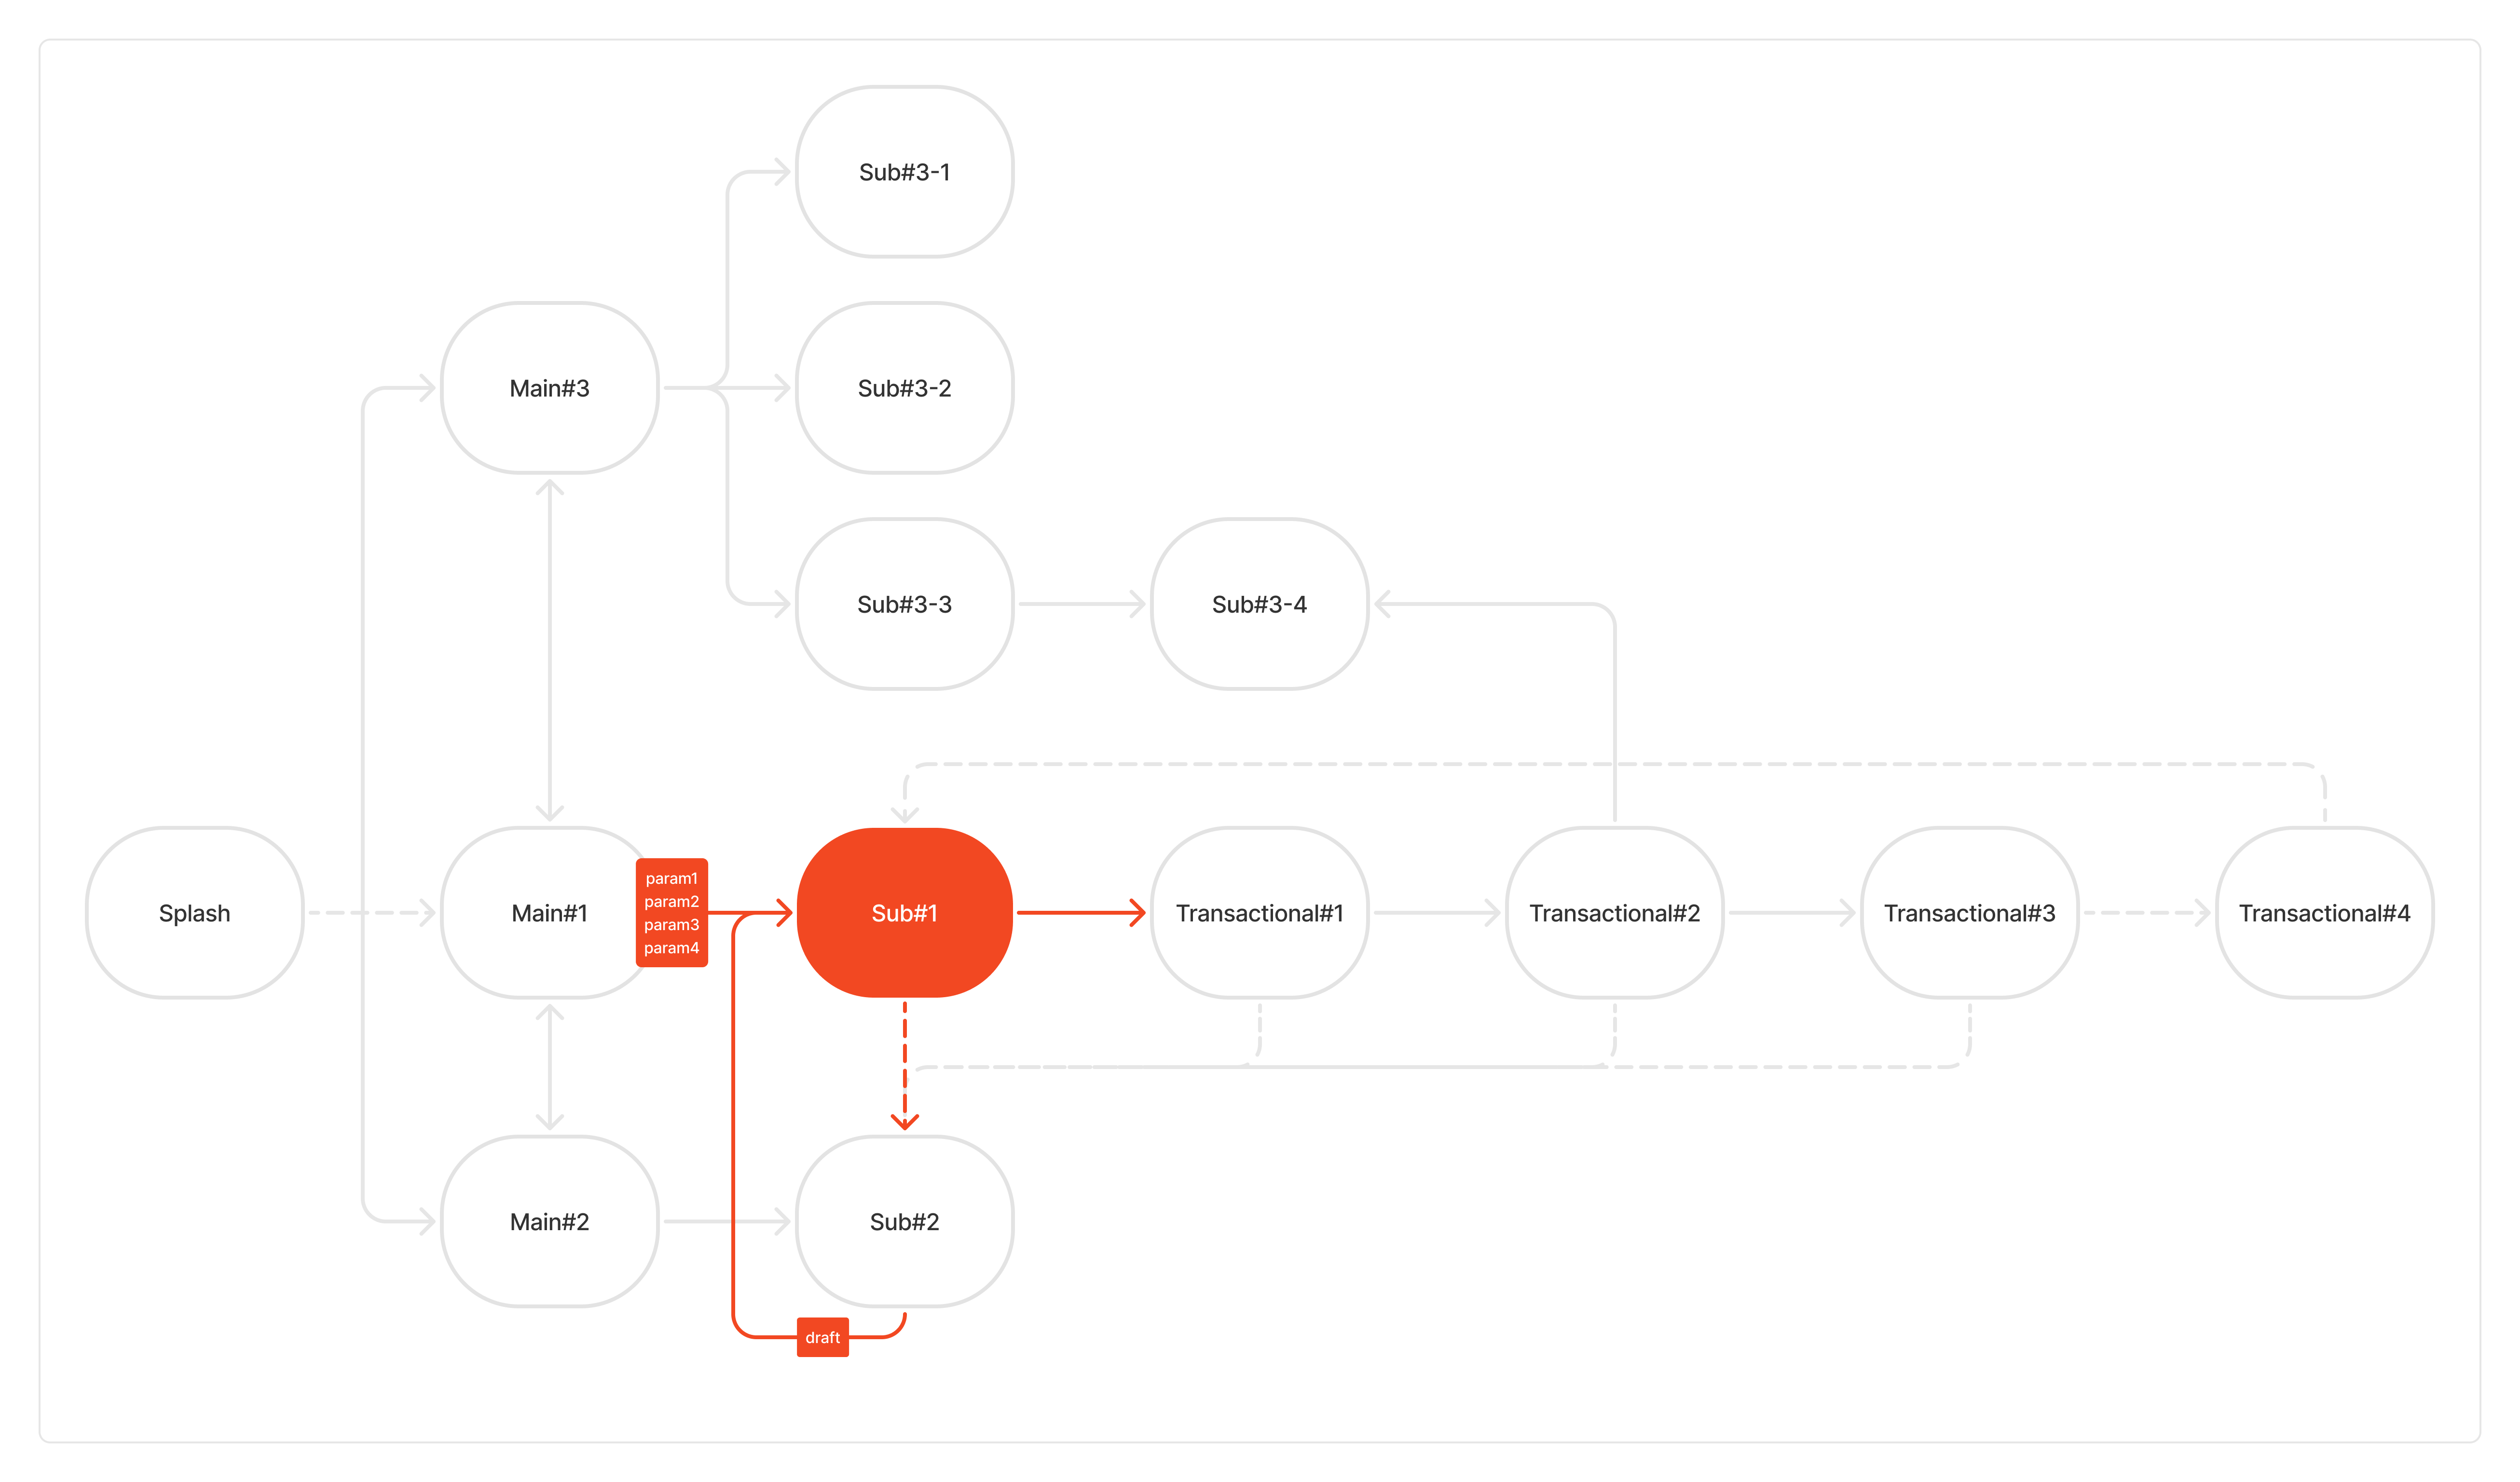
Sub#1 画面と、その関連する遷移(赤で強調)を使用して、オブジェクト指向の方法でナビゲーションを管理する方法を説明します。オブジェクト指向の要素を段階的に導入していきます。
Sub#1画面には、次の条件があります。
Sub#1画面を開くには、draftパラメータ、またはparam1、param2、param3、Param4パラメータの組み合わせが必要です。Sub #1画面からSub #2画面に移動するには、長時間実行されるsave関数の完了を待つ必要があります。Sub #1画面からTransactional #1画面に移動するには、長時間実行されるstart関数の完了を待つ必要があります。
ViewModel はナビゲーショングラフやUIから独立している必要があります。ナビゲーションルートから直接受け取った引数を使用するか、それを元にデータを取得し、UI に必要なプロパティを設定する必要があります。
@HiltViewModel
class Sub1ViewModel @Inject constructor(
    handle: SavedStateHandle,
    private val draftModel:DraftModel
) :ViewModel() {
    val id:UUID = UUID.randomUUID()

    val draft: Draft? = handle.get<Int?>("draft")?.let {
        runBlocking {
            if (null != draft && 0 < draft) {
                draftModel.get(draft)!!.also {
                    param1 = it.param1
                    param2 = it.param2
                    param3 = it.param3
                    param4 = it.param4
                }
            }
        }
    }

    var param1: String? = handle["param1"]
        private set
    var param2: String? = handle["param2"]
        private set
    var param3: String? = handle["param3"]
        private set
    var param4: String? = handle["param4"]
        private set

    fun onClickSave(callback: () -> Unit) {
        viewModelScope.launch {
            // Long save task.
            delay(2_000)
            callback()
        }
    }

    fun onClickStart(callback: () -> Unit) {
        viewModelScope.launch {
            // Long start task.
            delay(2_000)
            callback()
        }
    }
}
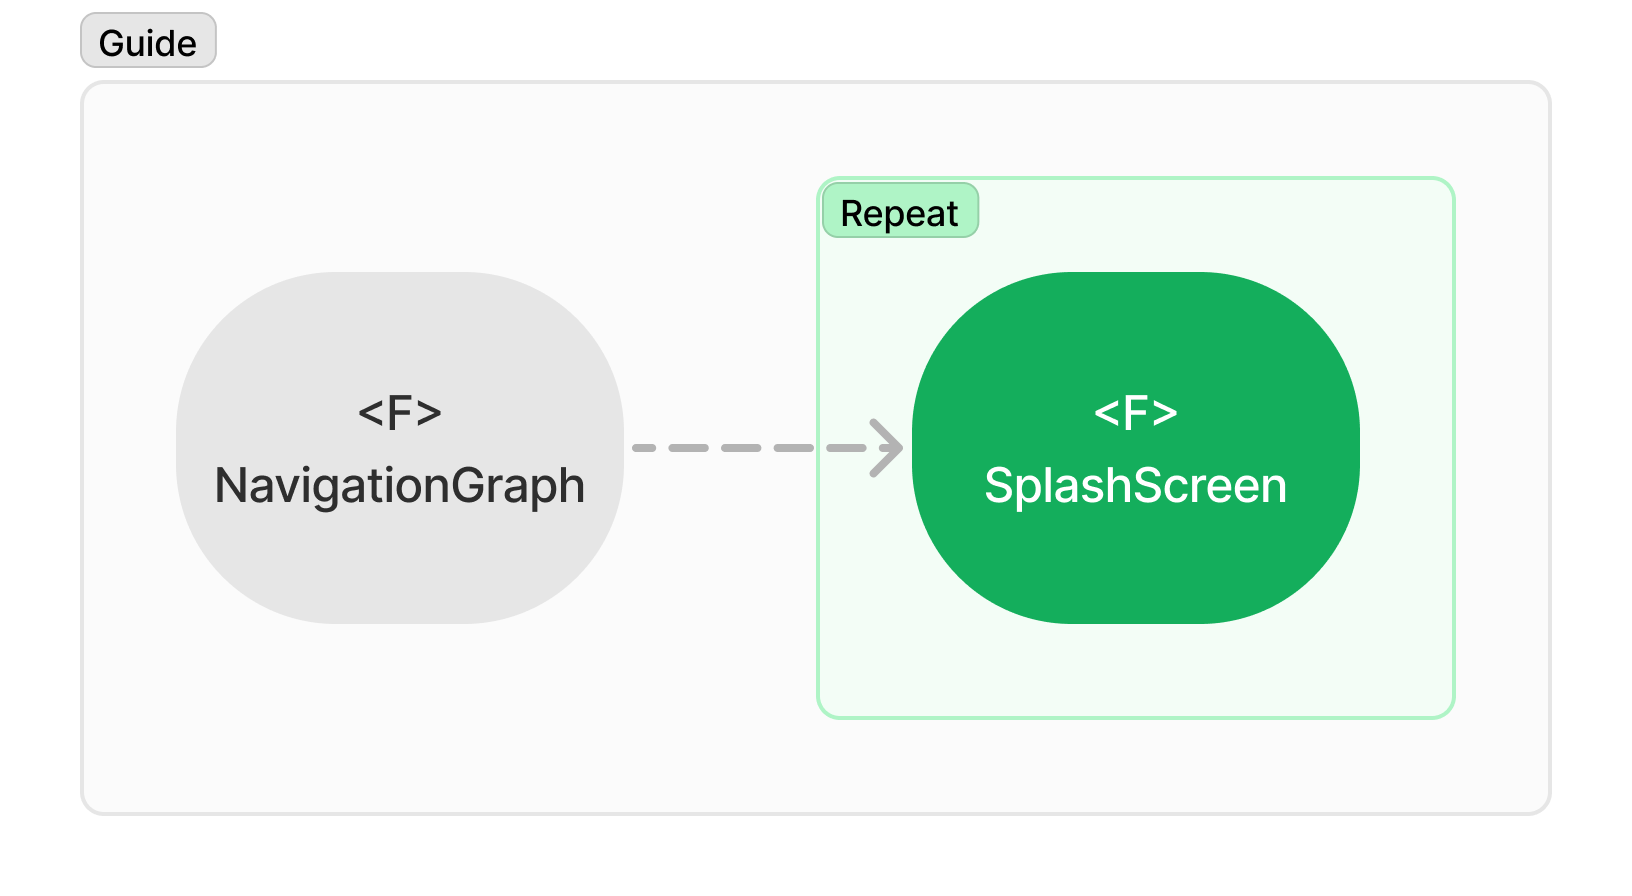
ガイドドキュメントの基本機能のみを使用する
「ナビゲーショングラフの最小例」ガイドを基に記述されたナビゲーションでは、 NavigationGraph に次の役割があります。
- 画面の登録
- 画面ルートのパラメータリストの宣言と登録
- 画面ナビゲーション用の
routestringsの作成 NavController.Navigateのカプセル化- 画面のUIを実行し、カプセル化された
NavController.Navigateロジックを渡す
/**
 * ガイドドキュメント形式のナビゲーショングラフ
 */
@Composable
fun NavigationGraph() {
    val navController = rememberNavController()
    NavHost(navController, "splash") {
        composable(
            route = "sub1?${
                listOf(
                    "draft={draft}",
                    "param1={param1}",
                    "param2={param2}",
                    "param3={param3}",
                    "param4={param4}"
                ).joinToString("&")
            }",
            arguments = listOf(
                navArgument("draft") {
                    type = NavType.IntType
                    defaultValue = 0
                },
                navArgument("param1") {
                    type = NavType.StringType
                    nullable = true
                },
                navArgument("param2") {
                    type = NavType.StringType
                    nullable = true
                },
                navArgument("param3") {
                    type = NavType.StringType
                    nullable = true
                },
                navArgument("param4") {
                    type = NavType.StringType
                    nullable = true
                }
            )
        ) {
            Sub1Screen(
                navBack = navController::popBackStack,
                navSub2 = {
                    navController.navigate("sub2") {
                        popUpTo("sub1") {
                            inclusive = true
                        }
                    }
                },
                navTransactional1 = { draft ->
                    if (null == draft) {
                        navController.navigate("transactional1")
                    } else {
                        navController.navigate("transactional1?draft=${draft.id}")
                    }
                }
            )
        }
    }
}
/**
 * ナビゲーション(カプセル化)、`ViewModel`(状態ホイスティング)、UI をつなぐ
 */
@Composable
fun Sub1Screen(
    viewModel: Sub1ViewModel = hiltViewModel(),
    navBack: () -> Unit = {},
    navSub2: () -> Unit = {},
    navTransactional1: (Draft?) -> Unit = {}
) {
    Sub1Content(
        id = viewModel.id,
        param1 = viewModel.param1!!,
        param2 = viewModel.param2!!,
        param3 = viewModel.param3!!,
        param4 = viewModel.param4!!,
        onClickBack = navBack,
        onClickSave = {
            viewModel.onClickSave(callback = navSub2)
        },
        onClickStart = {
            viewModel.onClickStart(callback = { navTransactional1(viewModel.draft) })
        }
    )
}

/**
 * 引数の状態を表示するだけ
 */
@Composable
private fun Sub1Content(
    id: UUID,
    param1: String,
    param2: String,
    param3: String,
    param4: String,
    onClickBack: () -> Unit = {},
    onClickSave: () -> Unit = {},
    onClickStart: () -> Unit = {}
) {
    IconButton(onClick = onClickBack) {
        Icon(Icons.AutoMirrored.Filled.ArrowBack, "back")
    }

    // ...

    Row(
        modifier = Modifier.fillMaxWidth(),
        horizontalArrangement = Arrangement.Center,
        verticalAlignment = Alignment.CenterVertically
    ) {
        OutlinedButton(
            onClick = onClickSave,
            modifier = Modifier.padding(16.dp)
        ) {
            Text("SAVE", style = MaterialTheme.typography.labelLarge)
        }

        Button(
            onClick = onClickStart,
            modifier = Modifier.padding(16.dp)
        ) {
            Text("START", style = MaterialTheme.typography.labelLarge)
        }
    }
}
進行中の課題
- 長いナビゲーショングラフコード:
NavigationGraphのコードは、画面数、各画面の引数、接続された画面、バックスタック操作が増えるにつれて長くなります。 - コード順と実行順の不一致:コードが記述される順序は、そのまま読み込まれる順序になりますが、実行順とは一致しません。この不一致により、開発者は読み取っているコードが現在のコンテキストに関連しているかどうかを常に判断する必要があり、認知的オーバーヘッドが増え、メンテナンスが難しくなります。
- UI関数のパラメータが多すぎる:UI関数(
Sub1Screen)のパラメータ数は、接続される画面が増えるほど増加します。例えば、詳細な設定項目が多い設定画面では、それに応じてパラメータの数も増えてしまいます。
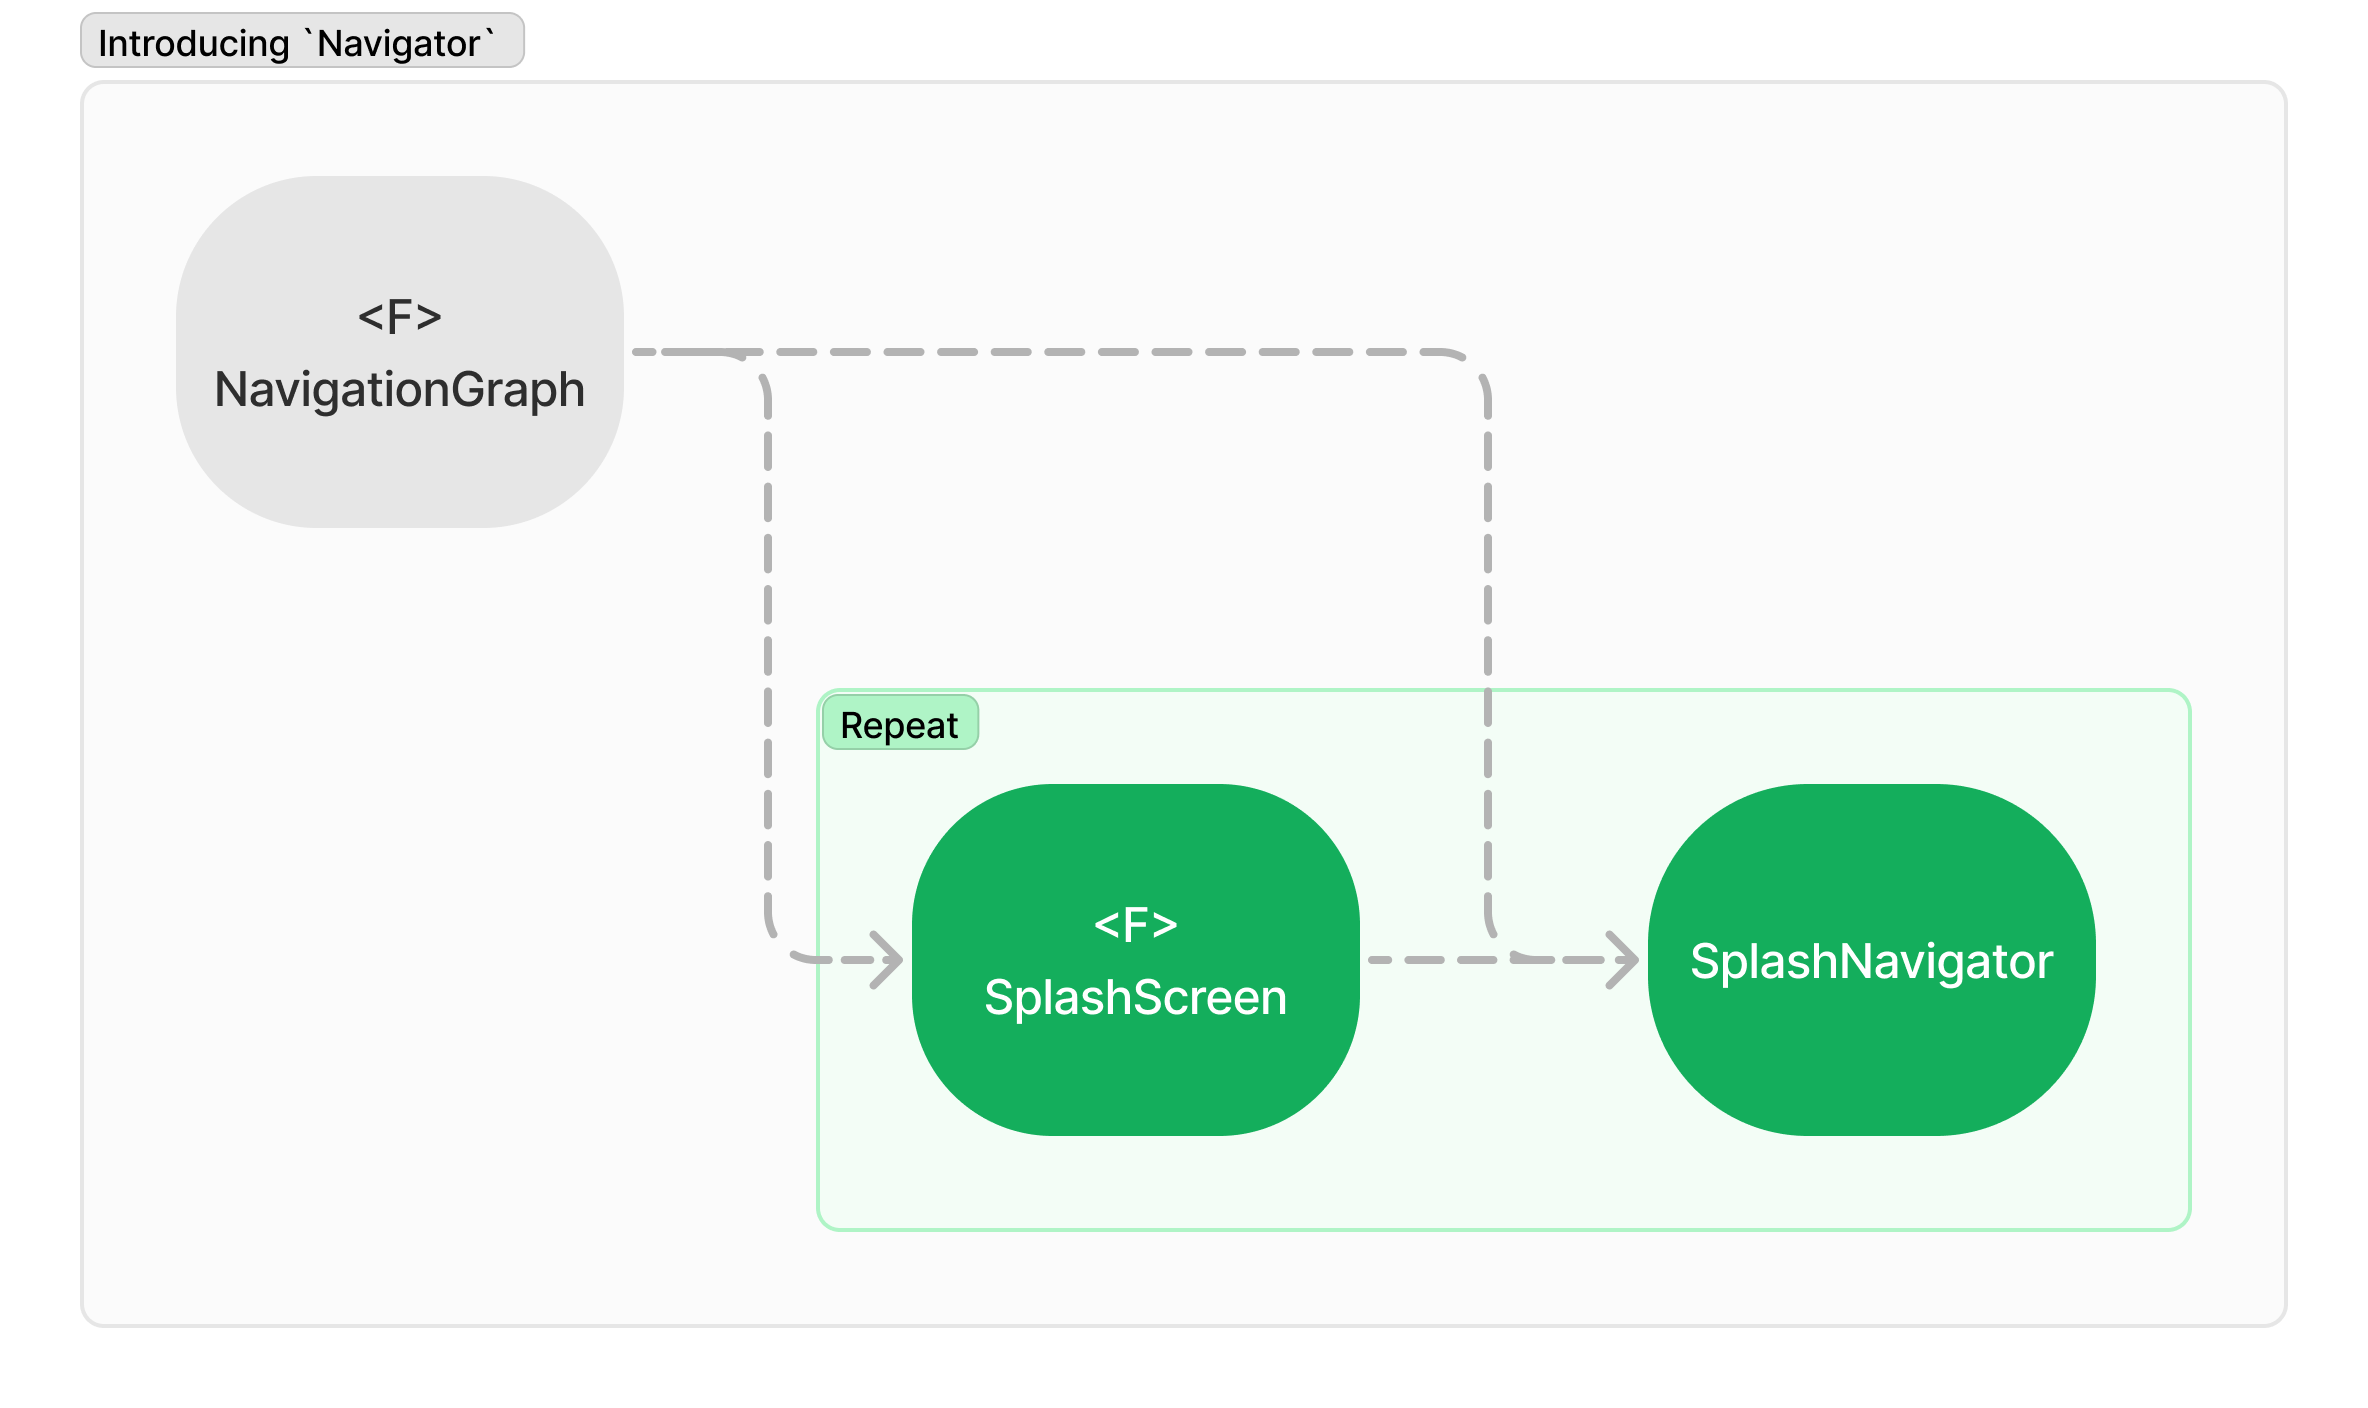
Navigatorの導入
ナビゲーターを導入する目的は、UI 関数のパラメータ数を減らすことです。UI 関数のナビゲーション関連パラメータをナビゲーターオブジェクトにまとめます。
ナビゲータの役割:
Sub#1から移動可能な画面をオブジェクトにグループ化:ナビゲーターオブジェクトは、Sub#1画面から遷移できる画面のナビゲーションロジックをカプセル化します。- ナビゲーション
routeの作成:ナビゲーターオブジェクトが、ナビゲーションに必要なroutestringsを生成します。 - バックスタックの操作 :ナビゲーターオブジェクトは、画面の pop やpush などのバックスタック操作を管理し、適切なナビゲーションフローを維持します。
@Immutable
class Sub1Navigator(
    private val navController: NavController
) {
    fun back() {
        navController.popBackStack()
    }

    fun sub2() {
        navController.navigate("sub2") {
            popUpTo("sub1") {
                inclusive = true
            }
        }
    }

    fun transactional1(draft: Drift? = null) {
        if (null == draft) {
            navController.navigate("transactional1")
        } else {
            navController.navigate("transactional1?draft=${draft.id}")
        }
    }
}
Navigatorを導入し、ナビゲーションルートの作成とバックスタック操作コードを分離することで、 NavigationGraph がよりシンプルになりました。
composable(
    route = "sub1?${
        listOf(
            "draft={draft}",
            "param1={param1}",
            "param2={param2}",
            "param3={param3}",
            "param4={param4}"
        ).joinToString("&")
    }",
    arguments = listOf(
        navArgument("draft") {
            type = NavType.IntType
            defaultValue = 0
        },
        navArgument("param1") {
            type = NavType.StringType
            nullable = true
        },
        navArgument("param2") {
            type = NavType.StringType
            nullable = true
        },
        navArgument("param3") {
            type = NavType.StringType
            nullable = true
        },
        navArgument("param4") {
            type = NavType.StringType
            nullable = true
        }
    )
) {
    Sub1Screen(navigator = remember(navController) { Sub1Navigator(navController) })
}
Sub1Screenでは、ナビゲーション関連のパラメータを 1 つのオブジェクトにまとめることでパラメータ数が減り、オブジェクトメンバーとしてカプセル化することでコールコードがより明確になります。
@Composable
fun Sub1Screen(
    navigator:Sub1Navigator,
    viewModel:Sub1ViewModel = hiltViewModel()
) {
    Sub1Content(
        id = viewModel.id,
        param1 = viewModel.param1!!,
        param2 = viewModel.param2!!,
        param3 = viewModel.param3!!,
        param4 = viewModel.param4!!,
        onClickBack = navigator::back,
        onClickSave = {
            viewModel.onClickSave(callback = navigator::sub2)
        },
        onClickStart = {
            viewModel.onClickStart(callback = { navigator.transactional1(viewModel.draft) })
        }
    )
}
進行中の課題
UI 関数は簡素化されましたが、ナビゲーショングラフの複雑さは変わらず、開発者は次の役割のために継続的なコンテキスト切り替えを求められます。
- 画面の登録
- 画面ルートのパラメータリストの宣言と登録
Navigator コンパニオンオブジェクト
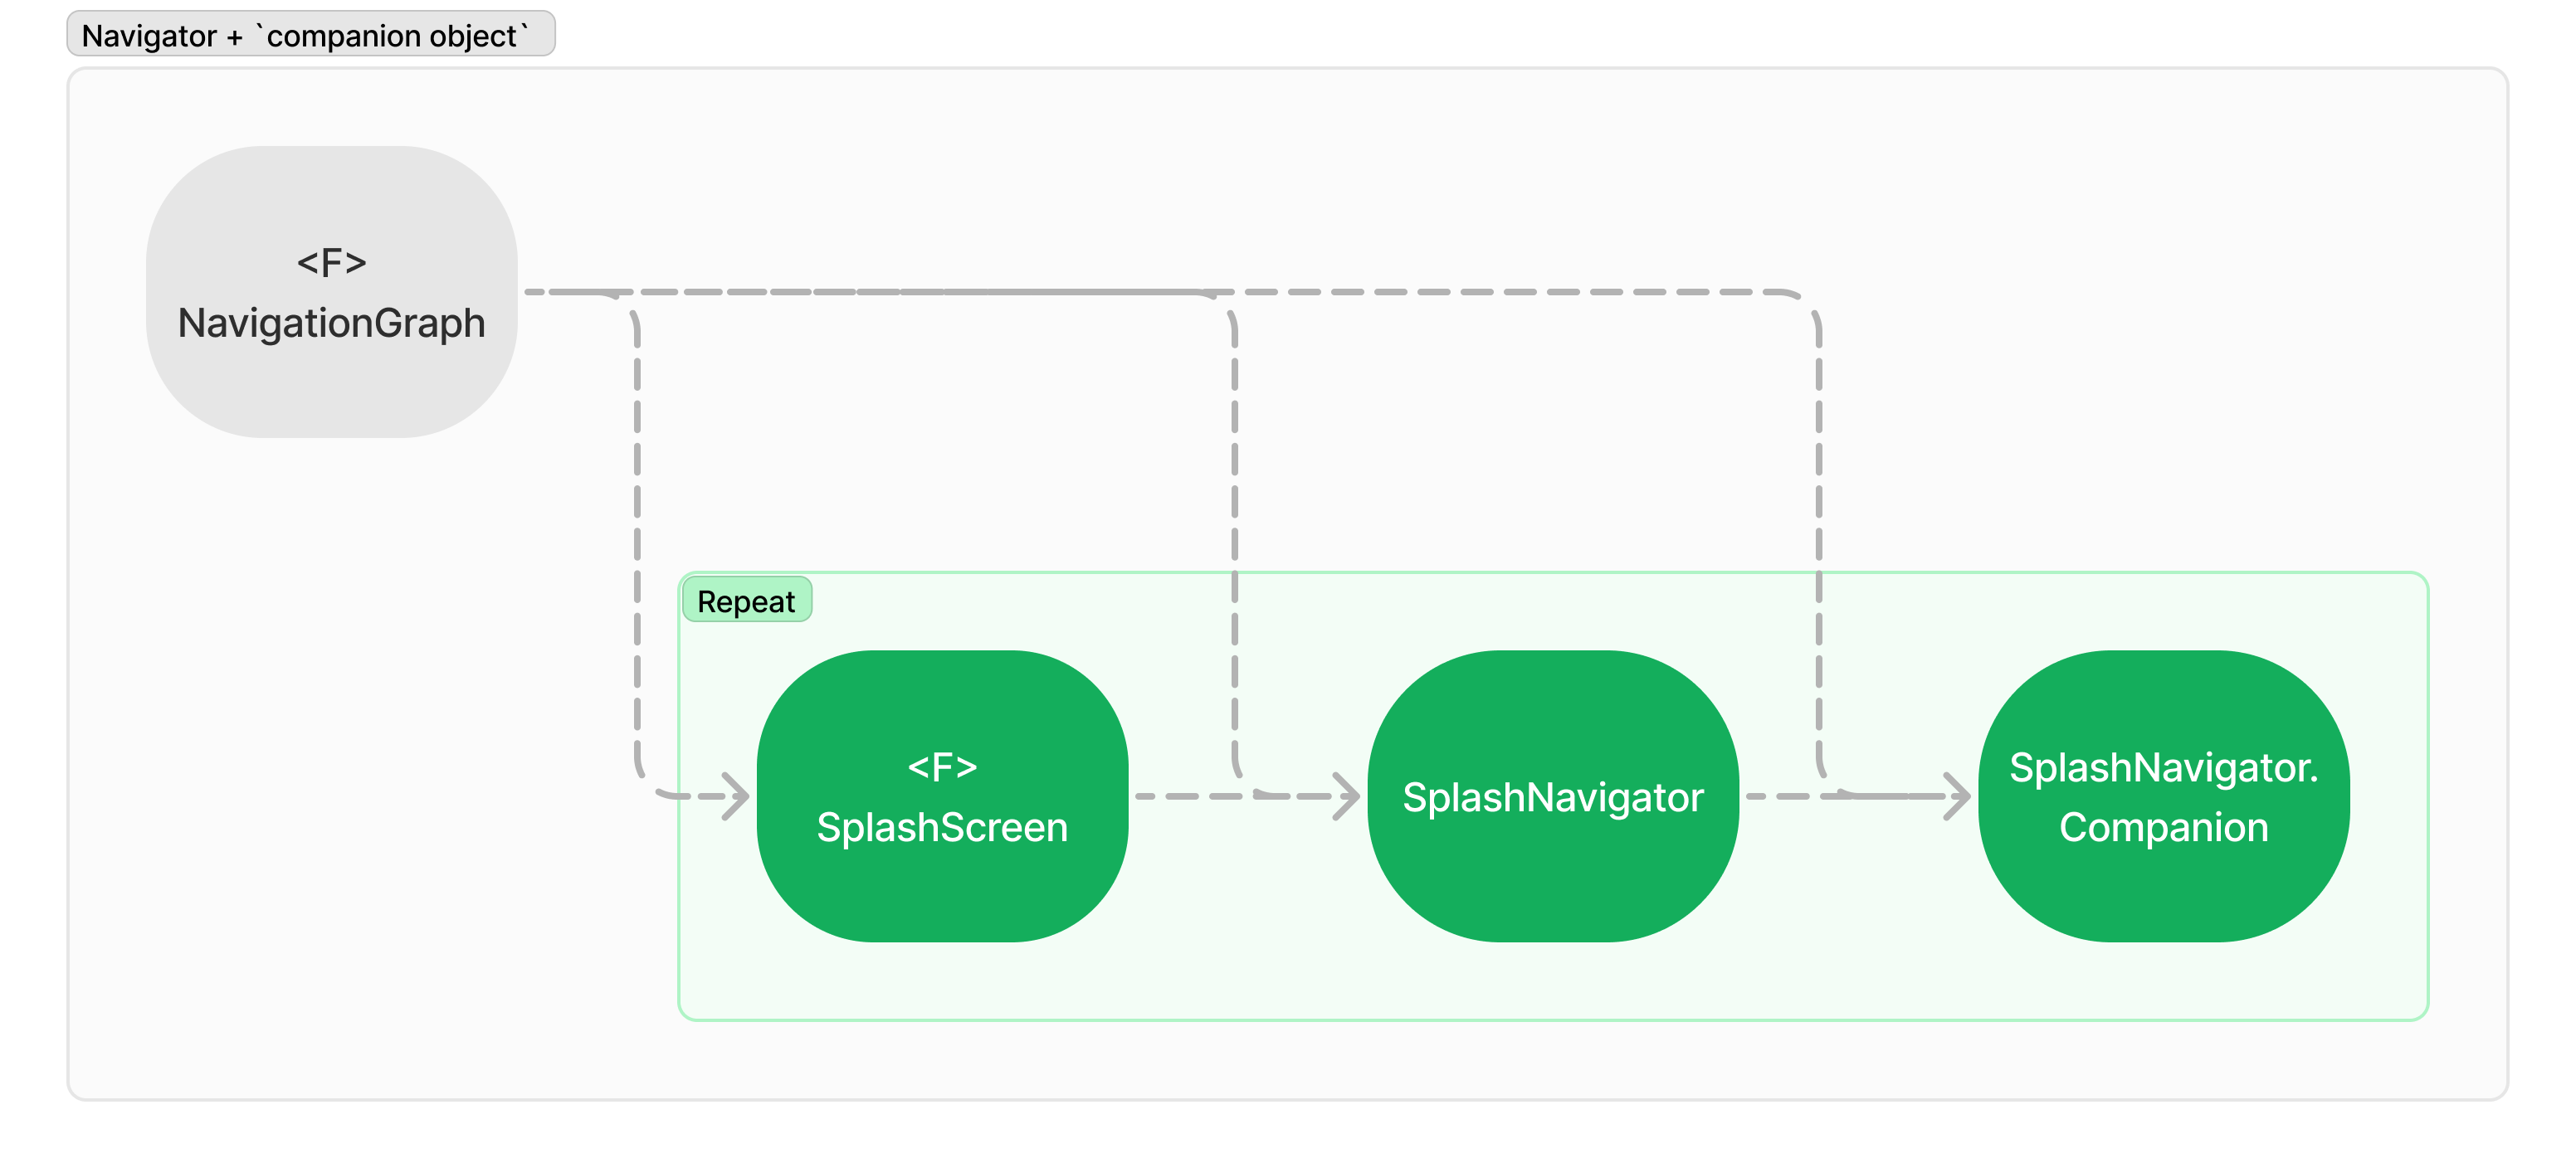
NavigationGraphの機能を簡素化し、ナビゲーション情報を一元化するために、Navigatorクラス内でコンパニオンオブジェクトを使用できます。このアプローチにより、routes と argumentsを1か所で定義できます。方法は次のとおりです。
- Navigator クラスの
コンパニオンオブジェクト内でroutes と argumentsを定義する。 - これらの定義を、
NavigationGraph関数で使用する。
@Immutable
class Sub1Navigator(
    private val navController: NavController
) {
    @Suppress("MemberVisibilityCanBePrivate")
    companion object {
        const val ARG_DRAFT = "draft"
        const val ARG_PARAM1 = "param1"
        const val ARG_PARAM2 = "param2"
        const val ARG_PARAM3 = "param3"
        const val ARG_PARAM4 = "param4"

        const val ROUTE = "sub1?" +
                "$ARG_DRAFT={draft}&" +
                "$ARG_PARAM1={param1}&" +
                "$ARG_PARAM2={param2}&" +
                "$ARG_PARAM3={param3}&" +
                "$ARG_PARAM4={param4}"

        val ARGUMENTS = listOf(
            navArgument(ARG_DRAFT) {
                type = NavType.LongType
                defaultValue = 0
            },
            navArgument(ARG_PARAM1) {
                type = NavType.StringType
                nullable = true
            },
            navArgument(ARG_PARAM2) {
                type = NavType.StringType
                nullable = true
            },
            navArgument(ARG_PARAM3) {
                type = NavType.StringType
                nullable = true
            },
            navArgument(ARG_PARAM4) {
                type = NavType.StringType
                nullable = true
            }
        )
    }
    // ...
}
ナビゲータークラスで コンパニオンオブジェクトを使用することで、ナビゲーショングラフを単純化し、画面登録と UI 関数の呼び出しに集中できるようになります。UI 関数自体は変更されません。
composable(
    route = Sub1Navigator.ROUTE,
    arguments = Sub1Navigator.ARGUMENTS
) {
    Sub1Screen(navigator = remember(navController) { Sub1Navigator(navController) })
}
進行中の課題
Sub#1画面のみを考慮する場合、これで十分です。しかし、Sub #1画面に移動する必要があるMain #1 や Sub #2 のナビゲーターも含める場合、次のような対応が必要になります。
@Immutable
class Main1Navigator(
private val navController: NavController
) {
// ...
fun sub1(item:Main1Item) {
navController.navigate("sub1?param1=${item.param1}¶m2=${item.param2}¶m3=${item.param3}¶m4=${item.param4}")
}
}
@Immutable
class Sub2Navigator(
    private val navController: NavController
) {
    // ...

    fun sub1(draft: Draft) {
        navController.navigate("sub1?draft=${draft.id}") {
            popUpTo(Main2Navigator.ROUTE) {
                inclusive = true
            }
        }
    }
}
Sub1Navigatorは有効なroute フォーマットを管理しますが、実際のroute の作成は Main1NavigatoとSub2Navigator が処理するため、 Sub#1 のroute管理が Sub#1 に集中せず、ユーザー側に分散してしまうという一貫性のない状態になります。
共有宛先の処理
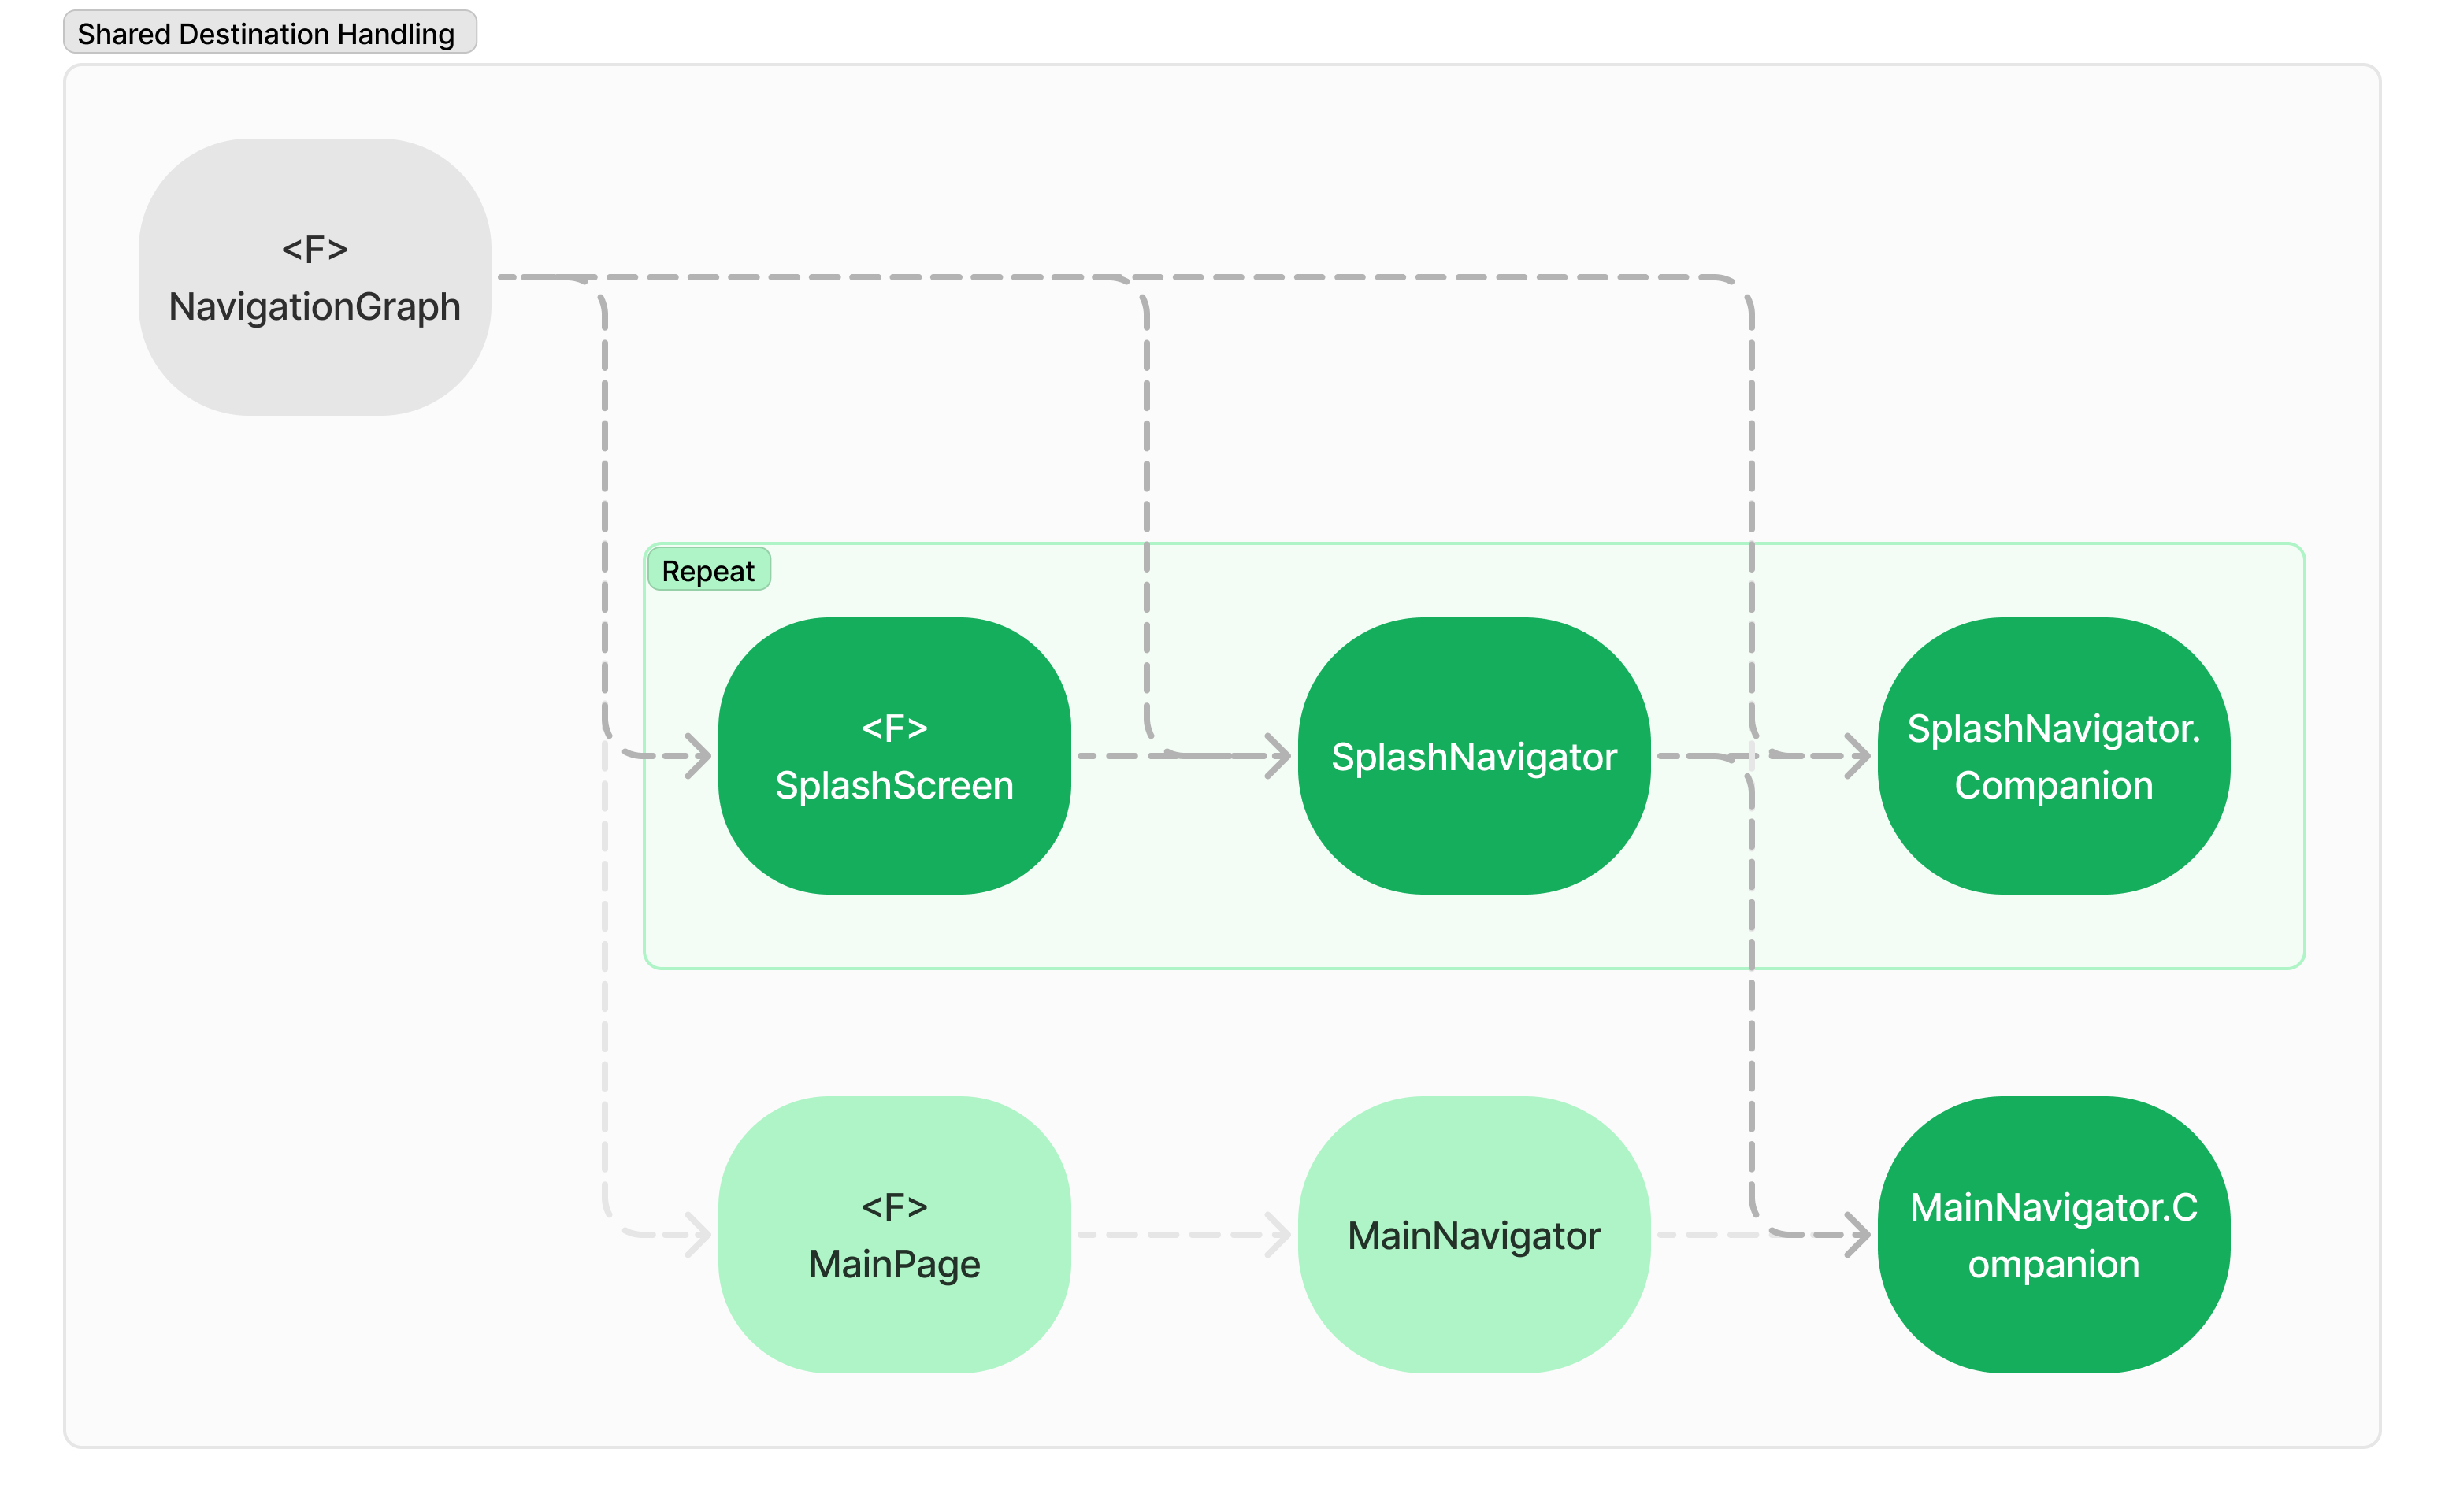
有効なrouteフォーマットと、有効なroute値を構成するロジックを、一緒に管理するのが妥当です。各 companion objectに route 作成ロジックを移動させることで、標準化できます。
route自体とその組み立てをカプセル化する。- オブジェクトベースのナビゲーションを実装する。
@Immutable
class Sub1Navigator(
    private val navController: NavController
) {
    companion object {
        // ...

        const val ARG_DRAFT = "draft"
        const val ARG_PARAM1 = "param1"
        const val ARG_PARAM2 = "param2"
        const val ARG_PARAM3 = "param3"
        const val ARG_PARAM4 = "param4"

        fun route(item:Main1Item) = "sub1?$ARG_PARAM1=${item.param1}&$ARG_PARAM2=${item.param2}&$ARG_PARAM3=${item.param3}&$ARG_PARAM4=${item.param4}"

        fun route(draft:Draft) = "sub1?draft=${draft.id}"
    }

    // ...
}
@Immutable
class Main1Navigator(
    private val navController: NavController
) {
    // ...

    fun sub1(item: Main1Item) {
        navController.navigate(Sub1Navigator.route(item))
    }
}
@Immutable
class Sub2Navigator(
    private val navController: NavController
) {
    // ...

    fun sub1(draft: Draft) {
        navController.navigate(Sub1Navigator.route(draft)) {
            popUpTo(Main2Navigator.ROUTE) {
                inclusive = true
            }
        }
    }
}
進行中の課題
画面を登録する際は、route、arguments、そしてナビゲーターインスタンスの作成を同じクラス内でまとめて管理することが重要です。もし誤りがあると、次のような論理エラーが発生する可能性があります。
- 不整合なルート定義:routeとargumentsが一貫して定義されていない場合、ナビゲーションが失敗したり、予期しない動作をする可能性があります。
- 不正なナビゲーターインスタンス:異なる ナビゲーターインスタンスを使用すると、ナビゲーションロジックのエラーが発生し、アプリが誤った画面に遷移したり、ナビゲーションが機能しなくなったりする可能性があります。
composable(
    route = Main1Navigator.ROUTE,
    arguments = Transactional1Navigator.ARGUMENTS
) {
    Sub1Screen(navigator = remember(navController) { Sub1Navigator(navController) })
}
Navigator、 コンパニオンオブジェクトの抽象化、および宛先処理の標準化
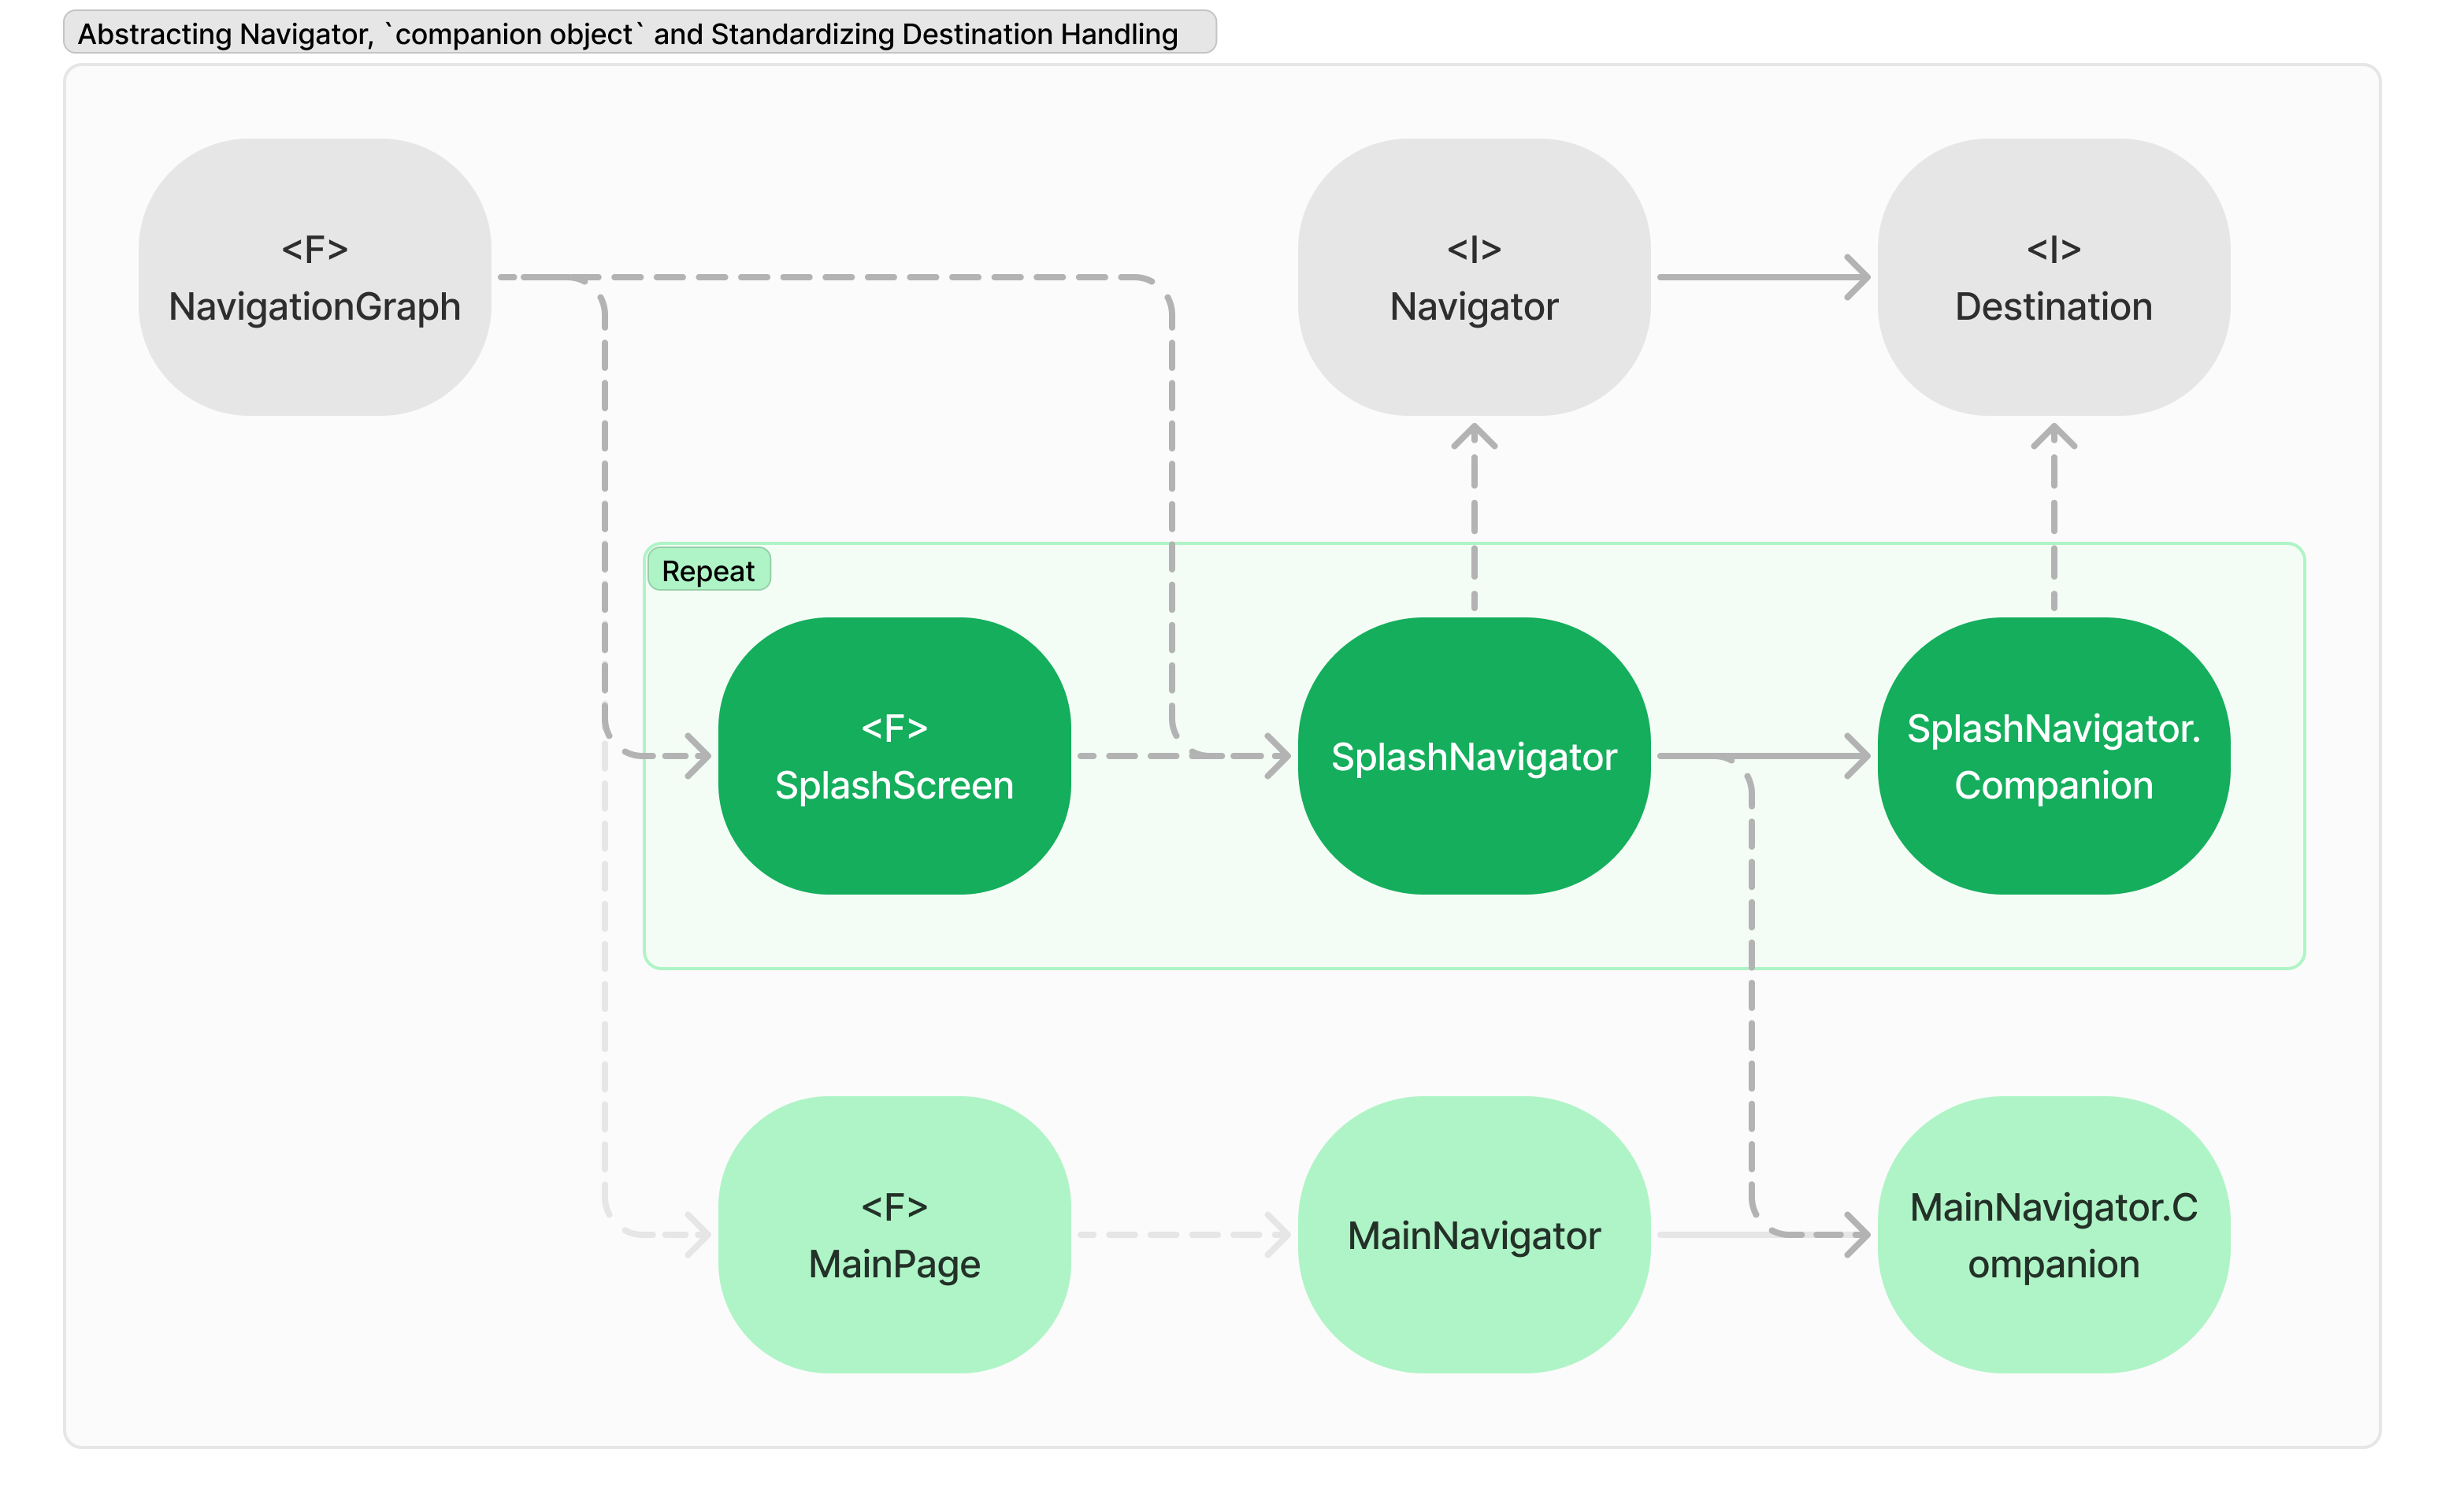
ナビゲーターとその コンパニオンオブジェクトを抽象化し、次のプロパティを定義できます
interface Navigator {
    val destination: Destination
}

interface Destination {
    val routePattern: String

    val arguments: List<NamedNavArgument>

    fun route(varargs arguments: Any?): String
}
ナビゲーターと コンパニオンオブジェクトがそれぞれNavigatorとDestinationを実装している場合、ナビゲーショングラフの設定は次のように標準化されます。
@Immutable
class Sub1Navigator(
    private val navController: NavController
):Navigator {
  companion object:Destination {
      const val ARG_DRAFT = "draft"
      const val ARG_PARAM1 = "param1"
      const val ARG_PARAM2 = "param2"
      const val ARG_PARAM3 = "param3"
      const val ARG_PARAM4 = "param4"

      override val routePattern = "sub1?$ARG_DRAFT={draft}&$ARG_PARAM1={param1}&$ARG_PARAM2={param2}&$ARG_PARAM3={param3}&$ARG_PARAM4={param4}"

      override val arguments = listOf(
            navArgument(ARG_DRAFT) {
                type = NavType.LongType
                defaultValue = 0
            },
            navArgument(ARG_PARAM1) {
                type = NavType.StringType
                nullable = true
            },
            navArgument(ARG_PARAM2) {
                type = NavType.StringType
                nullable = true
            },
            navArgument(ARG_PARAM3) {
                type = NavType.StringType
                nullable = true
            },
            navArgument(ARG_PARAM4) {
                type = NavType.StringType
                nullable = true
            }
        )

      override fun route(varargs arguments: Any?): String = when {
          1 == arguments.size && arguments[0] is Main1Item -> route(arguments[0] as Main1Item)
          1 == arguments.size && arguments[0] is Draft -> route(arguments[0] as Draft)
          else -> throw IllegalArgumentException("Invalid arguments : arguments=$arguments")
      }

      fun route(item: Main1Item) = "sub1?$ARG_PARAM1=${item.param1}&$ARG_PARAM2=${item.param2}&$ARG_PARAM3=${item.param3}&$ARG_PARAM4=${item.param4}"

      fun route(draft: Draft) = "sub1?draft=${draft.id}"
  }

  override val destination = Companion
}
NavigationGraphの役割は次のとおりです。
- ナビゲーターインスタンスの作成
- 抽象化されたナビゲーションオブジェクトをUI関数と接続する。
Main1Navigator(navController).let { navigator ->
    composable(navigator.destination.routePattern, navigator.destination.arguments) {
        Main1Screen(navigator)
    }
}

Sub1Navigator(navController).let { navigator ->
    composable(navigator.destination.routePattern, navigator.destination.arguments) {
        Sub1Screen(navigator)
    }
}

Sub2Navigator(navController).let { navigator ->
    composable(navigator.destination.routePattern, navigator.destination.arguments) {
        Sub2Screen(navigator)
    }
}
開発の生産性向上
グローバルナビゲーション
Web ブラウザの起動、電話の発信、アプリ設定を開く、アプリの再起動、UI の再読み込みなどは、画面に関係なく必要になることがあります。これらの 共通機能 を、各画面ごとに個別実装するよりも、単一の実装を共有する方が効率的です。
@Immutable
class Sub1Navigator(
    private val navController: NavController
): Navigator {
    fun web(uri: Uri) { /* Indivisual impl */ }

    fun call(phoneNumber: String) { /* Indivisual impl */ }
}
@Immutable
class Sub31Navigator(
    private val navController: NavController
): Navigator {
    fun web(uri: Uri) { /* Indivisual impl */ }

    fun settings() { /* Indivisual impl */ }
}
ソリューション
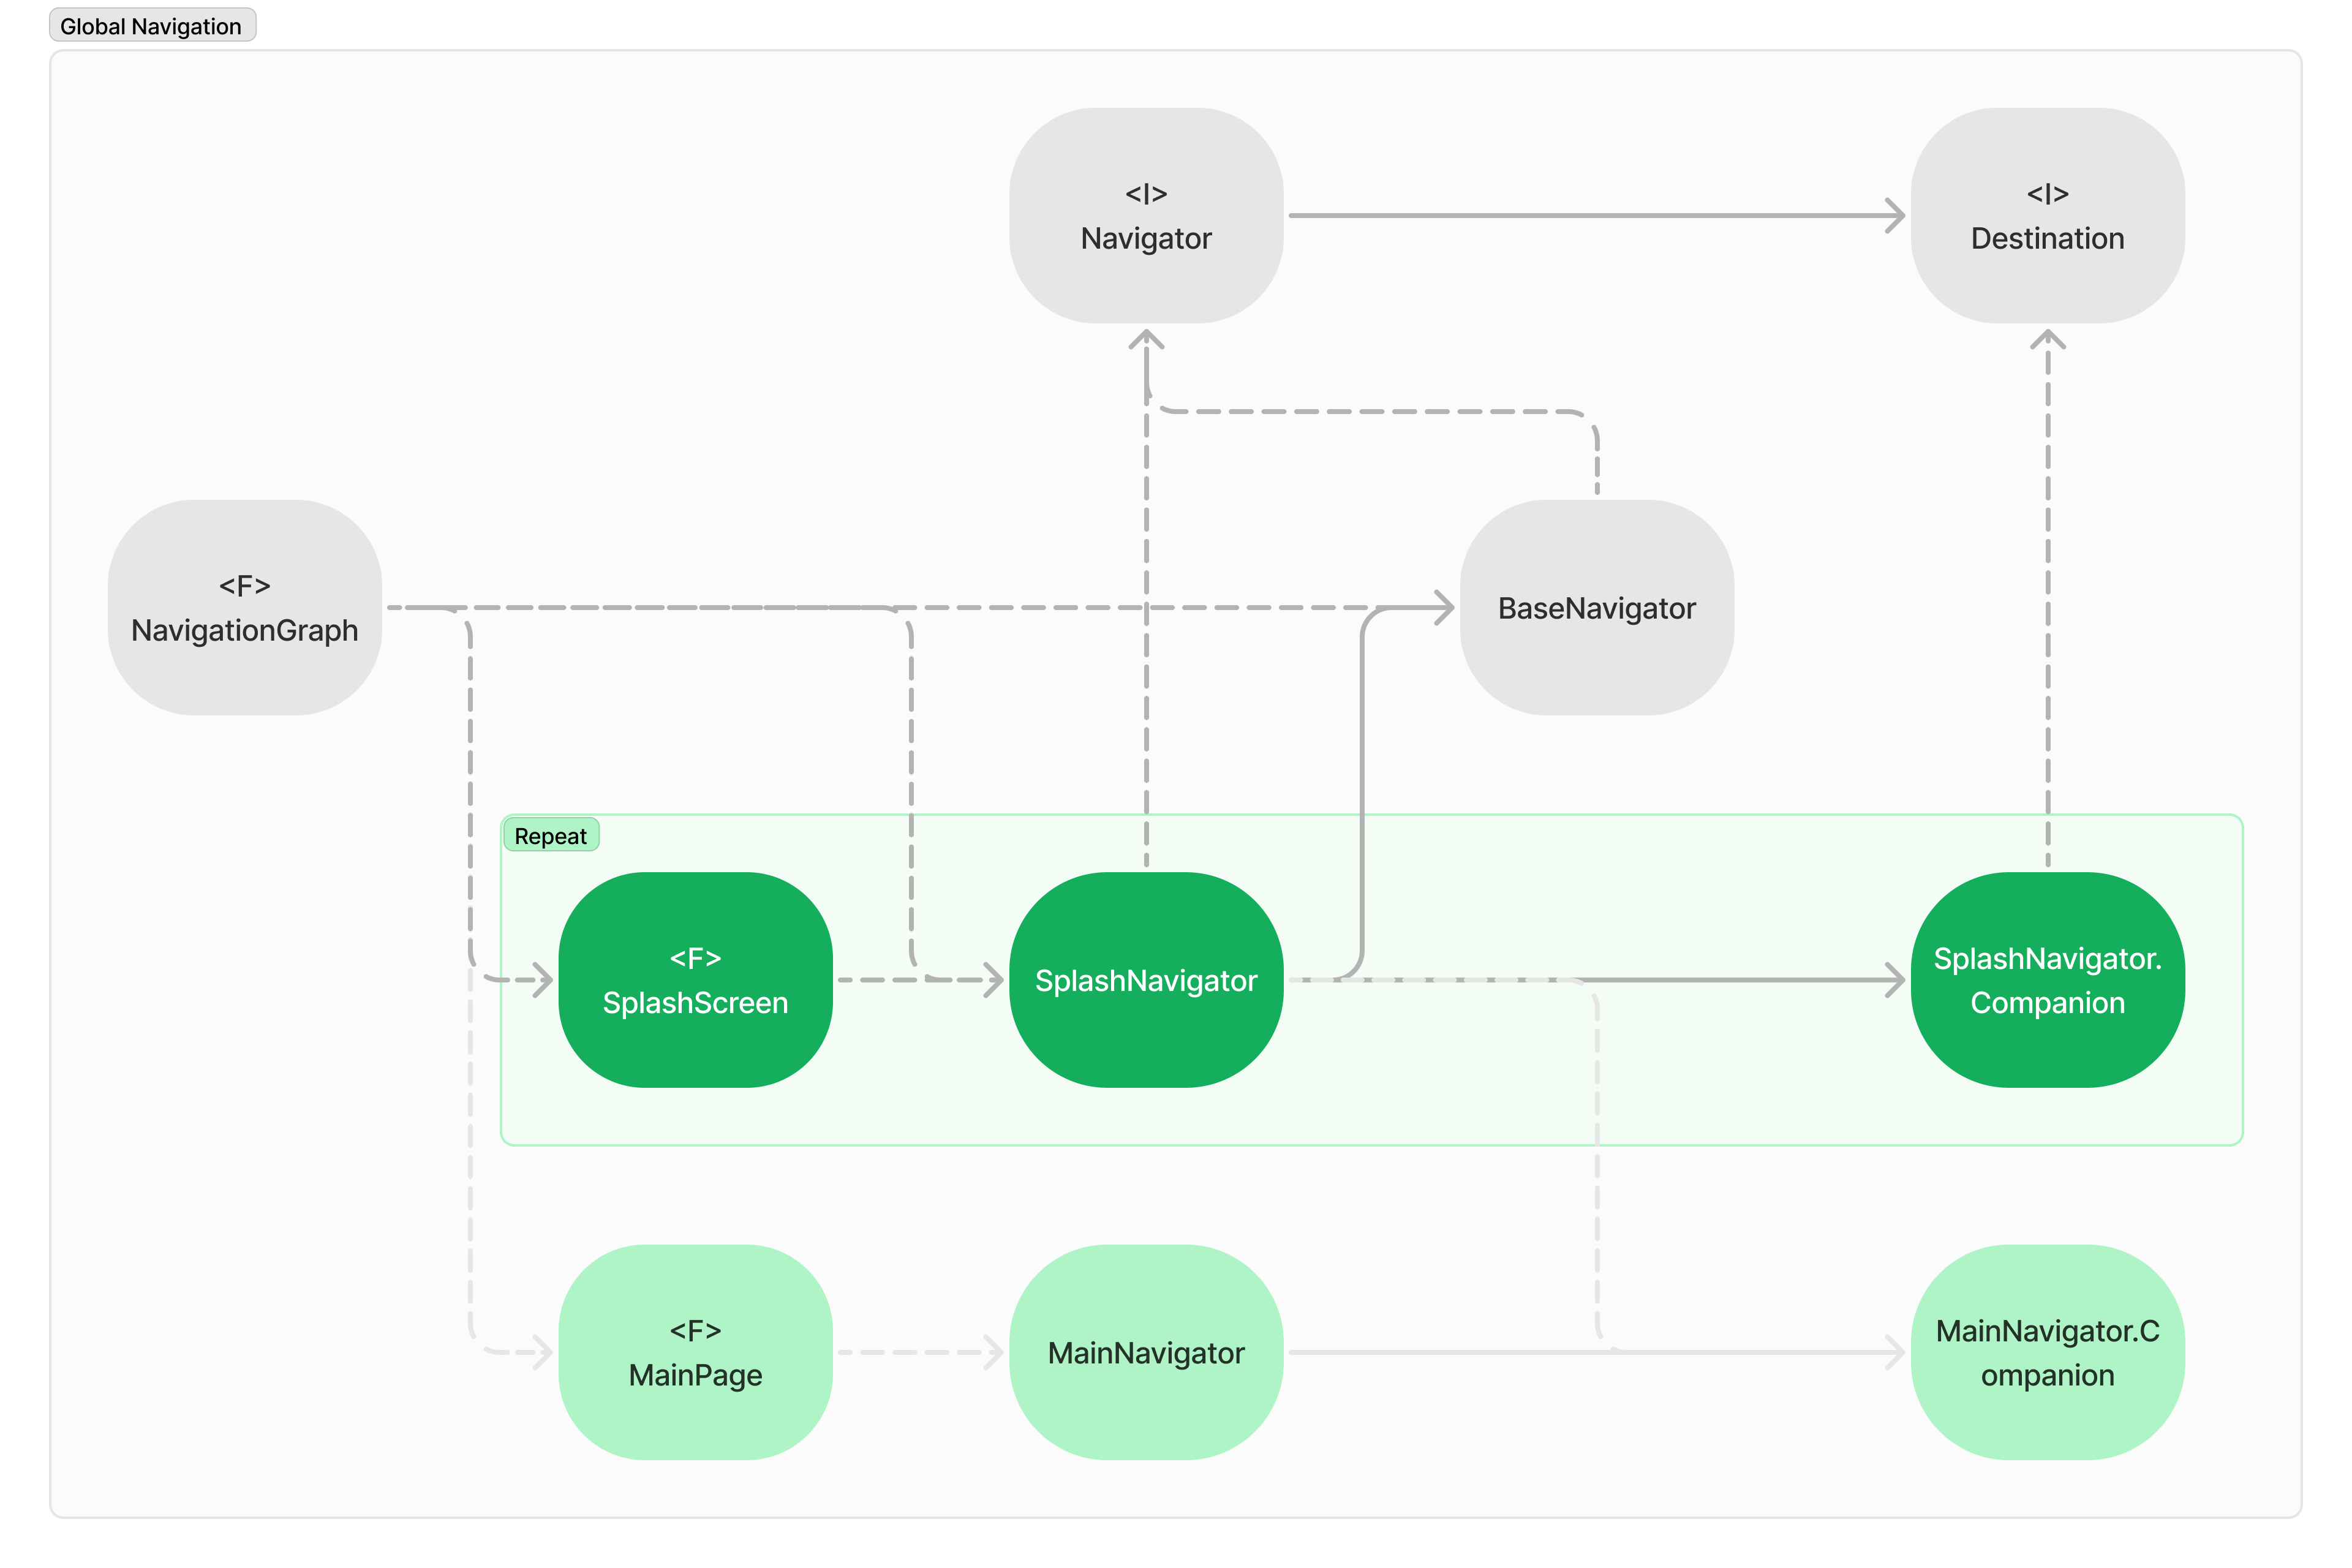
Navigator インターフェースで共通関数を宣言し、ユニバーサル関数を実装した上で、各スクリーンのナビゲーターに委任することで共通化を実現できます。
/**
 * 共通のナビゲーション関数を定義するインターフェース
 */
interface Navigator {
    val destination: Destination

    fun web(uri: Uri)

    fun call(phoneNumber: String)

    fun settings()

    fun reopen()

    fun restart()
}
/**
 * 共通のナビゲーション関数を実装する基底クラス
 */
open class BaseNavigator(
    private val activity: Activity,
    val navController: NavController
): Navigator {
    override fun web(uri: Uri) {
        activity.startActivity(Intent(ACTION_VIEW, uri))
    }

    // ...

    override fun reopen(){
        activity.finish()
        activity.startActivity(Intent(activity, activity::class.java))
    }

    override fun restart() {
        activity.startActivity(Intent(activity, activity::class.java))
        exitProcess(0)
    }
}
/**
 * 各画面のナビゲーターが共通のナビゲーション機能を委譲
 */
@Immutable
class Sub1Navigator(
    private val baseNavigator: BaseNavigator
): Navigator by baseNavigagor {
    fun sub2() {
        baseNavigator.navController.navigate(Sub2Navigator.route()) {
            popUpTo(routePattern) {
                inclusive = true
            }
        }
    }
}
@AndroidEntryPoint
class MainActivity : ComponentActivity() {
    override fun onCreate(savedInstanceState: Bundle?) {
        super.onCreate(savedInstanceState)

        enableEdgeToEdge()
        setContent {
            NavigationGraph(this@MainActivity)
        }
    }
}
/**
 * `NavController` を `BaseNavigator` インスタンスに置き換える
 *
 * @param activity ナビゲーショングラフを所有するアクティビティ
 */
@Composable
fun NavigationGraph(activity: Activity) {
    val baseNavigator = BaseNavigator(activity, rememberNavController())

    NavHost(baseNavigator.navController, SplahNavigator.routePattern) {
        Sub1Navigator(baseNavigator).let { navigator ->
            // ...
        }
    }
}
ナビゲーショングラフ設定ユーティリティ
以下のような論理的エラーのリスクがあります。
Sub1Navigator(baseNavigator).let { navigator ->
    composable(Main1Navigator.routePattern, Transactional1Navigator.arguments) {
        Sub1Screen(navigator)
    }
}
ソリューション
ナビゲーターインスタンスと画面登録を処理するユーティリティ関数を追加することで、
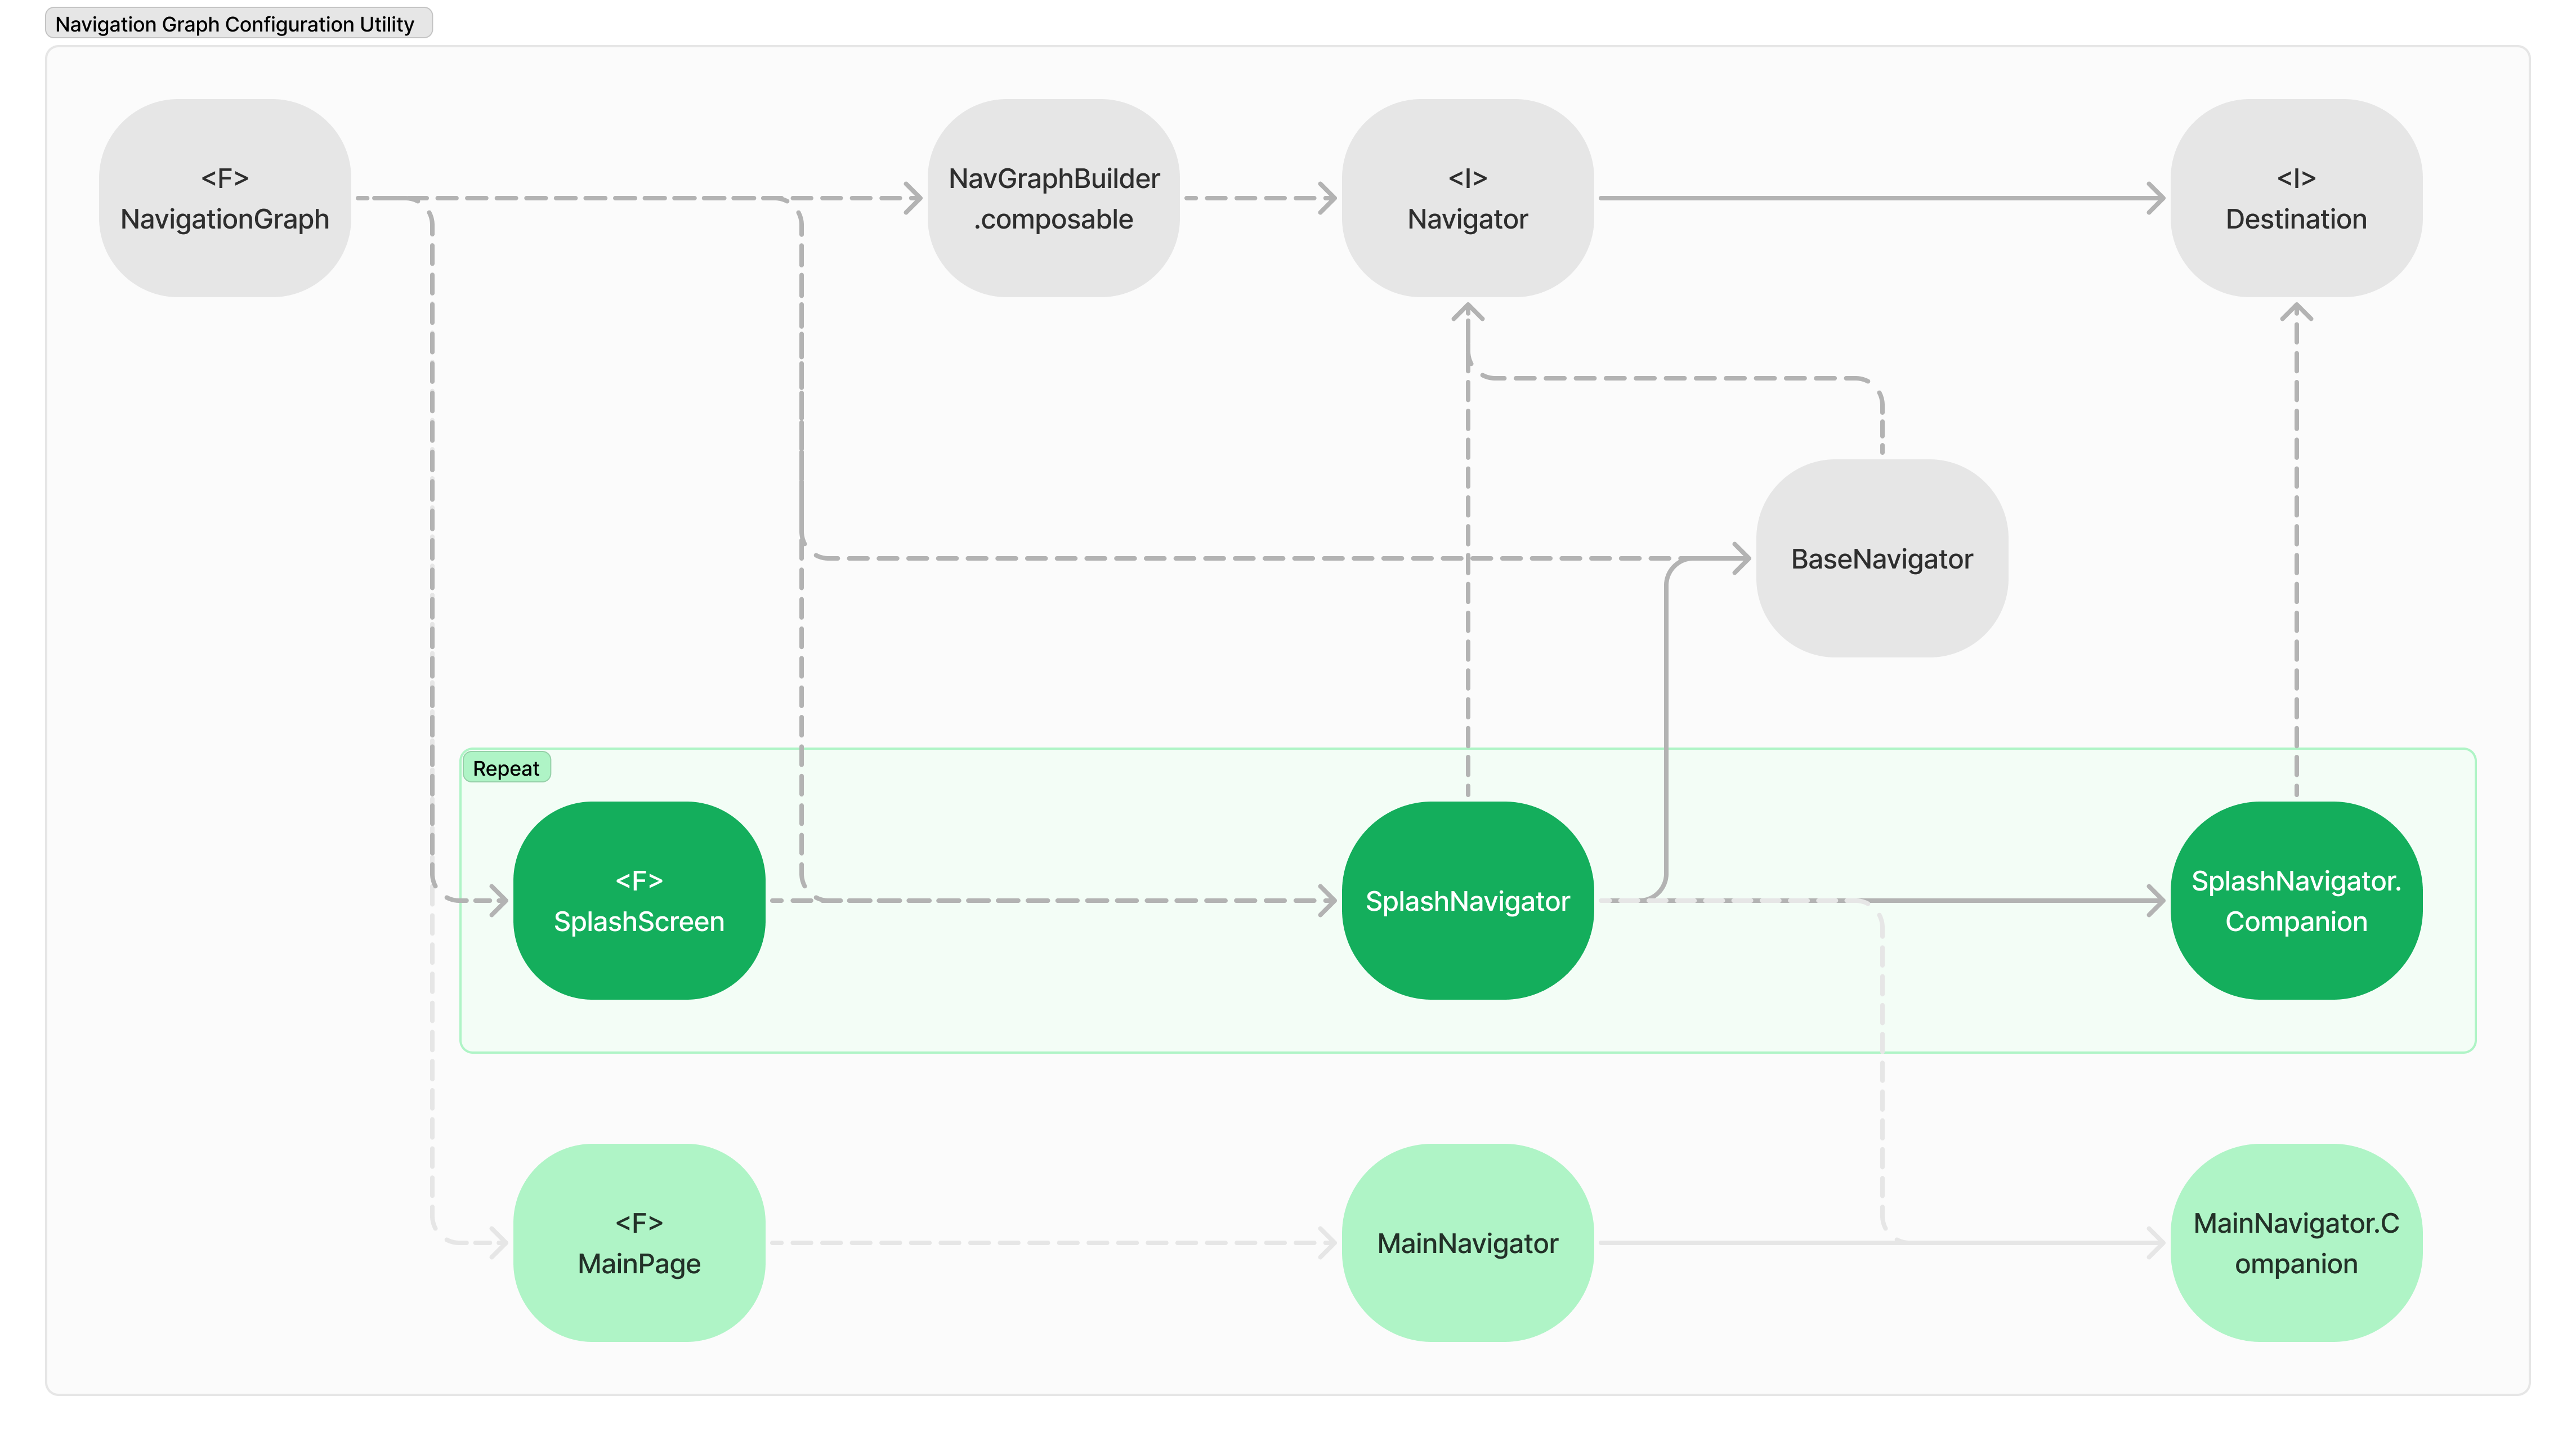
fun <N :Navigator> NavGraphBuilder.composable(
    navigator: N,
    content: @Composable AnimatedContentScope.(NavBackStackEntry, N) -> Unit
) {
    composable(
        route = navigator.destination.routePattern,
        arguments = navigator.destination.arguments
    ) { backStackEntry ->
        content(backStackEntry, navigator)
    }
}
ナビゲーショングラフの構成を単純化し、論理エラーの可能性を排除することができます。
composable(Main1Navigator(baseNavigator)) { _, navigator ->
    Main1Screen(navigator)
}

composable(Sub1Navigator(baseNavigator)) { backStackEntry, navigator ->
    Sub1Screen(navigator)
}

composable(Sub2Navigator(baseNavigator)) { _, navigator ->
    Sub2Screen(navigator)
}
@Preview のサポート
静的リソースをバンドルで表示する画面では、引数として別のイベントハンドラを渡すのではなく、ナビゲーターのみを渡すことで ナビゲーションコードを記述できます。
例:
@Composable
fun StaticResourceListScreen(navigator: StaticResourceListNavigator) {
    Column {
        Button(onClick = navigator::static1) {
            Text("Static#1")
        }
        Button(onClick = navigator::static2) {
            Text("Static#2")
        }
        Button(onClick = navigator::static2) {
            Text("Static#2")
        }
    }
}
@Preview コードでは、 NavigatorインスタンスごとにBaseNavigator(PreviewActivity(), rememberNavController()) を繰り返し記述することになります。 プレビューの種類や数が増えると、プレビューの記述が面倒になります。そして、このオーバーヘッドが原因で開発者がプレビューをスキップしてしまうこともあります。
@Composable
@Preview(showSystemUi = true)
fun PreviewStaticResourceListScreen() {
    MaterialTheme {
        StaticResourceListScreen(StaticResourceListNavigator(BaseNavigator(PreviewActivity(), rememberNavController())))
    }
}

@Composable
@Preview(showSystemUi = true)
fun PreviewStatic1Screen() {
    MaterialTheme {
        Static1Screen(Static1Navigator(BaseNavigator(PreviewActivity(), rememberNavController())))
    }
}

@Composable
@Preview(showSystemUi = true)
fun PreviewStatic2Screen() {
    MaterialTheme {
        Static2Screen(Static2Navigator(BaseNavigator(PreviewActivity(), rememberNavController())))
    }
}

@Composable
@Preview(showSystemUi = true)
fun PreviewStatic3Screen() {
    MaterialTheme {
        Static3Screen(Static3Navigator(BaseNavigator(PreviewActivity(), rememberNavController())))
    }
}
ソリューション
BaseNavigatorをインスタンス化するユーティリティ関数を作成し、実際のアプリケーションとプレビューを個別に処理 できるように実装します。
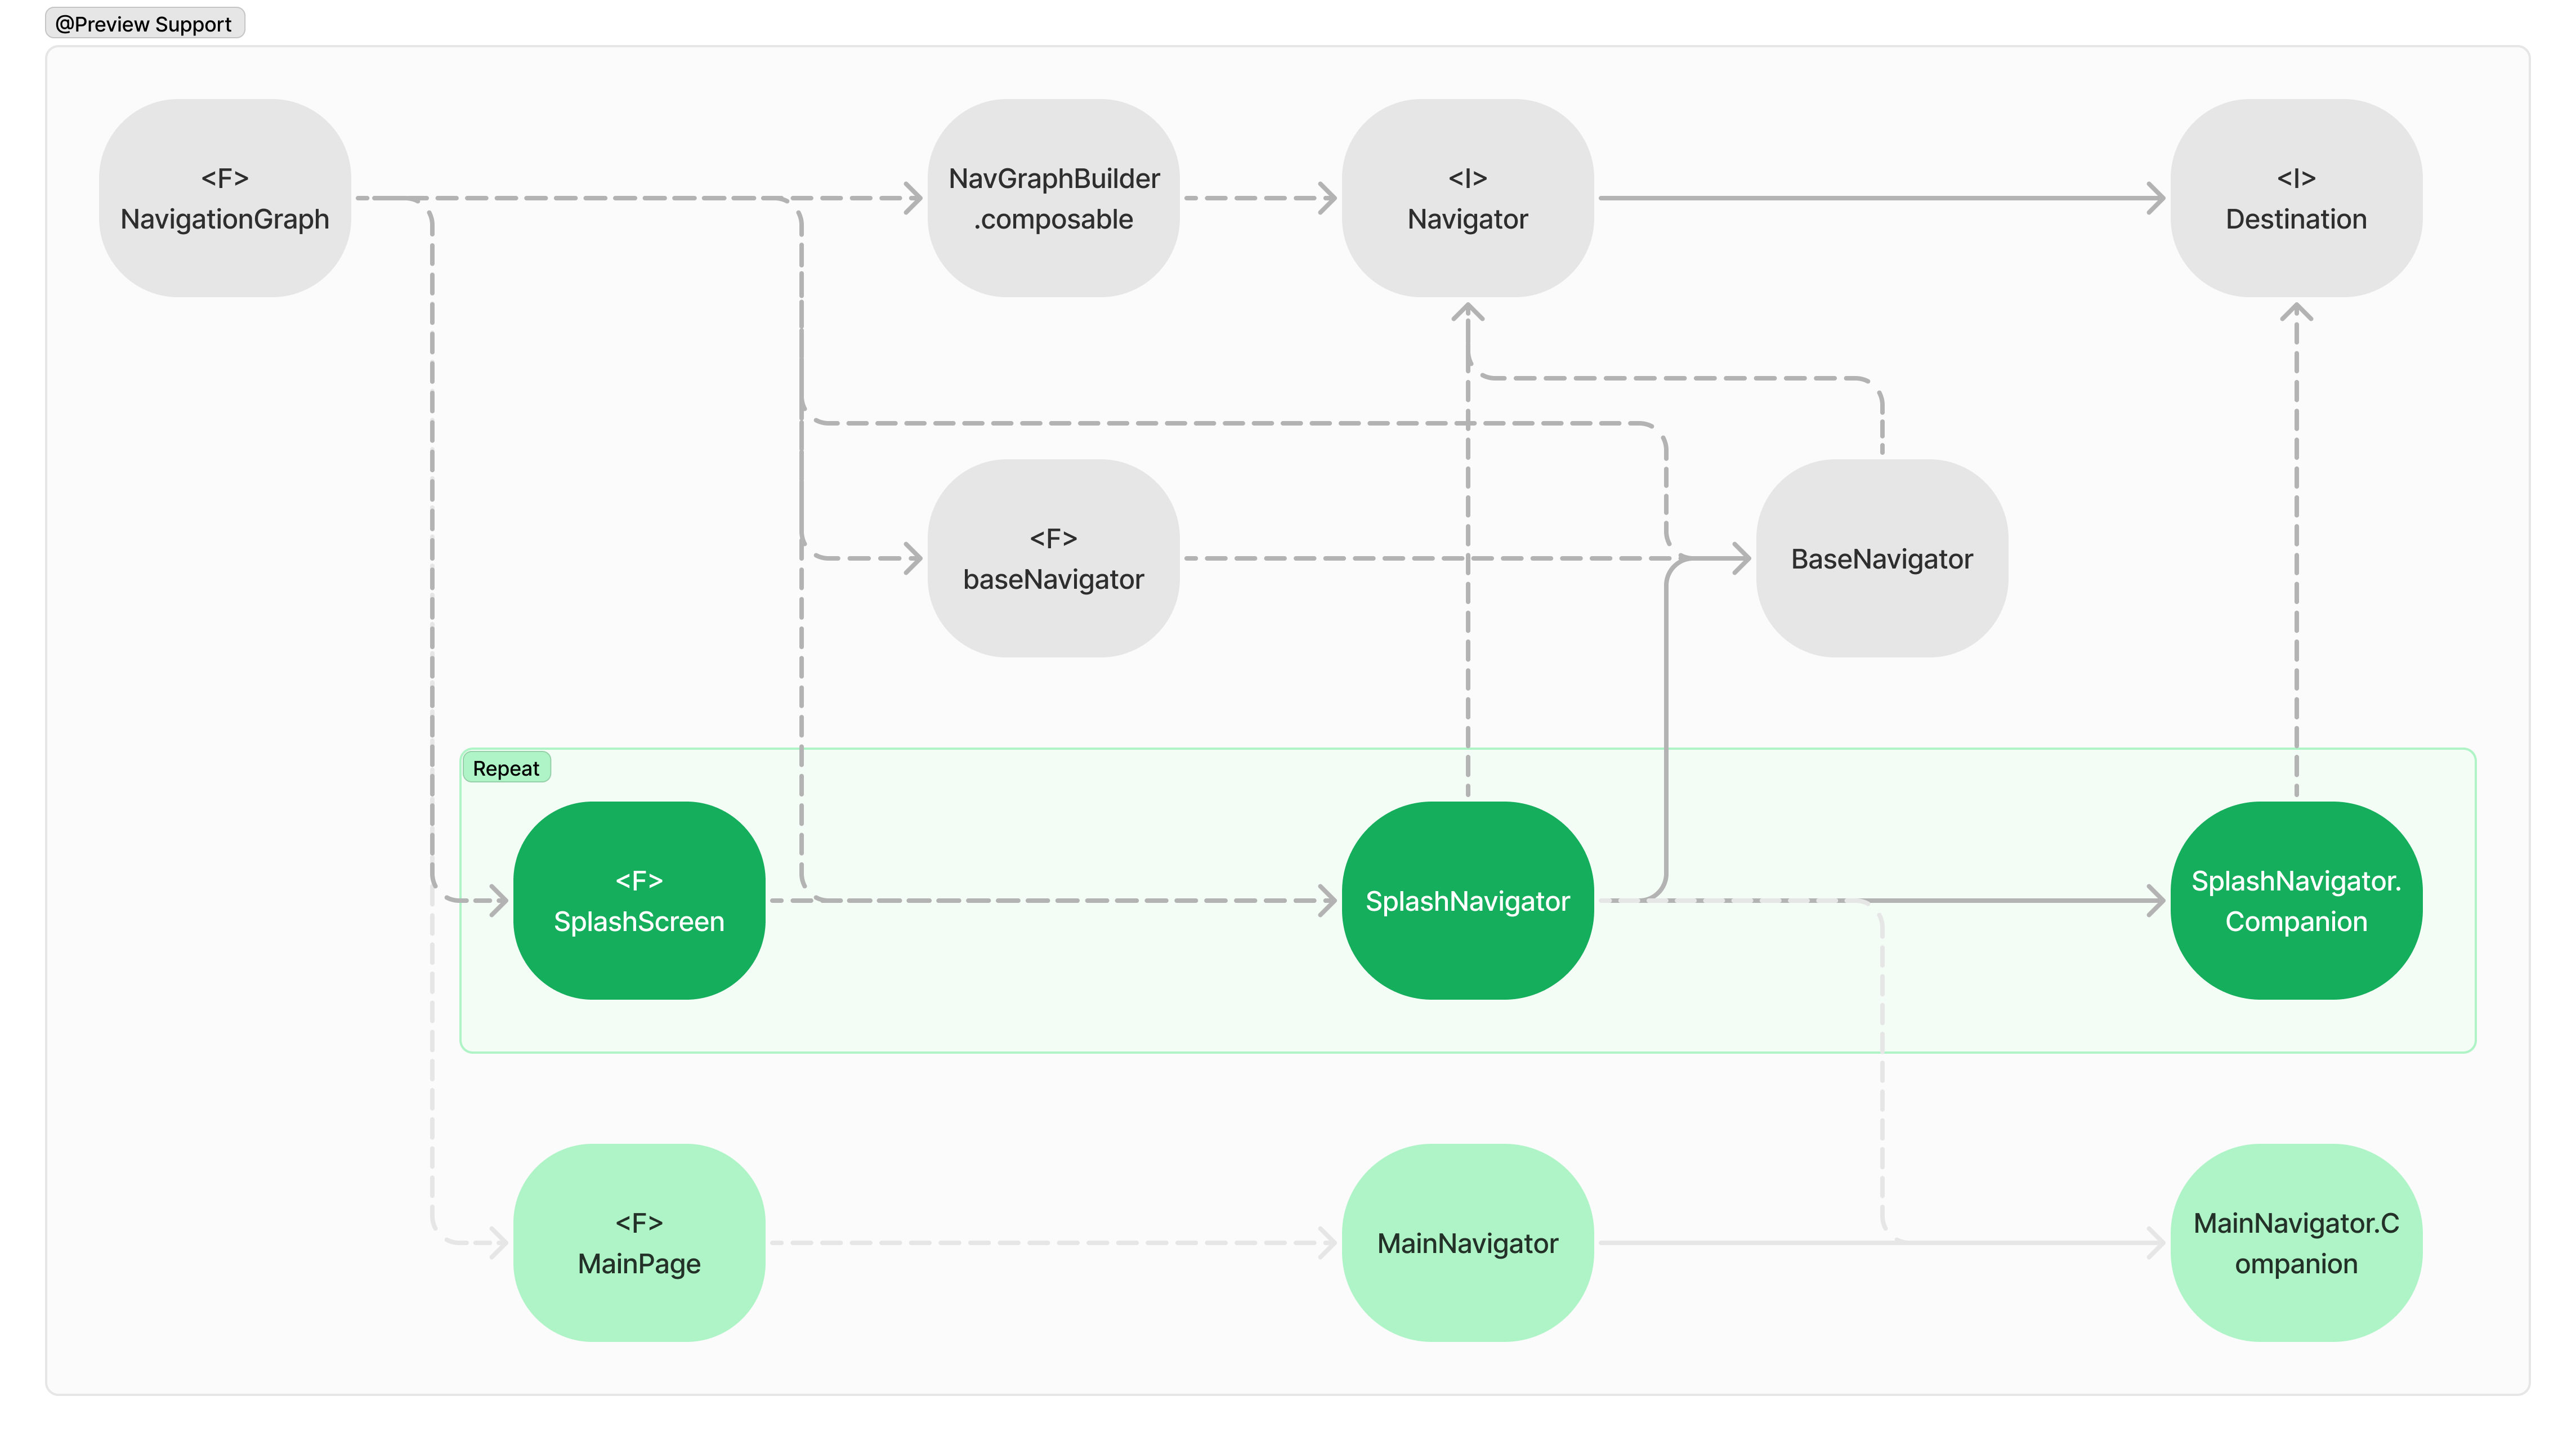
@Composable
fun baseNavigator(
    activity: Activity = if (LocalInspectionMode.current) {
        PreviewActivity()
    } else {
        LocalContext.current as Activity
    }
):BaseNavigator {
    val navHostController = rememberNavController()
    val base = remember(activity) {
        BaseNavigator(activity, navHostController)
    }
    return base
}
@Composable
fun NavigationGraph(activity: Activity) {
    val baseNavigator = baseNavigator(activity)

    NavHost(navController, SplahNavigator.routePattern) {
        // ...
    }
}
@Composable
@Preview(showSystemUi = true)
fun PreviewStaticResourceListScreen() {
    MaterialTheme {
        StaticResourceListScreen(StaticResourceListNavigator(baseNavigator()))
    }
}

@Composable
@Preview(showSystemUi = true)
fun PreviewStatic1Screen() {
    MaterialTheme {
        Static1Screen(Static1Navigator(baseNavigator()))
    }
}

@Composable
@Preview(showSystemUi = true)
fun PreviewStatic2Screen() {
    MaterialTheme {
        Static2Screen(Static2Navigator(baseNavigator()))
    }
}

@Composable
@Preview(showSystemUi = true)
fun PreviewStatic3Screen() {
    MaterialTheme {
        Static3Screen(Static3Navigator(baseNavigator()))
    }
}
カスタムスタート画面
これまで使用していた NavigationGraph設定機能は、スタート画面の変更は可能ですが、使用できるナビゲーショングラフは 1 つのみ です。そのため、既存の機能の一部だけを活用した デモアプリケーションの開発はできません。
@AndroidEntryPoint
class DemoActivity : ComponentActivity() {
    override fun onCreate(savedInstanceState: Bundle?) {
        super.onCreate(savedInstanceState)

        enableEdgeToEdge()
        setContent {
            NavigationGraph(this@DemoActivity) // 固定されたスタート画面
        }
    }
}
@AndroidEntryPoint
class MainActivity : ComponentActivity() {
    override fun onCreate(savedInstanceState: Bundle?) {
        super.onCreate(savedInstanceState)

        enableEdgeToEdge()
        setContent {
            NavigationGraph(this@MainActivity)
        }
    }
}
@Composable
fun NavigationGraph(activity: Activity) {
    val baseNavigator = baseNavigator(activity)

    NavHost(navController, SplahNavigator.routePattern) {
        Sub1Navigator(baseNavigator).let { navigator ->
            composable(navigator.destination.routePattern, navigator.destination.arguments) {
                Sub1Screen(navigator)
            }
        }
    }
}
ソリューション
BaseNavigatorにdestination を実装し、アクティビティからホイストされたBaseNavigatorインスタンスをナビゲーショングラフに渡します。
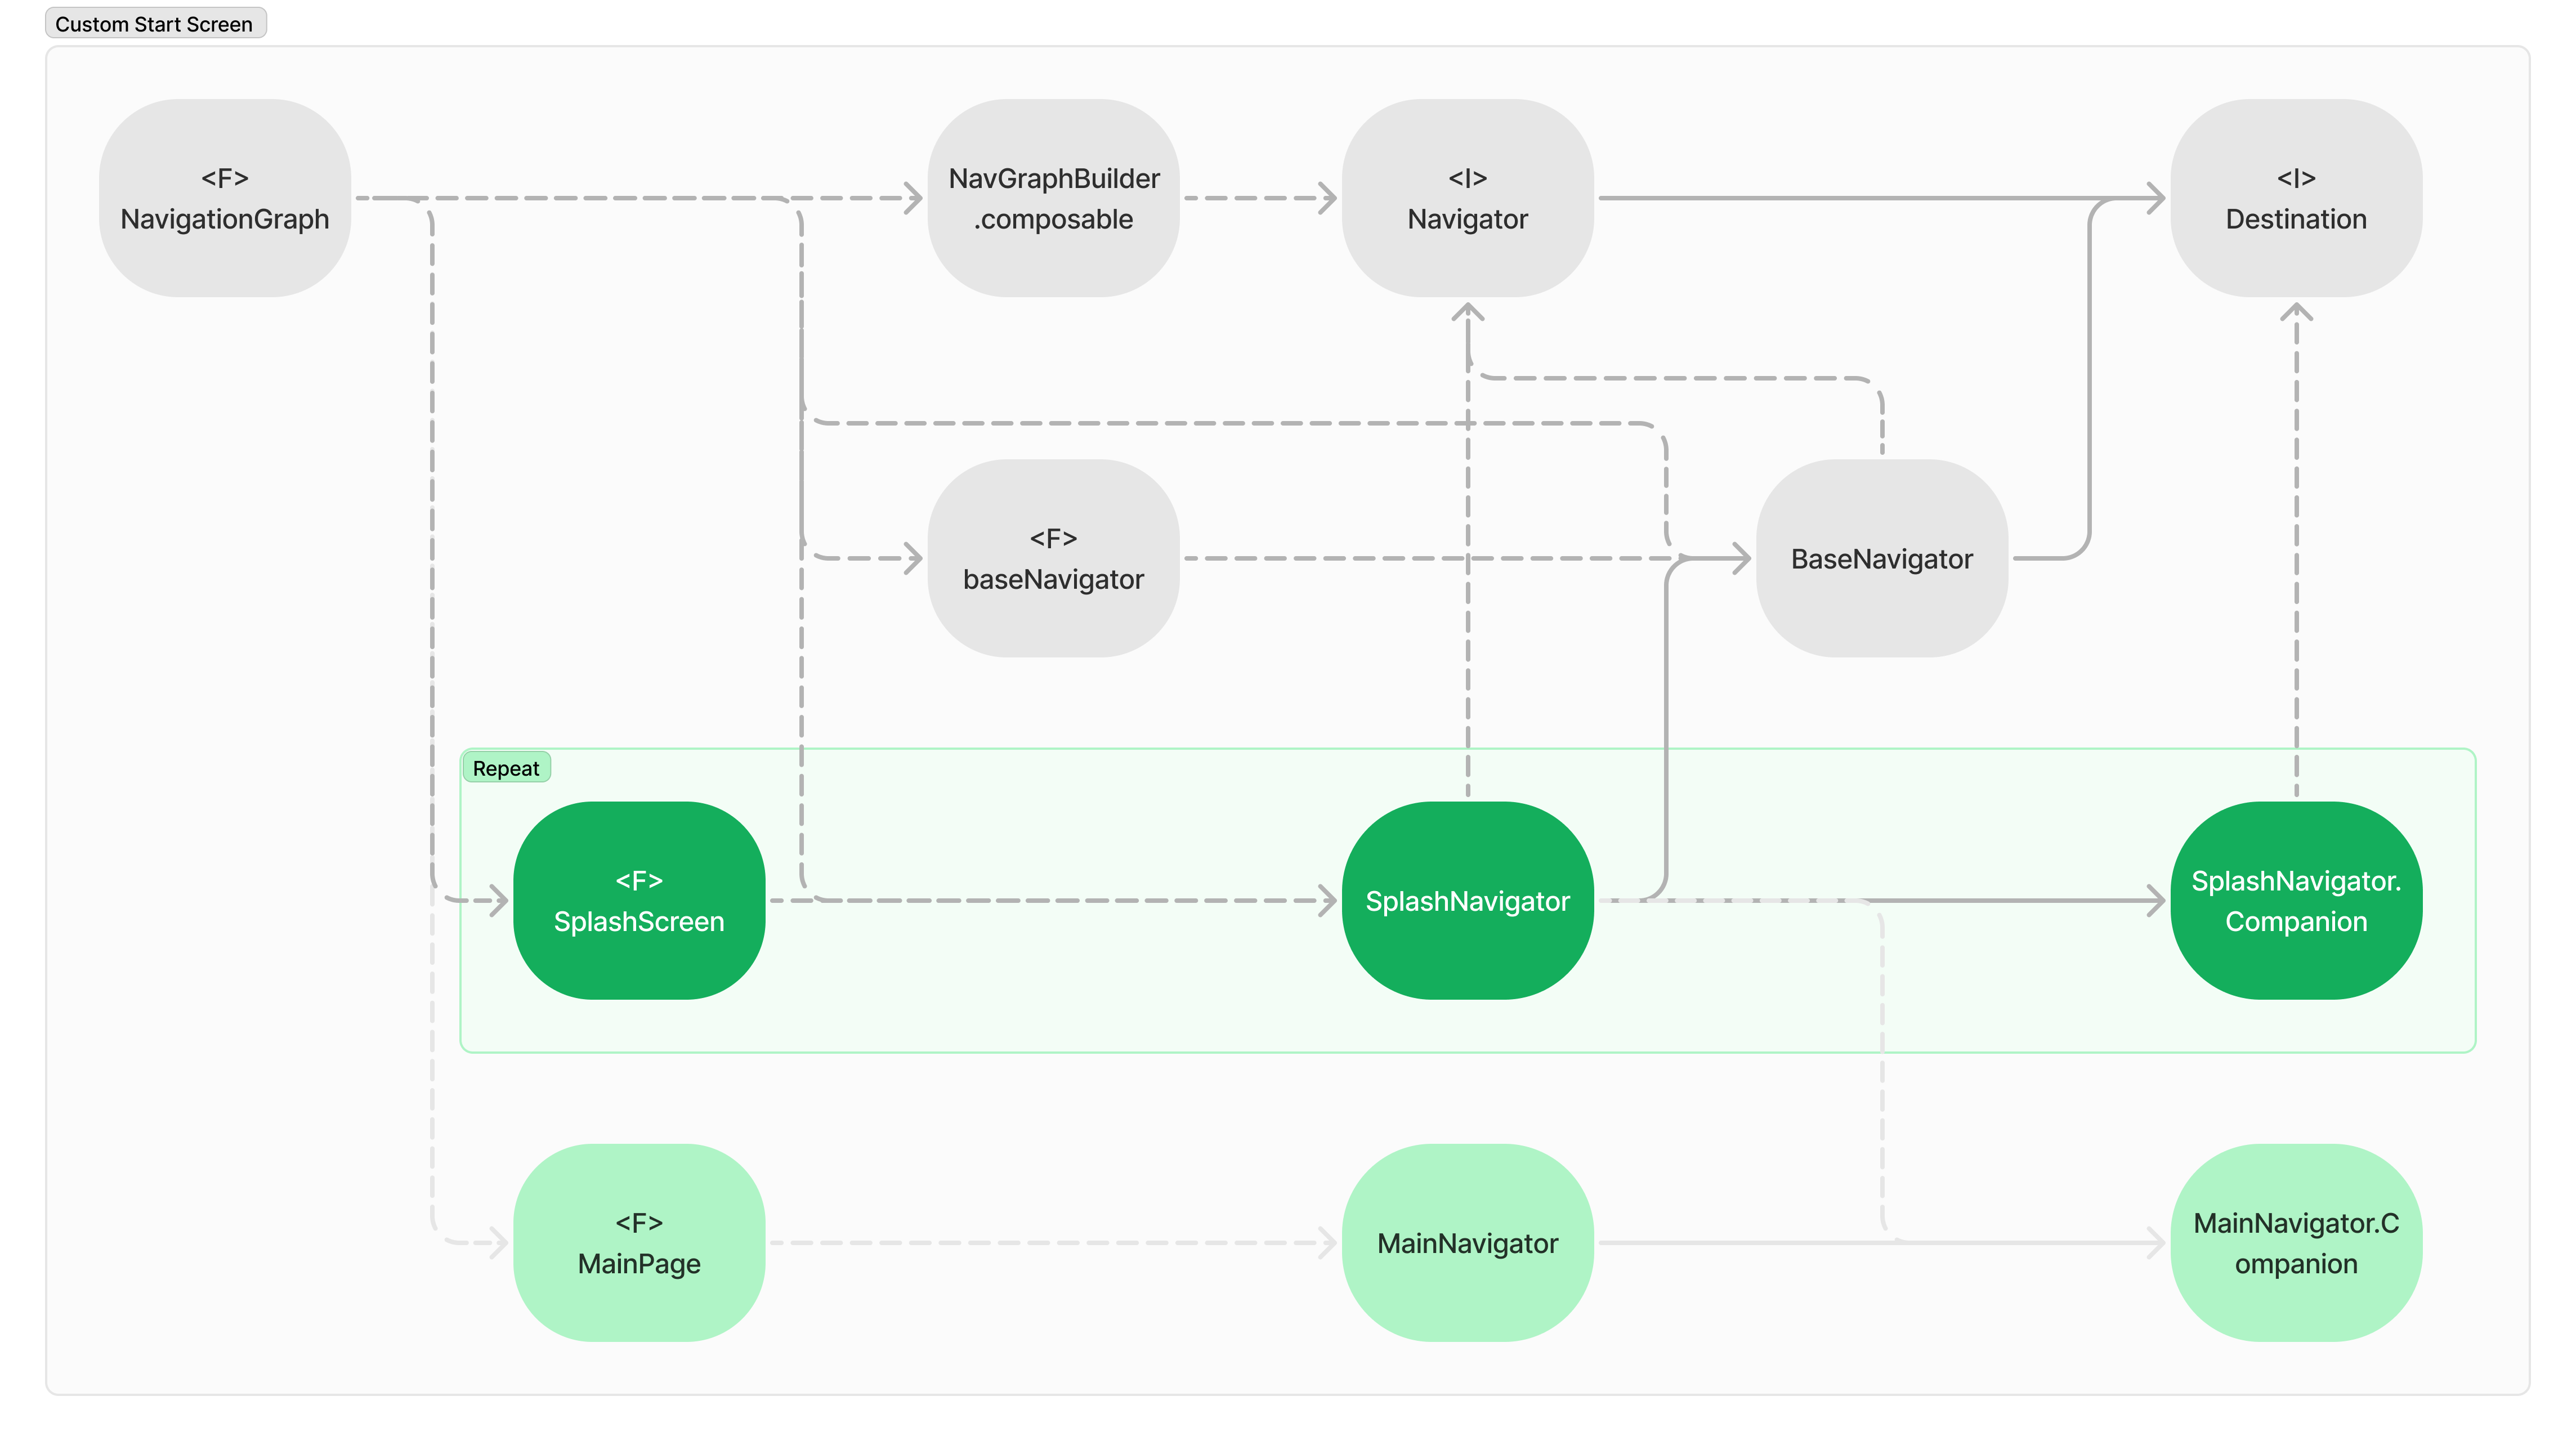
open class BaseNavigator(
    private val activity: Activity,
    val navController: NavController,
    override val destination: Desination
):Navigator {
    // ...
}
/**
 * @param startDestination プレビュー時のみ使用可能なデフォルト値
 */
@Composable
fun baseNavigator(
    activity: Activity = if (LocalInspectionMode.current) {
        PreviewActivity()
    } else {
        LocalContext.current as Activity
    },
    startDestination: Destination = if(LocalInspectionMode.current || activity is PreviewActivity) {
	      object: Destination {
	          override val routePattern = "preview"
	          // ...
	      }
    } else {
        throw IllegalArgumentException ("本番環境では `startDestination` を指定する必要があります。")
    }
): BaseNavigator {
    val navHostController = rememberNavController()
    val base = remember(activity) {
        BaseNavigator(activity, navHostController)
    }
    return base
}
@AndroidEntryPoint
class MainActivity : ComponentActivity() {
    override fun onCreate(savedInstanceState: Bundle?) {
        super.onCreate(savedInstanceState)

        enableEdgeToEdge()
        setContent {
            NavigationGraph(baseNavigator(destination = SplashNavigator.Companion))
        }
    }
}
@Composable
fun NavigationGraph(baseNavigator: BaseNavigator = baseNavigator()) {
    //追加の共通ナビゲーション機能を実装

    NavHost( // Encapsulate the `navigation-compose` dependency in activity(`MainActivity`) and UI(`UiRoot`).
        baseNavigator.navController,
        baseNavigator.destination.routePattern
    ) {
        // ...
    }
}
DEMOアプリ開発サポート
ナビゲーショングラフの設定機能(NavigationGraph)では、スタート画面の変更は可能ですが、使用できるナビゲーショングラフとスタート画面は 1 つのみです。そのため、既存の機能の一部だけを活用した デモアプリケーションの開発はできません。
@Composable
fun NavigationGraph(baseNavigator: BaseNavigator = rememberBaseNavigator()) {
    NavHost(
        navController = baeNavigator.navController,
        startDestination = baseNavigator.destination.routePattern
    ) {
        // ...
    }
}
ソリューション
ナビゲーショングラフ構成コードを、navigation-composeのコールから分離します。これにより、ナビゲーショングラフの構築、ナビゲーターと UI 機能の接続、共通ナビゲーション機能の分離 が可能になり、さらに 依存関係のカプセル化 も実現できます。
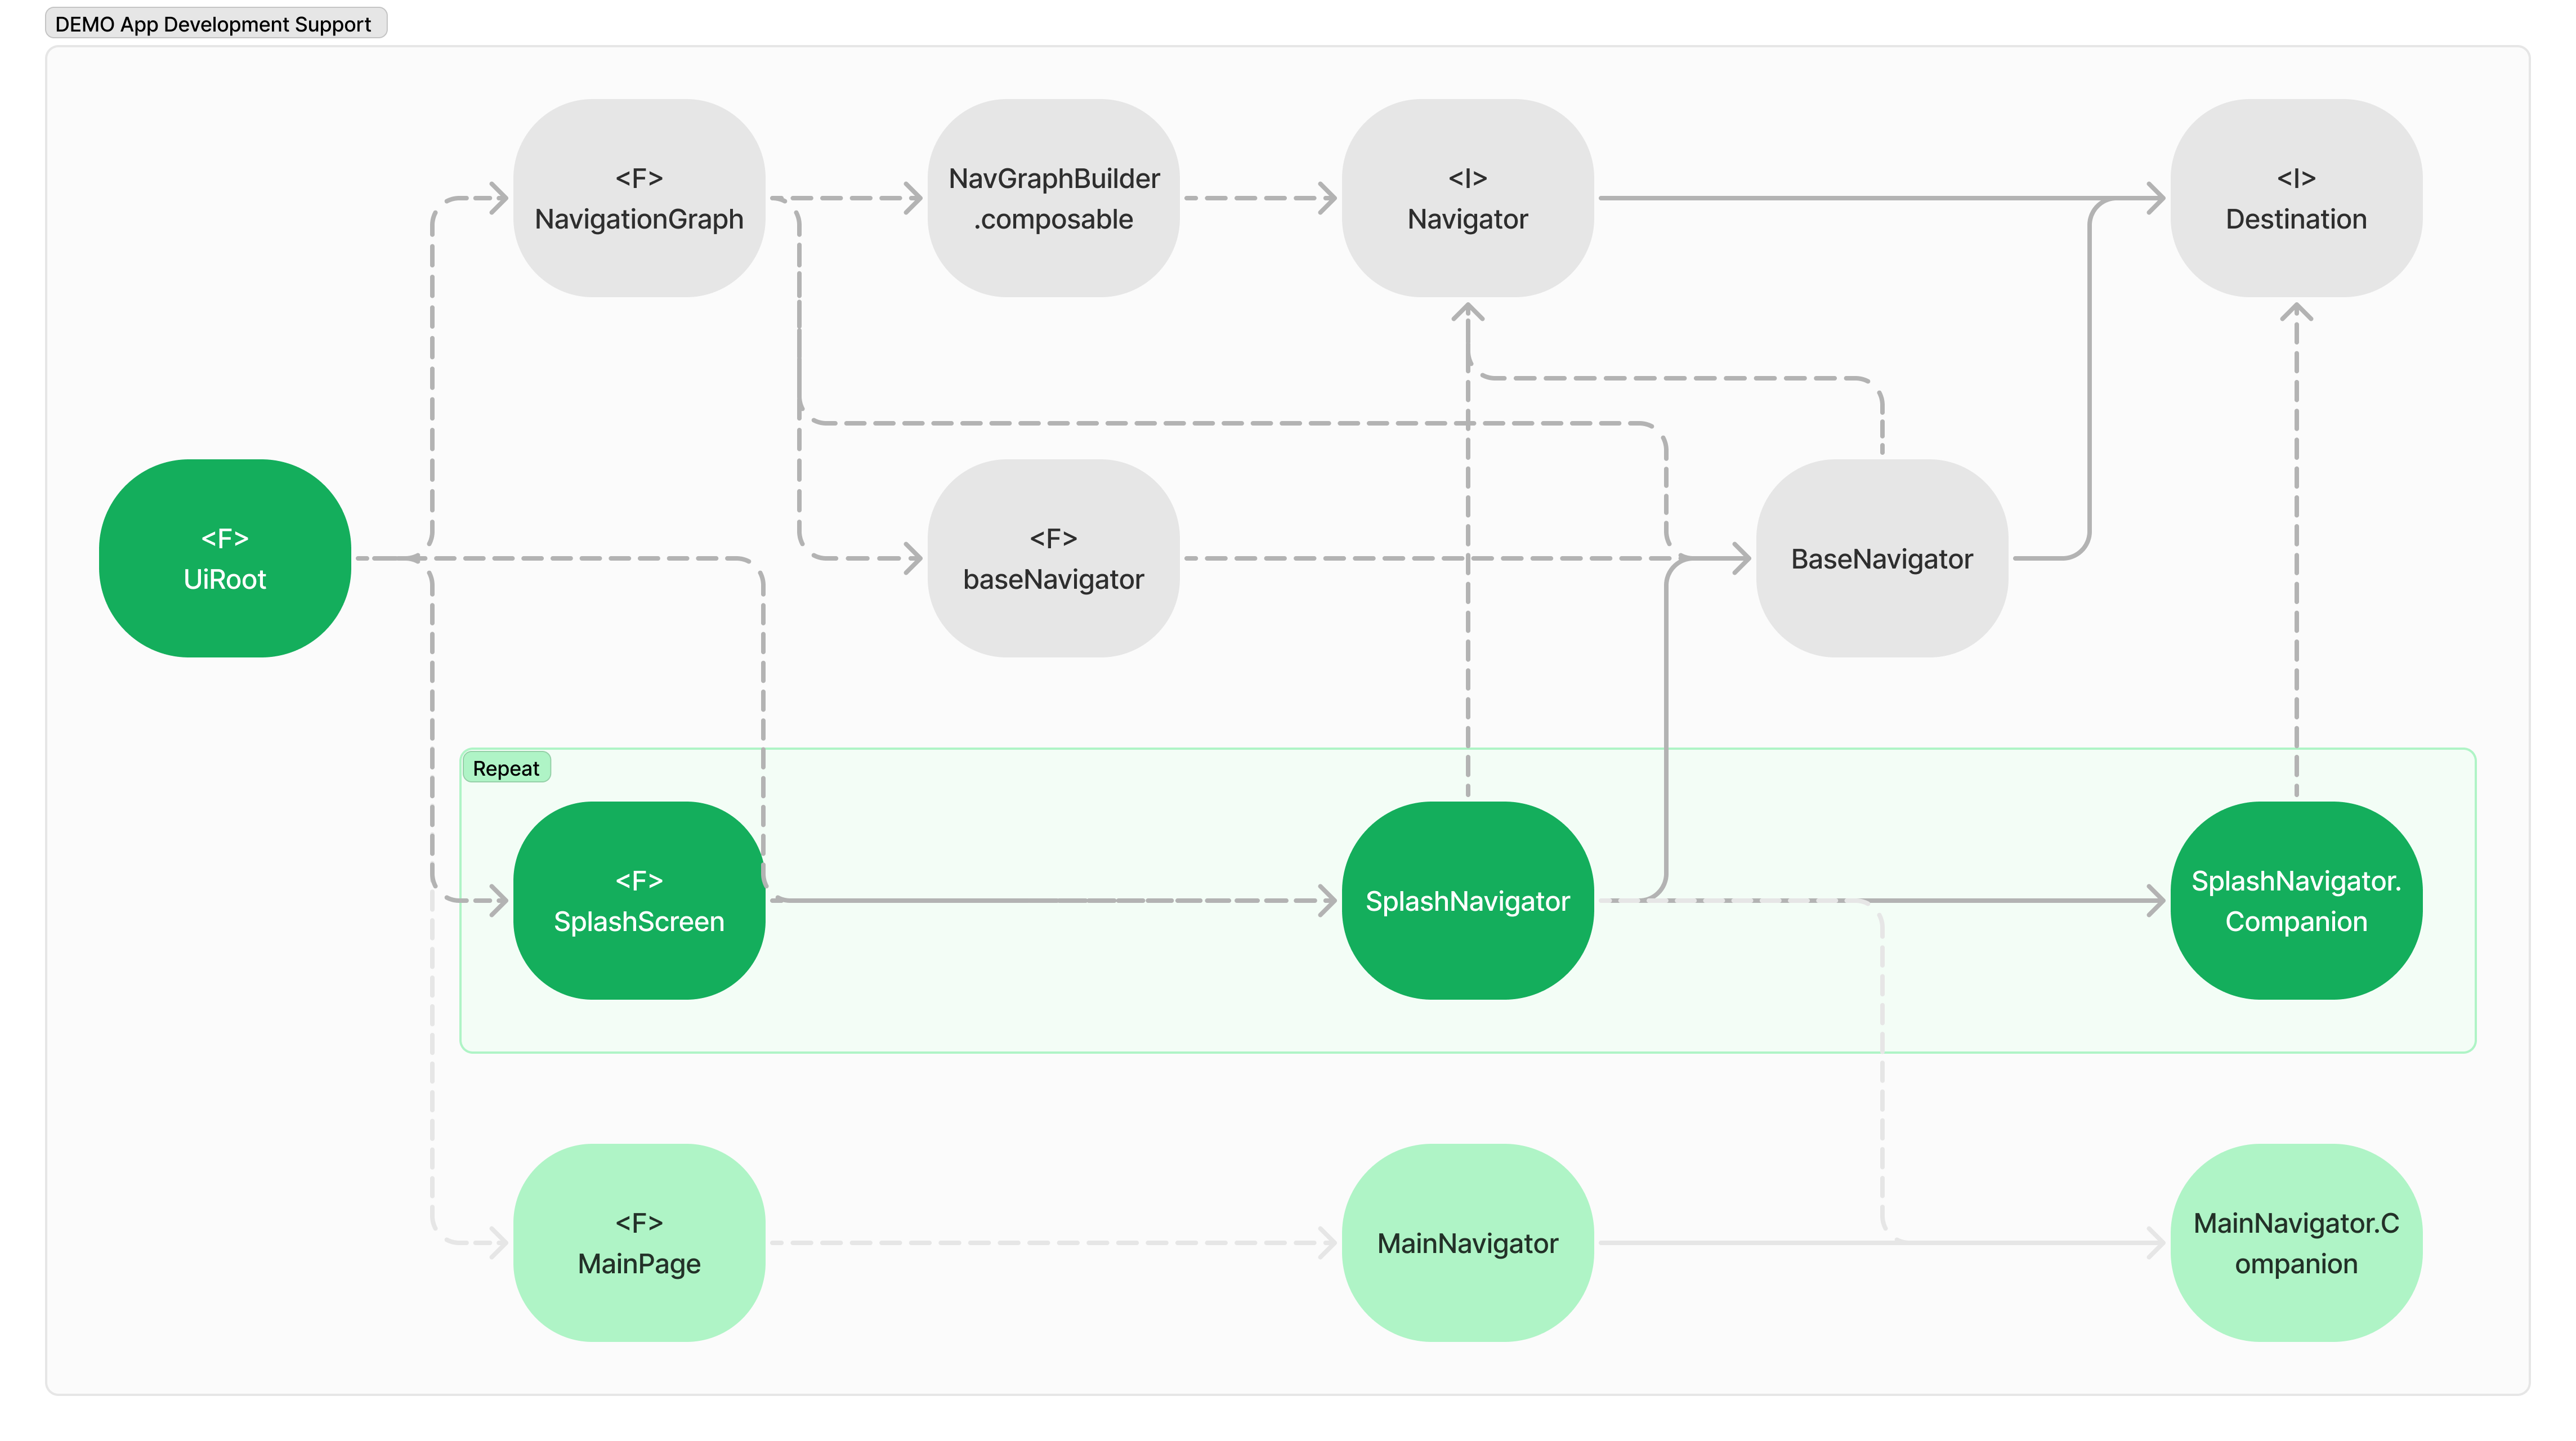
@Composable
fun NavigationGraph(baseNavigator: BaseNavigator = rememberBaseNavigator(), builder: NavGraphBuilder.() -> Unit) {
    NavHost(
        navController = baeNavigator.navController,
        startDestination = baseNavigator.destination.routePattern,
        builder = builder
    )
}
プロダクションアプリ
@AndroidEntryPoint
class MainActivity : ComponentActivity() {
    override fun onCreate(savedInstanceState: Bundle?) {
        super.onCreate(savedInstanceState)

        enableEdgeToEdge()
        setContent {
            UiRoot(baseNavigator(destination = SplashNavigator.Companion))
        }
    }
}
@Composable
fun UiRoot(baseNavigator: BaseNavigator) {
    NavigationGraph(baseNavigator) {
        // ...
        composable(Sub1Navigator(baseNavigator)) { _, navigator ->
	          Sub1Screen(navigator)
        }
        // ...
    }
}
デモアプリ
@AndroidEntryPoint
class DemoActivity : ComponentActivity() {
    override fun onCreate(savedInstanceState:Bundle?) {
        super.onCreate(savedInstanceState)

        enableEdgeToEdge()
        setContent {
            DemoUiRoot(baseNavigator(destination = Transactional1Navigator.Companion))
        }
    }
}
@Composable
fun DemoUiRoot(baseNavigator: BaseNavigator) {
    NavigationGraph(baseNavigator) {
        composable(Transactional1Navigator(baseNavigator)) { _, navigator ->
	          Transactional1Screen(navigator)
        }
    }
}
用語の統一
ガイドドキュメントでは、screen という用語を ナビゲーションターゲット を指すために使っています。しかし、多くの UI デザインシステム(例: Atomic Design、Carbon Design System、Ant Design、Shopify Polarisなど)では、ページを使い、ナビゲーションターゲットに使用し、screen は物理デバイスのディスプレイに使用します。
さらに、ナビゲーショングラフに画面を登録するとき、関数名composable は@Composable 関数が呼び出されたことを示すために使用されます。
開発者向けの専門用語を 開発以外の分野でも通じる表現に統一することで、混乱や意味の確認が不要になり、スムーズで素早いコミュニケーション ができるようになります。そのため、用語の統一が望ましいというわけです。
fun <N : Navigator> NavGraphBuilder.composable(
    navigator: N,
    content: @Composable AnimatedContentScope.(NavBackStackEntry, N) -> Unit
) {
    composable(
        route = navigator.destination.routePattern,
        arguments = navigator.destination.arguments
    ) { entry ->
        content(entry, navigator)
    }
}
@Composable
fun UiRoot(baseNavigator: BaseNavigator) {
    NavigationGraph(baseNavigator) {
        composable(Sub1Navigator(baseNavigator)) { _, navigator ->
	          Sub1Screen(navigator)
        }
    }
}
@Composable
fun Sub1Screen(navigator: Sub1Navigator, viewModel:Sub1ViewModel = hiltViewModel()) {
		// ...
}
ソリューション
設計システムとしてAtomic Designを採用していると仮定し、ナビゲーションターゲットにはscreenではなくpageを使用する形で用語を統一します。
fun <N : Navigator> NavGraphBuilder.page(
    navigator: N,
    content: @Composable AnimatedContentScope.(NavBackStackEntry, N) -> Unit
) {
    composable(
        route = navigator.destination.routePattern,
        arguments = navigator.destination.arguments
    ) { entry ->
        content(entry, navigator)
    }
}
@Composable
fun UiRoot(baseNavigator: BaseNavigator) {
    NavigationGraph(baseNavigator) {
        page(Sub1Navigator(baseNavigator)) { _, navigator ->
	          Sub1Page(navigator)
        }
    }
}
@Composable
fun Sub1Page(navigator: Sub1Navigator, viewModel: Sub1ViewModel = hiltViewModel()) {
		// ...
}
結論
最初は、ガイドドキュメントの基本機能だけを使っていたため、構造はシンプルでした。

オブジェクト指向ナビゲーション設計を取り入れることで、特定のナビゲーション仕様に影響されることなく、それぞれが特殊機能を担当する複数のジェネリック型や機能を実現できるようになりました。
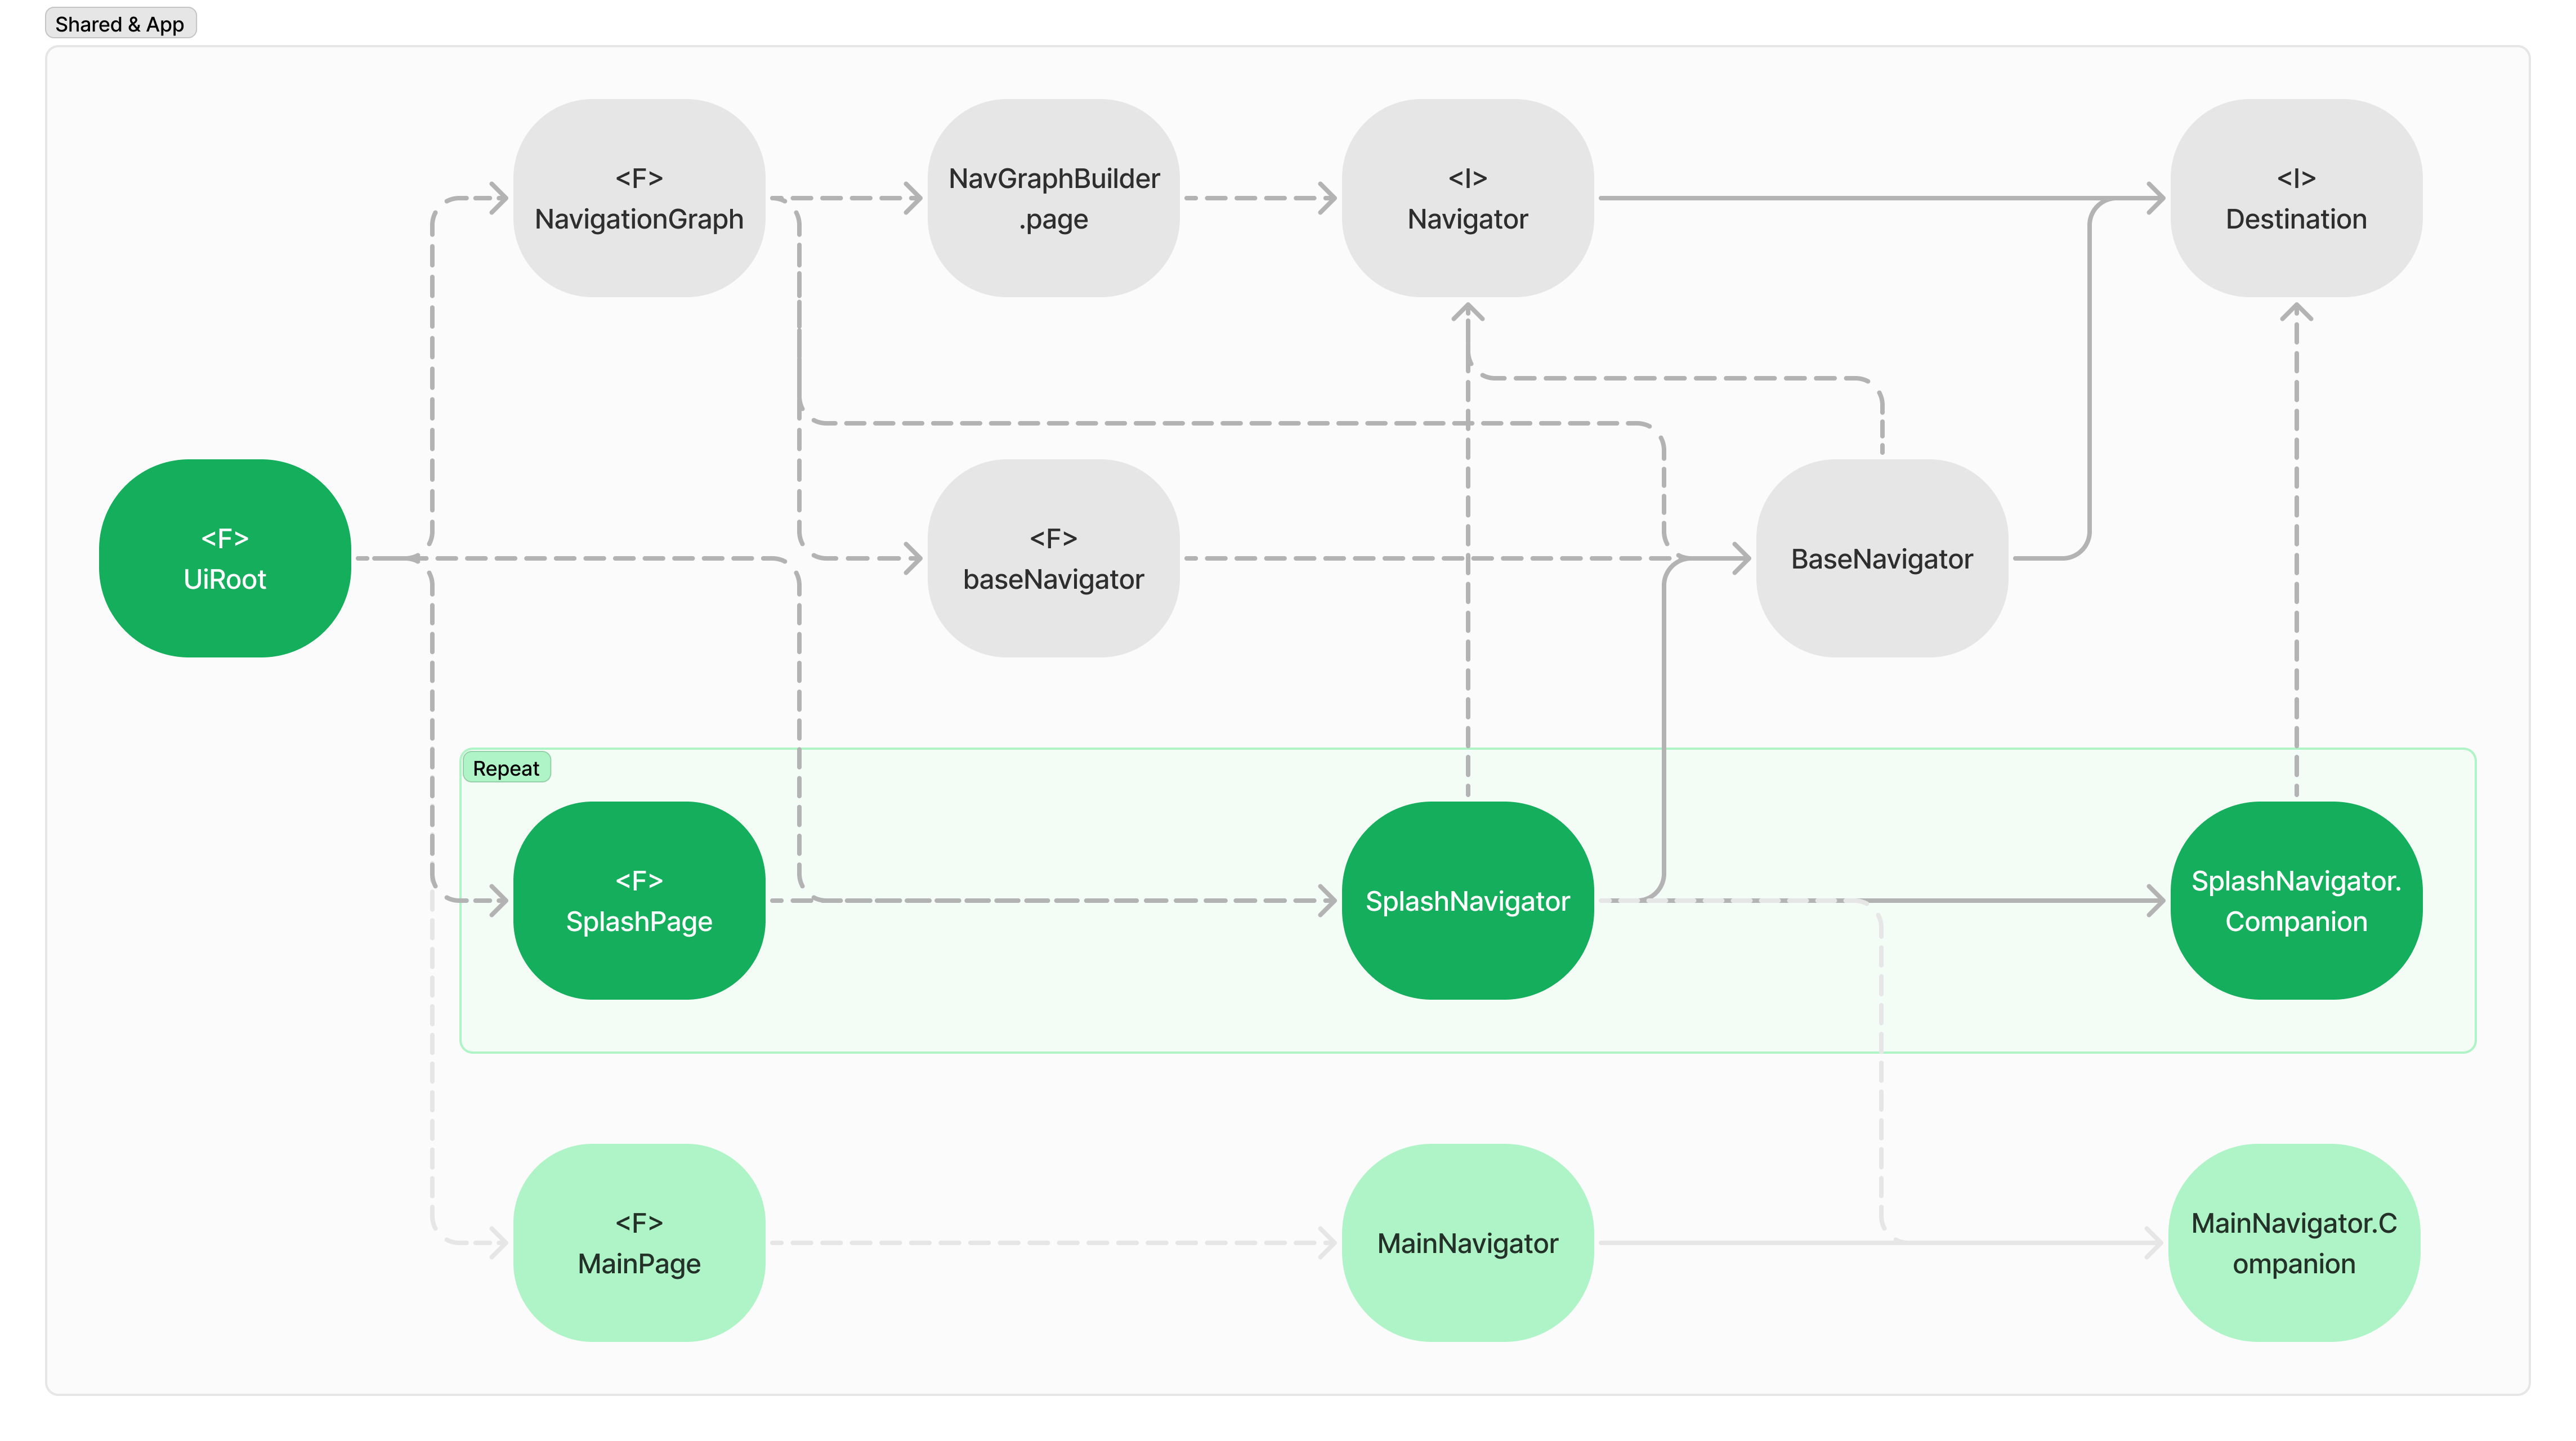
Navigator:UI に関連する グループナビゲーション を管理し、ナビゲーショングラフにどのように登録されるかを決めるプロパティを定義する。Destination:ナビゲーショングラフにページを登録するためのプロパティを定義する。BaseNavigator:Application、Activity、およびナビゲーショングラフの統合を定義し、共通・グローバルナビゲーションを実装する。NavGraphBuilder.page:ナビゲーショングラフと各ページをNavigator) を通じて接続する。@Composable fun NavigationGraph:navigation-composeをカプセル化し、共通のナビゲーション機能を実装することで、共通機能と具体的なナビゲーショングラフを分離する。@Composable fun baseNavigator:開発の利便性を向上させる。
ジェネリックオブジェクトの構造は以下のとおりです。
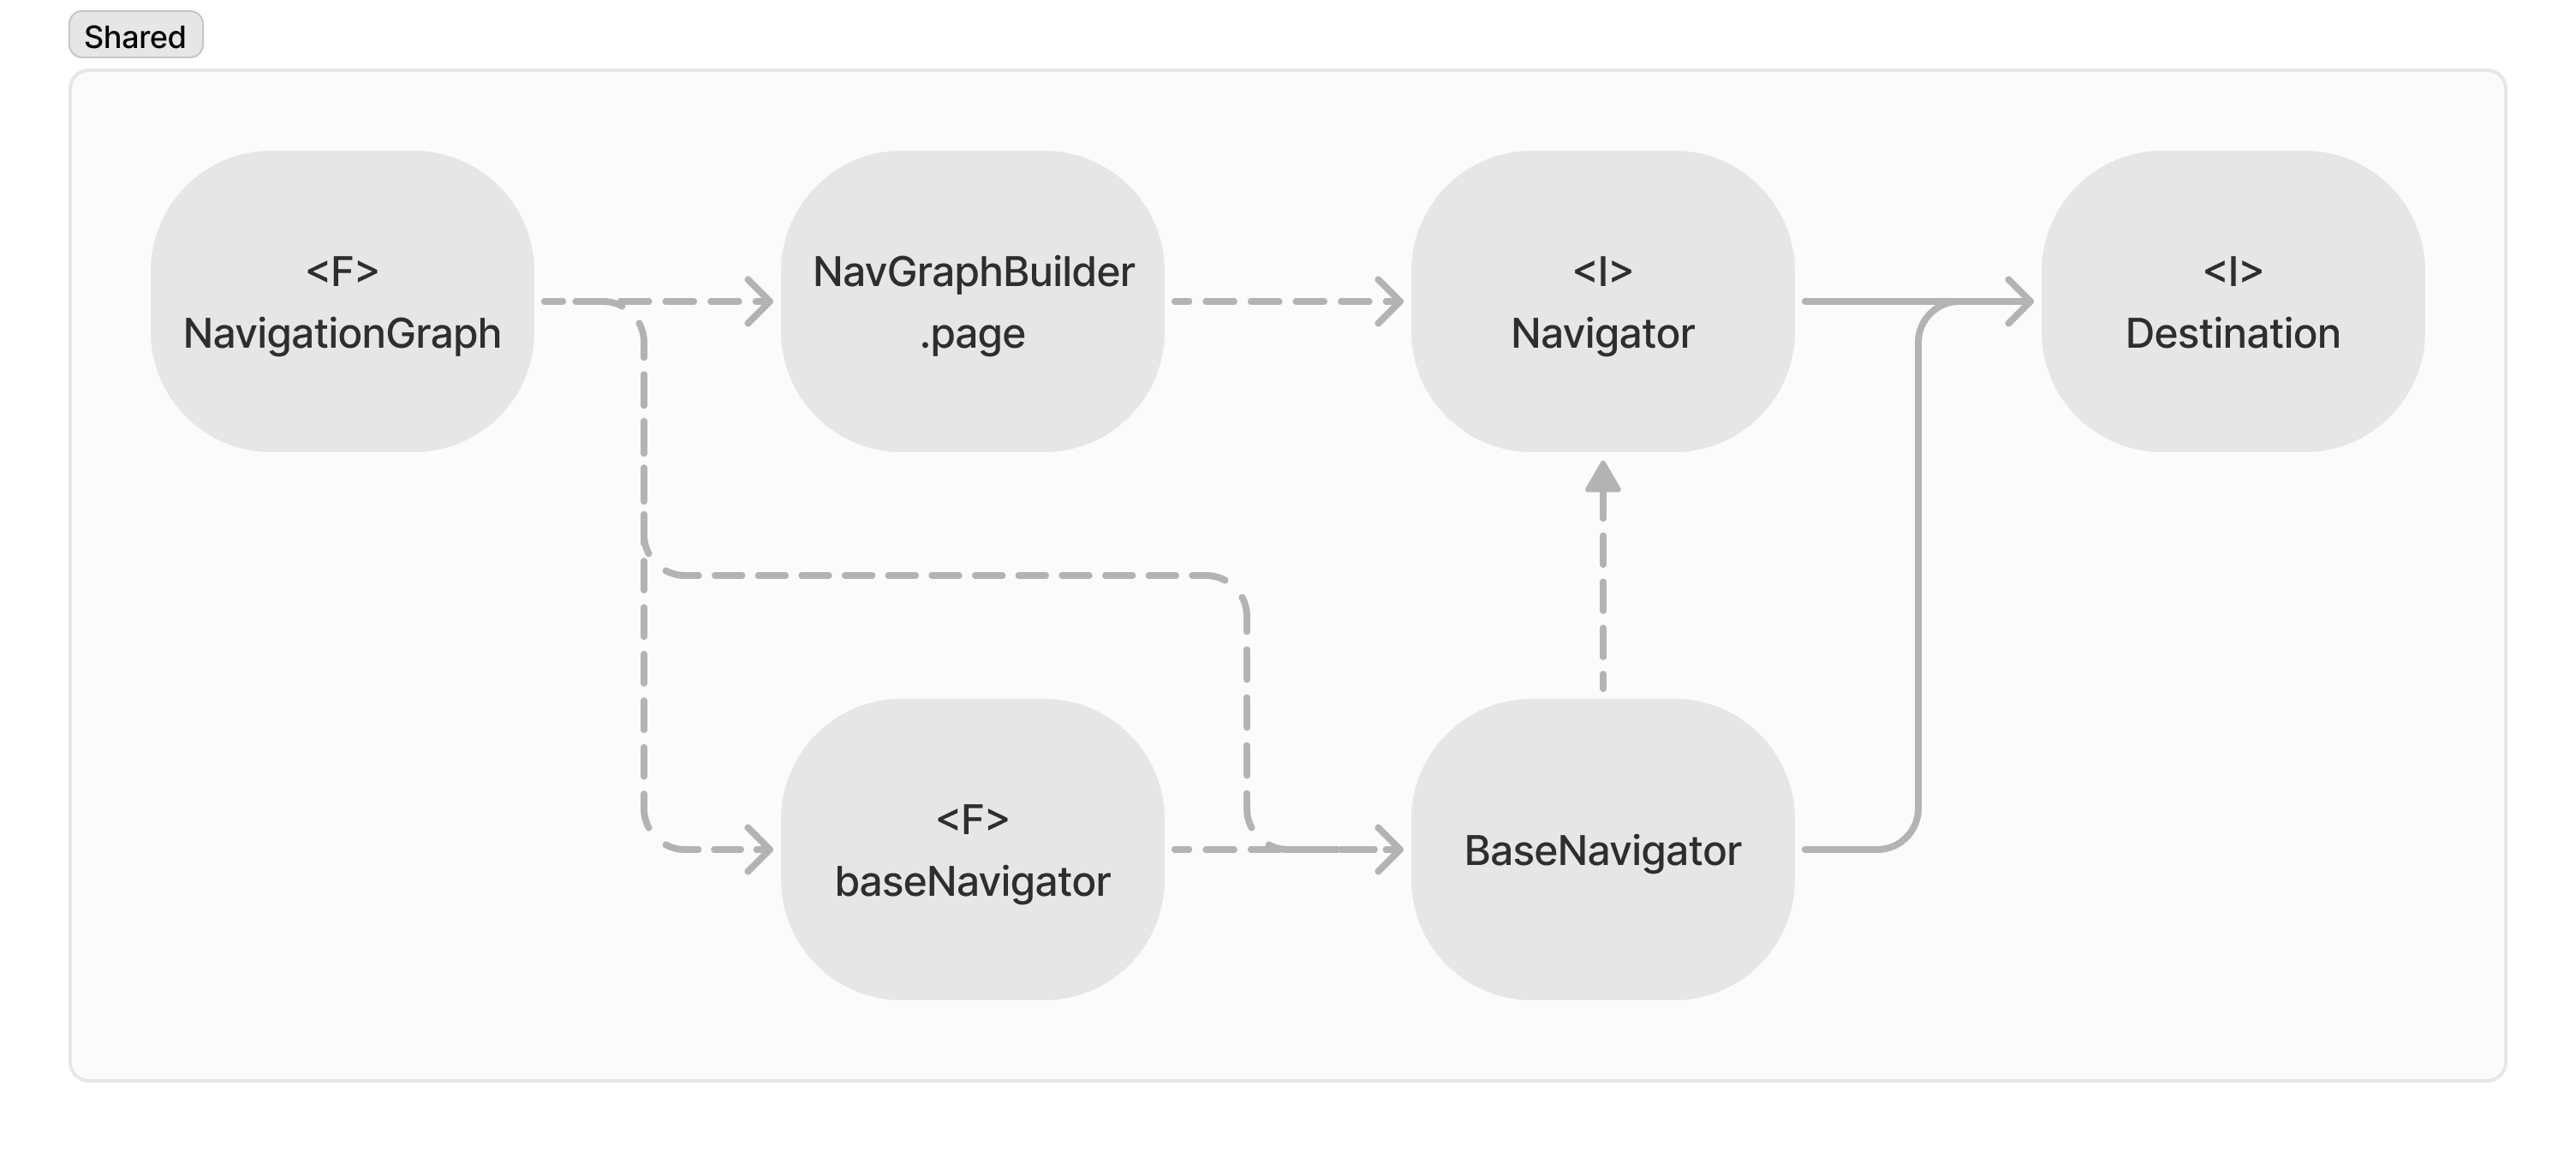
汎用オブジェクトを使用してナビゲーショングラフを構築すると、どうしても複雑な構造になりがちです。しかし、すでに汎用的な機能が整備されている場合、アプリケーションレベルの開発では考慮すべき要素が減るため、開発期間を短縮できます。その結果、新しい画面を追加するときの平均的な開発コストが低下します。

この設計アプローチが、 すべての分野、製品、開発環境、個人に必要というわけではありません。必要に応じて、優先度を下げたり、別の解決策を選択することが求められます。本記事で紹介しているオブジェクト指向設計あくまで一例です。ただ、ここで紹介した設計上の課題や方向性は、他のソフトウェア開発にも応用可能です。
オブジェクト指向設計とは?
オブジェクト指向設計は、必ずしもコードを短くし、シンプルな構造にするためのものではありません。コードは役割ごとに分割されている場合にのみ、見た目がシンプルになります。例えば、このガイドの手法に従っても、ナビゲーショングラフ全体を構築する機能と各画面の機能は別々に記述することになります。極端な話、すべての画面をNavigationGraph内に実装すること可能ですし、NavigationGraph をまったく使わずに、MainActivityではsetContentを呼び出してすべての画面を構築することもできます。
オブジェクト指向設計は、コードの役割と、その機能を実現するために必要な責務を分析することから始まります。そこから何をグループ化し、どのようにタイプやファイルに分割すべきかを決めます。各コードは、import またはオブジェクト参照を通じて接続されています。最終的に、どの開発者がコードを管理し、それに関する調査や保守の責任を負うのかが決まります。
IT業界において、開発者は非常に重要な生産リソースです。そのため、コストと生産性は開発者がどのように時間を使うかに大きく左右されます。このことから、開発者の認知能力は貴重なリソースとなります。技術スキルが高く、製品への理解が深まり、作業履歴に関する知識が豊富であるほど、開発者の集中力が生み出す価値も高まります。現在見ているコードが今のタスクに必要かどうかを判断する認知オーバーヘッド は、最も価値の低い形で開発者の集中力(認知能力)を消費してしまいます。集中力が低下すると、生産性も落ちてしまいます。
オブジェクト指向設計を適用すると、必然的に構造が複雑になり、コードを正しく理解するために 深い技術的知識や過去の開発履歴に関する知識が必要になります。オブジェクト指向設計_は、表面レベルの機能を迅速かつ容易に開発できる環境を整えるために、事前に大規模な開発と学習を必要とする開発手法です。
オブジェクト指向設計のリスクとコスト
オブジェクト指向設計は、大量の汎用機能と複雑な構造 を活用し、高い生産性を実現するための開発手法です。しかし、汎用的な機能や構造には限界があります。そして、これらの制限を超える変更は、いつ発生してもおかしくありません。開発者ではないプランナー、マネージャー、デザイナーは、暗黙の知識(ドメイン知識)を日常的に習得・活用しているわけではありません。そのため、一見シンプルに思える変更が、なぜ実際には難しく、時間がかかるのかを理解するのはほぼ不可能 です。開発者同士であっても、暗黙知を持っていない人は、それを理解するのが難しいと感じるでしょう。この問題は、個人が暗黙知を身につけることや、開発者が繰り返し説明して理解してもらうことで解決できるものではありません。代わりに、これは個人の問題ではなく、組織や企業全体での体系的かつ文化的な解決策が求められる課題です。
特に、企業や組織の生産性向上を目的としてオブジェクト指向設計を導入する場合、開発者同士や、開発者と他の職種との間で生じる暗黙知の違いによる衝突を管理することが重要になります。そして、そこにリスク(またはコスト)が発生します。もちろん、オブジェクト指向設計が適切に機能している場合は問題になりません。その前に、誰がオブジェクト指向設計を担当するのか、そして 組織や企業レベルで責任者をどのように決定するのかが大きな課題となります。もしこの判断を誤ると、組織や企業にとって最も貴重なリソースである「チームワーク」 が損なわれる可能性があります。
参考
関連記事 | Related Posts

Android Composeオブジェクト指向ナビゲーション
Jetpack Compose Animation Techniques: Enhance App Impressions with Minimal Code Changes

Compose MultiplatformとSwiftUIで作るハイブリッドモバイルアプリ(Part 2):実装ガイド

When We Put Compose on Top of BottomSheetDialogFragment, Anchoring a Button to the Bottom Proved Harder Than Expected

小規模なコード修正で効果的にアプリの印象を改善する、Jetpack Composeのアニメーション追加のテクニック

Jetpack Compose in myroute Android App
We are hiring!
【63】シニア/フロントエンドエンジニア(React/Typescript)/KINTO中古車開発G/東京・大阪・福岡
KINTO開発部KINTO中古車開発グループについて◉KINTO開発部 :67名 KINTO中古車開発G:10名★ KINTO開発推進G:8名 KINTOプロダクトマネジメントG:5名 KINTOバックエンド開発G:17名 KINTOフロントエンド開発G:21名 業務管理シス...
【バックエンドエンジニア】my route開発G/東京
my routeについてmy routeの概要 my routeは、移動需要を創出するために「魅力ある地域情報の発信」、「最適な移動手段の提案」、「交通機関や施設利用のスムーズな予約・決済」をワンストップで提供する、スマートフォン向けマルチモーダルモビリティサービスです。

