Android View から Jetpack Compose への移行の第一歩

この記事は KINTOテクノロジーズアドベントカレンダー2024 の18日目の記事です🎅🎄
はじめまして。KINTOテクノロジーズのAndroidエンジニア 山田 剛 です。
本記事では、Android View で構築されたアプリを Jetpack Compose を用いたUI記述へ移行させる、もしくは、Android View ベースのUIに徐々に Jetpack Compose ベースのUIを導入する際の第一歩となるような、ちょっとしたテクニックの一部を紹介します。
1. はじめに
宣言的UIのAndroid版として Jetpack Compose の開発開始が数年前にアナウンスされ、2021年7月にバージョン 1.0 がリリースされました。
多くのAndroid開発者が、その以前からJavaに続きAndroid開発の公式サポート言語となっていた Kotlin の柔軟性・拡張性を活用した Jetpack Compose のコンセプトを受け入れ、以降のAndroidアプリ開発において Jetpack Compose の採用が徐々に拡がっているようです。
宣言的UIの導入によって、従来のViewベースのUIと比べて少ないコード量で直感的な記述が可能になり、開発効率/生産性が向上すると考えられています。
最近になって Compose Multiplatform がリリースされ、Android 以外にも Jetpack Compose のスキルを活用できる領域が拡がってきました。 今後は魅力的なライブラリが Jetpack Compose のみに対応される、といったことも増えてくるかもしれません。
その魅力を既存アプリにも取り入れるべく、弊社でも当初 Android View ベースで構築されていたアプリのUIを Jetpack Compose ベースのUIに移行する取り組みを一部の開発プロジェクトで進めています。 しかし従来のViewベースのUIは手続き的な要素が多く、Jetpack Compose の宣言的なスタイルの導入は簡単というわけにはいきません。
この記事では、Jetpack Compose によって簡潔になったことで削ぎ落とされた、あるいは見えにくくなった要素を補完するためのちょっとしたテクニック、とりわけ Composable の位置やデバッグ情報の確認、 View と Composable の相互運用などについて紹介し、ViewベースからJetpack ComposeベースのUIにできるだけスムーズに移行するための一助となることを目指します。
2. Composable の位置合わせとデバッグ
View の表現を今までになかった Composable に替えるという作業をするにあたって、同じ表示内容をどのように表すのか、という課題と同等以上に、正しい位置に配置できるのだろうか、という点が、 Android View に馴染んだ筆者にとっても大きな不安要素でした。まずは、 Composable の表示位置を View と同じに揃えること、そのために必要なデバッグのための情報を取得・確認する方法を紹介します。
2.1. Composable と View の位置を確かめる
Android API level 1 から提供されている View は、Java のオブジェクト指向の考え方に基づき、矩形の画面要素としての表現のほか、View 同士の包含関係や相互作用、サブクラスによる機能拡張などもうまく表現しています。
たとえば、単一の View や ViewGroup が内包した多くの View の位置をログに出力することは、以下のようなコードでできます:
private fun Resources.findResourceName(@IdRes resId: Int): String = try {
    getResourceName(resId)
} catch (e: Resources.NotFoundException) {
    "?"
}

fun View.logCoordinators(logger: (String) -> Unit, res: Resources, outLocation: IntArray, rect: Rect, prefix: String, density: Float) {
    getLocationInWindow(outLocation)
    rect.set(outLocation[0], outLocation[1], outLocation[0] + width, outLocation[1] + height)
    var log = "$prefix${this::class.simpleName}(${res.findResourceName(id)})${rect.toShortString()}(${rect.width().toFloat() / density}dp, ${rect.height().toFloat() / density}dp)"
    if (this is TextView) {
        log += "{${if (text.length <= 10) text else text.substring(0, 7) + "..."}}"
    }
    logger(log)
    if (this is ViewGroup) {
        val nextPrefix = "$prefix  "
        repeat(childCount) {
            getChildAt(it).logCoordinators(logger, res, outLocation, rect, nextPrefix, density)
        }
    }
}

fun View.logCoordinators(logger: (String) -> Unit = { Log.d("ViewLogUtil", it) }) =
    logCoordinators(logger, resources, IntArray(2), Rect(), "", resources.displayMetrics.density)
ここで View$getLocationInWindow(IntArray) は、View が属する Activity のウィンドウ上での左上の座標を取得する関数です。Android View に慣れている開発者なら、このようなコードで動作を確認するのは簡単でしょう。
一点 Activity$onResume() などから直接これらの関数を呼び出してもまだ View の配置は完了しておらず意味のある情報が取得できないため、多くの場合は View$addOnLayoutChangeListener(OnLayoutChangeListener) などのコールバックから呼び出す必要があることに注意が必要です。
同じようなことを Jetpack Compose ではどうするかよく分からず、 Composable で同じように動作しているか確かめにくく移行作業がおっくう、という開発者も少なくないのではないでしょうか。
Jetpack Compose では、以下のように Modifier の拡張関数 onGloballyPositioned((LayoutCoordinator) -> Unit) を使って Composable の配置を取得できます:
@Composable
fun BoundsInWindowExample() {
    Text(
        modifier = Modifier
            .padding(16.dp)
            .background(Color.White)
            .onGloballyPositioned {
                Log.d("ComposeLog", "Target boundsInWindow: ${it.boundsInWindow()}")
            },
        text = "Hello, World!",
        style = TextStyle(
            color = MaterialTheme.colorScheme.onSecondary,
            fontSize = 24.sp
        )
    )
}
onGloballyPositioned(...) の引数にコールバックを与えることで、Composable の位置が更新されるたびにコールバックで位置の座標を取得できます。 ここで LayoutCoordinator.boundsInWindow() は Composable の矩形の上下左右を Activity 座標系で取得する拡張関数です。
ひとつの Composable に内包されるすべての Composable の位置を一気に取得するのは今のところ難しそうですが、その代わりに単一の Composable の位置は簡単に取得できます。
しかも多くの場合、Activity などの複雑なライフサイクルを気にせずに位置情報を取得できそうです。
onGloballyPositioned(...) に似たコールバックとして onPositioned(...) もあり、こちらは親となる Composable の内部での相対的な位置が決定された後にコールバックが呼ばれるようです。
boundsInWindow() のほかにも boundsInRoot()、boundsInParent() などがあり、場合に応じて使い分けることができますが、今回は割愛します。
2.2. 画面表示確認用Composableを作ってみる
Composable でもView$getLocationInWindow(IntArray) と互換性のあるboundsInWindow() で位置を取得する方法がわかったので、テスト動作させているときの位置の動きをログに出力して動作を確かめながら Composable を作り込んでいけば、徐々に compose に慣れながら View と同じものを作れそうです。
それは正しく、お手軽な方法なのですが、 LogCat は大量の文字が流れていくので、特に情報量が多いときには見づらいことも多々あります。
そこで、画面表示確認用の Composable を別に作ってみることを考えます。
テストのときに限ってアプリの一部にデバッグ用表示領域を作って、常に更新させるようにすれば、流れていく大量の LogCat の中から決定的なログを必死に探す必要もなくなります。
…そんなことは Android View の時代からわかっていたのだがそれを作り込むのがおっくうで…という嘆息が聞こえてきそうですね。
宣言的UIたる Jetpack Compose では、そのようなデバッグ用表示領域を少ない手間で作りやすくなっています:
class MainActivity : ComponentActivity() {
    override fun onCreate(savedInstanceState: Bundle?) {
        super.onCreate(savedInstanceState)
        WindowCompat.getInsetsController(window, window.decorView).isAppearanceLightStatusBars =
            resources.configuration.uiMode and Configuration.UI_MODE_NIGHT_MASK != Configuration.UI_MODE_NIGHT_YES
        setContentView(R.layout.activity_main)
        findViewById<WebView>(R.id.webView).let { webView ->
            webView.loadUrl("https://blog.kinto-technologies.com/")
        }

        val targetRect = mutableStateOf(Rect.Zero) // androidx.compose.ui.geometry.Rect
        findViewById<ComposeView>(R.id.composeTargetContainer).let { containerComposeView ->
            containerComposeView.setViewCompositionStrategy(ViewCompositionStrategy.DisposeOnViewTreeLifecycleDestroyed)
            containerComposeView.setContent {
                KtcAdventCalendar2024Theme {
                    ScrollComposable(targetRect)
                }
            }
        }

        val visibleRect = mutableStateOf(Rect.Zero)
        val outLocation = IntArray(2)
        findViewById<View>(R.id.layoutMain).addOnLayoutChangeListener { v, left, top, right, bottom, _, _, _, _ ->
            v.getLocationInWindow(outLocation)
            visibleRect.value = Rect(outLocation[0].toFloat(), outLocation[1].toFloat(), outLocation[0].toFloat() + (right - left), outLocation[1].toFloat() + (bottom - top))
        }

        findViewById<ComposeView>(R.id.composeTargetWatcher).let { watcherComposeView ->
            watcherComposeView.setViewCompositionStrategy(ViewCompositionStrategy.DisposeOnViewTreeLifecycleDestroyed)
            watcherComposeView.setContent {
                KtcAdventCalendar2024Theme {
                    TargetWatcher(visibleRect.value, targetRect.value)
                }
            }
        }
    }
}
サンプルコードで作っているアプリは Jetpack Compose 化作業の途中で、まだ Activity$setContentView(Int) で View を使っており、その View の中で ComposeView を使って Composable を導入しようとしています。
ここでは mutableStateOf(...) で View および Composable の矩形の位置の情報を共有し、画面上での振る舞いを確かめようとしています。
画面構成は下のようになります。HorizontalScrollView の部分を Composable化しようとしており、そのために画面下部をデバッグ情報の表示に利用します:
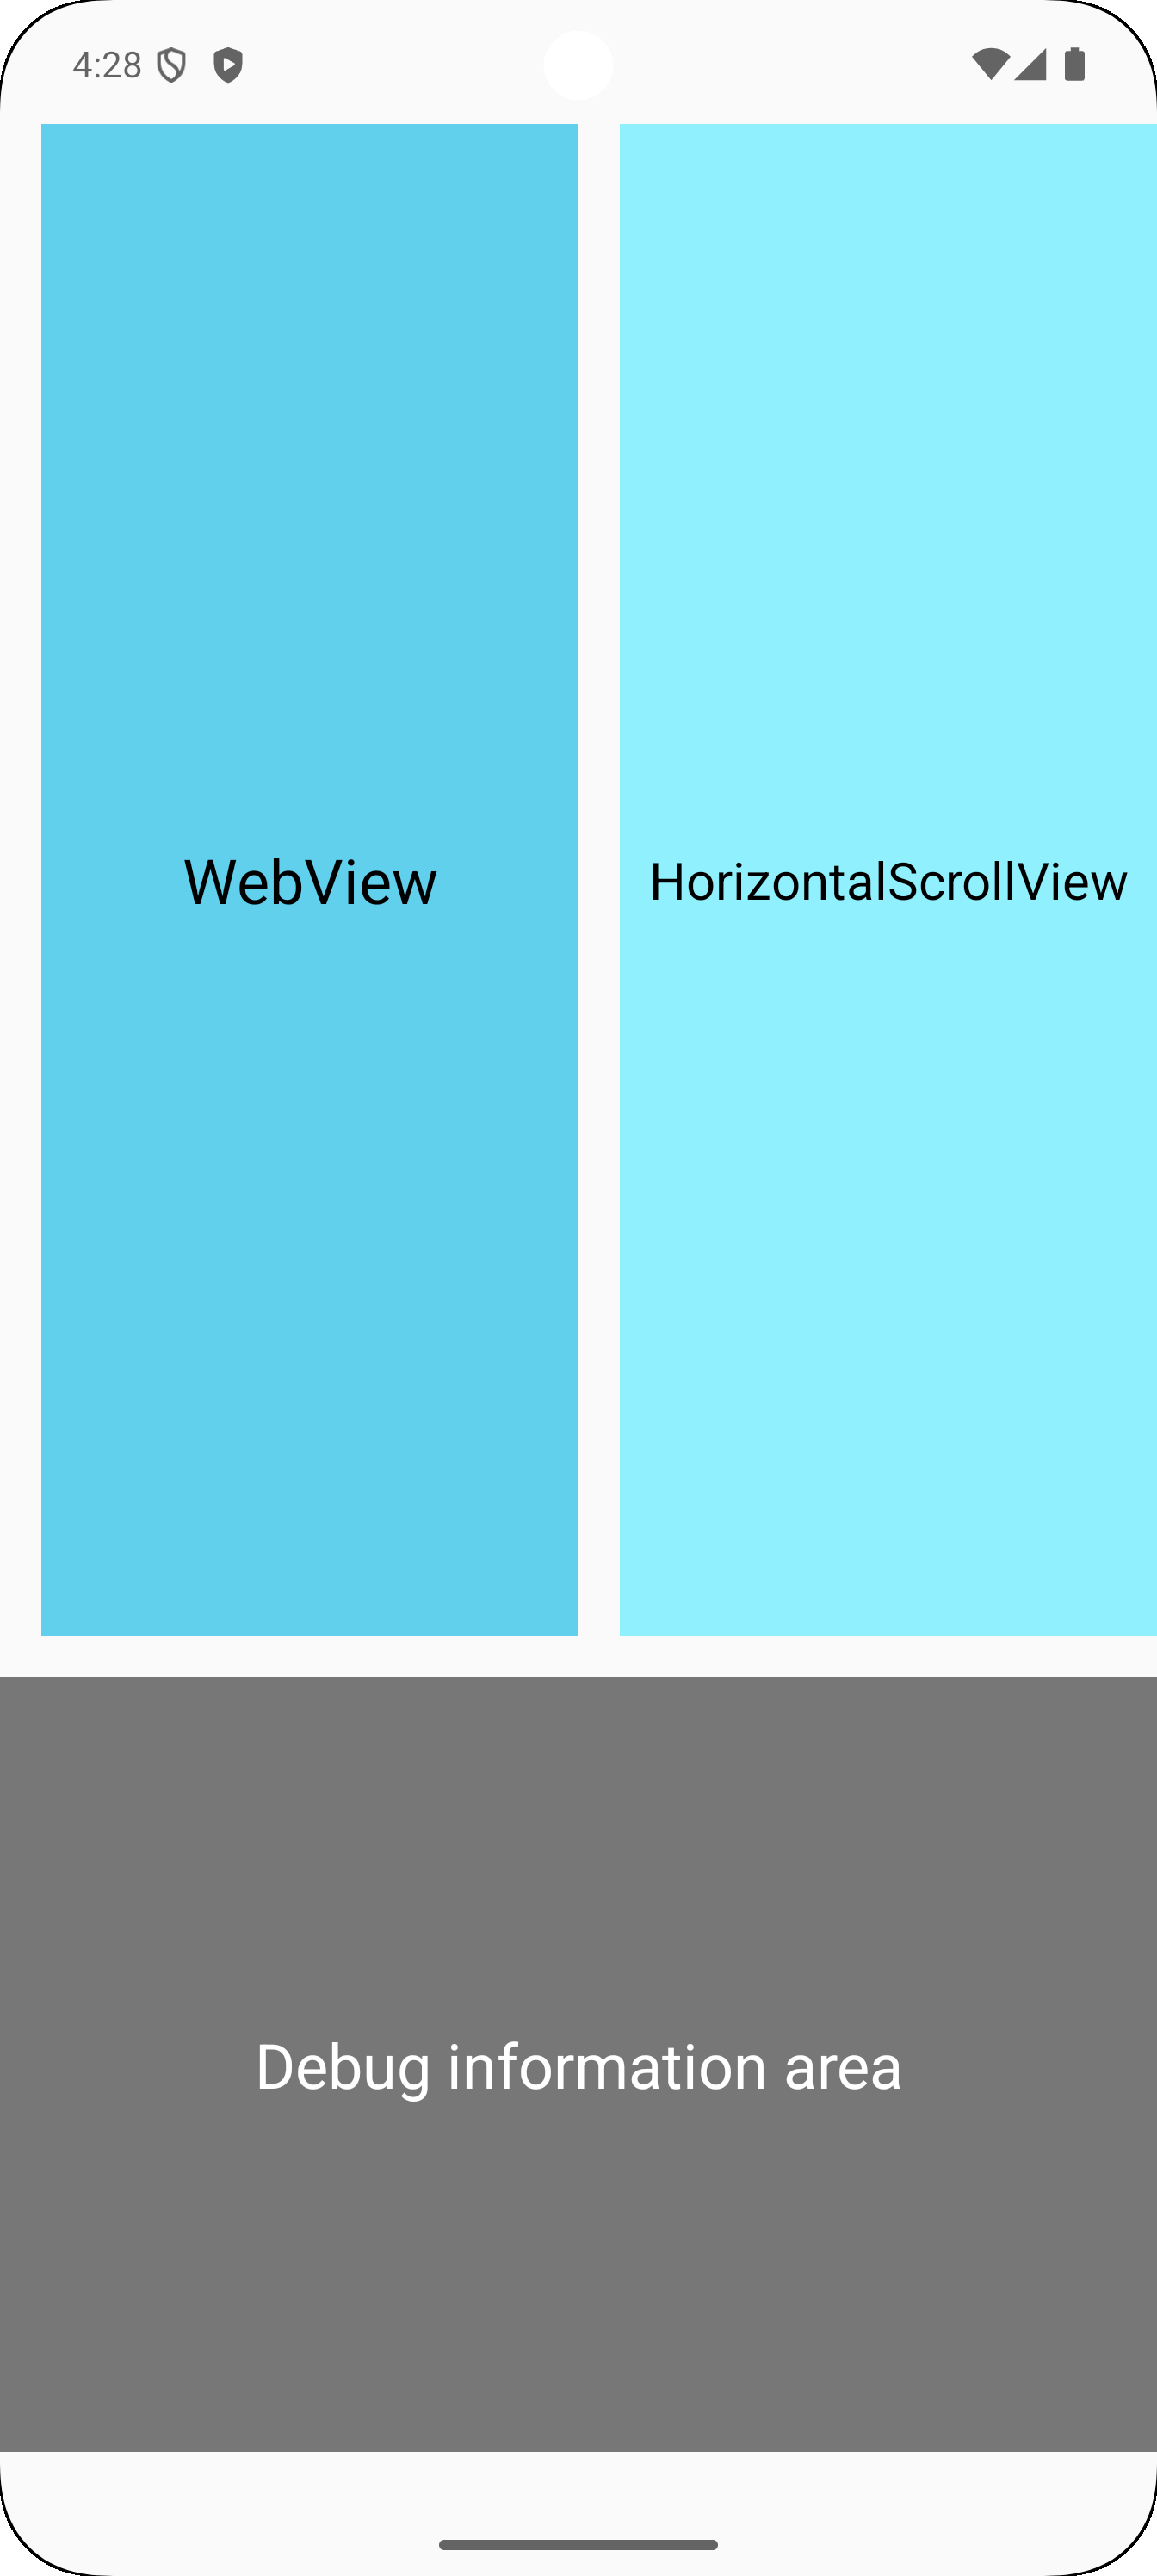
MainActivity のレイアウトXMLファイルは以下のようになっています:
<?xml version="1.0" encoding="utf-8"?>
<LinearLayout xmlns:android="http://schemas.android.com/apk/res/android"
    xmlns:app="http://schemas.android.com/apk/res-auto"
    xmlns:tools="http://schemas.android.com/tools"
    android:layout_width="match_parent"
    android:layout_height="match_parent"
    android:orientation="vertical"
    android:layout_marginVertical="48dp">

    <androidx.constraintlayout.widget.ConstraintLayout
        android:id="@+id/layoutMain"
        android:layout_width="match_parent"
        android:layout_height="0dp"
        android:layout_weight="1">

        <WebView
            android:id="@+id/webView"
            android:layout_width="0dp"
            android:layout_height="match_parent"
            android:layout_marginHorizontal="16dp"
            app:layout_constraintBottom_toBottomOf="parent"
            app:layout_constraintEnd_toStartOf="@id/scrollView"
            app:layout_constraintStart_toStartOf="parent"
            app:layout_constraintTop_toTopOf="parent"
            tools:ignore="NestedWeights" />

        <HorizontalScrollView
            android:id="@+id/scrollView"
            android:layout_width="0dp"
            android:layout_height="match_parent"
            app:layout_constraintBottom_toBottomOf="parent"
            app:layout_constraintEnd_toEndOf="parent"
            app:layout_constraintStart_toEndOf="@id/webView"
            app:layout_constraintTop_toTopOf="parent">
            <androidx.compose.ui.platform.ComposeView
                android:id="@+id/composeTargetContainer"
                android:layout_width="wrap_content"
                android:layout_height="match_parent" />
        </HorizontalScrollView>

    </androidx.constraintlayout.widget.ConstraintLayout>

    <androidx.compose.ui.platform.ComposeView
        android:id="@+id/composeTargetWatcher"
        android:layout_width="match_parent"
        android:layout_height="300dp"
        android:paddingTop="16dp" />

</LinearLayout>
MainActivity.kt と activity_main.xml は Jetpack Compose 化作業の途中で、View と Composable が混在しています。
WebView などは、本記事執筆時点ではまだ Composable が提供されていないため、現時点では混在させながらうまく運用する実装も必要です。[1]
activity_main.xml において、 HorizontalScrollView の内部に含まれる ComposeView は既存の View を Composable で置き換えようとするもの、もう一方の ComposeView は上の Composable の位置を監視するために設置したものです。
View にとって代わる Composable は以下のようになっており、 "Target" と表示される部分の配置をチェックするべく、 onGloballyPositioned(...) を実装しています。
@Composable
fun ScrollComposable(targetRect: MutableState<Rect>) {
    val textStyle = TextStyle(
        textAlign = TextAlign.Center,
        color = MaterialTheme.colorScheme.onSecondary,
        fontSize = 24.sp,
        fontWeight = FontWeight.W600
    )

    Row(
        modifier = Modifier
            .fillMaxSize(),
        horizontalArrangement = Arrangement.Center,
        verticalAlignment = Alignment.CenterVertically
    ) {
        Box(
            modifier = Modifier
                .padding(16.dp)
                .width(100.dp)
                .fillMaxHeight()
                .background(Color.Red),
            contentAlignment = Alignment.Center
        ) {
            Text("1", style = textStyle)
        }

        Box(
            modifier = Modifier
                .padding(16.dp)
                .width(100.dp)
                .fillMaxHeight()
                .background(Color.Magenta),
            contentAlignment = Alignment.Center
        ) {
            Text("2", style = textStyle)
        }

        Box(
            modifier = Modifier
                .padding(16.dp)
                .width(100.dp)
                .fillMaxHeight()
                .background(MaterialTheme.colorScheme.primary)
                .onGloballyPositioned { targetRect.value = it.boundsInWindow() },
            contentAlignment = Alignment.Center
        ) {
            Text("Target", style = textStyle)
        }

        Box(
            modifier = Modifier
                .padding(16.dp)
                .width(100.dp)
                .fillMaxHeight()
                .background(Color.Cyan),
            contentAlignment = Alignment.Center
        ) {
            Text("4", style = textStyle)
        }
    }
}
これを監視する Composable が以下です。ここではこの Composable 自身も onGloballyPositioned(...) を使って、自身のサイズを取得しています。
@Composable
fun TargetWatcher(visibleRect: Rect, targetRect: Rect) {
    if (visibleRect.width <= 0f || visibleRect.height <= 0f) return
    val rootAspectRatio = visibleRect.width / visibleRect.height
    val density = LocalDensity.current // For calculating toDp()
    val targetColor = MaterialTheme.colorScheme.primary.copy(alpha = 0.25F)
    var size by remember { mutableStateOf(IntSize.Zero) }
    Box(
        modifier = Modifier
            .fillMaxSize()
            .onGloballyPositioned { coordinates -> size = coordinates.size }
    ) {
        if (size.width <= 0F || size.height <= 0F) return@Box
        val watchAspectRatio = size.width.toFloat() / size.height
        val (paddingH: Float, paddingV: Float) = if (rootAspectRatio < watchAspectRatio) {
            (size.width - size.height * rootAspectRatio) / 2 to 0F
        } else {
            0F to (size.height - size.width / rootAspectRatio) / 2
        }

        with(density) {
            Box(
                modifier = Modifier
                    .padding(horizontal = paddingH.toDp(), vertical = paddingV.toDp())
                    .fillMaxSize()
                    .background(Color.Gray)
            )
        }

        if (targetRect.width <= 0f || targetRect.height <= 0f) return@Box
        with(density) {
            Box(
                modifier = Modifier
                    .padding( // Caution: exception is thrown if padding is negative
                        start = max(
                            0F, marginOf(
                                size.width,
                                paddingH,
                                visibleRect.left,
                                visibleRect.right,
                                targetRect.left
                            )
                        ).toDp(),
                        end = max(
                            0F, size.width - marginOf(
                                size.width,
                                paddingH,
                                visibleRect.left,
                                visibleRect.right,
                                targetRect.right
                            )
                        ).toDp(),
                        top = max(
                            0F, marginOf(
                                size.height,
                                paddingV,
                                visibleRect.top,
                                visibleRect.bottom,
                                targetRect.top
                            )
                        ).toDp(),
                        bottom = max(
                            0F, size.height - marginOf(
                                size.height,
                                paddingV,
                                visibleRect.top,
                                visibleRect.bottom,
                                targetRect.bottom
                            )
                        ).toDp()
                    )
                    .fillMaxSize()
                    .background(targetColor)
            )
        }
    }
}

private fun marginOf(
    sizePx: Int,
    halfPx: Float,
    visibleFrom: Float,
    visibleTo: Float,
    px: Float
): Float {
    val alpha = (px - visibleFrom) / (visibleTo - visibleFrom)
    return (1 - alpha) * halfPx + alpha * (sizePx - halfPx)
}
このComposable関数で、Activityの画面と "Target" と表示される Composable の位置関係を図示しています。 padding の設定が少しわずらわしいですが、難しい算術ではありません。
Composable は形式的には関数ですが、 MutableState や remember を用いて状態を継続的に保持することでUIの表現を成り立たせています。同時に、継続的な情報が変更されたとき Composable の再描画 (recomposition) が行われるようになっており、わずらわしいイベント処理の記述を減らすことができ、宣言的なコーディングを可能にしています。
画面右上部分の HorizontalScrollView を左右にスクロールすると、画面下の Composable がスクロールに追従して位置を表示してくれます。ScrollView の内部に存在する View や Composable の位置を View$getLocationInWindow(IntArray) や LayoutCoordinator.boundsInWindow() で取得すると画面外の座標も得られますので、画面の内外を正常に行き来できるかどうかを確かめられます(Composable で Modifier.horizontalScroll(...) や Modifier.verticalScroll(...) などを用いてスクロールさせる場合はこの限りではありません)。
従来からの View でこのようなデバッグ情報を表示するには、レイアウトXMLファイルと Java/Kotlin のコードをそれぞれ書き換える必要があり、リリース後のアプリに反映されない作業としてはちょっとわずらわしいものでした。変数の更新に追随するレイアウトXMLファイルを作成できるデータバインディングも提供されましたが、直感的とはいいがたいものでした。Jetpack Compose は情報をデザインに直接書き込むような感覚で画面を設計でき、時間のかからない作業で実装の成果を確認できます。
なんでもグラフィカルに表示するのがよいわけではありませんが、表現の選択肢が増え、コーディング作業に入っていきやすくなると思います。
2.3. 宣言的にデバッグ情報を書く
Composable によるデバッグ情報の表現は、さらに少ない手数で情報の追加を行なえます:
@Composable
fun TargetWatcher(visibleRect: Rect, targetRect: Rect) {

    // ...

        // ...

        Text(
            text = when {
                targetRect in visibleRect -> "Target: inside screen"
                visibleRect.overlaps(targetRect) -> "Target: crossing edge of screen"
                else -> "Target: outside screen"
            },
            modifier = Modifier.align(Alignment.TopStart),
            style = TextStyle(
                textAlign = TextAlign.Center,
                color = MaterialTheme.colorScheme.onSurface,
                fontSize = 24.sp,
                fontWeight = FontWeight.W600
            )
        )
    }
}

/**
 * "operator fun receiver.contains" defines in and !in (syntax: other in(!in) receiver)
 */
private operator fun Rect.contains(other: Rect) =
    left <= other.left && top <= other.top && right >= other.right && bottom >= other.bottom
上記では Text(...) を使ってデバッグ情報を追加しています。Text(...) の引数 style は、デフォルト設定で充分なら省略できます。Log.d(...) や println(...) などとほとんど変わらないタイプ数で情報を表示できます。しかもそれらと違ってスクロールで流れていってしまうこともありません。
「print文デバッグ」のような手軽さでUI構築ができるのも、宣言的UIの意義の1つでしょう。
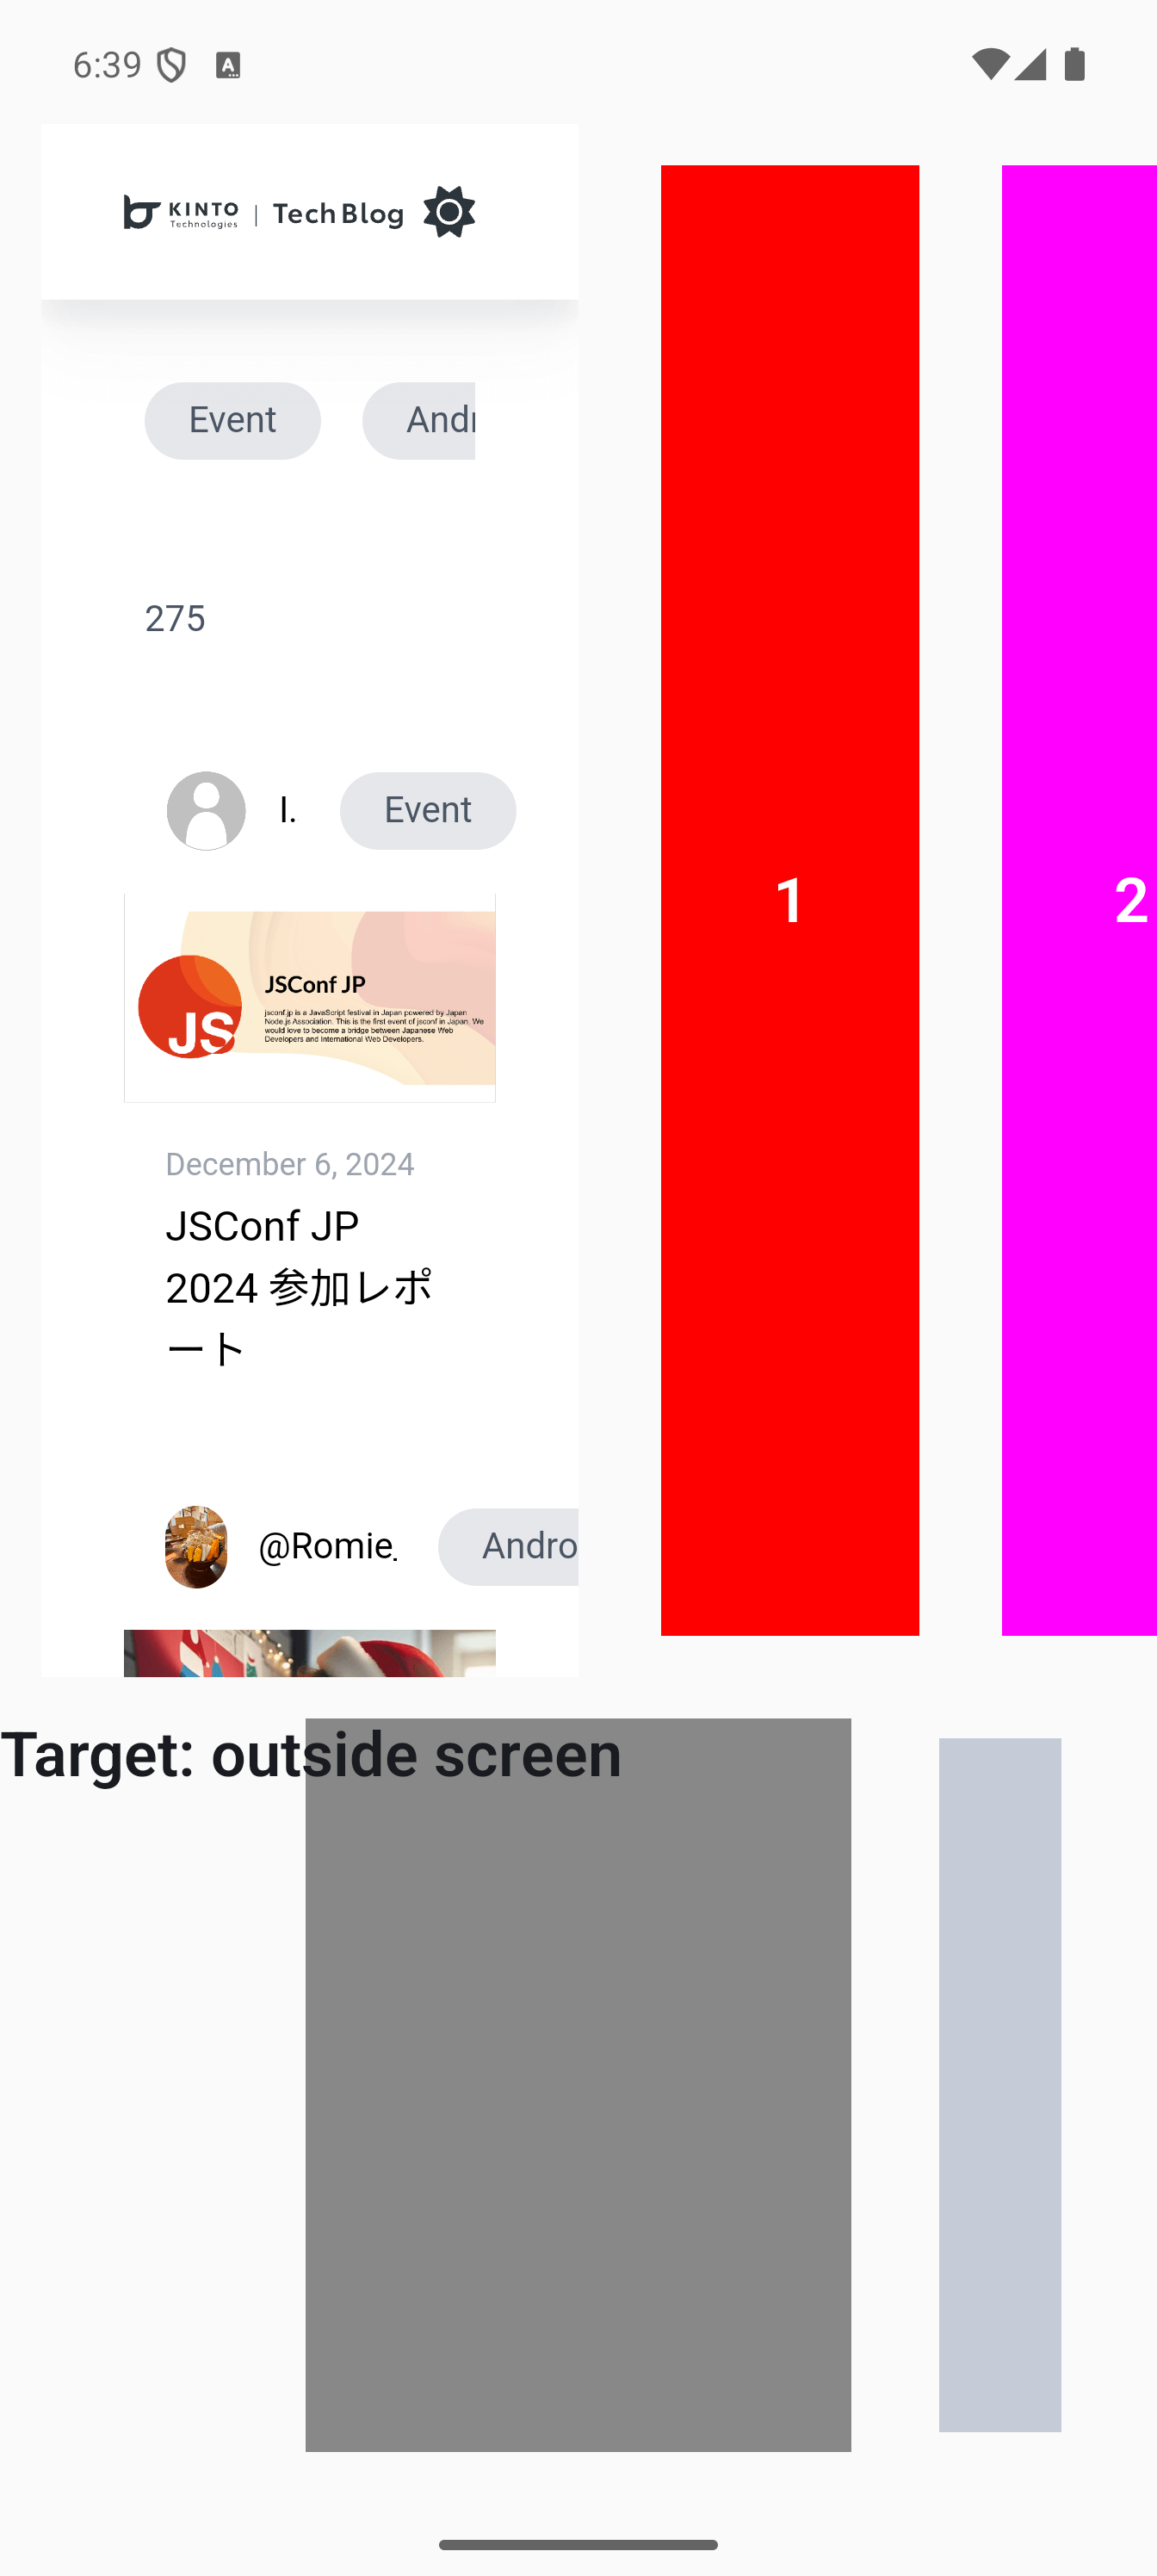
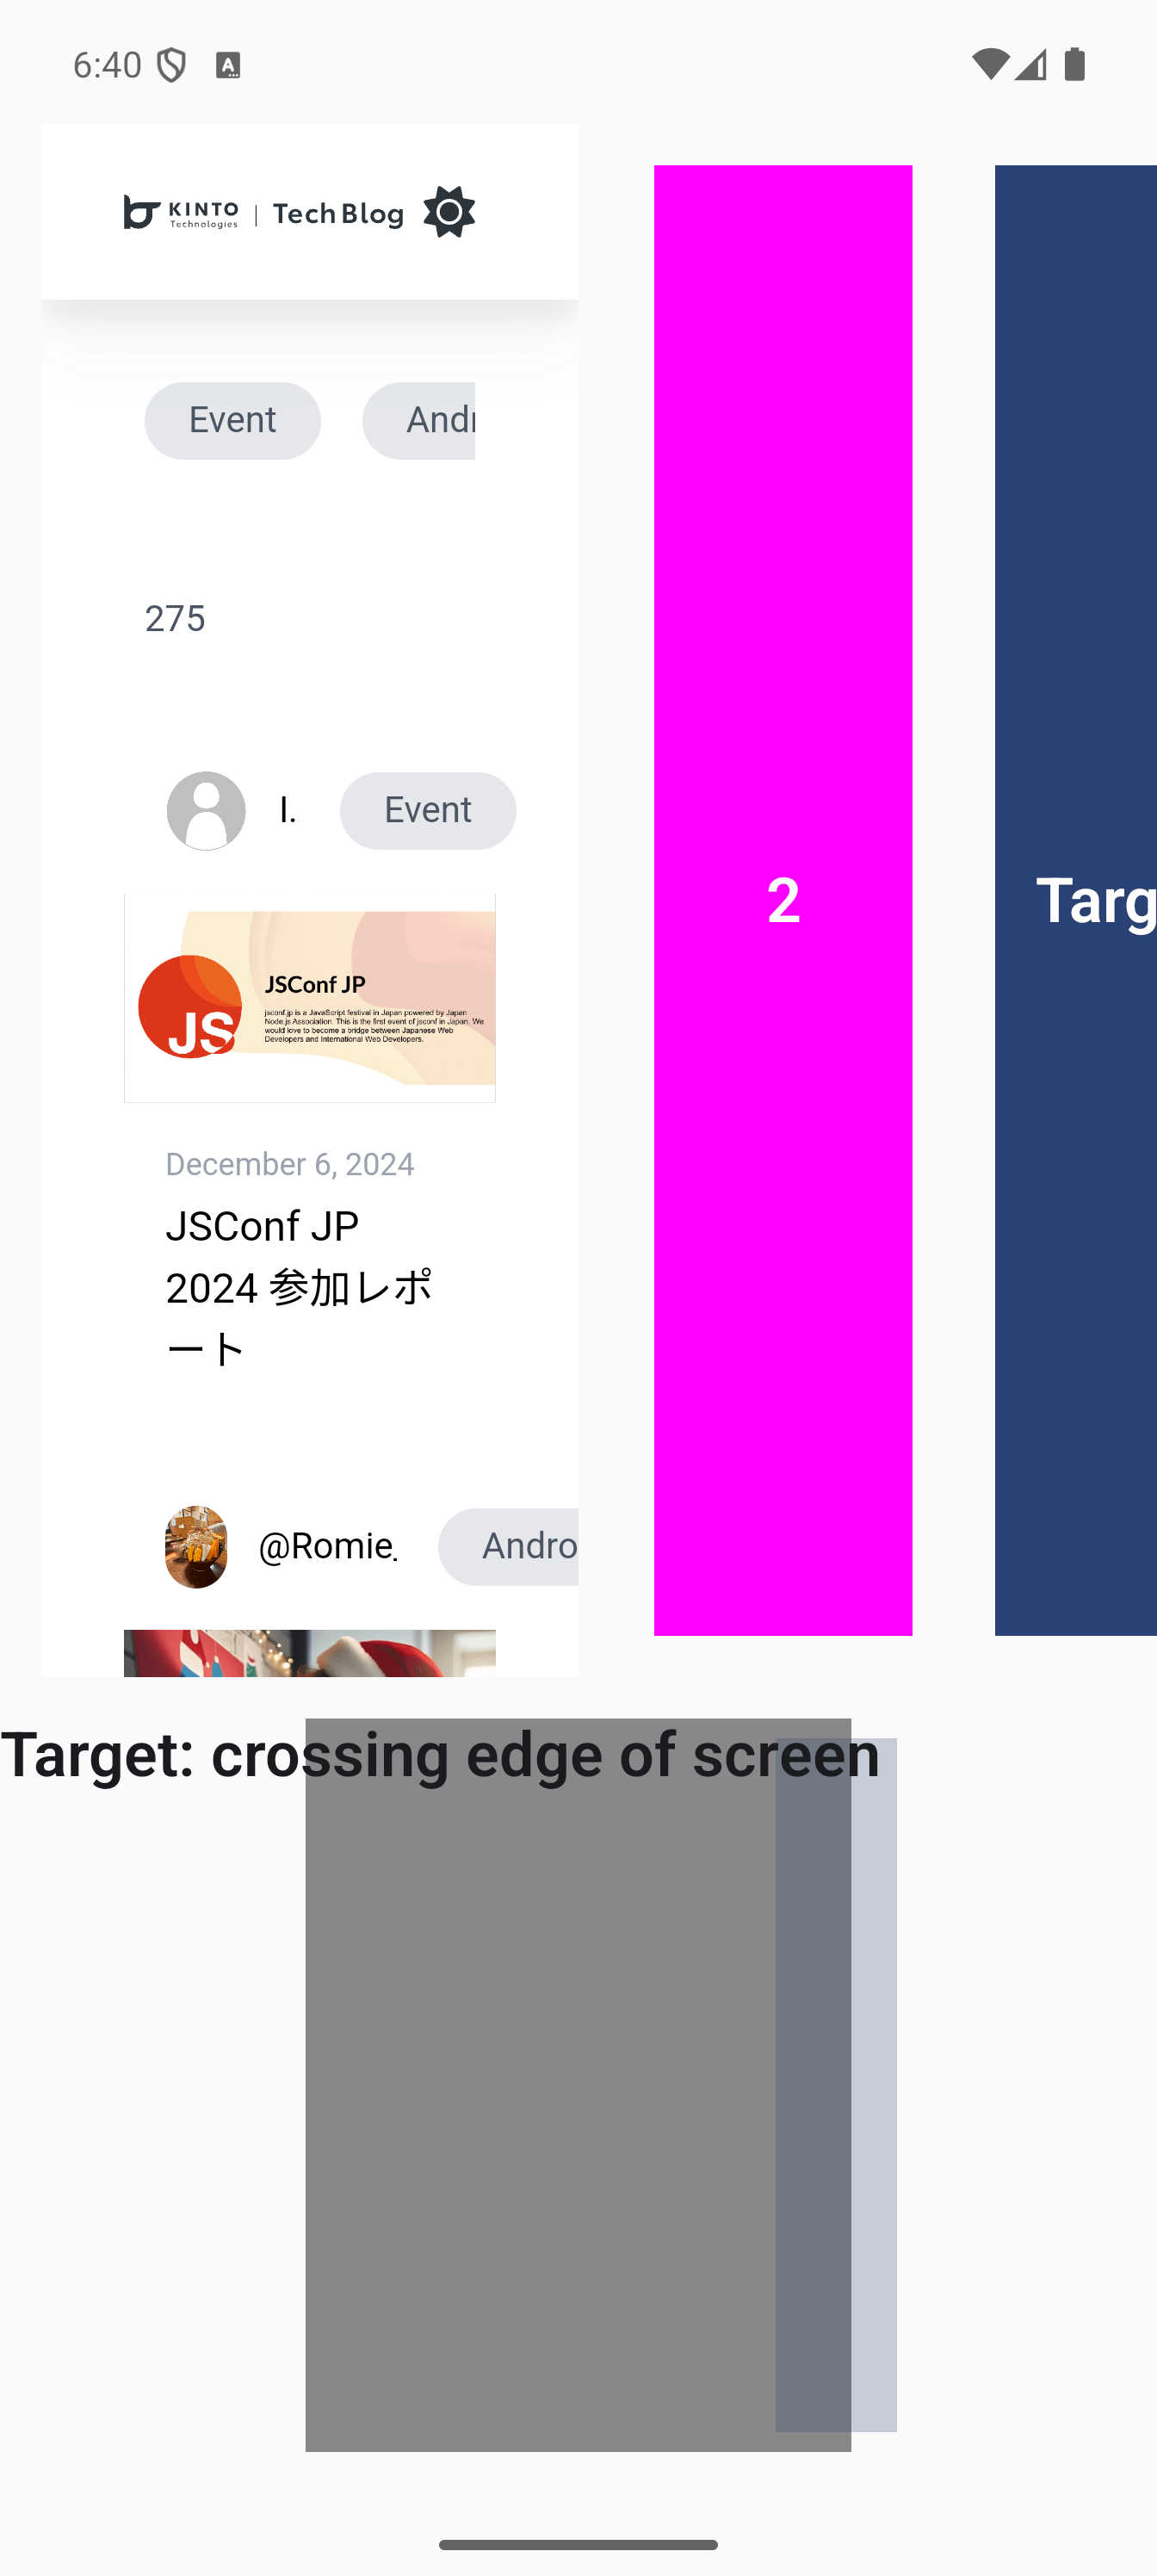
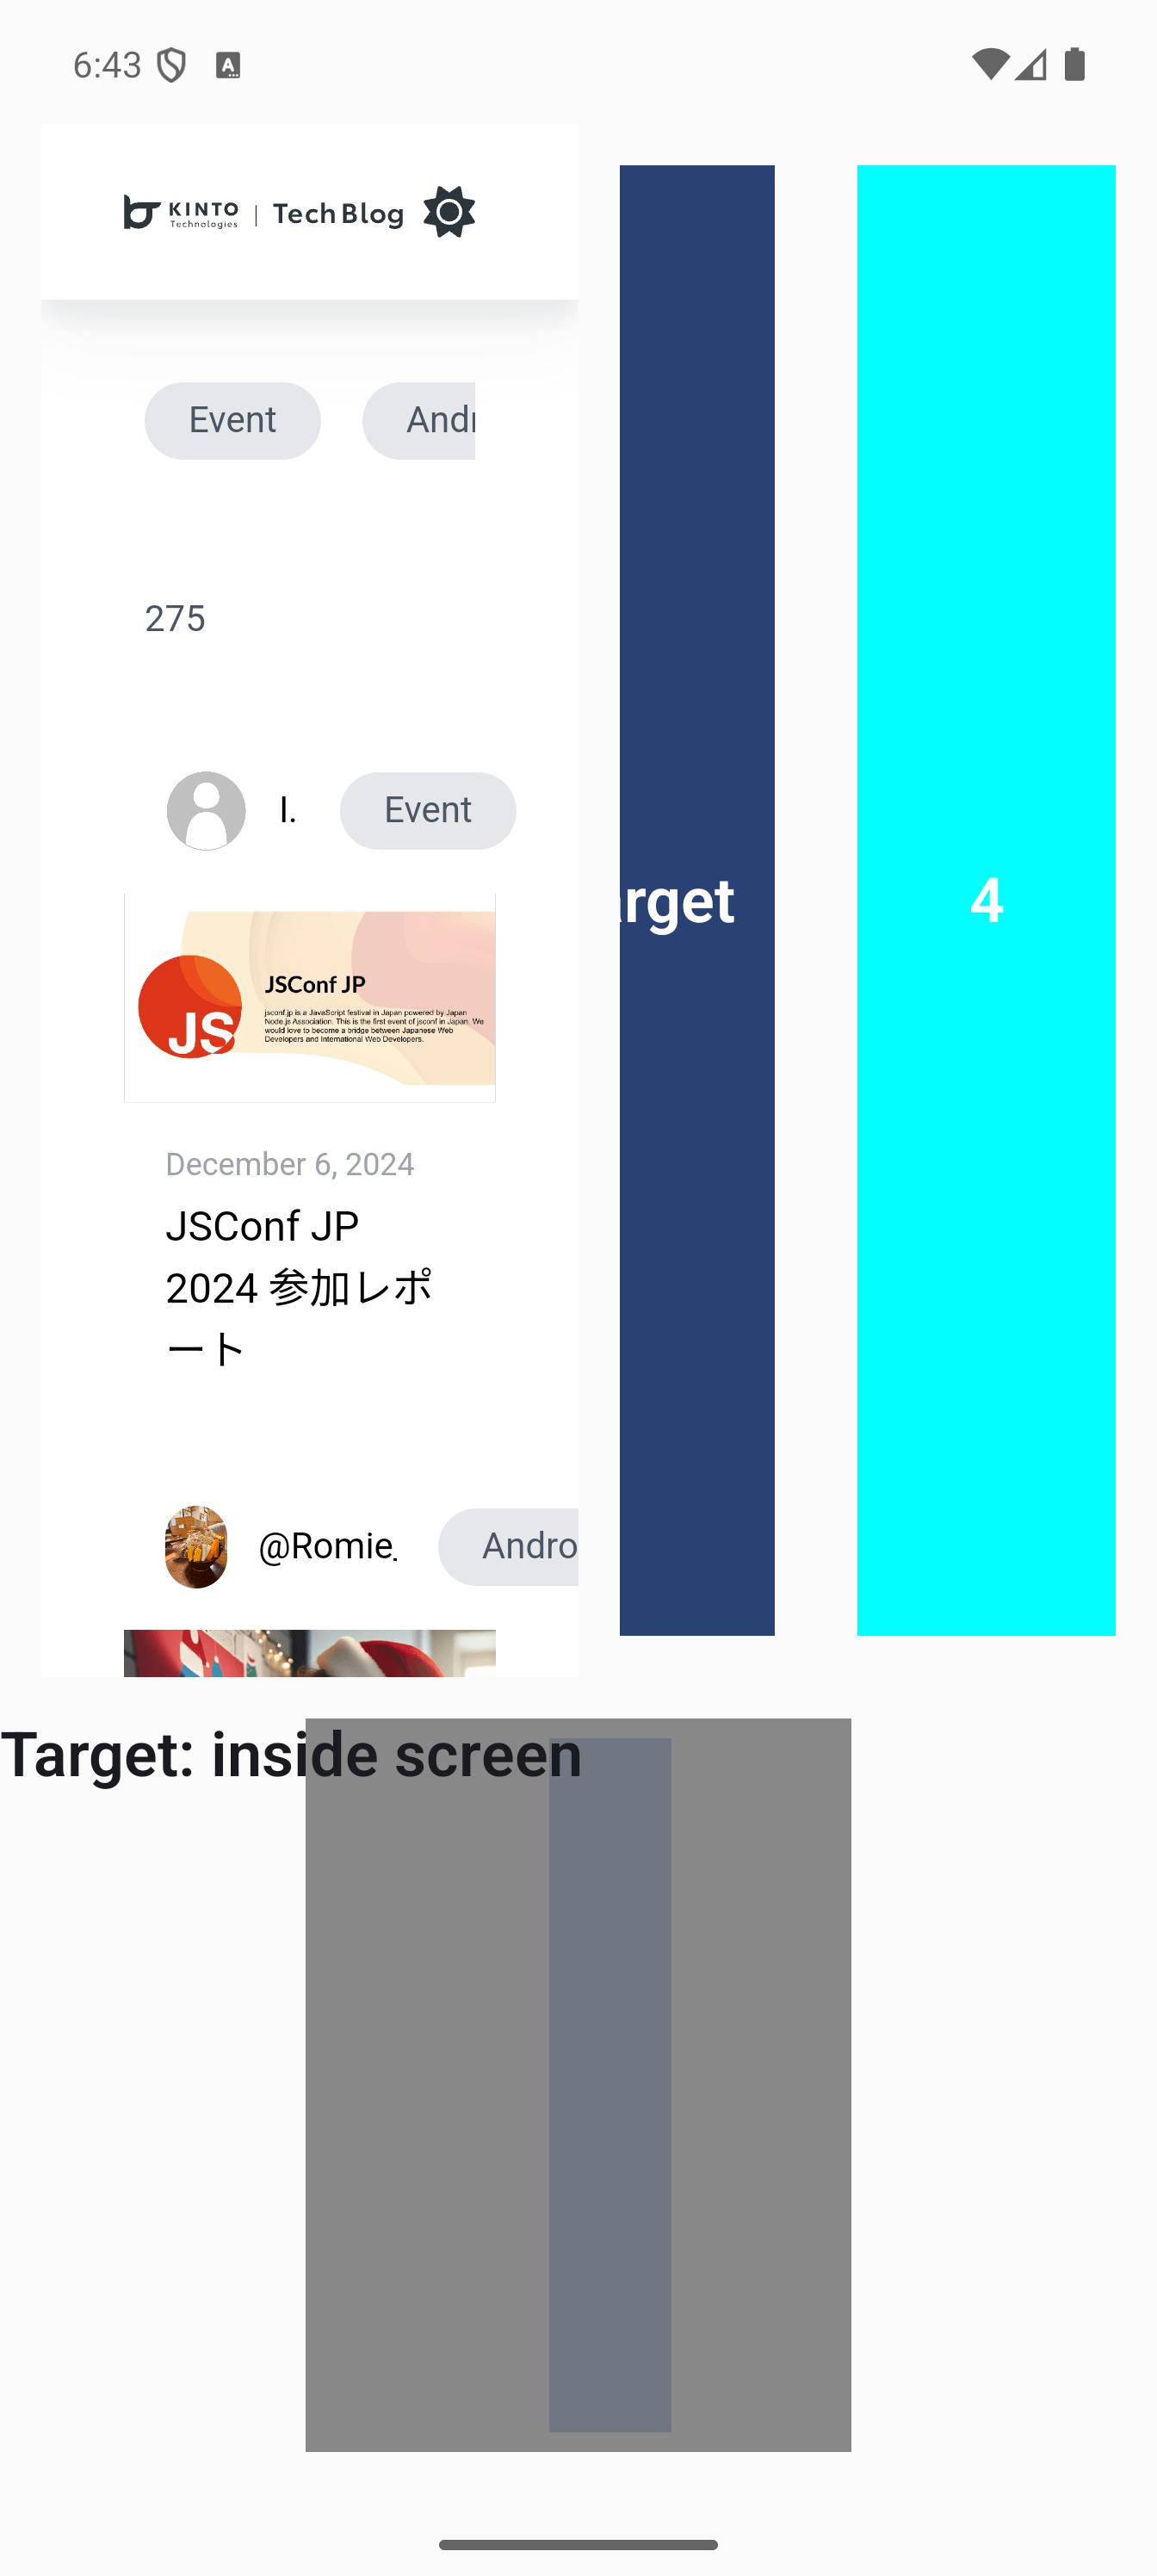
アプリをビルドして実行し、右上のスクロールビューを横スクロールすると、以下のように画面下部でアプリの動作する様子が確認できます:
| 画面外に表示中 | 画面の境界上にかかっている | 画面内に表示中 |
|---|---|---|
 |
 |
 |
3. LaunchedEffect で手続き的な処理
これまで宣言的UIの意義を説明してきましたが、状態が変わったときのイベント処理や、状態が変わったことを示すアニメーションなどを実装するには、手続き的な処理も必要です。従来からの View で行なってきたイベント処理など手続き的な記述もできなければ、Jetpack Compose へは移行できません。
Jetpack Compose では LaunchedEffect を使って状態の変化に応じた処理を書くのが一般的です:
@Composable
fun TargetWatcher(visibleRect: Rect, targetRect: Rect) {

    // ...

        // ...

        var currentState by remember { mutableStateOf(TargetState.INSIDE) }
        var nextState by remember { mutableStateOf(TargetState.INSIDE) }
        var stateText by remember { mutableStateOf("") }
        var isTextVisible by remember { mutableStateOf(true) }
        nextState = when {
            targetRect in visibleRect -> TargetState.INSIDE
            visibleRect.overlaps(targetRect) -> TargetState.CROSSING
            else -> TargetState.OUTSIDE
        }

        LaunchedEffect(key1 = nextState) {
            if (stateText.isNotEmpty()) {
                if (currentState == nextState) return@LaunchedEffect
                stateText = when (nextState) {
                    TargetState.INSIDE -> "Target: entered screen"
                    TargetState.OUTSIDE -> "Target: exited screen"
                    TargetState.CROSSING -> if (currentState == TargetState.INSIDE)
                        "Target: exiting screen"
                    else
                        "Target: entering screen"
                }
                currentState = nextState
                repeat(3) {
                    isTextVisible = true
                    delay(250)
                    isTextVisible = false
                    delay(250)
                }
            }
            stateText = when (nextState) {
                TargetState.INSIDE -> "Target: inside screen"
                TargetState.CROSSING -> "Target: crossing edge of screen"
                TargetState.OUTSIDE -> "Target: outside screen"
            }
            isTextVisible = true
        }

        if (isTextVisible) {
            Text(
                text = stateText,
                modifier = Modifier.align(Alignment.TopStart),
            )
        }
    }
}

enum class TargetState { INSIDE, CROSSING, OUTSIDE }
LaunchedEffect の key は複数個の設定も可能です。また、Composable が呼び出される最初の1回だけ処理を行ないたい場合は、 LaunchedEffect(Unit) { ... } として実現できます。
ここで key に指定された nextState が変化するたびに、その変化に応じた処理が行なわれます。上記のコードは、状態が変化した直後の1.5秒間はテキストが点滅しながら直前の状態と比較した現在の状態を表示し、その後は静的な状態を表示します。LaunchedEffect の key に状態の変数を指定し、それが変化したときの処理をブロック内に記述することでイベント処理が可能です。
LaunchedEffect の ブロック内では delay(...) などの suspend関数を使った時間のかかる処理の記述が可能です。ブロック内の処理が終わる前に次の状態の変化があった場合、ブロック内の処理はキャンセルされ、次の状態の変化に応じた処理が最初から行なわれます。
LaunchedEffect の ブロック内では手続き的な処理を書いていますが、その後の Text(...) は手続き的に与えられた変数の値にしたがって宣言的に記述されていることに注目してください。UIの変化に応じた処理は LaunchedEffect を利用するのがよいでしょう。このほか、SideEffect や、Activity および Fragment のライフサイクルに応じた処理を行なう DisposableEffect など、さまざまな状況への備えが用意されています。
一方、必要以上に複雑にならないよう、このような処理を多く書きすぎないことも重要です。たとえばインターネットからのレスポンスやNFCなど各種センサーの入力を契機としたイベント処理は ViewModel などに記述して、Composable 内の手続き的な記述はUIに関する要素のみにとどめることをお勧めします。
4. ComposeView と AndroidView の相互運用
Activity や Fragment の中で Composable を使う場合、上記のように ComposeView を使って Composable を表示できます。
逆に先述の WebView などを Composable の中で使うために AndroidView または AndroidViewBinding を使って View を Composable に埋め込むこともできます。方法はこちら(Compose でビューを使用する)をご参照ください。
本記事では詳細は省きますが、AndroidView Composable の存在によって、Composable化の作業を進めたものの一部の View は Composable への置き換えが困難、もしくは非常に時間を要する、といった場合にも、Compose と View を混在させながら開発を進めることができます。
この相互運用は非常に強力で、ComposeView で呼び出している Composable の中で AndroidView を呼び出し、その中で再度 ComposeView を設置して Composable を呼び出し、さらにその中で AndroidView を…という階層構造も可能です。Composable の中に View を使う余地を残すことで、Composable化作業が思ったように進展しない、あるいは Composable への置き換え作業に開発スプリントの期間を大きく超える時間を要する、といった場合にも、作業に費やした時間を無駄にするリスクが抑えられています。
5. Preview関数
Composable も View と遜色ない水準で位置合わせやデバッグ情報取得のテクニックが使え、手続き的な処理も書くことができ、あるいは Composable化の障害に直面しても強力な相互運用によって一部を View に戻す選択肢がある、と、これまで来た道を振り返ることのできる柔軟さについて主に述べました。ここでは Composable化によって新たに得られる果実、Preview関数の簡単で強力なプレビュー機能について述べます。
5.1. Preview関数を作成する
レイアウトXMLファイルによる View の表現も Android Studio のプレビュー機能が利用できましたが、Jetpack Compose ではさらに強力なプレビュー関数を書けます。@Preview アノテーションで修飾した関数を作成するだけで、Composable がプレビュー表示されます:
// ...

private class TargetWatcherParameterProvider :
    PreviewParameterProvider<TargetWatcherParameterProvider.TargetWatcherParameter> {
    class TargetWatcherParameter(
        val visibleRect: Rect,
        val targetRect: Rect
    )

    override val values: Sequence<TargetWatcherParameter> = sequenceOf(
        TargetWatcherParameter(
            visibleRect = Rect(0f, 0f, 100f, 300f),
            targetRect = Rect(90f, 80f, 110f, 120f)
        ),
        TargetWatcherParameter(
            visibleRect = Rect(0f, 0f, 300f, 100f),
            targetRect = Rect(80f, 90f, 120f, 110f)
        )
    )
}

@Preview
@Composable
private fun PreviewTargetWatcher(
    @PreviewParameter(TargetWatcherParameterProvider::class)
    params: TargetWatcherParameterProvider.TargetWatcherParameter
) {
    KtcAdventCalendar2024Theme {
        TargetWatcher(params.visibleRect, params.targetRect)
    }
}
上記は PreviewParameterProvider を利用して、ひとつのプレビュー関数で複数のパラメータを与えてプレビュー表示する例を示しています。
Android View のレイアウトXMLファイルで tools:??? 属性を使ってプレビューを設定する方式では、このようなことはできません。
PreviewParameterProvider を使わなくても、 @Preview と @Composable の2つのアノテーションで修飾された関数内で Composable関数を呼び出す記述を書くだけでプレビュー表示が可能です。
筆者といたしましては、新しい Composable を作り始めたときにはすぐにプレビュー関数を作成することをお勧めします。Composable の新規作成時に最初から強力なプレビュー機能を使える長所だけでも、Jetpack Compose への移行の動機として充分であると考えます。 デバッグ情報の表示の確認がプレビュー関数で行なえることも、Composable を活用してデバッグする利点の1つでしょう。
また最近では、roborazziなどのライブラリを利用してプレビュー関数をUIテストに利用する手法が注目されており、テスト効率化の観点からもプレビュー関数の作成は有用です。
5.2. Preview関数を実行してみる
こちら(プレビューを実行)に書かれている通り、Android Studio の左側の**Run '...'**アイコンをクリックすると、Preview関数をAndroid実機またはエミュレータで実行してみることができます。従来からの特定のActivityを実行する機能と同じようなものですが、Preview関数が簡単に書けること、およびインテントなどの要素がなく単純化された状況での実行が可能であることから、より強力になっているといえます。ボタンタップなどのUIアクションのコールバックも実行されるので、Preview関数をあたかも簡易なアプリであるかのようにテストに使えます。
ただし、Preview関数でテストができることを重視するあまりに Composable に多くの機能を持たせすぎることはお勧めしません。ビジネスロジックはできるだけ ViewModel や Circuit における Presenter などの別のクラスないしは関数に分離し、Composable はあくまでも宣言的UIであり続けるべく、極力UIの表現のみを記述することをお勧めします。
6. おわりに
本記事が、ひとりでも多くの開発者にとって Android View から Jetpack Compose に踏み出すきっかけとなれれば幸いです。考え方の異なるUIシステムへの移行は一筋縄ではいかず、挫折の不安がつきまといます。その第一歩の足取りができるだけ軽やかになること、かつ徒労に終わるリスクができるだけ抑えられることを願っています。
7. 参考文献
- Android API reference
- [Android]View の位置を取得する関数たち
- Jetpack Compose Modifier 徹底解説
- What can Advanced / Lesser Known Modifiers do for your UI? — A Comprehensive Exploration in Jetpack Compose
A Journey Through Advanced and
備考
Android ロボットは、Google が作成および提供している作品から複製または変更したものであり、クリエイティブ・コモンズ表示 3.0 ライセンスに記載された条件に従って使用しています。[2]
WebView の機能を Composable として利用するラッパーがaccompanistのライブラリで提供されていますが、現在は非推奨となっています。View の Composable化はご本家でも簡単ではないようですし、一般のアプリ開発で View と Composable の同居が長く続くのは特におかしなことではありませんので、安心してComposable化に踏み切りましょう。 ↩︎
https://developer.android.com/distribute/marketing-tools/brand-guidelines#android_robot ↩︎
関連記事 | Related Posts

Android View から Jetpack Compose への移行の第一歩
必須! 既存のAndroidアプリをedge-to-edge対応にするための速習ガイド

A Beginner’s Story of Inspiration With Compose Preview
SwiftUI in Compose Multiplatform of KMP

When We Put Compose on Top of BottomSheetDialogFragment, Anchoring a Button to the Bottom Proved Harder Than Expected
Kotlin Multiplatform Hybrid Mode: Compose Multiplatform Meets SwiftUI and Jetpack Compose
We are hiring!
【UI/UXデザイナー】クリエイティブ室/東京・大阪・福岡
クリエイティブGについてKINTOやトヨタが抱えている課題やサービスの状況に応じて、色々なプロジェクトが発生しそれにクリエイティブ力で応えるグループです。所属しているメンバーはそれぞれ異なる技術や経験を持っているので、クリエイティブの側面からサービスの改善案を出し、周りを巻き込みながらプロジェクトを進めています。
【ソフトウェアエンジニア(リーダークラス)】共通サービス開発G/東京・大阪・福岡
共通サービス開発グループについてWebサービスやモバイルアプリの開発において、必要となる共通機能=会員プラットフォームや決済プラットフォームなどの企画・開発を手がけるグループです。KINTOの名前が付くサービスやKINTOに関わりのあるサービスを同一のユーザーアカウントに対して提供し、より良いユーザー体験を実現できるよう、様々な共通機能や顧客基盤を構築していくことを目的としています。

