Swift Observation:UI を更新するための、よりシンプルで効率的なアプローチ
本記事は、KINTOテクノロジーズアドベントカレンダー2024の19日目の投稿です。🎅🎄
はじめに
こんにちは。モバイルアプリ開発グループでiOSエンジニアをしているラセル・ミアです。今日は、iOS 17で導入された新しい@Observableマクロを使用して、SwiftUIのUIを更新するための改善されたアプローチを紹介します。その仕組み、解決する課題、そしてなぜこれを使うべきなのかを説明します。
TL;DR
Observationを使用すると、Swiftにおけるオブザーバーデザインパターンを、堅牢で型安全かつ効率的に実装することができます。このパターンでは、Observableオブジェクトがオブザーバーのリストを保持し、特定または一般的な状態変化を通知することができます。これにより、オブジェクト同士を直接結びつけることなく、複数のオブザーバー間で暗黙的に更新を分配できるという利点があります。
Appleドキュメントより
簡単に言えば、Observationはビューをデータの変更に応答させるための新しく簡単な方法です。
Observationを使用しない場合の課題
Observationを使う前に、従来の方法でUIを更新する手法と、それに関連する課題を説明します。
簡単な例から見てみましょう。
import SwiftUI

class User:ObservableObject {
	@Published var name = ""
	let age = 20

	func setName() {
		name = "KINTO Technologies"
	}
}

struct ParentView:View {

	@StateObject private var user = User()

	var body: some View {
		let _ = print("ParentView.body")
		VStack {
			Button("Set Name") {
				user.setName()
			}
			ChildView(user: user)
		}
	}
}

struct ChildView:View {

	@ObservedObject var user:User

	var body: some View {
		let _ = print("ChildView.body")
		VStack {
			Text("Age is (user.age)")
		}
	}
}
User
ObservableObjectプロトコルに準拠し、状態の監視を可能にしています。- プロパティnameに
@Publishedを付与することで、ビューに変更を通知します。
ParentView
@StateObjectを使用してUserクラスのインスタンスを管理します。
ChildView
@ObservedObjectを使用してUserオブジェクトを受け取ります。
両方のビューで、let _ = print("xxx.body")を使用して、ビューの更新をデバッグログに出力します。
プロジェクトをビルドすると、初期状態では次のようなログが表示されます。
ParentView.body
ChildView.Body
この時点では問題ありません。初期状態で両方のビューが描画されます。しかし、SetNameボタンを押すと、次のようなログが出力されます。
ParentView.body
ChildView.Body
ParentViewとChildViewの両方が再描画されますが、ParentViewはUserのプロパティをまったく使用していなかったため、これは予想外です。さらに、ChildViewではUserモデルに依存しない定数プロパティを使用しているだけですが、それも再描画されています。このように、ChildViewが静的なTextを返すだけの場合でも、Userモデルへの参照を保持しているため、Userモデルが変更されると再描画されてしまいます。これはパフォーマンス上の重大な課題を浮き彫りにしています。ここで、Observationフレームワークが私たちを救うために登場します。
こんにちは、@Observable!
@Observableマクロは、WWDC 2023で ObservableObjectとその@Publishedプロパティの代わりとして紹介されました。このマクロはプロパティを明示的にPublishedとマークする必要をなくし、SwiftUIビューが変更に応じて自動的に再描画されるようにします。
ObservableObjectから@Observableマクロに移行するには、観測できるようにしたいクラスに新しいSwiftマクロ@Observableを付けるだけです。また、すべてのプロパティから@Published 属性を削除してください。
@Observable
class User {
	var name = ""
	let age = 20

	func setName() {
		name = "KINTO Technologies"
	}
}
注意点: Structは
@Observableマクロをサポートしていません。
以上です!これで、UIはnameプロパティが変更されたときにのみ更新されるようになります。この動作を確認するには、以下のようにビューを修正します。
struct ParentView:View {
	// BEFORE
	// @StateObject private var user = User()

	// AFTER
	@State private var user = User()

	var body: some View {
		let _ = print("ParentView.body")
		VStack {
			Button("Set Name") {
				user.setName()
			}
			ChildView(user: user)
		}
	}
}

struct ChildView:View {
	// BEFORE
	// @ObservedObject var user:User

	// AFTER
	@Bindable var user:User

	var body: some View {
		let _ = print("ChildView.body")
		VStack {
			Text("Age is (user.age)")
		}
	}
}
修正後、カスタムのobservableモデルは@Stateを使用して宣言できます。この変更により、@ObservedObject、 ObservableObject、@Published、@EnvironmentObjectが不要になります。
@Bindable:Observableオブジェクトの変更可能なプロパティに対してバインディングを作成するためのプロパティラッパー型です。Appleドキュメントより
コードを実行すると、初期レンダリング時に以下の出力が表示されます。
ParentView.body
ChildView.Body
しかし、setName ボタンを押しても、コンソールには何も表示されません。これは、ParentViewがUserのプロパティを使用していないため、更新する必要がないからです。同様に、ChildViewにも適用されます。
ParentViewにText(user.name)を追加してプロジェクトをビルドします。その後、setNameボタンを押すと、以下の出力が得られます。
struct ParentView:View {

	@State private var user = User()

	var body: some View {
		let _ = print("ParentView.body")
		VStack {
			Button("Set Name") {
				user.setName()
			}
			Text(user.name) // <--- 追加部分
			ChildView(user: user)
		}
	}
}

// 出力
ParentView.body

// ChildViewで年齢を変更するコードを追加します。
@Observable
class User {
    var name = ""
    var age = 20

    func setName() {
        name = "KINTO Technologies"
    }
}

struct ParentView:View {

    @State private var user = User()

    var body: some View {
        let _ = print("ParentView.body")
        VStack {
            Button("Set Name") {
                user.setName()
            }
            ChildView(user: user)
        }
    }
}

struct ChildView:View {

    @Bindable var user:User

    var body: some View {
        let _ = print("ChildView.body")
        VStack {
            Button("Change Age") {
                user.age = 30
            }
            Text("Age is (user.age)")
        }
    }
}

// 出力
ChildView.Body
この結果から、ビューが不要な再描画を行わず、正しく更新されていることが確認できます。これはパフォーマンスにおいて大きな改善を示しています。
@Observableの仕組み
@Observableの仕組みは一見すると魔法のように思えるかもしれません。モデルに@Observableマクロを付与しただけで、SwiftUIビューが問題なく更新されるようになります。しかし、その背後ではいくつかの重要な処理が行われています。ObservableObjectプロトコルから Observation.Observableプロトコルへ移行しました。さらに、@Publishedプロパティラッパーの代わりに@ObservationTrackedマクロを使用し、 nameとageは @ObservationTrackedに関連付けられています。このマクロを展開することで、その実装内容を確認することができます。以下は展開されたコードです。
@Observable
class User {
	@ObservationTracked
    var name = ""
	@ObservationTracked
    var age = 20

    func setName() {
        name = "KINTO Technologies"
    }

	@ObservationIgnored private let _$observationRegistrar = Observation.ObservationRegistrar()

	internal nonisolated func access<Member>(
		keyPath:KeyPath<User, Member>
	) {
		_$observationRegistrar.access(self, keyPath: keyPath)
	}

	internal nonisolated func withMutation<Member, MutationResult>(
		keyPath:KeyPath<User, Member>,
		_ mutation: () throws -> MutationResult
	) rethrows -> MutationResult {
		try _$observationRegistrar.withMutation(of: self, keyPath: keyPath, mutation)
	}
}
extension User:Observation.Observable {}
デフォルトでは、オブジェクトは観測オブジェクトにアクセス可能な、観測可能な型のすべてのプロパティを観測します。ただし、特定のプロパティが観測されないようにしたい場合は、そのプロパティに @ObservationIgnored マクロを付与することで制御できます。
@Observable
class User {
	var name = ""
	@ObservationIgnored var age = 20

	func setName() {
		name = "KINTO Technologies"
	}
}
これにより、ageプロパティの変更は追跡されなくなり、それに伴うUIの更新も発生しなくなります。
パフォーマンス分析
以下は、Instrumentsツールを使用して記録されたビュー更新回数のレポートです。
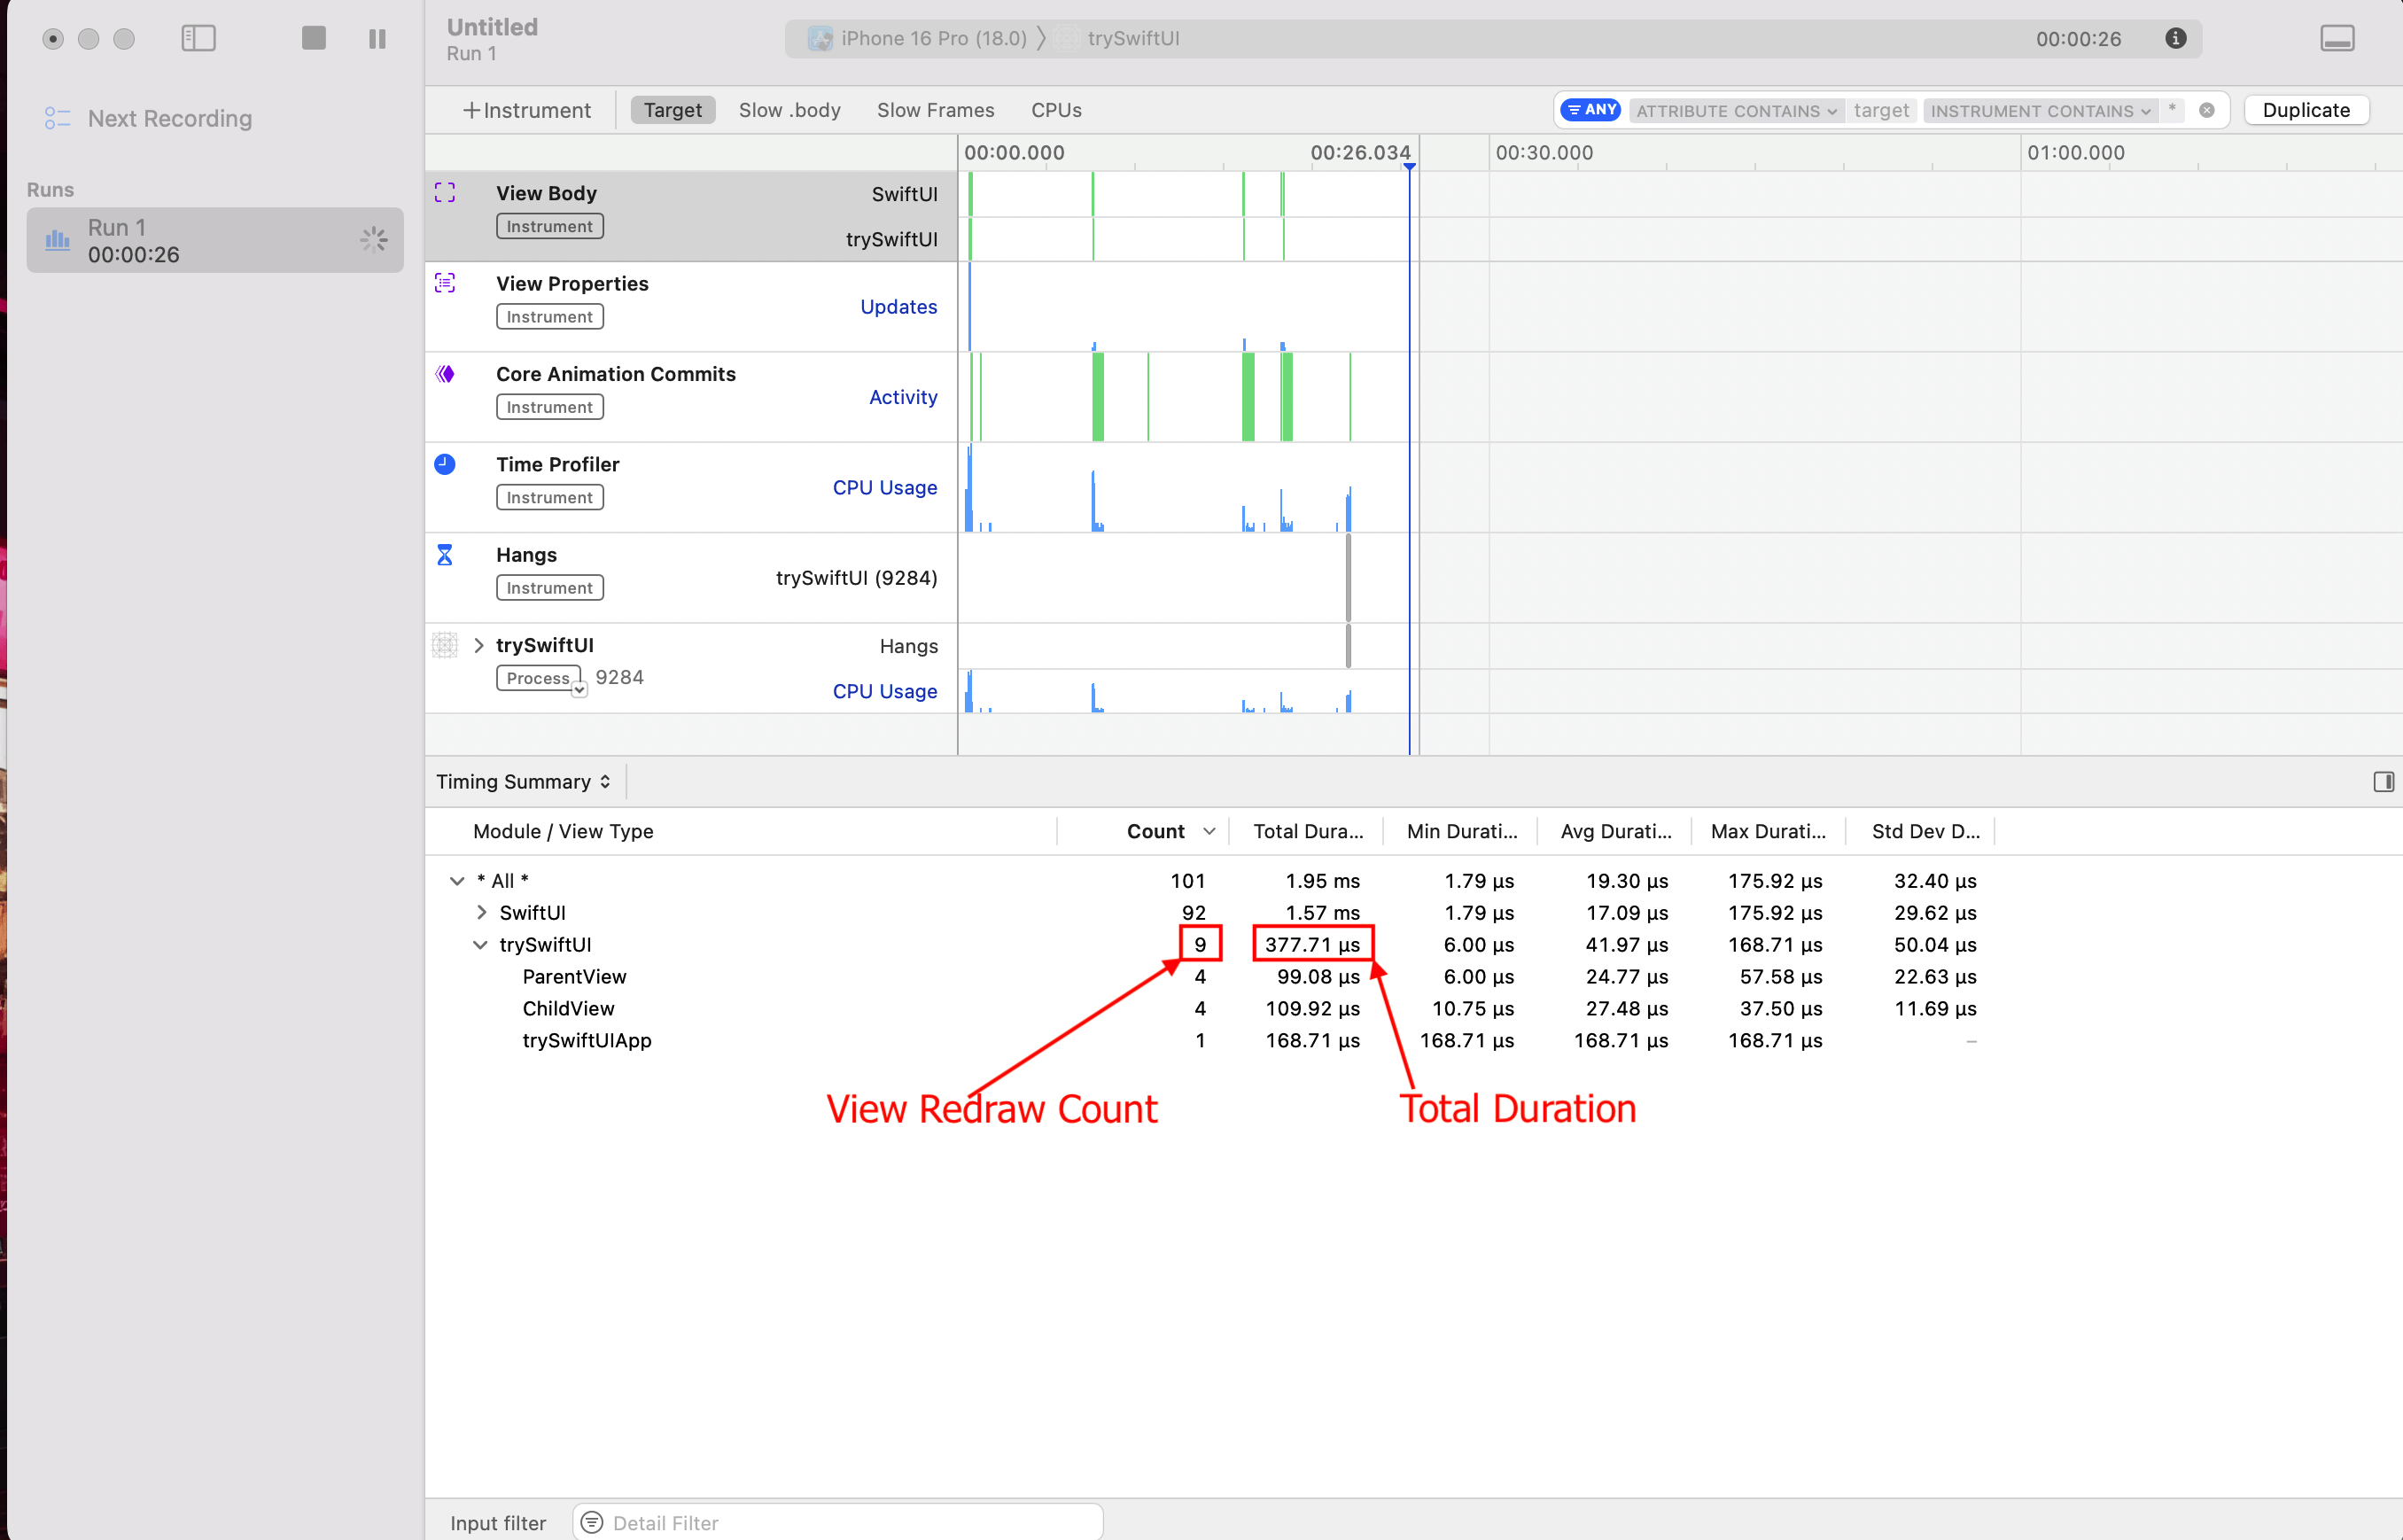 Observation未使用時
 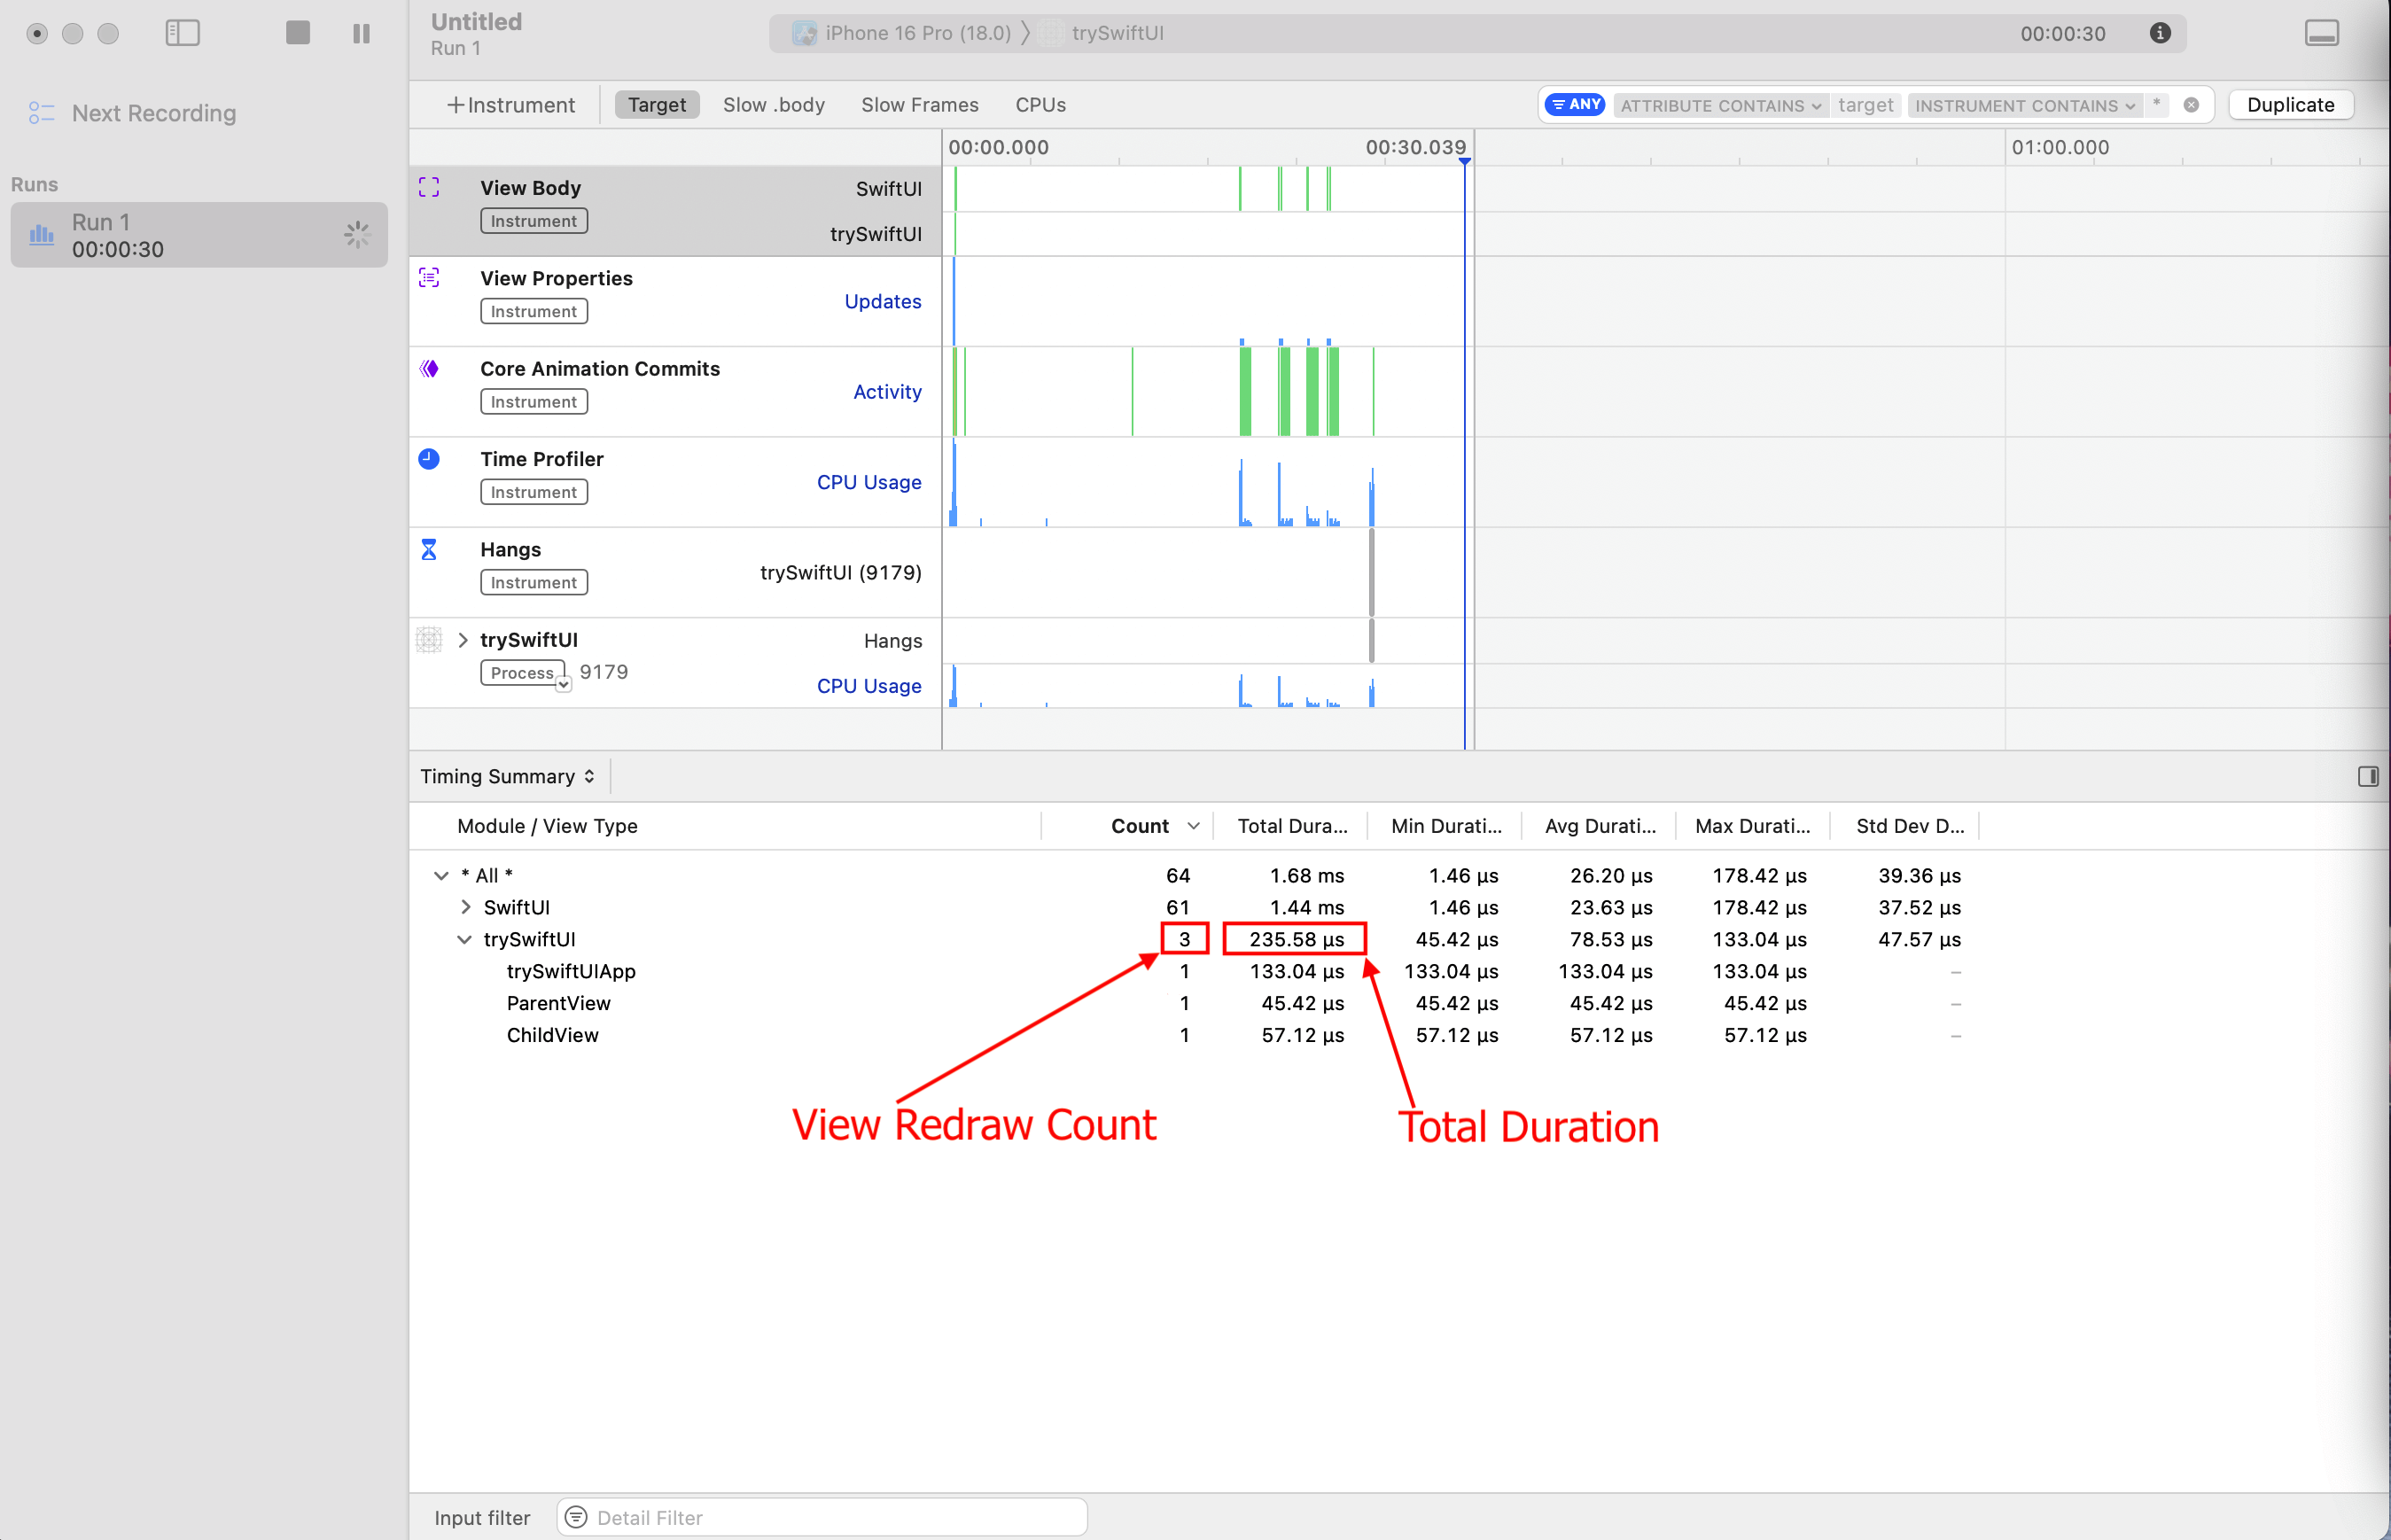 Observation使用時
記録結果からの考察
Observation未使用時(最初のイメージ)
このInstrumentsセッションでは、SwiftUIアプリの最適化されていないパフォーマンスが記録されています。
- 表示されたメトリクス:ビューの更新、プロパティの変更、タイミングの概要が表示されます。
- ビューの再描画回数:初期レンダリングに加え、
Set Nameボタンを3回押した際の再描画がそれぞれ発生し、合計で 9回の再描画が行われました。 - パフォーマンス:
- 合計再描画時間:377.71 マイクロ秒
- 平均再描画時間:41.97マイクロ秒/回
Observation使用時(2番目のイメージ)
このセッションでは、Observationフレームワークを使用した最適化されたレンダリングが記録されています。
- 表示されたメトリクス:最初のセッションと同じメトリクスが表示されますが、効率の向上が反映されています。
- ビューの再描画回数:ボタンを複数回タップしても、初期レンダリングと状態変化時の再描画が1回のみの 3 回の再描画で構成されます。
- パフォーマンス:
- 合計再描画時間:235.58 マイクロ秒
- 平均再描画時間:78.53 マイクロ秒/回
定量的な比較
- ビューの再描画回数の削減:
- Observation未使用時:9回再描画。
- Observation使用時:3回の再描画(66.67% 削減)
- 合計再描画時間の短縮:
- Observation未使用時:377.71 マイクロ秒
- Observation使用時:235.58 マイクロ秒 (37.65% 削減)
- 再描画の効率性:
- Observation未使用時:より頻繁で、平均41.97 マイクロ秒
- Observation使用時:再描画回数は少ないが最適化されており、平均78.53 マイクロ秒
この比較から、再描画回数が少なくなった結果としてインスタンスごとの平均再描画時間がやや増加しているものの、Observationフレームワークが再描画回数の削減と全体的なレンダリングパフォーマンスの向上に大きく貢献していることが分かります。
まとめ
この記事では、iOS 17で導入された新しい @ObservableマクロによるSwiftUIの改善点について解説しました。重要なポイントを簡単にまとめると、次のようになります。
以前のアプローチの課題
従来のObservableObjectと@Published プロパティを使用する方法では、不要な再描画が発生し、特に一部のビューが変更されたデータに依存しない場合に、パフォーマンスの問題が生じていました。
@Observable の紹介
この新しいマクロは状態監視プロセスを簡素化し、@Published、@ObservableObject、@EnvironmentObjectの必要性を排除します。クラスに@Observableを付与し、ビューで @Bindableを使用することで、データの変更を自動的に追跡し、必要な場合にのみビューの更新をトリガーできます。
パフォーマンスの向上
@Observableを使用することで、関連するデータが変更された場合にのみビューが更新され、不要な再描画が削減されるため、パフォーマンスが向上します。さらに、@ObservationIgnored マクロを活用することで、どのプロパティがUI更新をトリガーするかを開発者が細かく制御できるようになります。
メリット
- 的確な更新によるパフォーマンスの向上。
- ObservableObjectと@Publishedが不要になることでコードが簡潔に。
- 状態変更を型安全に管理可能。
- ビューの更新をトリガーするプロパティを細かく制御できる柔軟性。
@Observableを使用することで、SwiftUIでのUI更新の管理がより簡単かつ効率的になり、エラーが減少します。その結果、開発者にとっては作業効率が向上し、エンドユーザーにとってはスムーズな体験が提供されます。
以上で本日の内容は終了です。楽しいコーディングを!
参照-
関連記事 | Related Posts

Swift Observation:UI を更新するための、よりシンプルで効率的なアプローチ
![Cover Image for [iOS] From UIKit + Combine to a Tailor-Made SwiftUI Architecture](/assets/common/thumbnail_default_×2.png)
[iOS] From UIKit + Combine to a Tailor-Made SwiftUI Architecture
Using Combine to Achieve MVVM
![Cover Image for [SwiftUI] Define Your Own Style and Write Stylish Code](/assets/blog/authors/ryomm/2024-12-11/thumbnail.png)
[SwiftUI] Define Your Own Style and Write Stylish Code
![Cover Image for [IOS] [SwiftUI] Converting the KINTO Kantan Moushikomi App to SwiftUI](/assets/blog/authors/nakaguchi/2024-12-04-swiftUI-conversion/top.png)
[IOS] [SwiftUI] Converting the KINTO Kantan Moushikomi App to SwiftUI

【iOS】UIKit+CombineからSwiftUIを使った独自アーキテクチャへ
We are hiring!
【UI/UXデザイナー】クリエイティブ室/東京・大阪・福岡
クリエイティブGについてKINTOやトヨタが抱えている課題やサービスの状況に応じて、色々なプロジェクトが発生しそれにクリエイティブ力で応えるグループです。所属しているメンバーはそれぞれ異なる技術や経験を持っているので、クリエイティブの側面からサービスの改善案を出し、周りを巻き込みながらプロジェクトを進めています。
【クラウドエンジニア(クラウド活用の推進)】Cloud Infrastructure G/東京・名古屋・大阪・福岡
KINTO Tech BlogCloud InfrastructureグループについてAWSを主としたクラウドインフラの設計、構築、運用を主に担当しています。

![[Mirror]不確実な事業環境を突破した、成長企業6社独自のエンジニアリング](/assets/banners/thumb1.png)

