Contributing to OSS from Scratch: 11 Steps to Add a New Resource to Terraform AWS Provider
Hello. I’m @p2sk from the DBRE team.
The DBRE (Database Reliability Engineering) team is a cross-functional organization focused on resolving database issues and developing platforms.
Recently, I had the opportunity to contribute to the OSS repository terraform-provider-aws. Specifically, I implemented a new resource called aws_redshift_integration that enables users to manage managed data integrations between DynamoDB or S3 and Redshift, officially made available by AWS in October 2024, using Terraform. The PR has already been merged and released in v5.95.0, and the feature is now available.
This was my first OSS contribution, so I was a little worried about whether I could complete it, but with the help of generative AI, I was able to see it through to creating the PR.
It can sometimes take months after a new AWS feature becomes GA before it’s supported in Terraform (implemented as a new resource in terraform-provider-aws). In such cases, I felt that it was a huge advantage to have the option to implement it myself instead of waiting for official support. That’s why this article is for anyone looking to make their first contribution like me by adding a new resource to Terraform’s AWS Provider, and aims to share insights to help you work efficiently from the beginning.
Maybe in the future we’ll be able to just hand an issue over to a coding agent and have it generate the entire PR, but at the moment it seems quite difficult. I hope this article will be helpful to anyone in a similar situation.
About the Resource I Added
The resource I implemented enables management of two AWS features. Each is briefly described below:
- Zero-ETL integration from DynamoDB to Redshift
- Event integration from S3 to Redshift
Zero-ETL integration is a managed data integration feature that eliminates the need to build an ETL pipeline. The "zero-ETL integration" feature was initially launched as a data integration between Aurora MySQL and Redshift, and has since expanded support to multiple other sources and targets. Here’s the architecture diagram:
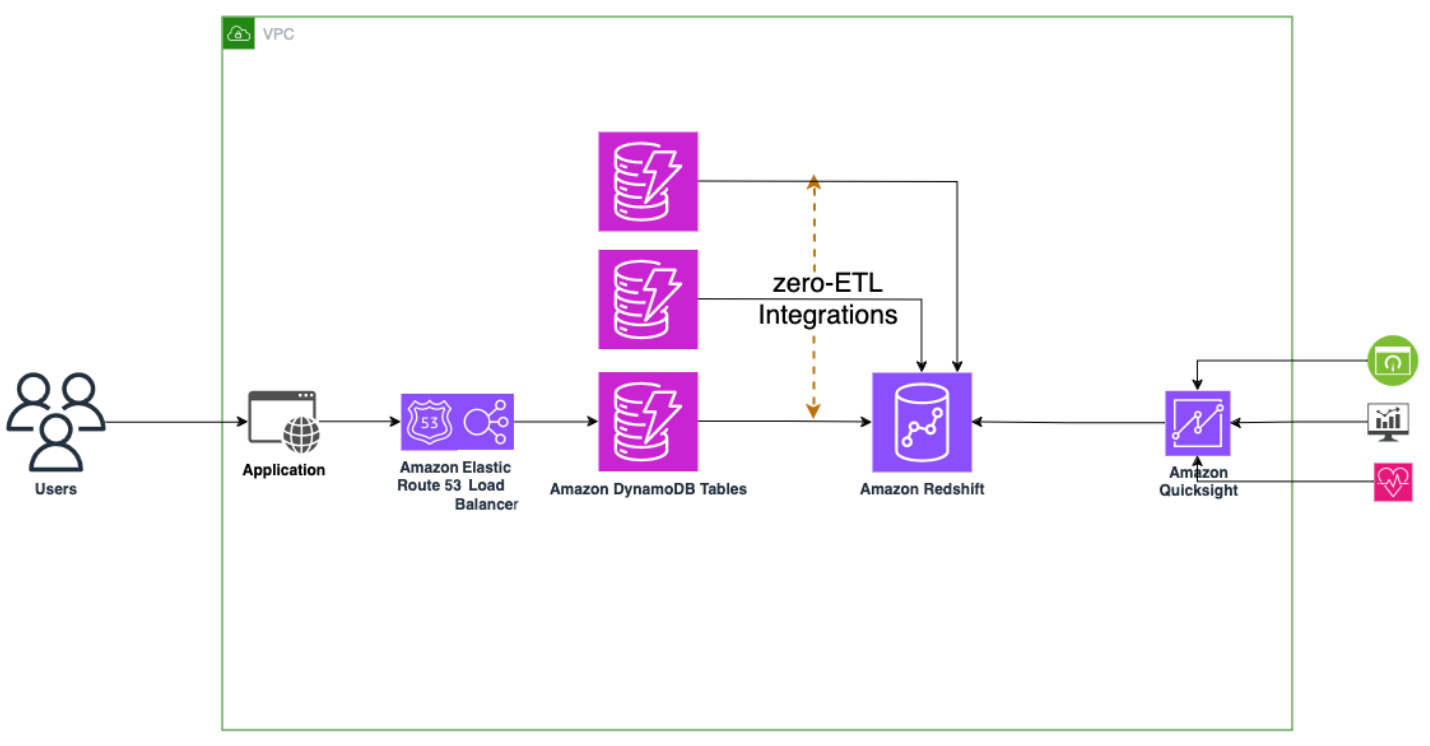 Source: AWS - Getting started with Amazon DynamoDB zero-ETL integration with Amazon Redshift
Similarly, event integration from S3 to Redshift allows files added to an S3 bucket to be automatically and quickly integrated into Redshift.
Although these two features are technically separate, they share the same API for creating an integration. Since resources in terraform-provider-aws are mapped directly to APIs, supporting this API in Terraform makes it possible to implement both features at the same time. So in the end, I only needed to add one resource.
Criteria for Adding Resources
The official documentation states the following :
New resources are required when AWS adds a new service, or adds new features within an existing service which would require a new resource to manage in Terraform. Typically anything with a new set of CRUD API endpoints is a great candidate for a new resource.
Japanese translation:
AWS が新しいサービスを追加したり、既存のサービスに新しい機能を追加したりする場合、Terraform で管理するための新しいリソースが必要になります。 一般的に、新しい CRUD API エンドポイントセットを持つものは、新しいリソースの候補として最適です。
So, having a new set of CRUD API endpoints is a major factor in deciding whether a new resource should be added. In this case, the criteria were met, so I went ahead and implemented a new resource.
Contribution Flow
The process is very well explained in the official documentation.
- Configure Development Environment
- Debug Code (Skipped this time because it was a new resource)
- Change Code
- Write Tests
- Continuous Integration
- Update the Changelog
- Create a Pull Request
Based on the above items, the steps recommended in this article are summarized below. In addition, the effort levels marked using ★ based on my own experience. You’ll need to check the official documentation for detailed instructions, but I hope these notes from actually doing it will help you get a smoother start.
- Investigate or create related issues ★
- Preliminary research on the relevant AWS API and SDK ★
- Configure development environment ★
- Validate the target resource and code dependent resources ★★★
- Generate boilerplate code using the scaffolding tool ★
- Modify the code and check if it works ★★★★★
- Write a test ★★★
- Run a continuous integration test locally ★★
- Update the documentation ★
- Create a pull request ★
- Create and push a changelog ★
Before diving into the details of each step, I want to first highlight a few things that are good to know before starting development.
Points to Note
Mixed coding styles due to multiple SDKs
In terraform-provider-aws, the repository contains two different patterns using different SDKs.
- Terraform plugin framework
- The new SDK recommended for use at this time
- Terraform Plugin SDKv2
- No longer recommended for new development, However, it’s still used for maintaining and fixing existing resources.
- There may still be code for the unsupported v1 version, so in reality, there are three possible patterns.
Therefore, if you’re using generative AI to assist with research or coding, it’s a good idea to include the Terraform Plugin Framework as a target in your prompt.
If you’re interested in the historical background of this, check out ChatGPT Deep Research’ results, though keep in mind there’s always a chance of hallucination.
Licensing
Terraform itself changed its license to BSL in 2023, which means it is no longer defined as OSS, but terraform-provider-aws will still remain OSS under the MPL 2.0.
Various providers appear to be used in opentofu, which was forked from Terraform. The AWS Provider for opentofu is also forked from terraform-provider-aws, so by contributing to the provider, you’ll indirectly contribute to both Terraform and opentofu.
If you’re interested in the details behind this, check out ChatGPT Deep Research’s results. (Take the same precautions regarding hallucination.)
The following section explains the actual steps. Note that the test execution times mentioned in this article are approximate values based on the following environment.
- Machine: MacBook Pro
- Chip: Apple M2 Pro
- Memory: 32 GB
1. Investigate or Create Related Issues
When creating a PR, include a link to the related issue (e.g. "Relations" in the image below). So, first search for a related issue and if you don’t find one, create one.
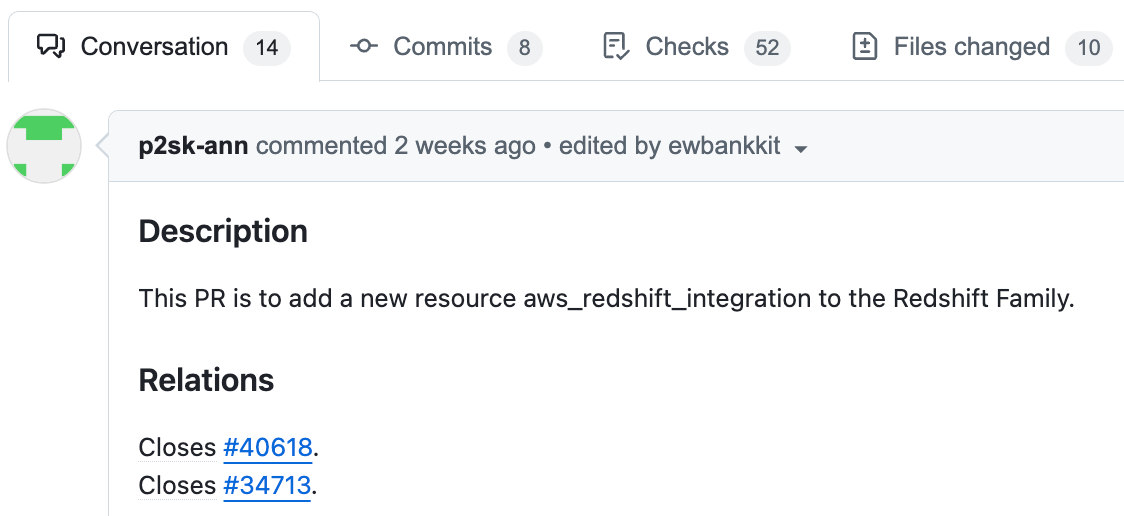
If an issue has already been created, someone else might be working on it. Be sure to skim through the comments to check whether it looks like work has already started.
In this case, an issue already existed, so I simply linked to it when I created the PR.
2. Preliminary Research on the Relevant AWS API and SDK
To implement a new resource, the Go SDK (aws-sdk-go-v2) must support the relevant CRUD operations for the resource. I assume that the SDK will generally be provided at the same time as it becomes GA, but there may be some lag. The go.mod in terraform-provider-aws also needs to be updated to a version that corresponds to the relevant resource, but it seems to be updated frequently by the maintainers, so in many cases you won’t need to do it yourself, it’s likely already up-to-date.
This time, I found it convenient to bookmark the following references so I could refer to them whenever I wanted during development. They’re also useful if you want to feed them into a generative AI for reference.
API Reference
- https://docs.aws.amazon.com/ja_jp/redshift/latest/APIReference/API_CreateIntegration.html
- https://docs.aws.amazon.com/ja_jp/redshift/latest/APIReference/API_ModifyIntegration.html
- https://docs.aws.amazon.com/ja_jp/redshift/latest/APIReference/API_DeleteIntegration.html
- https://docs.aws.amazon.com/ja_jp/redshift/latest/APIReference/API_DescribeIntegrations.html
SDK Reference
- https://pkg.go.dev/github.com/aws/aws-sdk-go-v2/service/redshift#Client.CreateIntegration
- https://pkg.go.dev/github.com/aws/aws-sdk-go-v2/service/redshift#Client.ModifyIntegration
- https://pkg.go.dev/github.com/aws/aws-sdk-go-v2/service/redshift#Client.DeleteIntegration
- https://pkg.go.dev/github.com/aws/aws-sdk-go-v2/service/redshift#Client.DescribeIntegrations
Initially, my motivation was to make DynamoDB zero-ETL integration compatible with Terraform, but when I looked through the references, I found that the API’s SourceARN parameter pattern also supported S3, as shown in the figure below. That’s when I realized I’d need to validate the S3 integration as well. Since the validation scope can end up being broader than expected, it’s a good idea to review all input and output in the reference before jumping in.
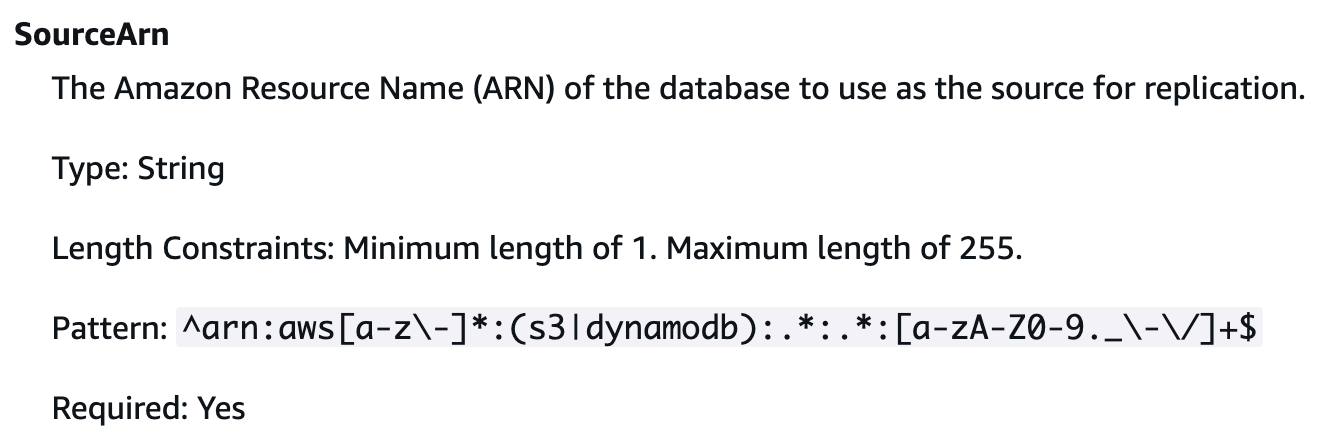
Source: AWS - Redshift CreateIntegration API Reference
Also, depending on the type of resource, there may be no Delete or Modify available. In those cases, you only need to implement what’s provided. For example, with the zero-ETL integration between Aurora MySQL and Redshift, only Create / Delete / Describe were available at the time of GA, with Modify added later.
Redshift has two SDK directories: redshift and redshiftserverless. I wasn’t sure whether I need to implement both, but since the relevant API didn’t exist under redshiftserverless, and the functions under redshift could also create integrations for serverless, I concluded that implementing it under redshift alone would be sufficient.
3. Configure Development Environment
Just follow the steps in the official documentation and you should be good to go. However, running make testacc, which creates the actual resource and checks if it works, is unnecessary at this point. You may not need to run make test either, but it took around 30 to 40 minutes in my environment.
By following the steps in the Using the Provider section, you’ll be able to run Terraform commands using the locally built provider. You can consider it working correctly if a warning like the one below appears during execution.

This confirms that your locally built provider is being used when running Terraform. Although you can check if it works via the "acceptance test" described later, I found that using the local build directly with Terraform commands is a much faster way to iterate between building and testing. Personally, checking it this way felt more intuitive since it aligned with how I normally use Terraform. If you want to debug in more detail, you might find delve useful..
4. Validate the Target Resource and Code Dependent Resources
Before starting to code, it’s a good idea to check if the new AWS resource you’re planning to add works as expected. This helps build a deeper understanding of how it works. In this case, you will most likely need to create dependent resources before creating a new AWS resource. For example, in my case, the integration depended on the following AWS resources. (To be precise, the source can be either a provisioned Redshift, Redshift Serverless, or S3.)
- aws_vpc
- aws_subnet
- aws_security_group
- aws_dynamodb_table
- aws_dynamodb_resource_policy
- aws_redshift_subnet_group
- aws_redshift_parameter_group
- aws_redshift_cluster
- aws_redshift_resource_policy
- aws_kms_key
- aws_kms_alias
- aws_kms_key_policy
- aws_redshiftserverless_namespace
- aws_redshiftserverless_workgroup
- aws_s3_bucket
- aws_s3_bucket_public_access_block
- aws_s3_bucket_policy
- aws_iam_role
- aws_iam_role_policy
- aws_redshift_cluster_iam_roles
I highly recommend coding the dependent resources as .tf files at this point. The reasons are as follows.
- If your validation and development cannot be completed in one day, it will be costly, so you’ll want to apply and destroy each time.
- You’ll need a similar configuration for "acceptance test" described later, so having it ready upfront will save time.
- Formatting with
terraform fmtnow will also make local CI testing smoother later on.
- Formatting with
I think you can speed up the HCL coding significantly by leveraging generative AI. After coding the dependent resources, you can use the AWS Console or CLI to manually create the target resource and validate its behavior.
5. Generate Boilerplate Code Using the Scaffolding Tool
When adding new resources, it’s recommended to use a scaffolding tool called Skaff to generate the base code.
The resource type name follows a specific naming rule: aws_${service name}_${AWS resource name}. The AWS resource name should match the function name used in the SDK. For example, in this case, the "CreateIntegration" function is provided, so the AWS resource name is "Integration." It seems best to use the value of the service directory in the repository as the service name.
Therefore, the resource type name in this case is aws_redshift_integration. I also used this as the name of my feature branch, f-aws_redshift_integration. With Skaff, you just need to specify the AWS resource name, so after changing to the directory for the relevant service, I executed the following command.
$ pwd
/Users/masaki.hirose/workspace/terraform-provider-aws/internal/service/redshift
$ skaff resource --name Integration
Running Skaff generates three files: the resource code, test code, and documentation. You can view the generated file here, and it is a user-friendly file with extensive comments. Comparing these initial files to the final merged code also gives a clear picture of what needs to be modified.
6. Modify the Code and Check If It works
Based on the generated code, I began modifying it so that it actually worked. As described in the documentation, the first step is implementing the resource schema, followed by the CRUD handlers.
In the Terraform Plugin Framework, the CRUD handlers are named intuitively: "Create," "Read," "Update," and "Delete." For example, the first time you run terraform apply to create a new resource, the Create() function implemented here will be called. Within that, the corresponding function in the Go SDK (in this case CreateIntegration) is executed, and internally the corresponding AWS API (in this case CreateIntegration) is executed to create the resource.
If terraform apply is used to perform modifications without replacing, the Update() function is executed, and if terraform destroy is used to delete the resource, the Delete() function is executed. Whenever resource information needs to be read, The Read() function gets called.
Resource schema implementation
In the Schema() function, you define the arguments that Terraform accepts and the attributes that it outputs as schema information. Define each field in the Attributes map, as shown in the code below. Each attribute is a struct whose key is a name in Terraform (snake case) and whose value implements the schema.Attribute interface, using an appropriate one from schema.MapAttribute, or schema.StringAttribute.
// 修正後の Schema() 関数の一部を抜粋
func (r *integrationResource) Schema(ctx context.Context, req resource.SchemaRequest, resp *resource.SchemaResponse) {
	resp.Schema = schema.Schema{
		Attributes: map[string]schema.Attribute{
			"additional_encryption_context": schema.MapAttribute{
				CustomType:  fwtypes.MapOfStringType,
				ElementType: types.StringType,
				Optional:    true,
				PlanModifiers: []planmodifier.Map{
					mapplanmodifier.RequiresReplace(),
				},
			},
			names.AttrARN: framework.ARNAttributeComputedOnly(),
			names.AttrDescription: schema.StringAttribute{
				Optional: true,
			},
			"integration_name": schema.StringAttribute{
				Required: true,
			},
As shown above, the parameters marked as required in the SDK reference should be set with Required: true, and if a change requires replacing the resource, add a RequiresReplace() modifier. Personally, I found it challenging to choose the appropriate modifier. Modifiers can be implemented on your own, so I decided to implement one manually, but later found that a maintainer had replaced mine with an existing built-in modifier after creating the PR. If you’re unsure, it is a good idea to first understand the functions provided by the modifier that corresponds to the target type, such as stringplanmodifier, and check whether you can use them. Through the maintainer’s feedback after submitting the PR, I learned that most cases can actually be handled using existing modifiers.
Along with that, I also defined the ResourceModel struct.
type integrationResourceModel struct {
	AdditionalEncryptionContext fwtypes.MapValueOf[types.String] `tfsdk:"additional_encryption_context"`
	Description                 types.String                     `tfsdk:"description"`
	IntegrationARN              types.String                     `tfsdk:"arn"`
	IntegrationName             types.String                     `tfsdk:"integration_name"`
	KMSKeyID                    types.String                     `tfsdk:"kms_key_id"`
	SourceARN                   fwtypes.ARN                      `tfsdk:"source_arn"`
	Tags                        tftags.Map                       `tfsdk:"tags"`
	TagsAll                     tftags.Map                       `tfsdk:"tags_all"`
	TargetARN                   fwtypes.ARN                      `tfsdk:"target_arn"`
	Timeouts                    timeouts.Value                   `tfsdk:"timeouts"`
}
Implementing CRUD handlers and related logic
All CRUD handlers are implemented by creating an input struct for the SDK and calling SDK functions. You’ll also implement the functions used in the CRUD handler. This includes the following:
- A finder function to retrieve the resource information
- A waiter function to wait for create, update, or delete to complete
- A status function to check the state of the resource
- A sweeper function to remove all resources (mainly for testing; not always required)
Please note that some services have their own Go files such as wait.go or find.go. In that case, you need to add your logic there. If not, it seems fine to include all the logic in the file you’re working on. The Redshift service I used already had wait.go, so I added the relevant logic there.
Registering resources
Once the implementation is complete, you need to register the resource so that the Terraform Provider can recognize it. The following annotations are required, but since it’s already included in the code generated by Skaff, you don’t need to write it yourself. Just be careful not to delete it by mistake.
// @FrameworkResource("aws_redshift_integration", name="Integration")
func newIntegrationResource(context.Context)
After writing the above annotations, run make gen in the project root directory. This will regenerate service_package_gen.go in each service package, and your newly implemented resource will be registered with the provider. Once you have reached this stage, you can run make build, and if it passes, you will be able to check that it works using commands like terraform apply.
Verifying operation
Write the newly implemented resources in HCL and run terraform apply to check that it works. In step 4. Validate the target resource and code dependent resources, the dependent resources have already been coded, so here you can define only the newly implemented resource in a separate file under a different directory, and manage it with a separate state. This way, you can apply and destroy only the resource you’re checking to see if it works, which helps speed things up. Alternatively, if everything is written in a single file, you can still apply just the new resource by specifying a target, like this:
terraform plan -target=new_resource_type.hoge -out=myplan
terraform apply myplan
7. Write a Test
In terraform-provider-aws, there are three tests:
- Acceptance Tests
- These verify that Terraform can successfully create, update, and delete AWS resources. Since resources are actually operated, monetary costs are incurred. That’s why the documentation states that running them is optional.
- Unit Tests
- Function level tests. In this case, I judged that they weren’t necessary and skipped them.
- CI Tests
- Comprehensive testing including linting, formatting, and other checks after PR is created.
Since CI tests only run what is already prepared, acceptance tests and unit tests are the tests that should be written by the contributor. Unit tests are recommended when implementing complex logic, but since that wasn’t the case this time, I judged they weren’t necessary and wrote only the acceptance test. For acceptance tests, the AWS resources needed for testing must be written in HCL, as shown in the code below:
func testAccIntegrationConfig_base(rName string) string {
	return acctest.ConfigCompose(acctest.ConfigVPCWithSubnets(rName, 3), fmt.Sprintf(`
data "aws_caller_identity" "current" {}
data "aws_partition" "current" {}
resource "aws_security_group" "test" {
  name   = %[1]q
  vpc_id = aws_vpc.test.id
  ingress {
    protocol  = -1
    self      = true
    from_port = 0
    to_port   = 0
  }
  ...
Since the dependent resources were already written in code in step 4. Validate the target resource and code dependent resources, this step was very easy with simple copy-and-paste. When running tests, you can execute them at the function level by specifying the function name, like this:
make testacc TESTS=TestAccRedshiftIntegration_basic PKG=redshift
To run all tests for a specific resource at once, delete the part after the underscore and run it like this:
make testacc TESTS=TestAccRedshiftIntegration PKG=redshift
8. Run a Continuous Integration Test Locally
The terraform-provider-aws repository has a strict CI pipeline to ensure code quality. These checks run automatically after creating a PR, but it's a good idea to run them locally first and make sure everything passes before submitting.
A complete check can be run with make ci, but in my case, it took several hours to complete. So, I recommend first fixing any issues detected with make ci-quick and then running make ci to minimize the wait time.
For me, after a few rounds of fixes, I was able to pass all checks with make ci-quick locally. But when running make ci, I encountered one issue that required modifying the GNUmakefile. Since this may be a problem specific to my environment, I didn’t include it in the PR and instead worked around it with a local fix.
As described in the Documentation, running make testacc-lint-fix first can automatically fix issues only related to terrafmt, so that’s a good step to begin with.
9. Update the Documentation
Update the documentation generated by Skaff. What you write here will be reflected as Frequently viewed documentation. There shouldn’t be any issues if you refer to existing documentation and follow their format.
10. Create a Pull Request
This step should be pretty straightforward and not cause any confusion.
11. Create and Push a Changelog
I think you can create it without any problems by following the official documentation. The PR number is required according to the file naming rule, so you need to submit a PR first, then create a changelog and push it afterward.
That covers the steps up to creating a PR. In the next section, I’ll share the insights I gained through this initiative.
Changes Made by the Maintainer
The PR was successfully merged and released in v5.95.0 recently, and the feature is now available for use. Before the merge, the maintainer made some revisions to the code. Here’s an overview of what those changes were:
Removal of the ID from schema.attribute
Although the following comment was already included in the code generated by Skaff, I overlooked it and left the ID attribute, so it was removed as unnecessary. It’s a good idea to refer to the AWS API reference to decide whether to keep it or not.
// Only include an "id" attribute if the AWS API has an "Id" field, such as "IntegrationId"
names.AttrID: framework.IDAttribute(),
Changes to variable names, etc.
This was the majority of the changes, and I realized my naming needed more attention. On the other hand, the struct name "resourceIntegrationModel" was automatically generated by Skaff, but it was modified to "integrationResourceModel." This might indicate that Skaff’s naming logic isn’t entirely consistent.
Replacing my custom modifier with an existing one
To address a specific issue, I implemented my own plan modifier, but it was modified to an existing one.
Since I wasn’t fully confident about this part, I left a detailed comment in the PR. In response, I received the following feedback, which made me realize I should have looked more closely into the existing modifiers beforehand. However, by clearly explaining why I implemented it the way I did, the maintainer was able to make an informed correction.
This can be accomplished with the RequiresReplaceIfConfigured plan modifier.
To see whether this fix could have been guided by an LLM, I modified the prompt I was using during implementation and sent it to LLM, and this time, the LLM suggested a fix using the existing modifier. During development, I had assumed that I had no choice but to create my own modifier, and gave the LLM overly specific instructions, which may have limited its ability to suggest a better solution. This experience taught me that there’s room to improve how I use the LLM.
Addition of Check Items in Acceptance Tests
As noted in this commit, I learned that acceptance tests can be written to specify whether a test scenario is expected to "create or update a resource." This helps detect unintended resource recreation, which can be very useful.
Cost of Creating AWS Resources
Since I ran the acceptance tests myself and also ran individual checks to see if it works, some monetary cost was incurred from creating AWS resources. I used Terraform to manage the infrastructure as code (IaC), and destroyed resources frequently when they weren’t needed. Still, the total came to about $50. Most of this was the cost of Redshift, which will significantly vary depending on the resources you’re implementing.
Other Thoughts
Lesson learned: a huge effort goes into standardization
In repositories like those related to Terraform, which involve thousands of contributors, it’s essential to have a solid "track" that allows everyone to reach the same goal. If standardization is weak, maintainers (reviewers) have to put in a lot more effort, and that slows down feature releases. Given this background, I really felt a strong push toward code standardization by providing various resources and tools like:
- Extensive documentation
- Detailed guides for each type of contribution (bug fixes, adding new resources, etc.)
- Description of rules such as naming
- Scaffolding using the dedicated tool "Skaff"
- Automatic generation of base code that can be easily fixed
- Locally run CI tests
- Thorough checks can be performed from various perspectives, including lint, formatting, and testing.
- By getting everything to pass locally first, there’s a high chance that your code will pass all the CI checks after you open the PR, reducing the burden on maintainers.
In particular, you can really see the effort put into enabling local execution of CI-equivalent tests in the documentation below.
NOTE: We’ve made a great effort to ensure that tests running on GitHub have a close-as-possible equivalent in the Makefile.
Japanese translation
注: GitHub で実行されるテストについては、Makefile に可能な限り同等のコードが含まれるよう最大限の努力を払っています。
This helps minimize inconsistencies in code style, even down to the smallest details. For example, as shown below, if a value is hardcoded instead of using a const-defined constant, the system prompts you to use the appropriate constant.
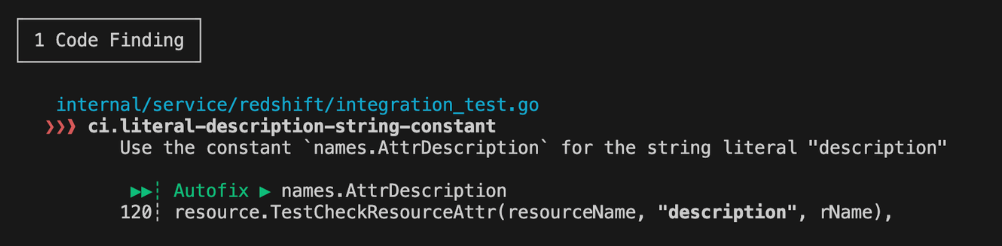
As you can see, the test items are very detailed and cover a wide range, but on the flip side, once both the acceptance tests and local CI tests pass, I was able to create my very first PR with confidence.
In the DBRE team I belong to, DevOps specialists had already structured the entire development flow from scaffolding to formatting, linting, and testing as described above. Thanks to that, I was able to follow the process smoothly.
Reflection: there is room for improvement in the use of generated AI
Looking back, I realize there was room for improvement in how I used generative AI. To speed up my understanding of an unfamiliar repository, I could have indexed it with GitHub Copilot. That said, in cases like this one where the repository contains a mixture of code from different SDKs, I realized it's important to be more deliberate, such as clearly specifying the currently recommended SDK when asking questions. In fact, I looked into the Plan Modifier area through deep research and tried a solution I found in an issue online. However, it didn’t work because the solution was based on the old SDK. Instead, I fed the LLM with a set of relevant sources, and it returned code that resolved the issue with almost no modification. I hope to leverage LLMs more effectively to stay up to date and accelerate development.
Challenges: mixed code from different SDKs
As mentioned above, the repository contained a mix of code with different SDKs, so "not all existing code could be used for reference." It took me a while to realize this. For example, the implementation of the sweeper function differs between the current SDK (Terraform Plugin Framework) and the previous one. In this case, the target service was Redshift, but thefile for implementing the Redshift sweeper function hadn’t yet been updated to use the current SDK. I based my initial implementation on the old SDK, which resulted in non-working code. I solved the problem by finding functions implemented with the current SDK in another service and using them as a reference. That said, it’s best to be mindful of whether the existing code you’re referencing follows the current recommended SDK conventions.
Dividing Tasks Between AI and Humans
Lastly, I’ve summarized my current perspective on which steps are better handled by AI or humans in the table below. After completing this development, I also had the AI engineer Devin try the same task for validation purposes, but as written in the official documentation it seemed necessary to break down the task into smaller steps when delegating to AI. Of course, this is just my current view, and is likely to change as AI evolves.
| Step | AI / Human | Notes |
|---|---|---|
| 1. Investigate or Create Related Issues | Human | Fastest to search manually via web or GitHub Issues |
| 2. Preliminary Research on the Relevant AWS API and SDK | Human | Quicker to look it up manually |
| 3. Configure Development Environment | Human | Quicker to set it up manually |
| 4. Validate the Target Resource and Code Dependent Resources | AI + Human | Using LLMs is effective for coding dependencies |
| 5. Generate boilerplate code using the scaffolding tool | Human | Quicker to run manually |
| 6. Modify the Code and Check If It works | AI + Human | Let the LLM draft the base, then finish the details manually |
| 7. Write a Test | AI + Human | Let the LLM draft the base, then finish the details manually |
| 8. Run CI tests locally | AI or Human | LLM may adjust code to pass tests, but long test run times may consume more credits depending on the product |
| 9. Update the Documentation | AI + Human | Feed merged document to LLM to generate a draft |
| 10. Create a Pull Request | Human | Likely faster to handle manually |
| 11. Create and Push a Changelog | Human | Likely faster to handle manually |
Conclusion
Contributing to the Terraform Provider seemed like a high hurdle to overcome, but I found that once you get used to it, the process goes smoothly—thanks to well-maintained guides, scaffolding tools, and a solid testing framework. Since this was my first time, I spent a lot of time reading through the documentation, but I believe I'll be able to develop faster next time. If you're excited to Terraform new AWS features as soon as they are released, I definitely encourage you to give it a try. I hope this article can be a helpful reference when you do.
KINTO Technologies' DBRE team is actively looking for new members to join us! Casual interviews are also welcome, so if you're even slightly interested, feel free to contact us via DM on X. Don't forget to follow us on our recruitment X too!
関連記事 | Related Posts


We are hiring!
【クラウドエンジニア】Cloud Infrastructure G/東京・大阪・福岡
KINTO Tech BlogWantedlyストーリーCloud InfrastructureグループについてAWSを主としたクラウドインフラの設計、構築、運用を主に担当しています。
【クラウドエンジニア(クラウド活用の推進)】Cloud Infrastructure G/東京・名古屋・大阪・福岡
KINTO Tech BlogCloud InfrastructureグループについてAWSを主としたクラウドインフラの設計、構築、運用を主に担当しています。