[続!Dev Container] GitHub Codespacesでクラウド開発環境を構築
![Cover Image for [続!Dev Container] GitHub Codespacesでクラウド開発環境を構築](/assets/blog/authors/torii/codespaces/codespaces_banner.webp)
1. はじめに
こんにちは。共通サービス開発グループ[1][2][3]で複数のサービスが利用する決済プラットフォームの開発チームに所属している鳥居です。
前回の記事[4]では、Visual Studio Code(以下 VS Code)の Dev Container を活用し、快適な開発環境を構築する方法を紹介しました。Dev Container は非常に便利である一方、ローカルマシンのリソースを利用するため、パフォーマンスがマシンスペックに依存するという課題がありました。特に Mac での使用では、ファイルシステム間の相互作用が原因で遅延が生じる場合がありました。
今回の記事では、私たちのチームでも実際に活用している Dev Container による開発環境構築をさらに進化させた GitHub Codespaces について解説します。GitHub Codespaces を利用することで、クラウドベースの開発環境を手軽かつ効率的に構築する方法をご紹介します。
また、実際の開発で活用している設定ファイルのサンプルも紹介します。設定ファイルのサンプルは、Dev Container で MySQL や LocalStack を利用する方法や、ローカル環境と Dev Container の開発環境の共存方法など、実際の開発で活用しているものから抜粋したものです。
2. GitHub Codespaces の概要
GitHub Codespaces は、クラウド上で完全な開発環境を提供するサービスで、VS Code、VS Code Web、IntelliJ、JupyterLab などの主要な開発ツールをサポートしています。これらのツールは Windows、Mac、そして Linux のすべての主要なプラットフォームで使用することができます。これにより、開発者は自分の好みに応じた環境で開発作業を行うことができます。さらに、VS Code Web を使用する場合は、ブラウザがある場所ならどこでも開発環境にアクセスし、ローカルマシンとクラウド間での作業をシームレスに行うことが可能です。
3. GitHub Codespaces の具体的な活用シーン
GitHub Codespaces は、以下のようなシーンで活用することができます。
3.1 プロジェクトのクロスプラットフォーム開発
クラウドベースの開発環境であるため、GitHub Codespaces は開発者のデバイスや OS に依存しないのが特長です。これにより、各種環境における開発環境の構築や設定を一から行う手間が省かれます。開発者は自分の好きな OS を利用しつつ、他の全ての人と同等の開発環境を享受できます。
3.2 教育やワークショップでの使用
開発環境のセットアップが容易であるため、教育やワークショップなどの場では GitHub Codespaces が特に有用です。参加者は環境設定に時間を取られることなく、学習や実践に専念することが可能となります。
3.3 プルリクエストのレビュー
GitHub Codespaces は、GitHub と深く連携しているため、プルリクエストを直接開くことが可能です。これにより、現在作業しているブランチから切り替えることなく、プルリクエストのレビューをスムーズかつ迅速に行うことができます。

4. GitHub Codespaces のセットアップ手順
GitHub Codespaces を構築するには、Dev Container と同様に、.devcontainerディレクトリ内に設定ファイルを作成する必要があります。以下では、GitHub Codespaces のセットアップ手順を紹介します。
4.1 前提環境
- GitHub アカウント
- 対象のリポジトリ
4.2 Dev Container の構築手順
-
対象のリポジトリに
.devcontainerディレクトリを作成します。 -
.devcontainerディレクトリ内にDockerfile、docker-compose.yml、および.devcontainer.jsonを作成し、それぞれの設定ファイルに適切な内容を記述します(次章の 設定ファイルのサンプルを参考にしてください)。 -
設定ファイルをリポジトリにコミットし、プッシュします。
-
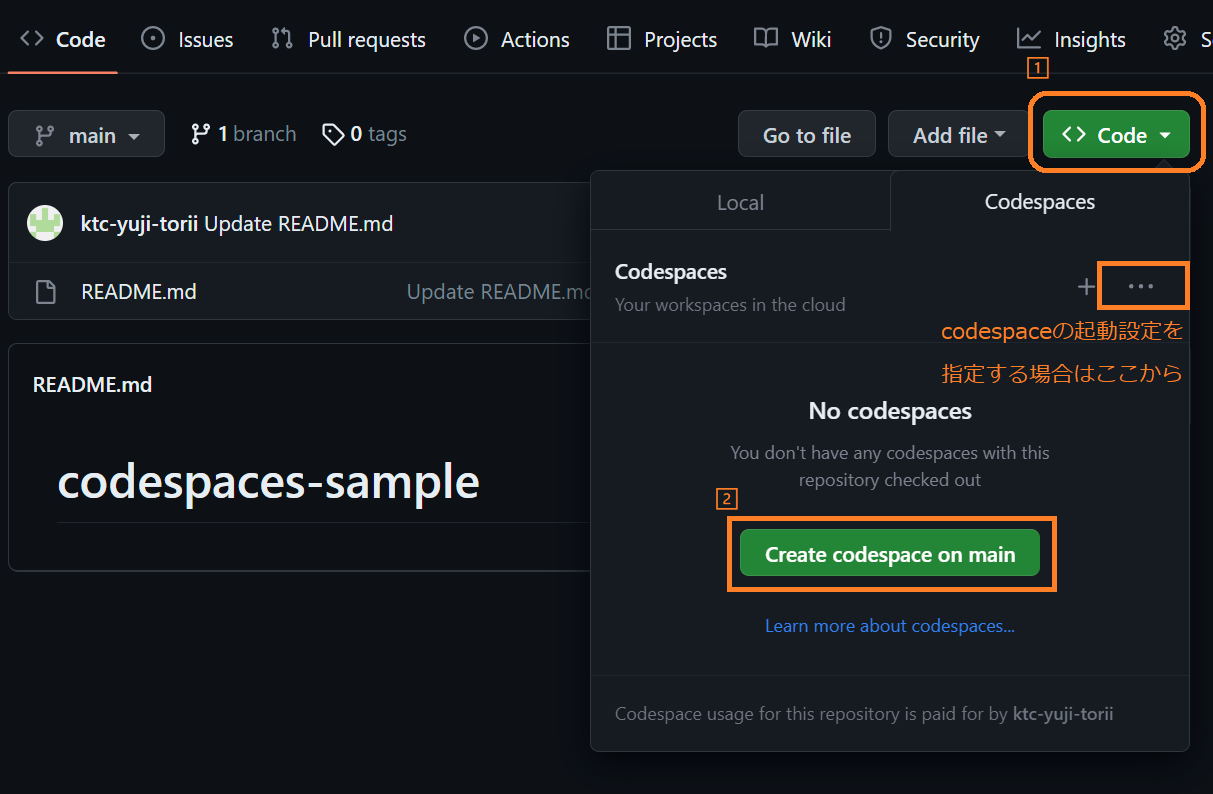
GitHub リポジトリにアクセスし、リポジトリページの右上にある緑色の "Code" ボタンをクリックします。
-
ドロップダウンメニューから "Codespaces"タブ を選択します。
-
新しい Codespace を作成するか、既存の Codespace を選択して開くことができます。
今回は初回なので、"Create new codespace on main"を選択します。 -
オプションとして、リモートマシンのスペックやリージョンを指定できます。
三点リーダーから "New with options..." を選択します。 -
Codespaces の起動画面に遷移し、準備が整うまで数分かかります。準備が整ったら、ブラウザ上で Visual Studio Code のインターフェイスが表示されます。
これで、Codespaces が起動し、リポジトリのコードを編集できるようになりました。また、ターミナルも利用可能で、開発環境にインストールされているツールを使用できます。
5. 設定ファイルのサンプル
5.1 .devcontainer.json のサンプル
.devcontainer.jsonは、Dev Container や Codespaces の設定を記述するためのファイルです。このファイルでは、開発環境の構築、使用する拡張機能、設定などを定義します。
docker-from-dockerは開発環境から Docker を利用するための設定項目です。この設定を追加することで、Dev Container 内からホストマシンの Docker を利用することが可能になります。この設定を追加しない場合、Dev Container 内から Docker を利用することはできません。
ghcr.io/devcontainers/features/sshd[5]は、JetBrains Gateway Codespaces 用の設定項目です。JetBrains Gateway Codespaces は、JetBrains IDE で GitHub Codespaces を利用するための機能です。この設定を追加することで、JetBrains IDE から GitHub Codespaces へのアクセスが可能になります。
{
    "name": "sample-app",
    "build": {
        "dockerfile": "Dockerfile"
    },
    "service": "devcontainer",
    "workspaceFolder": "/workspaces/${localWorkspaceFolderBasename}",
    "postCreateCommand": "sh .devcontainer/post-create.sh",
    "features": {
        "ghcr.io/devcontainers/features/go:1": {
            "version": "latest"
        },
        // ホストマシンのDockerを利用するための設定
        "docker-from-docker": {
            "version": "latest"
        },
        // Jetbrains Gateway Codespaces用
        "ghcr.io/devcontainers/features/sshd:1": {
            "version": "latest"
        }
    },
    "settings": {
        "editor.guides.bracketPairs": true,
        "editor.stickyScroll.enabled": true,
        "editor.stickyScroll.maxLineCount": 5,
        "workbench.colorCustomizations": {
            "editorStickyScroll.background": "#00708D",
            "editorStickyScrollHover.background": "#59A2B5"
        },
        "editor.formatOnSave": true,
        "[go]": {
            "editor.formatOnSave": true,
            "editor.defaultFormatter": "golang.go"
        },
        "go.formatTool": "gofmt"
    },
    "extensions": [
        "golang.go",
        "GitHub.vscode-pull-request-github",
        "GitHub.copilot"
    ]
}
5.2 Dockerfile のサンプル
devcontainer や Codespaces の Docker コンテナを構築する際に使用する Dockerfile です。
ARG VARIANT="jammy"
FROM mcr.microsoft.com/vscode/devcontainers/base:1-${VARIANT}
5.3 .devcontainer/docker-compose.yml のサンプル
devcontainer や Codespaces のコンテナを構築・実行するための docker-compose ファイルです。このファイルでは、開発環境に必要なサービスや環境変数、ボリュームの設定を行っています。
コンテナ内から MySQL や LocalStack にアクセスする場合、localhostではなく、mysqlやlocalstackというホスト名でアクセスする必要があります。そのため、MYSQL_HOSTやLOCALSTACK_HOSTのように、ホスト名を環境変数として設定しています。
version: "3"
services:
    devcontainer:
        build:
            context: .
            dockerfile: .devcontainer/Dockerfile
        environment:
            TZ: Asia/Tokyo
            MYSQL_USER: developer
            MYSQL_PASSWORD: password
            MYSQL_HOST: mysql:3306
            # localstack
            LOCALSTACK_HOST: localstack:4566
            DEFAULT_REGION: ap-northeast-1
            AWS_ACCOUNT_ID: "000000000000"
            AWS_ACCESS_KEY_ID: dummy-access-key
            AWS_SECRET_ACCESS_KEY: dummy-secret-key
        volumes:
            - ..:/workspaces:cached
        command: /bin/sh -c "while sleep 1000; do :; done"
5.4 docker-compose.yml のサンプル
こちらは一般的なアプリケーション開発で利用されている docker-compose.yml のサンプルです。
このファイルでは、MySQL[6]やlocalstack[7]などのアプリケーションに必要なサービスや環境変数、ボリュームの設定を行っています。これにより、アプリケーションを構成するコンテナを一括で構築・実行することができます。
version: "3"

services:
    app:
        build:
            context: .
            dockerfile: Dockerfile
        volumes:
            - .:/workspace
        ports:
            - "3000:3000"
    mysql:
        container_name: mysql
        build: ./docker/mysql
        environment:
            MYSQL_DATABASE: sample
            MYSQL_USER: developer
            MYSQL_PASSWORD: password
            MYSQL_ROOT_PASSWORD: password
        volumes:
            - ./docker/mysql/sql:/docker-entrypoint-initdb.d
        ports:
            - 3320:3306
    localstack:
        image: localstack/localstack:latest
        environment:
            - HOSTNAME=localstack
            - SERVICES=s3
            - DEFAULT_REGION=ap-northeast-1
            - DATA_DIR=/tmp/localstack/data
        volumes:
            - "${LOCALSTACK_VOLUME_DIR:-./volume}:/var/lib/localstack"
            - "/var/run/docker.sock:/var/run/docker.sock"
        ports:
            - 4777:4566
6. VSCode、JetBrains IDE から利用
Codespaces は、Web ブラウザから利用できますが、VSCode、 JetBrains IDE からも利用できます。ここでは、それぞれの利用方法を紹介します。
6.1 VSCode で Codespaces を起動する
-
「VSCode GitHub Codespaces」拡張機能をインストールする
VSCode で Codespaces を利用するためには、「VSCode GitHub Codespaces」拡張機能をインストールする必要があります。
拡張機能パネルを開くために、左側のアクティビティバーから拡張機能アイコンをクリックし、検索ボックスに「GitHub CodeSpaces」と入力します。検索結果に表示される「GitHub CodeSpaces」拡張機能をインストールします。
または、こちらからインストールすることもできます。 -
GitHub にログインする
VSCode で「GitHub CodeSpaces」拡張機能を起動し、GitHub アカウントでサインインします。
6.2 JetBrains IDE で Codespaces を起動する
-
JetBrains Gateway をインストールする
JetBrains Gateway は、JetBrains 製の IDE(IntelliJ IDEA、WebStorm、PyCharm など)で GitHub CodeSpaces を利用するためのツールです。[8] JetBrains Gateway で CodeSpaces を起動する手順は以下のとおりです。
なお、先程の例に示したように、JetBrains Gateway で CodeSpaces を利用するためには、.devcontainer.jsonに以下の設定を追加する必要があります。{ "features": { "ghcr.io/devcontainers/features/sshd:1": { "version": "latest" } } }
JetBrains Gateway のインストールページにアクセスし、インストーラをダウンロードしてインストールします。
または、JetBrains Toolbox からインストールすることもできます。
-
GitHub CLI をインストールする
JetBrains Gateway は、GitHub CLI を利用して GitHub にログインします。
GitHub CLI をインストールするには、こちらの手順に従ってください。
Windows を利用している場合は、こちらのインストーラを利用することもできます。 -
GitHub にログインする
JetBrains Gateway を起動し、 GitHub Codespace をインストールします。
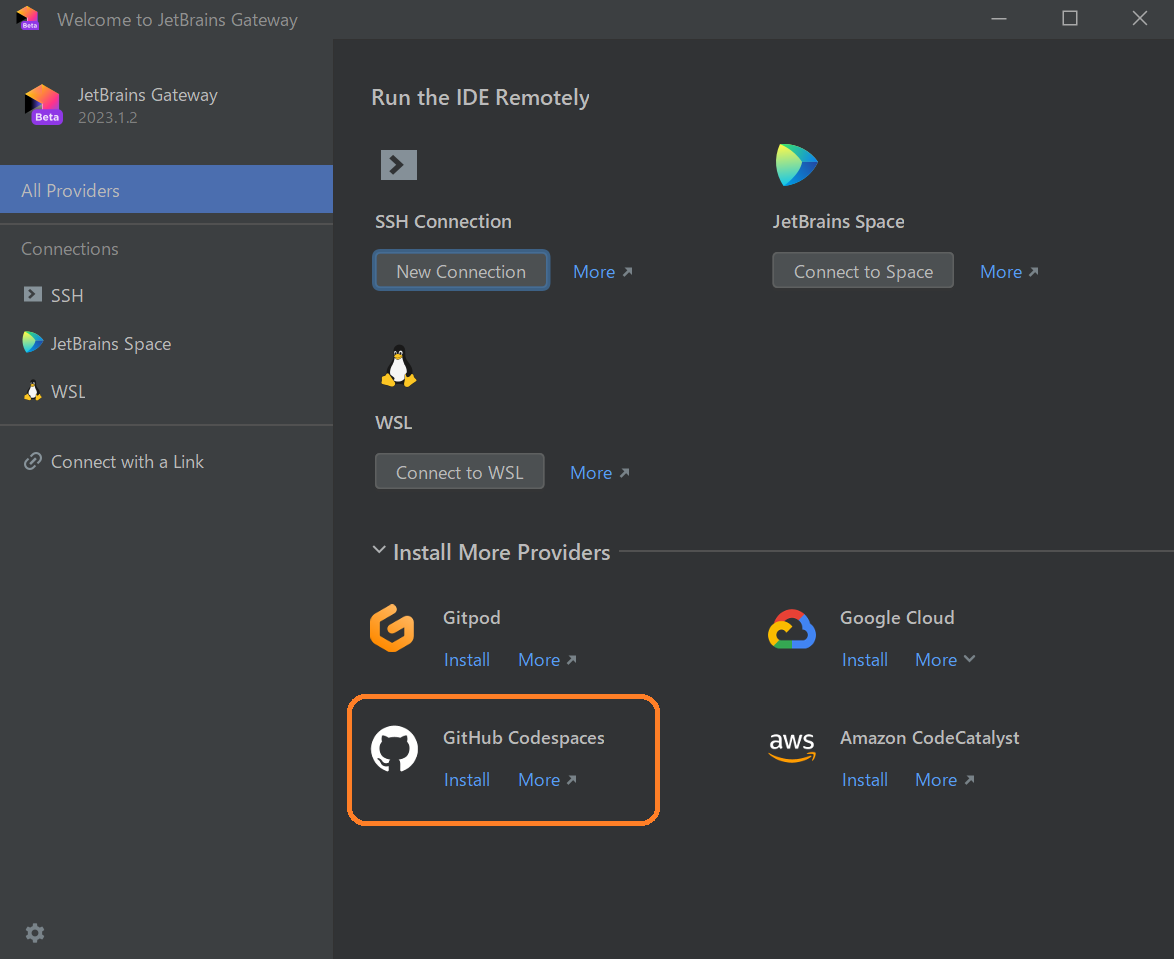
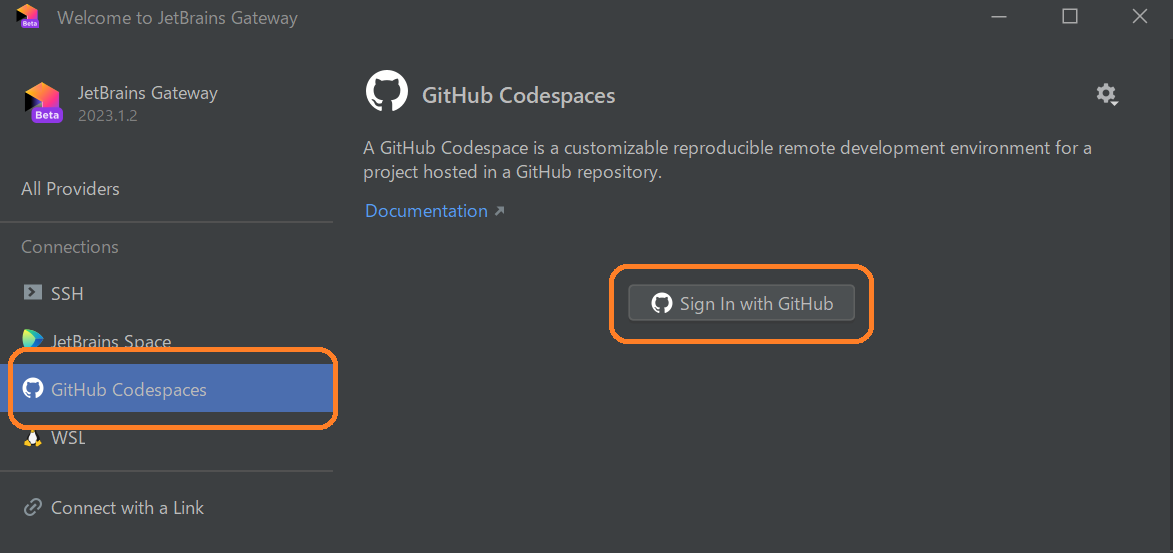
次に、メニューの GitHub Codespaces > Sign in to GitHub をクリックし、 GitHub にログインします。
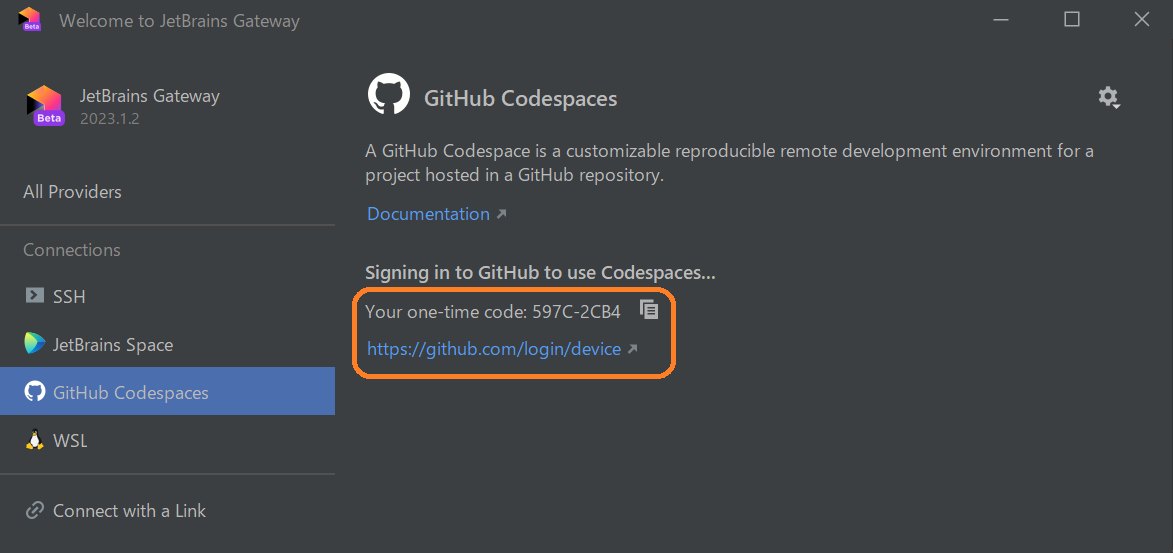
ワンタイムコードと認証ページへのリンクが表示されます。リンクをクリックし、GitHub にログインします。
ワンタイムコードを入力し、[Continue] ボタンをクリックします。
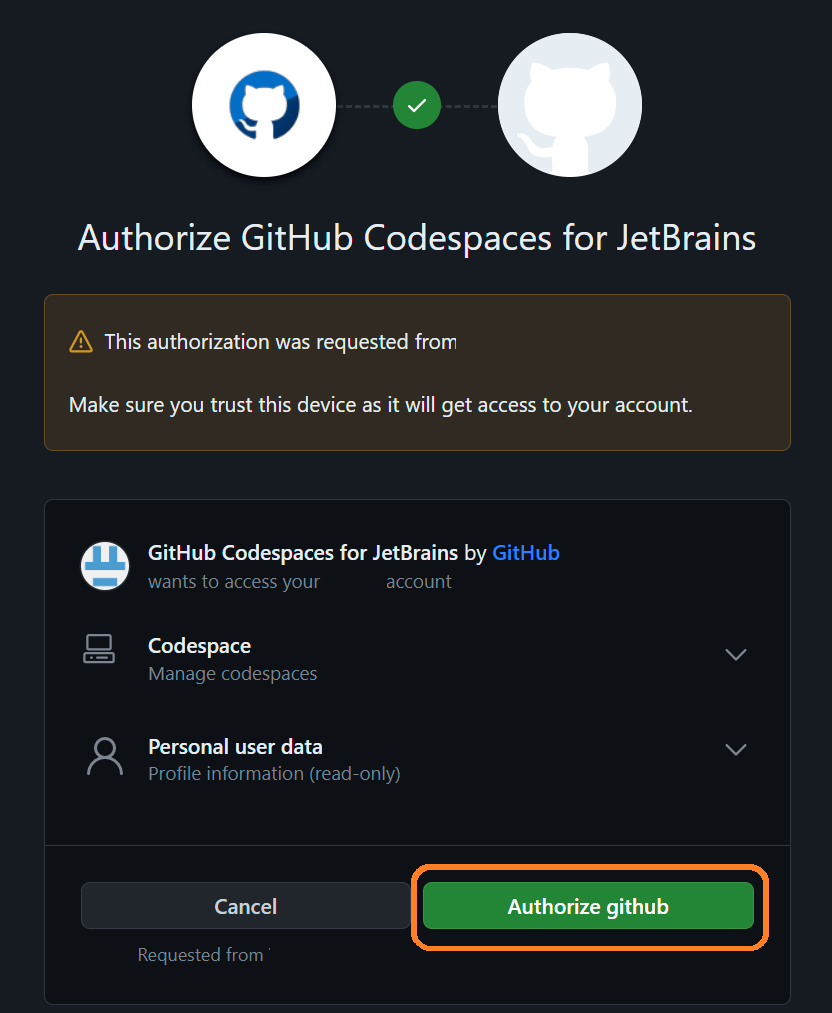
次に、 [Authorize github] ボタンをクリックします。
- CodeSpaces を起動する
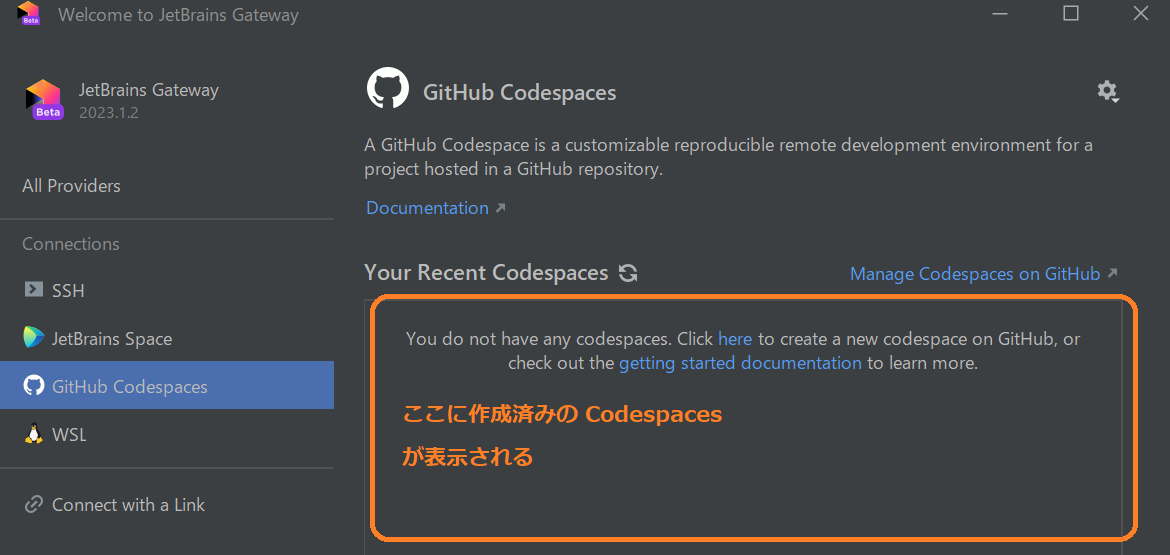
Your Recent Codespaces から起動したい Codespace を選択し、[Open] ボタンをクリックします。
もし、 Codespaces を作成していない場合は Click here から Codespaces の作成画面を開くことができます。
7. 導入してみて感じたメリット・デメリット
7.1 メリット
- 開発環境がどこからでもアクセス可能:物理的な場所に縛られずに開発作業が可能
- チーム内での環境構築が容易:環境設定を共有することで、新たなメンバーのセットアップが迅速かつ簡単
- devcontainer と設定を共有できる:開発環境の一貫性が保証される
- 新しいデバイスでのセットアップが迅速:ハードウェアの変更がプロジェクトの進行を妨げない
- 複数の開発ツールで利用可能:Visual Studio Code, Visual Studio Code for the Web, JetBrains IDE, JupyterLab(Dev Container では VS Code に限定されていた)
7.2 デメリット
- 費用がかかる場合がある:利用時間やリソースに応じて、費用が発生する可能性がある[9][10]
- JetBrains Gateway はまだ Beta で不安定な場合がある:この機能がまだ開発段階にあるため、一部の機能が期待通りに動作しない可能性がある
- インターネット接続が必須:オフラインでの作業ができない
- クラウド上で実行されるため、パフォーマンスやセキュリティへの懸念がある場合もある:ネットワーク遅延やデータ保護などの問題が生じる可能性がある
- リポジトリ管理されていないファイルや MySQL などに投入したデータは Codespaces が削除されると消えてしまう:永続的なデータストレージが必要な場合は、適切なバックアップ戦略が必要
8. さいごに
いかがでしたでしょうか。参考になれば幸いです。
設定ファイルのサンプルは、実際に開発で利用しているものから抜粋したもので、各メンバーがそれぞれローカル環境、Dev Container、Codespaces でシームレスに開発をおこなっています。
さらに、VS Code のCode Tour拡張機能と組み合わせて、新規メンバーのオンボーディングや、ワークショップ形式の勉強会にも活用しています。
ワークショップでは、環境構築手順の手間を省いてすぐに本題の作業に取り組むことが出来るので、Codespaces の利便性を大いに感じています。
また、Google Cloud からも Cloud Workstations [11] がリリースされました。興味がありましたらぜひ触ってみてください。
GitHub Codespaces は、クラウドベースの開発環境を手軽に構築するための強力なツールです。Dev Container を利用することで、チーム全体での環境構築を効率化することができます。GitHub Codespaces を利用することで、さらに手軽に開発環境の構築を行うことができ、チームの生産性の向上につながります。ぜひ、GitHub Codespaces を活用してみてください。
共通サービス開発グループメンバーによる投稿 1
[ グローバル展開も視野に入れた決済プラットフォームにドメイン駆動設計(DDD)を取り入れた ] ↩︎共通サービス開発グループメンバーによる投稿 2
[入社 1 年未満メンバーだけのチームによる新システム開発をリモートモブプログラミングで成功させた話] ↩︎共通サービス開発グループメンバーによる投稿 3
[JIRA と GitHub Actions を活用した複数環境へのデプロイトレーサビリティ向上の取り組み] ↩︎前回の記事
[ VSCode Dev Container を使った開発環境構築 ] ↩︎devcontainers/features sshdについて
[ devcontainers/features sshd ] ↩︎docker-composeでの MySQL 設定方法
[ MySQL と Docker Compose を使ってマルチコンテナー アプリを作成する ] ↩︎docker-composeでのlocalstack設定方法
[ GitHub localstack ] ↩︎JetBrains IDE でのリモート開
[ JetBrains IDE でのリモート開発 ] ↩︎GitHub Codespaces の請求について
[ GitHub Codespaces の請求について ] ↩︎Default idle timeoutの設定を短くすることで、無駄なコストを抑えることができます。
[ Codespaces の設定 ] ↩︎Google Cloud - Cloud Workstations
[ Cloud Workstations ] ↩︎
関連記事 | Related Posts
![Cover Image for [続!Dev Container] GitHub Codespacesでクラウド開発環境を構築](/assets/blog/authors/torii/codespaces/codespaces_banner.webp)
[続!Dev Container] GitHub Codespacesでクラウド開発環境を構築
Creating a Development Environment Using VS Code's Dev Container

VSCode Dev Containerを使った開発環境構築
Guide to Building an S3 Local Development Environment Using MinIO (AWS SDK for Java 2.x) with Docker Compose and Health Checks
Quick Start Spring Batch with Spring Boot 3

Debugging my React project with VS Code
We are hiring!
【クラウドエンジニア】Cloud Infrastructure G/東京・大阪・福岡
KINTO Tech BlogWantedlyストーリーCloud InfrastructureグループについてAWSを主としたクラウドインフラの設計、構築、運用を主に担当しています。
【クラウドエンジニア(クラウド活用の推進)】Cloud Infrastructure G/東京・名古屋・大阪・福岡
KINTO Tech BlogCloud InfrastructureグループについてAWSを主としたクラウドインフラの設計、構築、運用を主に担当しています。

![[Mirror]不確実な事業環境を突破した、成長企業6社独自のエンジニアリング](/assets/banners/thumb1.png)

