StrapiにカスタムAPIを実装する

はじめに
こんにちは、KINTO FACTORY のフロントエンド開発を担当しているきーゆのです。
KINTO FACTORY では、専用のマガジンページを立ち上げるべくヘッドレス CMS の 1 つStrapiを利用することになりました。
※この辺りの詳細については、別途記事が投稿されるので楽しみにしていてください!
今回は Strapi 導入時に対応することになった「Strapi にカスタム API を追加する方法」について解説したいと思います。
本記事では、以下の 2 パターンのカスタム API 実装について記載しています。
Web ページの管理効率化は永遠の課題ですので、本記事をきっかけにエンジニアの血涙が少しでも減らせたらと願うばかりです。
環境情報
Strapi version : Strapi 4
node version   : v20.11.0
新規のカスタム API を実装する
本項では新規のカスタム API を実装する方法を紹介します。SQL レベルで実装ができるためカスタマイズ性は高いですが、やり過ぎるとメンテが大変なのでご利用は計画的に。
1. router を作成する
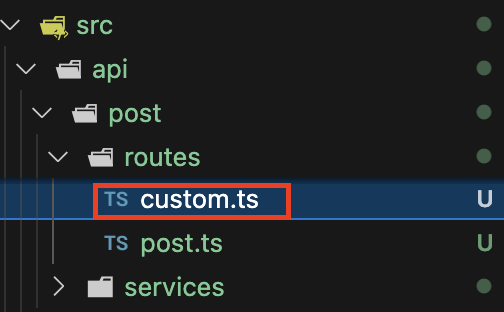
最初に作成する API のエンドポイントに合わせて routes を追加します。
src/api配下に任意の collectionType ごとのディレクトリ(下図ではpost)があり、その下にroutesディレクトリがあります。routes 配下に custom-route 定義用のファイルを作成してください。
※公式によると、必要なファイルを用意してくれるnpx strapi generateコマンドがあるみたいです(私は使ってない)
作成したファイルに、以下のようなコードを記述します。
export default {
  routes: [
    {
      method: "GET", // HTTPメソッドを指します。用途に合わせて適宜変更してください。
      path: "/posts/customapi/:value", // 実装するAPIのエンドポイントです。
      handler: "post.customapi", // このrouteが参照するcontrollerを指定します。
    }
};
method
HTTP メソッドを指定します。作成する API に合わせて、適宜変更してください。
path
実装するカスタム API のエンドポイントを指定します。
サンプルのエンドポイントの/:valueは末尾の値を value 変数として受け取ることを示しています。
Ex)/posts/customapi/1や/posts/customapi/2で叩かれた場合、value にはそれぞれ 1,2 が格納されます。
handler
実装するカスタム API が参照する controller(後述)を指定します。
参照したい controller の function 名を指定してください。
2. controller を実装する
1 で実装した routes が参照する controller を実装します。
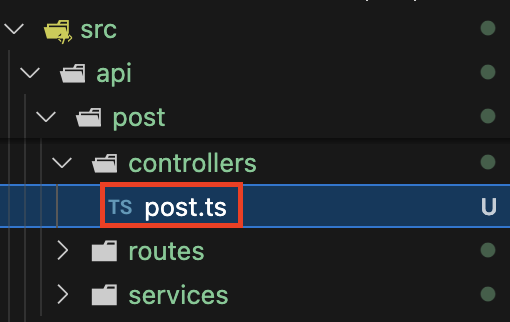
routesディレクトリと同階層のcontrollersディレクトリ内のpost.tsを開きます。
以下のような形で、デフォルトの controller (CoreController) に、前項の routes で指定した handler(customapi)を追加します。
変更前(初期状態)
import { factories } from '@strapi/strapi';

export default factories.createCoreController('api::post.post');
変更後
import { factories } from "@strapi/strapi";

export default factories.createCoreController("api::post.post", ({ strapi }) => ({
  async customapi(ctx) {
    try {
      await this.validateQuery(ctx);
      const entity = await strapi.service("api::post.post").customapi(ctx);
      const sanitizedEntity = await this.sanitizeOutput(entity, ctx);
      return this.transformResponse(sanitizedEntity);
    } catch (err) {
      ctx.body = err;
    }
  },
}));
変更内容
- デフォルト controller にカスタム handler
customapi()を追加 - 8 行目にて
customapi()のビジネスロジックが格納された servicecustomapi()の実行結果を取得
validateQuery(), sanitizeOutput(), transformResponse()の詳細は触れないので、気になる方は Strapi の公式ドキュメントを参照ください。
3. service を実装する
2 で実装した controller が参照する service を実装します。
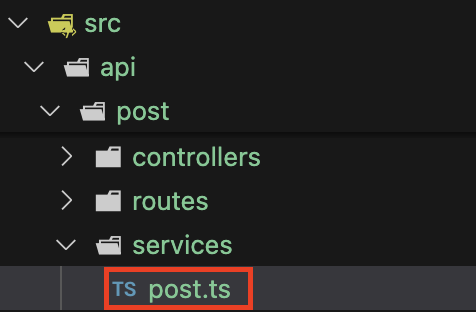
controllersディレクトリと同階層のservicesディレクトリ内のpost.tsを開きます。
以下のような形で、デフォルトの service (CoreService) に、前項の controller で指定した method (customapi) を追加します。
変更前(初期状態)
import { factories } from '@strapi/strapi';

export default factories.createCoreService('api::post.post');
変更後
import { factories } from "@strapi/strapi";

export default factories.createCoreService("api::post.post", ({ strapi }) => ({
  async customapi(ctx) {
    try {
      const queryParameter: { storeCode: string[]; userName: string } = ctx.query;
      const { parameterValue } = ctx.params;
      const sql = "/** 利用するDB、目的に合わせたSQL */";
      const [allEntries] = await strapi.db.connection.raw(sql);
      return allEntries;
    } catch (err) {
      return err;
    }
  },
}));
変更内容
- デフォルト service にカスタム service
customapi()を追加 - 6 行目にてクエリパラメータの情報を取得
- 7 行目にてエンドポイントのパラメータ情報を取得
- 10 行目にて SQL 実行結果を取得
4. 動作確認
以上で新規のカスタム API の実装は完了です。
実際に API を叩いてみて、想定通りの挙動になっているか確認してください。
デフォルトの API をオーバーライドする
本項では、デフォルトで作成されるエントリ詳細取得 API を、オーバーライドにより任意のパラメータで取得できるようにした例を紹介します。
【エントリ詳細取得 API】
- [オーバーライド前]
GET /{collectionType}/:postId(number) - [オーバーライド後]
GET /{collectionType}/:contentId(string)
1. router を作成する
新規のカスタム API 実装時と基本的に同じになります。
routes 配下に作成した custom.ts に以下のコードを追記します。
export default {
  routes: [
    {
      method: "GET",
      path: "/posts/:contentId",
      handler: "post.findOne",
    }
};
この route 追加により、/posts/:postId(number)でエントリ詳細を取得していたエンドポイントが/posts/:contentId(string)でエントリ詳細を取得するようになります(/posts/:postId(number)経由ではエントリ詳細が取得できなくなります)。
2. controller を実装する
controller の実装も新規のカスタム API 実装時と基本的に同じになります。
routesディレクトリと同階層のcontrollersディレクトリ内のpost.tsを以下のように変更します。
変更前(初期状態)
import { factories } from '@strapi/strapi';

export default factories.createCoreController('api::post.post');
変更後
import { factories } from "@strapi/strapi";
import getPopulateQueryValue from "../../utils/getPopulateQueryValue";

export default factories.createCoreController("api::post.post", ({ strapi }) => ({
  async findOne(ctx) {
    await this.validateQuery(ctx);
    const { contentId } = ctx.params;
    const { populate } = ctx.query;
    const entity = await strapi.query("api::post.post").findOne({
      where: { contentID: contentId },
      ...(populate && {
        populate: getPopulateQueryValue(populate),
      }),
    });
    const sanitizedEntity = await this.sanitizeOutput(entity, ctx);
    return this.transformResponse(sanitizedEntity);
  },
}));
変更内容
- デフォルト controller にカスタム controller
findOne()を追加 - 12 行目にて
contentIDカラムがcontentIdに一致するレコードを抽出- 11 行目にて
.findOne()を利用しているため、取得結果は 1 つのオブジェクトになる
- 11 行目にて
本項では、ビジネスロジックを service ではなく controller に実装しています。
3. 動作確認
以上でデフォルト提供している API をオーバーライドする実装は完了です。
実際に API を叩いてみて、想定通りの挙動になっているか確認してください。
まとめ
これにて Strapi でのカスタム API 実装の解説は以上になります。
Strapi はカスタマイズ性が高く良いツールだと思います。
そのため今後もナレッジをシェアできればと思いますし、皆様のナレッジもぜひシェアしていただけると嬉しいです。
まだ他にも、
- Strapi の記事公開時に自動でアプリケーションをビルドする
- CKEditor に動画(.mp4)を埋め込めるようにする
といったネタがありますが、また別の機会に。
読んでいただき、ありがとうございました。
関連記事 | Related Posts


We are hiring!
【フルスタックエンジニア】FACTORY 業務支援G/東京
募集背景TOYOTA UPGRADE FACTORY / LEXUS UPGRADE FACTORY を扱う、約230社4,100店舗のトヨタ販売店向けの新しい業務システムをスクラッチで開発するプロジェクトが進行しています。リリース後も継続的な改善・運用が見込まれるため、開発フェーズから安定稼働まで一貫して支え、複数プロジェクトを並行推進できる体制強化が急務です。
シニア/フロントエンドエンジニア(React/Typescript)/KINTO中古車開発G/東京・大阪・福岡
KINTO開発部KINTO中古車開発グループについて◉KINTO開発部 :66名 KINTO中古車開発G:9名★ KINTOプロダクトマネジメントG:3名 KINTOバックエンド開発G:16名 契約管理開発G :9名 KINTO開発推進G:8名 KINTOフロントエンド開発G...
イベント情報
![[Mirror]不確実な事業環境を突破した、成長企業6社独自のエンジニアリング](/assets/banners/thumb1.png)