
7 min read
Development
Implementing a custom API in Strapi


This summary was generated by AI. Please refer to the article for accurate details.
Read the summary
We added custom APIs to Strapi to handle business logic that the default APIs couldn’t cover. This let us retrieve data from multiple content types and return results based on specific rules, like filtering or combining entries from different collections. To build a new custom API, we created a route that points to a controller function. We placed this in the routes folder under the post directory. The route defines a path like /posts/customapi/:value, where the value is passed as a parameter. We then added a customapi() function to the controller, which calls a service layer to run business logic. This service fetches query and endpoint parameters and runs a SQL query to get results. The final output is transformed and sanitized before returning to the user. We tested the API and confirmed it works—calling /posts/customapi/1 returns a result with the correct data. The service layer handles the SQL execution, and the controller manages the flow. This setup keeps business logic separate and reusable, improving maintainability and readability. For overriding the default API, we changed the entry detail endpoint from /posts/:postId to /posts/:contentId. We updated the route and controller to use a findOne() method that looks for entries where the contentID matches the input. This means posts can now be fetched by a custom ID instead of a post number. The controller applies population settings, so media like videos or images can still be included. After this change, the old endpoint no longer works—only the new one is available. Overall, we solved two key problems: adding custom data retrieval and replacing default IDs with custom ones. We used Strapi’s built-in routing, controllers, and services to build flexible, maintainable APIs. The result is a more powerful, tailored system with clear separation of concerns. We now have two working custom APIs, one new and one overridden, both tested and ready for use.
Introduction
Hello, I am Keyuno and I am part of the KINTO FACTORY front end development team.
As part of our KINTO FACTORY service, we are launching a dedicated magazine using Strapi, a headless content management system (CMS). *More details will be shared in an upcoming article, so please stay tuned!
In this article, I would like to explain how to add custom APIs to Strapi, which we implemented when introducing Strapi. This article covers the following two patterns of custom API implementation.
Optimizing web page management is a constant challenge. I hope this article helps ease the burden for engineers, even if just a bit.
Development Environment Details
Strapi version : Strapi 4
node version   : v20.11.0
Implementing a new custom API
This section shows how to implement a new custom API. While this approach offers high flexibility because it can be implemented at the SQL level, overdoing it can make maintenance difficult, so use it wisely.
1. Create a router
First, add the routes for the API endpoints you create.
Under src/api, there is a directory for each collectionType. In the figure below, the routes directory is under post. Create a file under routes for defining custom-route.
*According to the official documentation, there is a command npx strapi generat that prepares the necessary files (though I haven’t used it).
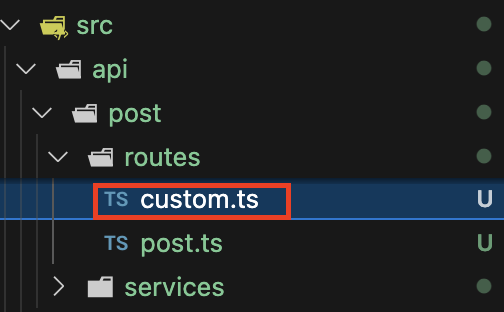
In the created file, write the following code:
export default {
  routes: [
    {
      method: "GET", // Refers to the HTTP method. Please modify as needed to suit your purposes.
      path: "/posts/customapi/:value", // These are the endpoints for the APIs you will implement.
      handler: "post.customapi", // Specify the controller that this route refers to.
    }
};
method
Specify the HTTP method. Please modify as needed to suit the API you are creating.
path
Specify the endpoint for the custom API you are implementing. The sample endpoint, /:value indicates that the trailing value is received as the value variable. For example, if /posts/customapi/1 and /posts/customapi/2 are called, the value will store 1 and 2 respectively.
handler
Specify the controller (explained later) that the custom API you are implementing refers to. Specify the name of the function in the controller that you want to reference.
2. Implement the controller
Implement the controller referenced by the routes implemented in step 1. Open the post.ts file located in the controllers directory , which is in the same level as the routes directory.
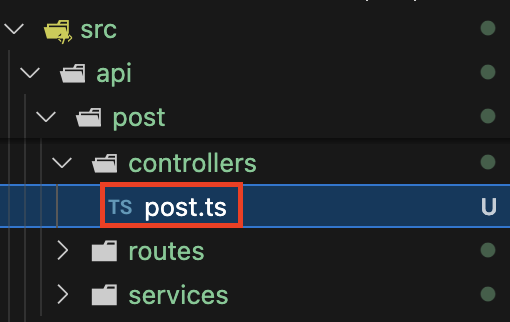
In this file, add the handler ( customapi ) specified in the previous routes to the default controller (CoreController) as follows:
Before change (initial state)
import { factories } from '@strapi/strapi';

export default factories.createCoreController('api::post.post');
After change
import { factories } from "@strapi/strapi";

export default factories.createCoreController("api::post.post", ({ strapi }) => ({
  async customapi(ctx) {
    try {
      await this.validateQuery(ctx);
      const entity = await strapi.service("api::post.post").customapi(ctx);
      const sanitizedEntity = await this.sanitizeOutput(entity, ctx);
      return this.transformResponse(sanitizedEntity);
    } catch (err) {
      ctx.body = err;
    }
  },
}));
What’s changed
- Added a custom handler
customapi()to the default controller - Retrieved the result of executing the
customapi ()service that contains the business logiccustomapi(), as referenced in line 8.
For details on validateQuery(), sanitizeOutput(), transformResponse() , please refer to Strapi’s official documentation .
3. Implement the service
Implement the service referenced by the controller implemented in step 2. Open the post.ts in the services directory , which is at the same level as the controllers directory.
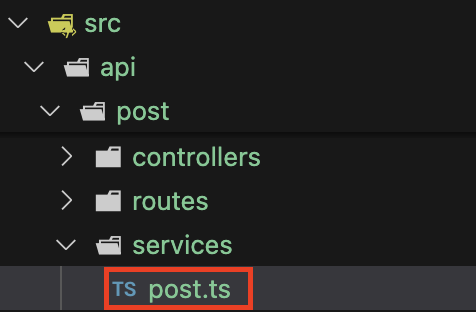
Add the method (customapi) specified in the previous controller to the default service (CoreService) as shown below.
Before change (initial state)
import { factories } from '@strapi/strapi';

export default factories.createCoreService('api::post.post');
After change
import { factories } from "@strapi/strapi";

export default factories.createCoreService("api::post.post", ({ strapi }) => ({
  async customapi(ctx) {
    try {
      const queryParameter: { storeCode: string[]; userName: string } = ctx.query;
      const { parameterValue } = ctx.params;
      const sql = "/** Database to use, SQL according to purpose */";
      const [allEntries] = await strapi.db.connection.raw(sql);
      return allEntries;
    } catch (err) {
      return err;
    }
  },
}));
What’s changed
- Add the custom service
customapi()to the default service - Line 6: Retrieve the query parameter information
- Line 7: Obtain endpoint parameter information
- Line 10: Get the SQL execution results
4. Confirm operation
With this, the implementation of the new custom API is complete. Please actually try calling the API and check that it works as expected.
Overriding the default API
In this section, I will show an example of how to override the default entry detail retrieval API to allow fetching with a custom parameter.
[Entry detail retrieval API]
- [Before override]
GET /{collectionType}/:postId(number) - [After override]
GET /{collectionType}/:contentId(string)
1. Create a router
It is basically the same as when implementing a new custom API. Add the following code to the custom.ts under the routes directory:
export default {
  routes: [
    {
      method: "GET",
      path: "/posts/:contentId",
      handler: "post.findOne",
    }
};
With this route addition, the endpoint that previously retrieved entry details using /posts/:postId(number) will now retrieve entry details using /posts/:contentId(string) (entry details can no longer be retrieved using /posts/:postId(number)).
2. Implement the controller
The implementation of the controller is basically the same as when implementing a new custom API. Modify the post.ts in the controllers directory, which is at the same level as the routes directory, as follows:
Before change (initial state)
import { factories } from '@strapi/strapi';

export default factories.createCoreController('api::post.post');
After change
import { factories } from "@strapi/strapi";
import getPopulateQueryValue from "../../utils/getPopulateQueryValue";

export default factories.createCoreController("api::post.post", ({ strapi }) => ({
  async findOne(ctx) {
    await this.validateQuery(ctx);
    const { contentId } = ctx.params;
    const { populate } = ctx.query;
    const entity = await strapi.query("api::post.post").findOne({
      where: { contentID: contentId },
      ...(populate && {
        populate: getPopulateQueryValue(populate),
      }),
    });
    const sanitizedEntity = await this.sanitizeOutput(entity, ctx);
    return this.transformResponse(sanitizedEntity);
  },
}));
What’s changed
- Added a custom
findOne()controller to the default controller - In line 12, it extracts records where the
contentIDcolumn matchescontentId.- Since
.findOne()is used in line 11, the result will be a single object.
- Since
In this section, the business logic is implemented in the controller rather than the service.
3. Confirm operation
With this, the implementation to override the default API is complete. Please actually try calling the API and check that it works as expected.
Conclusion
This concludes the explanation of implementing custom API in Strapi.
I think Strapi is a highly customizable and great tool. Therefore, I hope to continue sharing my knowledge, and I would be happy if you could share your insights as well.
We also have other topics, such as:
- Automatically building applications when publishing Strapi articles.
- Embedding videos (e.g., mp4) in CKEditor.
I will cover these topics in future articles.
Thank you for reading.

関連記事 | Related Posts






We are hiring!
【バックエンドエンジニア】my route開発G/東京
my routeについてmy routeの概要 my routeは、移動需要を創出するために「魅力ある地域情報の発信」、「最適な移動手段の提案」、「交通機関や施設利用のスムーズな予約・決済」をワンストップで提供する、スマートフォン向けマルチモーダルモビリティサービスです。
生成AI・AIエージェントの業務実装(FDE/Deployment Strategist)/AIファーストG/東京・名古屋・大阪・福岡
概要トヨタグループの業務現場に入り込み、生成AI・AIエージェントを「使われ続ける状態」まで届ける仕事です。こうした働き方は近年、Forward Deployed Engineer(FDE)やDeployment Strategist(DS)と呼ばれる動き方に近いポジションで、案件の上流の課題定義から、プロトタイプ構築、経営層への提言までを担います。
Follow Us



KINTOテクノロジーズの最新情報をSNSで発信中!イベント・テックブログ更新情報もお届けします。