Flutter開発: CustomPaintとPathでQRコードの枠線をデザインする
この記事は KINTOテクノロジーズアドベントカレンダー2024 の3日目の記事です🎅🎄
KINTOテクノロジーズ(以下KTC)でFlutterアプリケーション開発を担当しているSomiです。
Flutterは、プラットフォームに依存せず多様なUIを構築できる魅力的なフレームワークです。特に、CustomPaintは基本ウィジェットだけでは実現が難しい繊細なデザインを簡単に表現できます。
最近、QRコード認識画面を実装する際に、認識エリアの枠線を作成する課題がありました。既存のライブラリを使用しようとしましたが、希望する曲線デザインを実現するには限界がありました。そのため、CustomPaintとPathを活用して直接枠線を描き、課題を解決しました。
この記事では、CustomPaintとPathを使ってQRコード認識画面の枠線をどのように完成させたのか、その手順を詳しく説明します。
枠線デザインの目標
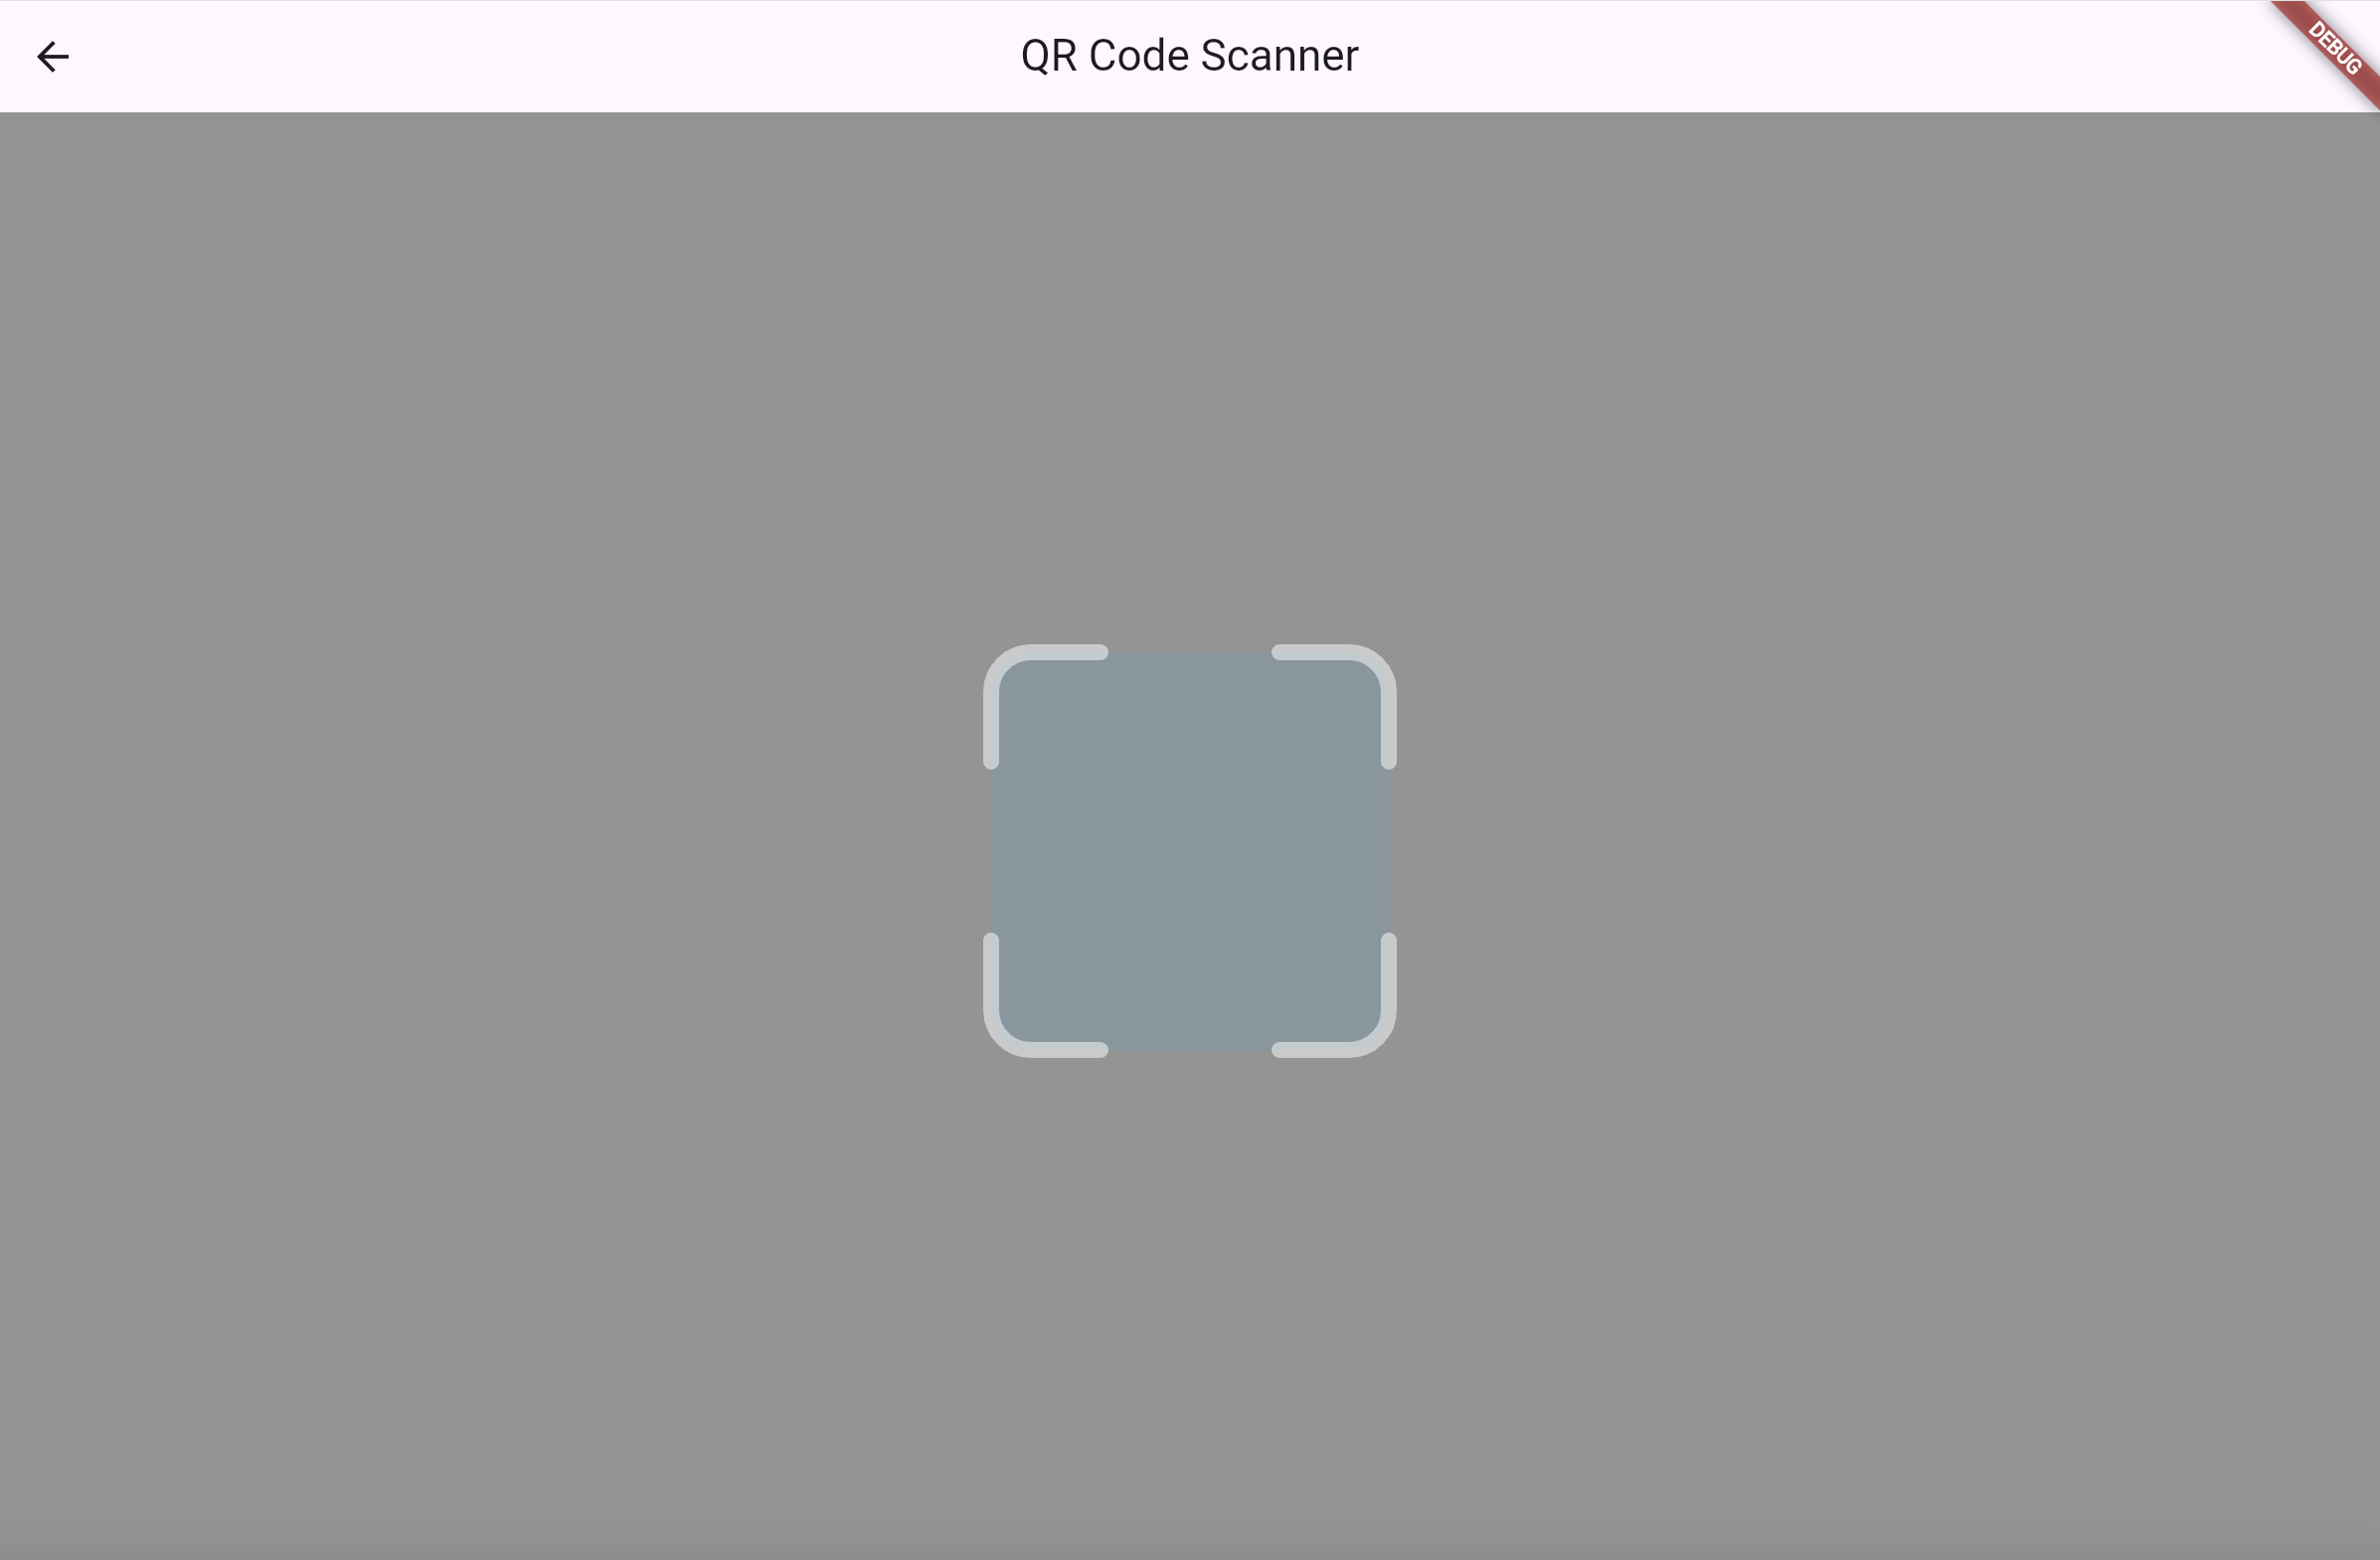
今回実装した枠線は、QRコード認識エリアの四隅を囲む曲線状の半透明な白い枠線です。CustomPainterクラスを活用し、Canvas上にPathで経路を定義し、曲線と直線を組み合わせて枠線を描きました。
CustomPainterを使用した枠線描画の準備
まず、枠線を描画するためのクラスである _OverlayPainter を定義します。このクラスはCustomPainterを拡張し、Canvasに枠線を描画する役割を担います。
以下は、既に定義された _OverlayPainter を用いて枠線を描画するサンプルコードです。この後、コードの具体的な実装内容について詳しく解説します。
class QrScanPageContent extends StatelessWidget {
const QrScanPageContent({super.key});
Widget build(BuildContext context) {
return Scaffold(
appBar: AppBar(
title: const Text("QR Code Scanner"), // 画面タイトル
),
body: CustomPaint(
size: Size.infinite, // 画面全体のサイズに合わせて描画
painter: _OverlayPainter(
squareSize: 200.0, // 枠線エリアのサイズ
borderRadius: 20.0, // 枠線の角の丸み
borderThickness: 8.0, // 枠線の太さ
),
),
);
}
}
背景と認識エリアの設定
先ほどお話しした _OverlayPainter を具体的に作成します。まず、背景色と QR コード認識領域を描画します。背景は drawRect メソッドを使用して半透明の長方形として描画し、QR コード認識領域は drawRRect メソッドを使用して角丸の長方形として描画します。また、それぞれの描画には Paint クラスでスタイル(色や透明度)を設定しています。次のセクションでは、本格的に枠線を描画する方法を解説します。
class _OverlayPainter extends CustomPainter {
final double squareSize;
final double borderRadius;
final double borderThickness;
_OverlayPainter({
required this.squareSize,
required this.borderRadius,
required this.borderThickness,
});
void paint(Canvas canvas, Size size) {
final centerX = size.width / 2;
final centerY = size.height / 2;
// 背景を描画
final backgroundPaint = Paint()..color = Colors.grey.withOpacity(0.5);
canvas.drawRect(
Rect.fromLTWH(0, 0, size.width, size.height), backgroundPaint);
// 認識エリアを描画
final rect = RRect.fromRectAndRadius(
Rect.fromCenter(
center: Offset(centerX, centerY),
width: squareSize,
height: squareSize,
),
Radius.circular(borderRadius),
);
final innerPaint = Paint()..color = Colors.lightBlue.withOpacity(0.1);
canvas.drawRRect(rect, innerPaint);
//ここで枠のスタイルおよび枠を描きます。
}
bool shouldRepaint(covariant CustomPainter oldDelegate) => false;
}
shouldRepaintメソッドは、このCustomPainterが再描画を必要とするかどうかを判断します。今回の例では、背景の色や認識エリアのサイズが固定されているため、再描画の必要がありません。そのため、このメソッドは常に false を返します。ただし、動的に描画する場合や、サイズや形状が変更される場合は、このメソッドを true にする必要があります。
枠線スタイルの設定
次に、枠線を描画する準備として、線のスタイルを設定します。枠線を描画する前に、Paintオブジェクトを使用してスタイルを定義します。Paintクラスは線の色、太さ、形状などを設定するためのツールを提供します。
ここでは、枠線を半透明の白色に設定し、線の形状を丸く定義します。枠線を半透明の白色に設定することで、視覚的に重要な認識エリアが一目で分かるようにしました。
final borderPaint = Paint()
  ..color = Colors.white.withOpacity(0.5) // 枠線の色と透明度を 設定
  ..style = PaintingStyle.stroke // 外枠スタイルを設定
  ..strokeWidth = borderThickness // 線の太さ
  ..strokeCap = StrokeCap.round; // 線の端を丸く設定
座標とサイズの計算
枠線を描画するために、まず各コーナーの座標とサイズを計算する必要があります。これにより、各コーナーの始点と終点を正確に定義できます。
以下は計算例です:
const double cornerLength = 55; // 各コーナーの長さ
double halfSquareSize = squareSize / 2; // 認識エリアの半分のサイズ
double left = centerX - halfSquareSize; // 左側の境界
double right = centerX + halfSquareSize; // 右側の境界
double top = centerY - halfSquareSize; // 上側の境界
double bottom = centerY + halfSquareSize; // 下側の境界
- 座標系: FlutterのCanvas座標系では、左上が(0, 0)です。そのため、上側は
centerY - halfSquareSizeで計算され、下側はcenterY + halfSquareSizeで定義されます。 - cornerLength: 各コーナーで直線を描く長さを定義します。
- halfSquareSize: QRコード認識エリアの半分のサイズを計算します。
- left, right, top, bottom: 中心座標を基準に認識エリアの境界座標を定義します。
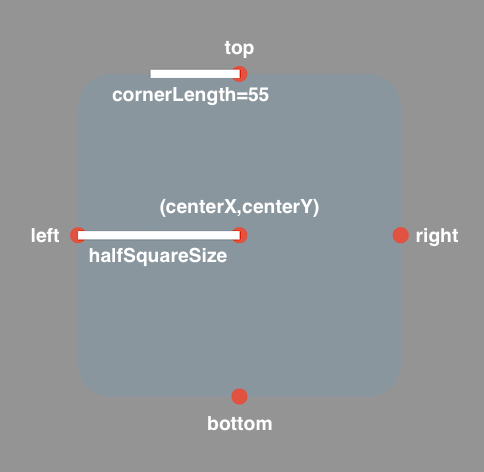
上記の式を図に表すと、以下のような位置関係になります。
枠線の描画
まず、左上コーナーから描き始めます。
左上コーナーを描くためにPathクラスを使用して経路を定義します。Pathは直線、曲線、弧などのさまざまな形状を指定し、それをCanvasに描画できる便利なクラスです。
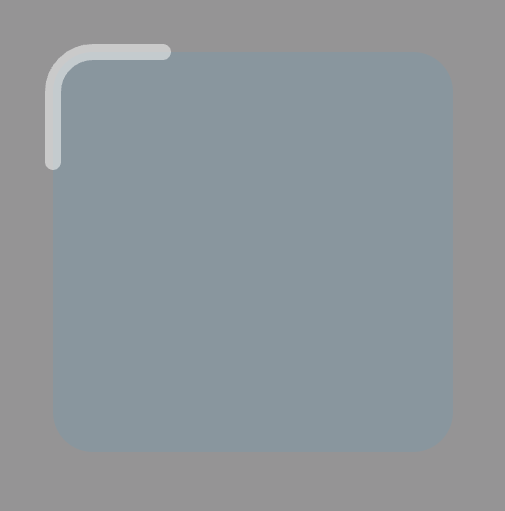
1. 右から左に直線を描く
始点をコーナーの上端に移動し、左方向に直線を描きます。
Path topLeftPath = Path(); // 新しい経路を定義
topLeftPath.moveTo(left + cornerLength, top);
topLeftPath.lineTo(left + borderRadius, top);
上記のコードで、以下のような直線が描画されます。

2. コーナーの曲線を描く
直線の終点から曲線を追加します。このとき、arcToPointメソッドを使用して、始点から指定された終点まで曲線を描きます。
これにより、直線から曲線への自然な接続を作成できます。以下のコードでは、Offsetで曲線の終点を、Radiusで曲線の半径を設定し、QRコードエリアの丸みを帯びたコーナーを実現します。
topLeftPath.arcToPoint(
  Offset(left, top + borderRadius), // 曲線の終点
  radius: Radius.circular(borderRadius), // 曲線の半径
  clockwise: false, // 反時計回りに曲線を描く
);
上記のコードで、以下のように角が丸くなった曲線が描画されます。

3. 縦方向の直線を描く
曲線の終点から下方向に直線を追加します。
topLeftPath.lineTo(left, top + cornerLength);
上記のコードで、以下のように縦方向の直線が追加されます。
4. 経路をCanvasに描く
Pathで定義した経路を、borderPaintを使ってCanvasに描画します。
canvas.drawPath(topLeftPath, borderPaint);
残りのコーナーの処理
以下は、左上コーナーに続いて、残りの3つのコーナーを描画するコード例です:
// 左下コーナー
final bottomLeftPath = Path()
  ..moveTo(left + cornerLength, bottom)
  ..lineTo(left + borderRadius, bottom)
  ..arcToPoint(
    Offset(left, bottom - borderRadius),
    radius: Radius.circular(borderRadius),
    clockwise: true,
  )
  ..lineTo(left, bottom - cornerLength);
canvas.drawPath(bottomLeftPath, borderPaint);

// 右下コーナー
final bottomRightPath = Path()
  ..moveTo(right - cornerLength, bottom)
  ..lineTo(right - borderRadius, bottom)
  ..arcToPoint(
    Offset(right, bottom - borderRadius),
    radius: Radius.circular(borderRadius),
    clockwise: false,
  )
  ..lineTo(right, bottom - cornerLength);
canvas.drawPath(bottomRightPath, borderPaint);

// 右上コーナー
final topRightPath = Path()
  ..moveTo(right - cornerLength, top)
  ..lineTo(right - borderRadius, top)
  ..arcToPoint(
    Offset(right, top + borderRadius),
    radius: Radius.circular(borderRadius),
    clockwise: true,
  )
  ..lineTo(right, top + cornerLength);
canvas.drawPath(topRightPath, borderPaint);
まとめ
CustomPaintとPathクラスを活用することで、QRコードの枠線のような精密なデザインだけでなく、さらに複雑なUIデザインを実現できます。QRコード認識画面の枠線を自分で実装することで、Flutterの柔軟性と強力なCanvas機能を再確認できました。
なお、CustomPainterを使用する際には、描画ロジックが複雑になるほどパフォーマンスに影響を与える可能性があります。再描画の頻度が高い場合は処理を最適化するか、他の既存ウィジェットを活用することも検討してください。
この記事が、CustomPaintやPathを活用したUIデザインの実装に役立つ参考になれば幸いです。
関連記事 | Related Posts

Flutter開発: CustomPaintとPathでQRコードの枠線をデザインする
Jetpack Compose in myroute Android App

Integration of Flutter Apps with Native Features – Our Approach to Adding an Android-Specific Camera Analysis Library
myroute Android AppでのJetpack Compose
Are You Unit Testing with Flutter Web?

バックエンドエンジニアたちが複数のFlutterアプリを並行開発していく中で見つけたベストプラクティス
We are hiring!
シニアQAエンジニア(責任者候補)/Quality Engineering G/東京・大阪
「テストするQA」から「品質戦略を描くQA」へ。AIがコードを書くことが当たり前になりつつある今、品質保証のあり方そのものが問われています。
シニアQAエンジニア(スペシャリスト)/Quality Engineering G/東京・大阪
Quality Engineeringグループについて品質保証の専門組織として、複数プロダクトを横断的にカバーしています。事業会社・第三者検証会社出身など多様なバックグラウンドを持つメンバーが在籍し、各チームが連携しながらプロダクト品質の向上に取り組んでいます。