
3 min read
iOS
[SwiftUI] Define Your Own Style and Write Stylish Code

![[SwiftUI] Define Your Own Style and Write Stylish Code cover](/assets/blog/authors/ryomm/2024-12-11/thumbnail.png)
This article is part of day 11 of KINTO Technologies Advent Calendar 2024
Merry Christmas! ✌ I'm Ryomm, and I work on developing the My Route iOS app at KINTO Technologies. In this article, I will introduce custom styles.
Introduction
App Dev Tutorials were the reason I learned to create custom styles.
How stylish...!
Using custom styles significantly enhances the readability and sophistication of SwiftUI code...! "I want to write stylish code, too!"
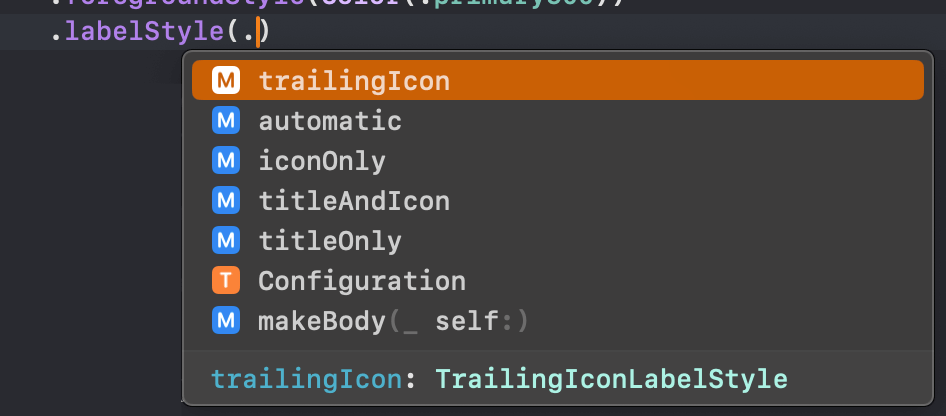
Initially, that was what inspired me to start using it, but now I recommend it because it’s genuinely convenient and makes the code much easier to read. What I particularly like is that you can search for options using dots in ~~Style() even if you don’t remember the specific structure names, as they are organized based on their purpose.
How to create a custom style
For example, if you want to create a custom style for a Label, create a structure that inherits LabelStyle and define the style in a protocol-compliant method (in this case makeBody(configuration:) ).
The values within the configuration object vary depending on what you're creating, so it's important to check each time. For LabelStyleConfiguration, it includes Text and Image views.
/// Character + Icon LabelStyle
struct TrailingIconLabelStyle: LabelStyle {
    func makeBody(configuration: Configuration) -> some View {
        HStack {
            configuration.title
            configuration.icon
        }
    }
}
You can also extend LabelStyle to add your custom style as a static property, which can be called as .labelStyle(.trailingIcon) when invoked, and improve readability. So~ stylish!
extension LabelStyle where Self == TrailingIconLabelStyle {
    static var trailingIcon: Self { Self() }
}
If you want to have a parameter, such as "specify a space," you can do this by adding a member property to your custom style.
/// Character + Icon LabelStyle
struct TrailingIconLabelStyle: LabelStyle {
    // you can set the default value to preserve the way the dot starts are called
    var spacing: CGFloat = 4
    func makeBody(configuration: Configuration) -> some View {
        HStack(spacing: spacing) {
            configuration.title
            configuration.icon
        }
    }
}
// call
The default value is used in Label().labelStyle(.trailingIcon) // space
Label().labelStyle(TrailingIconLabelStyle(spacing: 2)) // Set space to 2
Uses
You can use it for common designs that you use widely throughout apps, or for universal custom styles like TrailingIconLabelStyle above.
For example, my route uses it in ProgressView. While ProgressView itself is styled, you can also include a grayish background when ProgressView is displayed.
struct CommonProgressViewStyle: ProgressViewStyle {
    func makeBody(configuration: Configuration) -> some View {
        ZStack {
            ProgressView(configuration)
                .tint(Color(.gray))
                .controlSize(.large)
            Color(.loadingBackground)
                .frame(maxWidth: .infinity, maxHeight: .infinity)
        }
    }
}
extension ProgressViewStyle where Self == CommonProgressViewStyle {
    static var common: Self { Self() }
}
By the way, when you usebackground() with a ProgressView, it only applies to the area required by the ProgressView. To ensure the background color covers a larger area, you can use a ZStack to place the color beneath the ProgressView, allowing the background to expand to the desired size.
By defining a style in this way, you can achieve concise and elegant code, as shown in the example below.
struct SomeView: View {
    @State var loadingStatus: LoadingStatus
    var body: some View {
        SomeContentView
        .overlay {
            if loadingStatus == .loading {
                ProgressView()
                    .progressViewStyle(.common)
            }
        }
        .disabled(loadingStatus == .loading)
    }
}
Conclusion
That wraps up this introduction to custom styles!
You can create custom styles on the following page.
Take a step toward writing more stylish and elegant code!

関連記事 | Related Posts






We are hiring!
Follow Us


KINTOテクノロジーズの最新情報をSNSで発信中!イベント・テックブログ更新情報もお届けします。