First Steps When Migrating From Android View to Jetpack Compose

This article is the entry for day 18 in the KINTO Technologies Advent Calendar 2024🎅🎄
Nice to meet you, I’m Tsuyoshi Yamada, an Android engineer at KINTO Technologies. In this article, we’ll share some handy techniques to help you take the first step in migrating an app built with Android View to a Jetpack Compose-based UI or gradually integrating Jetpack Compose into an existing Android View-based UI.
1. Introduction
Development of Jetpack Compose, Android’s Declarative UI, was announced a few years ago, and version 1.0 was officially released in July 2021. Many Android developers quickly embraced the concept of Jetpack Compose, harnessing the flexibility and extensibility of Kotlin, which had already become the second officially supported language for Android development after Java. It seems that the adoption of Jetpack Compose in Android app development has been gradually increasing. With the introduction of declarative UI, developers can write UI more intuitively with less code compared to traditional view-based UI, leading to improved development efficiency and productivity. With the recent release of Compose Multiplatform, the scope of Jetpack Compose skills has expanded beyond Android. Moving forward, we might see more libraries being developed exclusively for Jetpack Compose.
To bring these benefits to our existing apps, we have started migrating some of our development projects from Android View-based UIs to Jetpack Compose-based UIs. However, traditional view-based UIs rely heavily on procedural elements, making it challenging to adopt Jetpack Compose’s declarative style seamlessly. This article introduces some practical techniques to compensate for elements that may have been lost or become less visible due to Jetpack Compose’s simplified approach. In particular, we’ll cover tracking Composable locations, checking debug information, and ensuring smooth interoperability between Views and Composables—all with the goal of making the transition from a View-based UI to a Jetpack Compose-based UI as seamless as possible.
2. Aligning and Debugging Composables
Replacing the existing View expressions with new Composables came with a big challenge—not just figuring out how to represent the same content, but also whether it could be positioned correctly. Even for someone familiar with Android Views, that was a major concern. To address this, we’ll first go over how to align a Composable’s position with a View’s and how to retrieve and check debugging information to assist in this process.
2.1. Checking the position of Composable and View
The View, available since Android API level 1, is built on Java’s object-oriented principles. It not only represents rectangular screen elements but also effectively handles containment relationships between Views, interactions, and extending functionality through subclasses. For example, you can log the positions of a single View or multiple Views inside a ViewGroup using the following code:
private fun Resources.findResourceName(@IdRes resId: Int): String = try {
    getResourceName(resId)
} catch (e: Resources.NotFoundException) {
    "?"
}

fun View.logCoordinators(logger: (String) -> Unit, res: Resources, outLocation: IntArray, rect: Rect, prefix: String, density: Float) {
    getLocationInWindow(outLocation)
    rect.set(outLocation[0], outLocation[1], outLocation[0] + width, outLocation[1] + height)
    var log = "$prefix${this::class.simpleName}(${res.findResourceName(id)})${rect.toShortString()}(${rect.width().toFloat() / density}dp, ${rect.height().toFloat() / density}dp)"
    if (this is TextView) {
        log += "{${if (text.length <= 10) text else text.substring(0, 7) + "..."}}"
    }
    logger(log)
    if (this is ViewGroup) {
        val nextPrefix = "$prefix  "
        repeat(childCount) {
            getChildAt(it).logCoordinators(logger, res, outLocation, rect, nextPrefix, density)
        }
    }
}

fun View.logCoordinators(logger: (String) -> Unit = { Log.d("ViewLogUtil", it) }) =
    logCoordinators(logger, resources, IntArray(2), Rect(), "", resources.displayMetrics.density)
Here, View$getLocationInWindow(IntArray) is a function that retrieves the top-left coordinates of the Activity’s window where the View is located. If you’re familiar with Android Views, checking how this code works should be pretty straightforward. One thing to keep in mind is that calling these functions directly from Activity$onResume(), for example, won’t work as expected because the View layout isn’t fully set up yet, so you won’t be able to get meaningful information. In most cases, you’ll need to call them from a callback like View$addOnLayoutChangeListener(OnLayoutChangeListener).
A lot of developers might not be sure how to achieve the same thing in Jetpack Compose, and since it’s not easy to check if Composable behaves the same way, the migration process can feel like a hassle. In Jetpack Compose, you can use the Modifier extension function onGloballyPositioned((LayoutCoordinator) -> Unit) to get a Composable's position like this:
@Composable
fun BoundsInWindowExample() {
    Text(
        modifier = Modifier
            .padding(16.dp)
            .background(Color.White)
            .onGloballyPositioned {
                Log.d("ComposeLog", "Target boundsInWindow: ${it.boundsInWindow()}")
            },
        text = "Hello, World!",
        style = TextStyle(
            color = MaterialTheme.colorScheme.onSecondary,
            fontSize = 24.sp
        )
    )
}
By passing a callback to onGloballyPositioned(...), you can get the position coordinates every time the Composable’s position updates. In this case, LayoutCoordinator.boundsInWindow() is an extension function that retrieves the top, bottom, left, and right bounds of the Composable’s rectangle in the Activity coordinate system.
Getting the positions of all Composables inside a single Composable at once seems tricky for now, but grabbing the position of an individual Composable is easy. Plus, in many cases, you can get position data without worrying about complex lifecycles like Activities. onGloballyPositioned(...) There’s also onPositioned(...), a callback similar to onGloballyPositioned(...), which gets called after the relative position within the parent Composable is determined. Besides boundsInWindow(), there are also boundsInRoot() and boundsInParent(), which you can use depending on the situation, but we’ll spare you the details for now.
2.2. Creating a Composable to Check Screen Display
Now that we’ve figured out how to get the position in Composable using boundsInWindow(), which is compatible with View$getLocationInWindow(IntArray), we can log the position changes during testing to check its behavior. By doing this while developing the Composable, we’ll gradually get used to Compose and be able to recreate something similar to View. This method is simple and effective, but since LogCat floods with text, it can be hard to read—especially when dealing with a lot of information. To make things easier, let’s try creating a separate Composable just for checking the screen display. If you create a debug display area in a part of your app just for testing purposes and keep it constantly updated, you won’t have to scramble to find key logs among the endless stream of LogCats.
...Of course, we’ve known this since the Android View days, but actually implementing it always felt like a hassle... I can almost hear the sighs. With Jetpack Compose, a declarative UI, creating such a debug area is much easier with minimal effort:
class MainActivity : ComponentActivity() {
    override fun onCreate(savedInstanceState: Bundle?) {
        super.onCreate(savedInstanceState)
        WindowCompat.getInsetsController(window, window.decorView).isAppearanceLightStatusBars =
            resources.configuration.uiMode and Configuration.UI_MODE_NIGHT_MASK != Configuration.UI_MODE_NIGHT_YES
        setContentView(R.layout.activity_main)
        findViewById<WebView>(R.id.webView).let { webView ->
            webView.loadUrl("https://blog.kinto-technologies.com/")
        }

        val targetRect = mutableStateOf(Rect.Zero) // androidx.compose.ui.geometry.Rect
        findViewById<ComposeView>(R.id.composeTargetContainer).let { containerComposeView ->
            containerComposeView.setViewCompositionStrategy(ViewCompositionStrategy.DisposeOnViewTreeLifecycleDestroyed)
            containerComposeView.setContent {
                KtcAdventCalendar2024Theme {
                    ScrollComposable(targetRect)
                }
            }
        }

        val visibleRect = mutableStateOf(Rect.Zero)
        val outLocation = IntArray(2)
        findViewById<View>(R.id.layoutMain).addOnLayoutChangeListener { v, left, top, right, bottom, _, _, _, _ ->
            v.getLocationInWindow(outLocation)
            visibleRect.value = Rect(outLocation[0].toFloat(), outLocation[1].toFloat(), outLocation[0].toFloat() + (right - left), outLocation[1].toFloat() + (bottom - top))
        }

        findViewById<ComposeView>(R.id.composeTargetWatcher).let { watcherComposeView ->
            watcherComposeView.setViewCompositionStrategy(ViewCompositionStrategy.DisposeOnViewTreeLifecycleDestroyed)
            watcherComposeView.setContent {
                KtcAdventCalendar2024Theme {
                    TargetWatcher(visibleRect.value, targetRect.value)
                }
            }
        }
    }
}
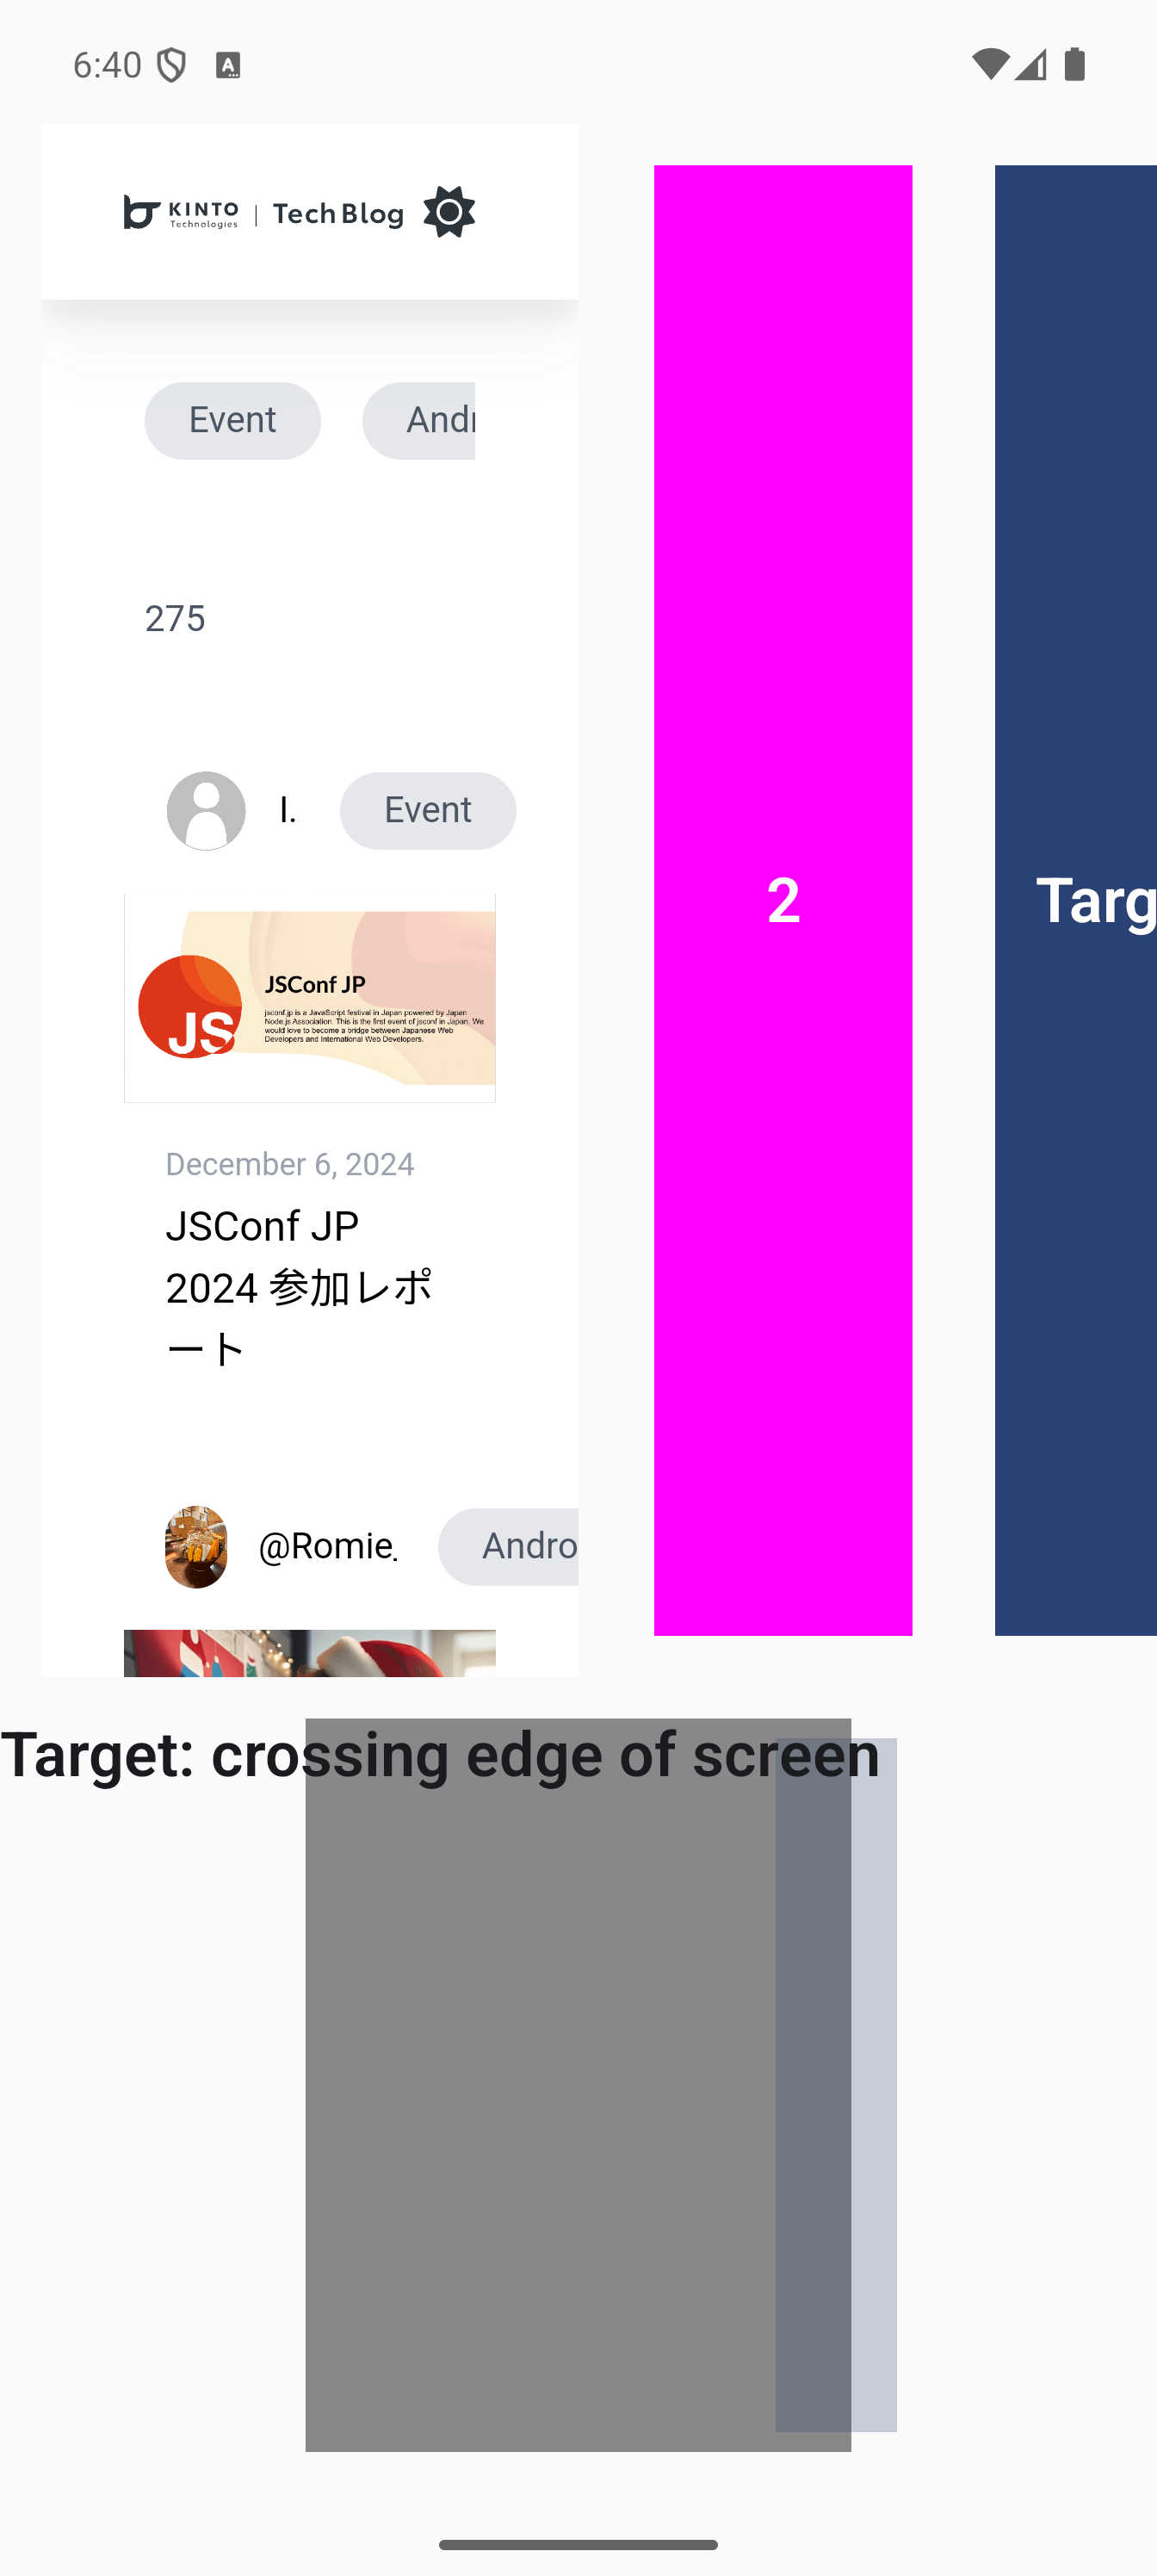
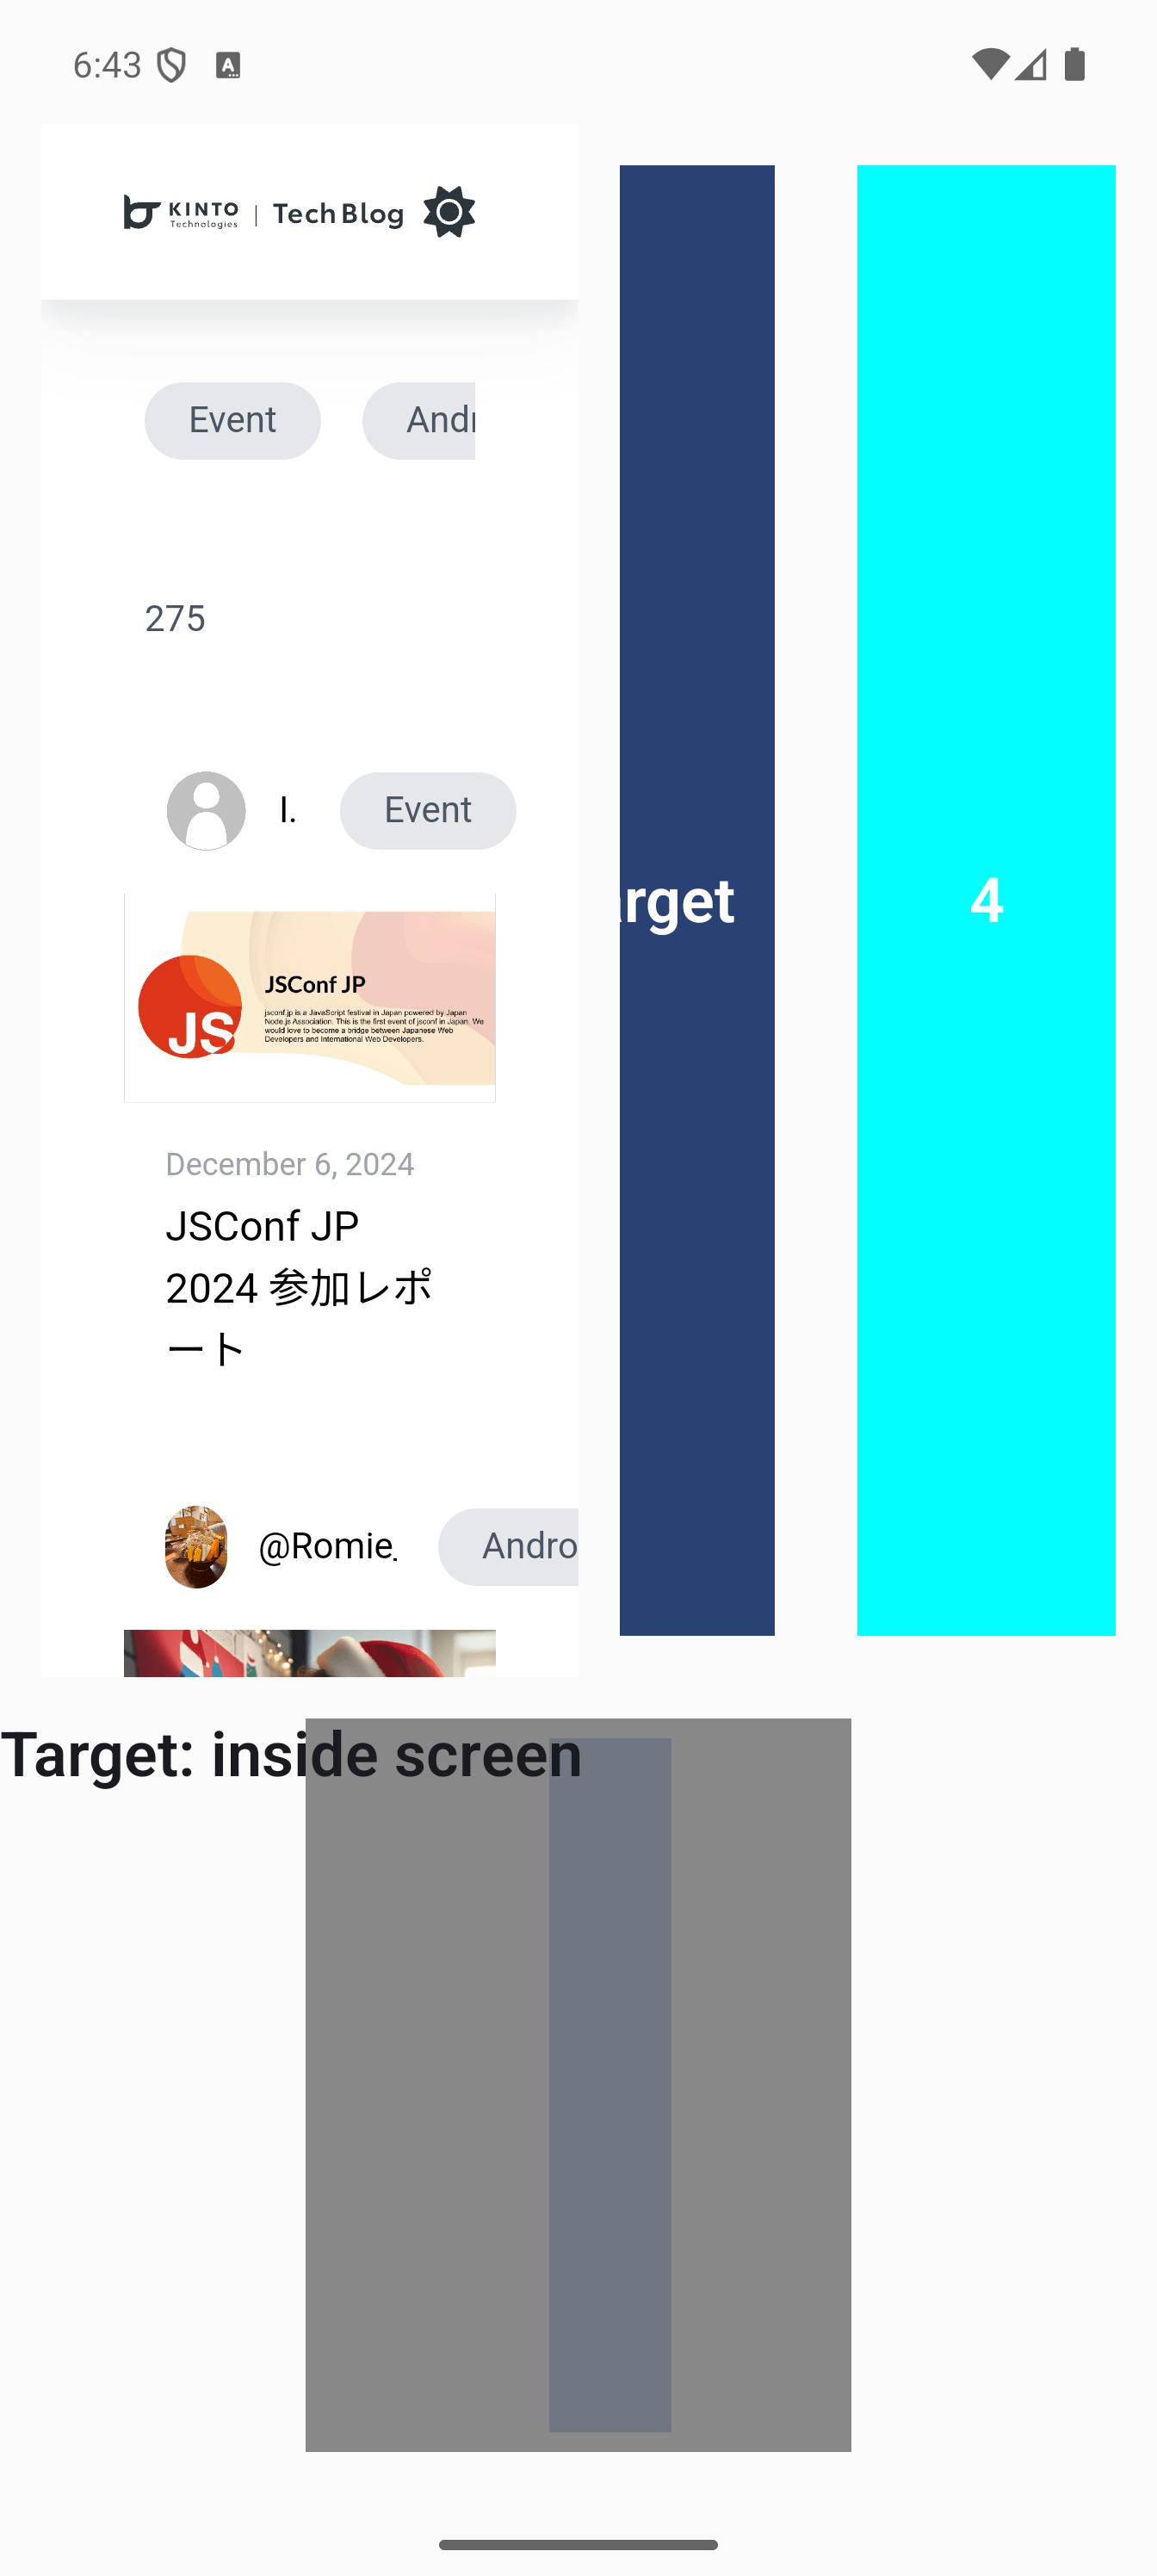
The app in the sample code is in the middle of being converted to Jetpack Compose. Right now, it’s still using a View with Activity$setContentView(Int), and we’re introducing Composable within that View by using ComposeView. Here, mutableStateOf(...) is used to share the rectangular position information between View and Composable, allowing us to observe how it behaves on the screen. The screen layout looks like this: We’re working on making the HorizontalScrollView part composable. To help with that, the bottom part of the screen will be used to display debug information:
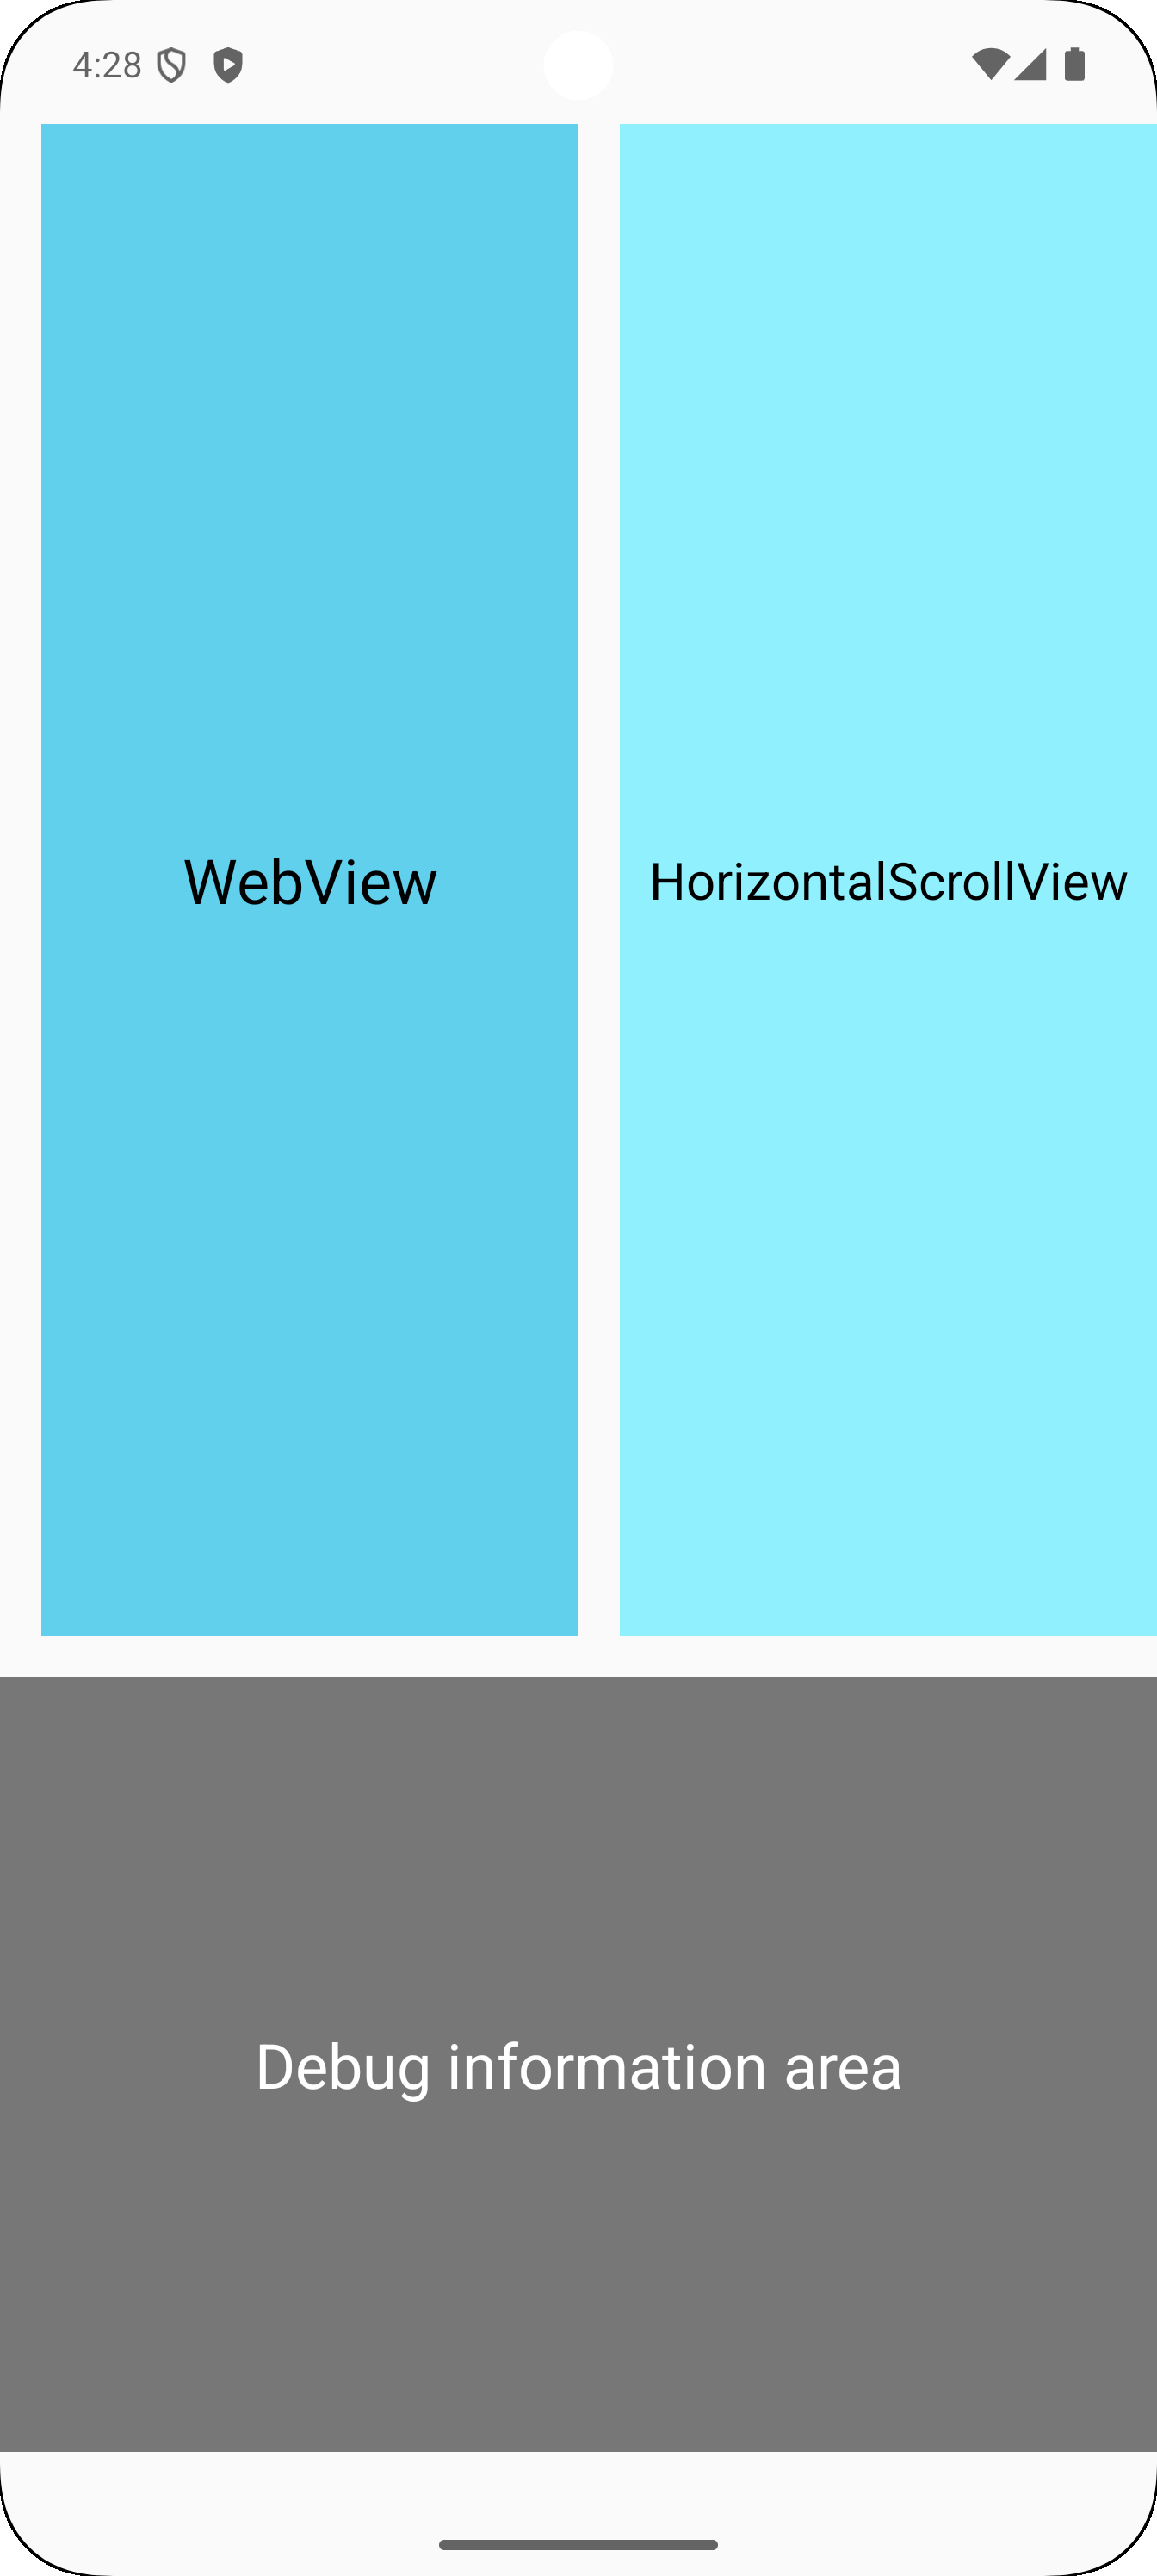
The layout XML file for MainActivity as follows:
<?xml version="1.0" encoding="utf-8"?>
<LinearLayout xmlns:android="http://schemas.android.com/apk/res/android"
    xmlns:app="http://schemas.android.com/apk/res-auto"
    xmlns:tools="http://schemas.android.com/tools"
    android:layout_width="match_parent"
    android:layout_height="match_parent"
    android:orientation="vertical"
    android:layout_marginVertical="48dp">

    <androidx.constraintlayout.widget.ConstraintLayout
        android:id="@+id/layoutMain"
        android:layout_width="match_parent"
        android:layout_height="0dp"
        android:layout_weight="1">

        <WebView
            android:id="@+id/webView"
            android:layout_width="0dp"
            android:layout_height="match_parent"
            android:layout_marginHorizontal="16dp"
            app:layout_constraintBottom_toBottomOf="parent"
            app:layout_constraintEnd_toStartOf="@id/scrollView"
            app:layout_constraintStart_toStartOf="parent"
            app:layout_constraintTop_toTopOf="parent"
            tools:ignore="NestedWeights" />

        <HorizontalScrollView
            android:id="@+id/scrollView"
            android:layout_width="0dp"
            android:layout_height="match_parent"
            app:layout_constraintBottom_toBottomOf="parent"
            app:layout_constraintEnd_toEndOf="parent"
            app:layout_constraintStart_toEndOf="@id/webView"
            app:layout_constraintTop_toTopOf="parent">
            <androidx.compose.ui.platform.ComposeView
                android:id="@+id/composeTargetContainer"
                android:layout_width="wrap_content"
                android:layout_height="match_parent" />
        </HorizontalScrollView>

    </androidx.constraintlayout.widget.ConstraintLayout>

    <androidx.compose.ui.platform.ComposeView
        android:id="@+id/composeTargetWatcher"
        android:layout_width="match_parent"
        android:layout_height="300dp"
        android:paddingTop="16dp" />

</LinearLayout>
MainActivity.kt and activity_main.xml are in the middle of being converted to Jetpack Compose, so they currently contain a mix of Views and Composables. As of this writing, WebView and some other elements don’t yet have Composable equivalents, so for now, a hybrid approach is necessary. [1] In activity_main.xml, ComposeView inside HorizontalScrollView is intended to replace an existing View with a Composable, while the other ComposeView is placed to track the position of the Composable above.
The Composable that replaces the View is structured as follows and implements onGloballyPositioned(...) to check the position of the part labeled "Target".
@Composable
fun ScrollComposable(targetRect: MutableState<Rect>) {
    val textStyle = TextStyle(
        textAlign = TextAlign.Center,
        color = MaterialTheme.colorScheme.onSecondary,
        fontSize = 24.sp,
        fontWeight = FontWeight.W600
    )

    Row(
        modifier = Modifier
            .fillMaxSize(),
        horizontalArrangement = Arrangement.Center,
        verticalAlignment = Alignment.CenterVertically
    ) {
        Box(
            modifier = Modifier
                .padding(16.dp)
                .width(100.dp)
                .fillMaxHeight()
                .background(Color.Red),
            contentAlignment = Alignment.Center
        ) {
            Text("1", style = textStyle)
        }

        Box(
            modifier = Modifier
                .padding(16.dp)
                .width(100.dp)
                .fillMaxHeight()
                .background(Color.Magenta),
            contentAlignment = Alignment.Center
        ) {
            Text("2", style = textStyle)
        }

        Box(
            modifier = Modifier
                .padding(16.dp)
                .width(100.dp)
                .fillMaxHeight()
                .background(MaterialTheme.colorScheme.primary)
                .onGloballyPositioned { targetRect.value = it.boundsInWindow() },
            contentAlignment = Alignment.Center
        ) {
            Text("Target", style = textStyle)
        }

        Box(
            modifier = Modifier
                .padding(16.dp)
                .width(100.dp)
                .fillMaxHeight()
                .background(Color.Cyan),
            contentAlignment = Alignment.Center
        ) {
            Text("4", style = textStyle)
        }
    }
}
Here's a Composable that keeps an eye on this: Here, the Composable itself uses onGloballyPositioned(...) to get its own size.
@Composable
fun TargetWatcher(visibleRect: Rect, targetRect: Rect) {
    if (visibleRect.width <= 0f || visibleRect.height <= 0f) return
    val rootAspectRatio = visibleRect.width / visibleRect.height
    val density = LocalDensity.current // For calculating toDp()
    val targetColor = MaterialTheme.colorScheme.primary.copy(alpha = 0.25F)
    var size by remember { mutableStateOf(IntSize.Zero) }
    Box(
        modifier = Modifier
            .fillMaxSize()
            .onGloballyPositioned { coordinates -> size = coordinates.size }
    ) {
        if (size.width <= 0F || size.height <= 0F) return@Box
        val watchAspectRatio = size.width.toFloat() / size.height
        val (paddingH: Float, paddingV: Float) = if (rootAspectRatio < watchAspectRatio) {
            (size.width - size.height * rootAspectRatio) / 2 to 0F
        } else {
            0F to (size.height - size.width / rootAspectRatio) / 2
        }

        with(density) {
            Box(
                modifier = Modifier
                    .padding(horizontal = paddingH.toDp(), vertical = paddingV.toDp())
                    .fillMaxSize()
                    .background(Color.Gray)
            )
        }

        if (targetRect.width <= 0f || targetRect.height <= 0f) return@Box
        with(density) {
            Box(
                modifier = Modifier
                    .padding( // Caution: exception is thrown if padding is negative
                        start = max(
                            0F, marginOf(
                                size.width,
                                paddingH,
                                visibleRect.left,
                                visibleRect.right,
                                targetRect.left
                            )
                        ).toDp(),
                        end = max(
                            0F, size.width - marginOf(
                                size.width,
                                paddingH,
                                visibleRect.left,
                                visibleRect.right,
                                targetRect.right
                            )
                        ).toDp(),
                        top = max(
                            0F, marginOf(
                                size.height,
                                paddingV,
                                visibleRect.top,
                                visibleRect.bottom,
                                targetRect.top
                            )
                        ).toDp(),
                        bottom = max(
                            0F, size.height - marginOf(
                                size.height,
                                paddingV,
                                visibleRect.top,
                                visibleRect.bottom,
                                targetRect.bottom
                            )
                        ).toDp()
                    )
                    .fillMaxSize()
                    .background(targetColor)
            )
        }
    }
}

private fun marginOf(
    sizePx: Int,
    halfPx: Float,
    visibleFrom: Float,
    visibleTo: Float,
    px: Float
): Float {
    val alpha = (px - visibleFrom) / (visibleTo - visibleFrom)
    return (1 - alpha) * halfPx + alpha * (sizePx - halfPx)
}
This Composable function illustrates the relationship between the Activity screen and the Composable labeled as "Target". Setting the padding is a bit tricky, but it’s not rocket science. Composable is technically a function, but it maintains UI state by continuously holding values with MutableState and remember. At the same time, automatically recompose when persistent information changes, reducing the need for tedious event handling and allowing for a more declarative coding style.
When you scroll the HorizontalScrollView in the upper right corner of the screen left and right, the Composable at the bottom follows along and updates its position. By retrieving the position of a View or Composable inside a ScrollView using View$getLocationInWindow(IntArray) or LayoutCoordinator.boundsInWindow(), you can also get off-screen coordinates. This allows you to check whether elements can move properly in and out of the visible screen. (However, this does not necessarily apply when scrolling using Modifier.horizontalScroll(...), Modifier.verticalScroll(...), or similar methods in a Composable.)
In a conventional View, displaying this kind of debug information required modifying both the layout XML file and the Java/Kotlin code. Since these changes wouldn’t be reflected in the released app, it felt like a bit of a hassle. Data binding was also introduced, allowing layout XML files to track variable updates, but it wasn’t the most intuitive approach. Jetpack Compose lets you to design screens as if you were writing information directly into the design, making it easy to see your implementation results almost instantly. Displaying everything graphically isn’t always the best approach, but having more options for expression can make it easier to dive into coding.
2.3. Writing Debug Information Declaratively
Displaying debug information with Composables allows you to add details even more easily with fewer steps:
@Composable
fun TargetWatcher(visibleRect: Rect, targetRect: Rect) {

    // ...

        // ...

        Text(
            text = when {
                targetRect in visibleRect -> "Target: inside screen"
                visibleRect.overlaps(targetRect) -> "Target: crossing edge of screen"
                else -> "Target: outside screen"
            },
            modifier = Modifier.align(Alignment.TopStart),
            style = TextStyle(
                textAlign = TextAlign.Center,
                color = MaterialTheme.colorScheme.onSurface,
                fontSize = 24.sp,
                fontWeight = FontWeight.W600
            )
        )
    }
}

/**
 * "operator fun receiver.contains" defines in and !in (syntax: other in(!in) receiver)
 */
private operator fun Rect.contains(other: Rect) =
    left <= other.left && top <= other.top && right >= other.right && bottom >= other.bottom
The above uses Text(...) to add debug information. The style argument in Text(...)
can be omitted if the default settings are sufficient. You can display information with almost the same amount of typing as Log.d(...) or println(...). Unlike those methods, the information doesn’t disappear as you scroll. One of the advantages of Declarative UI is that it makes building a UI as effortless as "debugging with print statements".
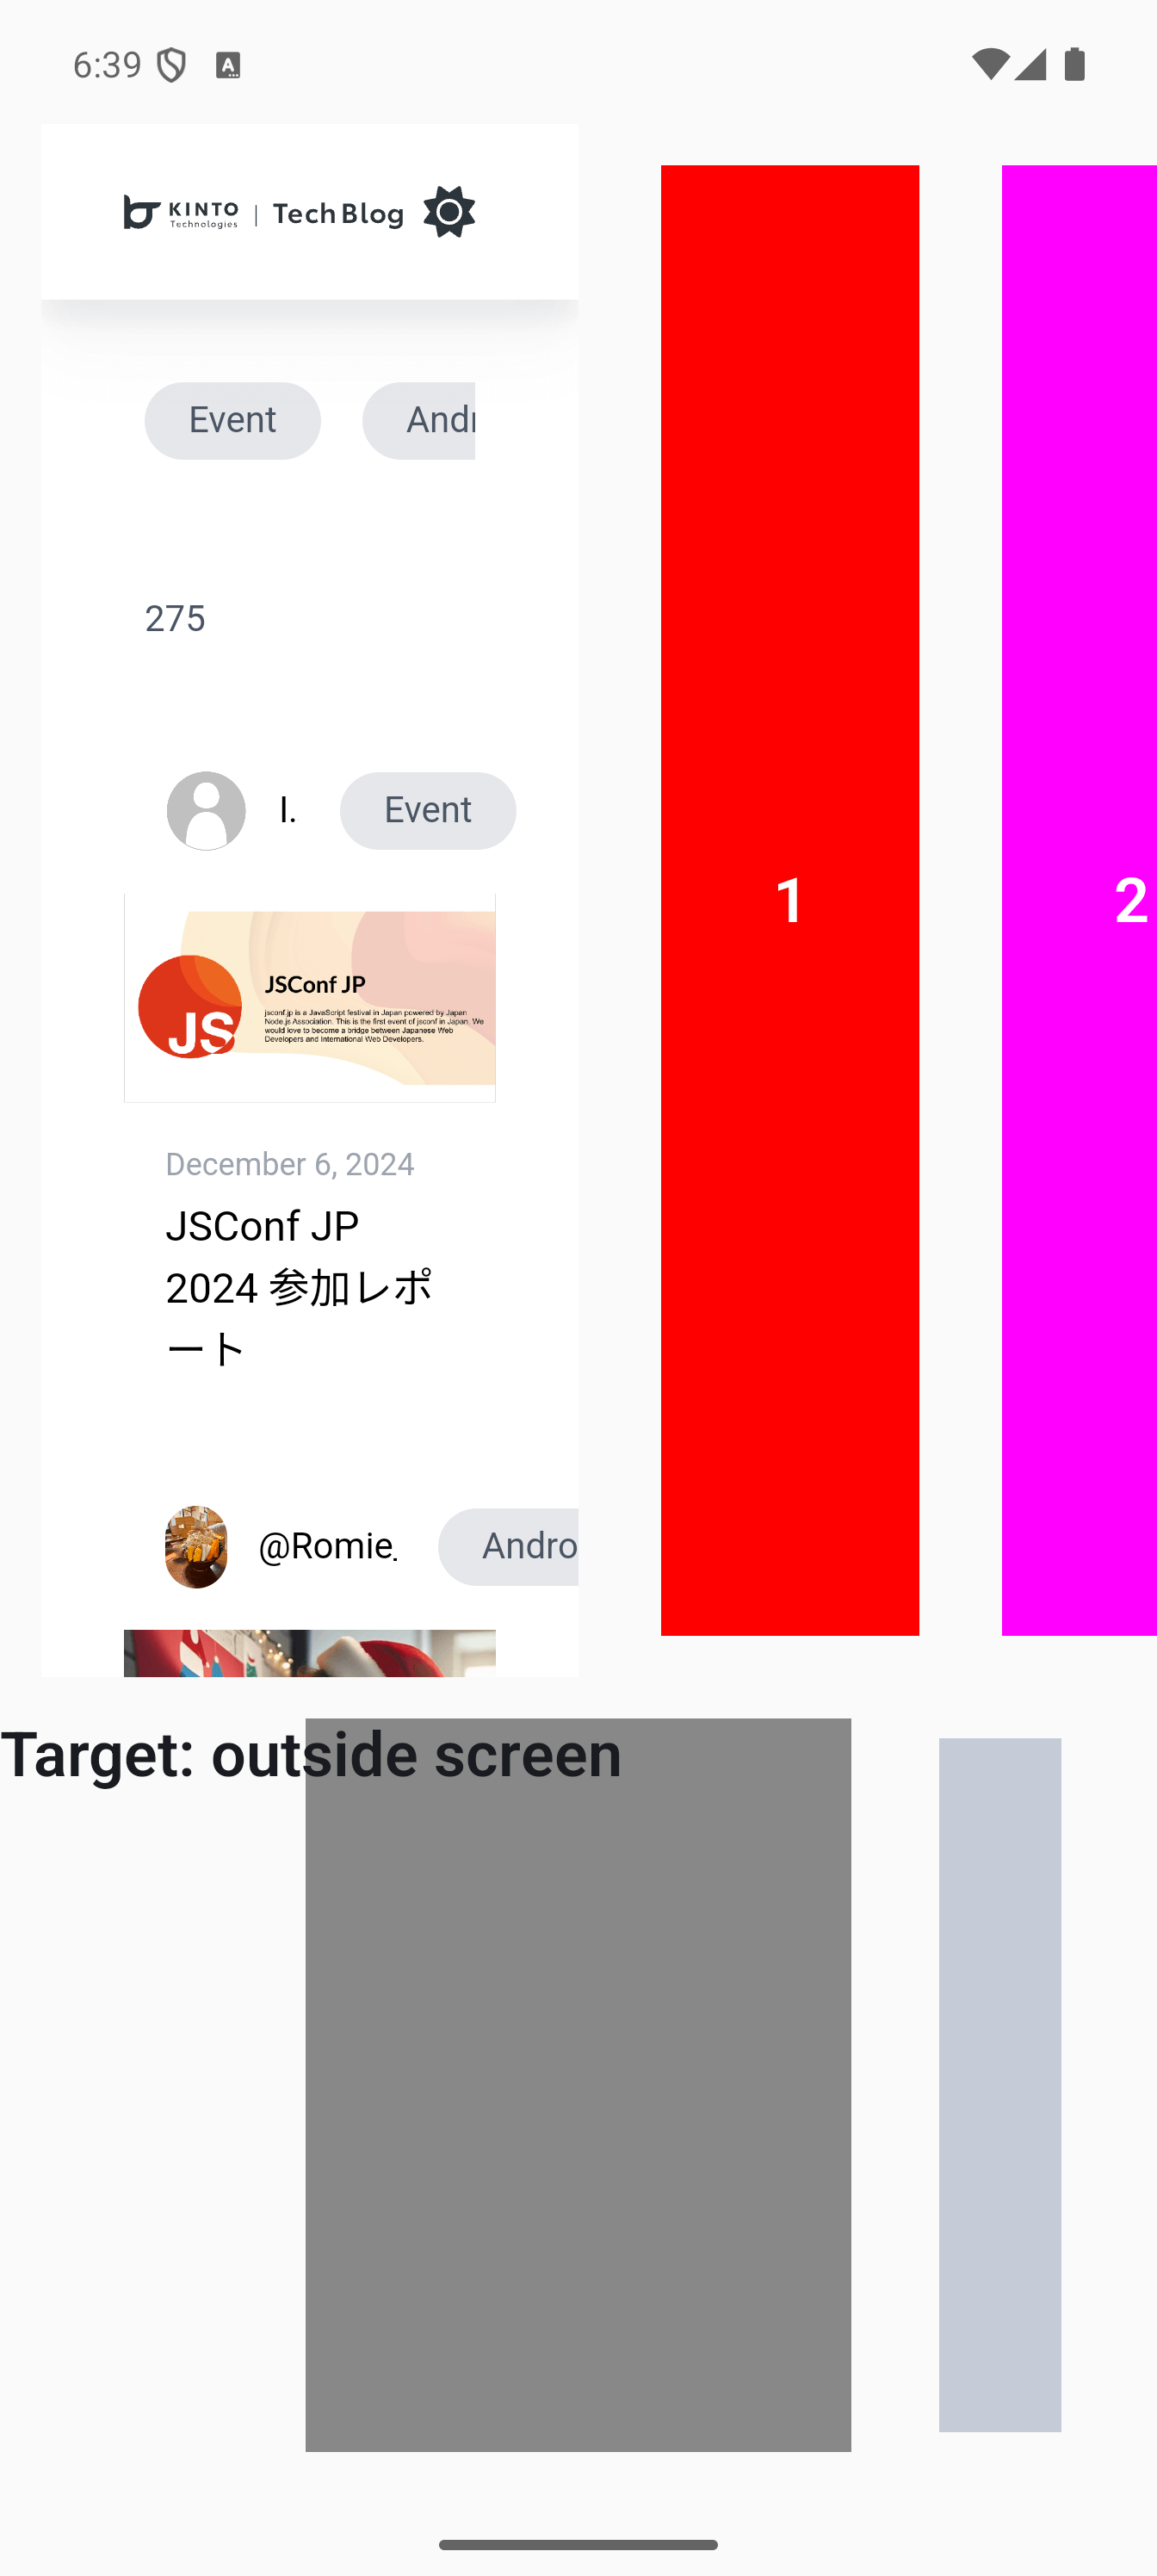
Build and run the app, then scroll horizontally in the top-right scroll view to see the app in action at the bottom of the screen, like this:
| Off-screen display | Partially over screen borders | On-screen display |
|---|---|---|
 |
 |
 |
3. Procedural Processing with LaunchedEffect
So far, we’ve discussed the significance of Declarative UI, but when it comes to handling events triggered by state changes or adding animations to show those changes, some Procedural processing is also necessary. If you can’t write procedural code like event handling, which has traditionally been done in View, moving to Jetpack Compose won't be possible. In Jetpack Compose, LaunchedEffect is commonly used to handle actions based on state changes.
@Composable
fun TargetWatcher(visibleRect: Rect, targetRect: Rect) {

    // ...

        // ...

        var currentState by remember { mutableStateOf(TargetState.INSIDE) }
        var nextState by remember { mutableStateOf(TargetState.INSIDE) }
        var nextState by remember { mutableStateOf(TargetState.INSIDE) }
        var stateText by remember { mutableStateOf("") }
        var isTextVisible by remember { mutableStateOf(true) }
            nextState = when {
            visibleRect.overlaps(targetRect) -> TargetState.CROSSING
            else -> TargetState.OUTSIDE
        }

        LaunchedEffect(key1 = nextState) {
            if (stateText.isNotEmpty()) {
                if (currentState == nextState) return@LaunchedEffect
                stateText = when (nextState) {
                    TargetState.INSIDE -> "Target: entered screen"
                    TargetState.OUTSIDE -> "Target: exited screen"
                    TargetState.CROSSING -> if (currentState == TargetState.INSIDE)
                        "Target: exiting screen"
                    else
                        "Target: entering screen"
                }
                currentState = nextState
                repeat(3) {
                    isTextVisible = true
                    delay(250)
                    isTextVisible = false
                    delay(250)
                }
            }
            stateText = when (nextState) {
                TargetState.INSIDE -> "Target: inside screen"
                TargetState.CROSSING -> "Target: crossing edge of screen"
                TargetState.OUTSIDE -> "Target: outside screen"
            }
            isTextVisible = true
        }

        if (isTextVisible) {
            Text(
                text = stateText,
                modifier = Modifier.align(Alignment.TopStart),
            )
        }
    }
}

enum class TargetState { INSIDE, CROSSING, OUTSIDE }
You can set multiple keys for LaunchedEffect . If you only want to run the process the first time the Composable is called, you can use LaunchedEffect(Unit) { ... } . Whenever the nextState specified as a key changes, the corresponding process will be executed accordingly. The code above will make the text flash for 1.5 seconds after a state change, showing the current state compared to the previous one, and then display it statically. You can handle events by specifying a state variable as the key of LaunchedEffect and writing the processing inside the block to run when the state changes. Inside the LaunchedEffect block, you can write time-consuming processes using suspendfunctions like delay(...). If a state change happens before the block’s processing finishes, the current processing is canceled, and the new state’s processing starts from the beginning in response to the change.
The LaunchedEffect block handles procedural processing, while the Text(...) follows a Declarative approach based on the values of the variables provided procedurally. For handling changes in the UI, it’s best to use LaunchedEffect . Besides, there are other effects suited for different situations, such as SideEffect , as well as DisposableEffect, which handles processing according to the lifecycle of Activity and Fragment. On the other hand, it’s also important not to overuse these processes to keep the code from becoming unnecessarily complex. For example, it’s recommended to handle event processing triggered by responses from the Internet or inputs from sensors like NFC in the ViewModel, while keeping procedural code in Composable limited to UI-related elements.
4. Interoperability between ComposeView and AndroidView
When using a Composable in an Activity or Fragment, you can display it with ComposeView, as shown above. Conversely, if you want to use something like the aforementioned WebView inside a Composable, you can embed a View into a Composable using AndroidView or AndroidViewBinding. For instructions, please refer to Here (Using views in Compose) . This article won’t go into details, but thanks to the AndroidView Composable, even if you’ve made progress in converting your app to Composable but find that replacing certain Views is challenging or time-consuming, you can still continue development by integrating both Compose and View. This interoperability is extremely powerful—you can call AndroidView inside a Composable invoked by ComposeView, then nest another ComposeView inside it to call a Composable again, and even embed AndroidView within that, creating a layered structure that can continue further. By keeping the option to use Views within Composables, you can minimize the risk of wasted effort if the transition to Composable doesn’t progress as expected or if replacing Views takes significantly longer than a development sprint.
5. Preview Function
So far, we’ve focused on the flexibility of Composable, which allows you to reflect on the development process. It supports techniques for alignment and debugging at a level comparable to Views, enables procedural processing, and offers the option to revert parts to Views through powerful interoperability when facing challenges in the transition to Composable. Here, we’ll talk about one of the key benefits of Composable—the simple yet powerful preview capabilities of the Preview function.
5.1. Create a Preview function
Android Studio’s preview feature allowed you to visualize Views in layout XML files, but Jetpack Compose takes it a step further with even more powerful preview functions. Just create a function with the @Preview annotation, and your Composable will be displayed in the preview:
// ...

private class TargetWatcherParameterProvider :
    PreviewParameterProvider<TargetWatcherParameterProvider.TargetWatcherParameter> {
    class TargetWatcherParameter(
        val visibleRect: Rect,
        val targetRect: Rect
    )

    override val values: Sequence<TargetWatcherParameter> = sequenceOf(
        TargetWatcherParameter(
            visibleRect = Rect(0f, 0f, 100f, 300f),
            targetRect = Rect(90f, 80f, 110f, 120f)
        ),
        TargetWatcherParameter(
            visibleRect = Rect(0f, 0f, 300f, 100f),
            targetRect = Rect(80f, 90f, 120f, 110f)
        )
    )
}

@Preview
@Composable
private fun PreviewTargetWatcher(
    @PreviewParameter(TargetWatcherParameterProvider::class)
    params: TargetWatcherParameterProvider.TargetWatcherParameter
) {
    KtcAdventCalendar2024Theme {
        TargetWatcher(params.visibleRect, params.targetRect)
    }
}
The above example demonstrates how to use PreviewParameterProvider to supply multiple parameters to a single preview function and display them in the preview. In the layout XML file of the Android View, you can’t achieve this using the tools:??? attribute to configure the preview. However, can display a preview without using PreviewParameterProvider —just call a Composable function inside a function annotated with @Preview and @Composable.
My recommendation is to create a preview function as soon as you start working on a new Composable. Just the advantage of having powerful preview capabilities from the start when creating a new Composable is reason enough to switch to Jetpack Compose. Being able to check the display of debug information with the preview function is another advantage of using Composable for debugging. Recently, using preview functions for UI testing with libraries like roborazzi has been gaining attention. From a testing efficiency standpoint, creating preview functions is definitely worthwhile.
5.2. Try running the Preview function
As explained here (Running the Preview), you can run the Preview function on an actual Android device or emulator by clicking the Run '...' icon on the left side of Android Studio. This is similar to the previous functionality for executing a specific Activity, but the Preview function is more powerful. It is easier to write and it can run in a simplified environment without needing elements like intents. Callbacks for UI actions, such as button taps, are also executed, allowing you to use the Preview function for testing as if it were a simple app.
However, it’s not recommended to overload a Composable with too many features just to make it more testable in the Preview function. To keep Composable purely as a declarative UI, it’s best to separate business logic into other classes or functions, such as a ViewModel or a Presenter in Circuit, and focus on writing only UI-related code.
6. Conclusion
I hope this article will encourage more developers to take the leap from Android View to Jetpack Compose. Transitioning to a UI system with a different approach isn’t always straightforward, and the fear of setbacks is understandable. My hope is that your first steps feel as smooth as possible and that the risk of wasted effort is kept to a minimum.
7. References
- Android API reference
- [Android] Functions for Retrieving a View’s Position
- In-Depth Guide to Jetpack Compose Modifier
- What can Advanced / Lesser Known Modifiers do for your UI? — A Comprehensive Exploration in Jetpack Compose: A Journey Through Advanced and
Notes
The Android robot is reproduced or modified from work created and shared by Google and used under the terms of the Creative Commons Attribution 3.0 License. [2]
A wrapper that uses WebView functionality as a Composable is available in the accompanist library, but it is currently deprecated. Even in the official implementation, making a View fully Composable doesn’t seem easy. Since it’s common for Views and Composables to coexist for a long time in general app development, there’s no need to worry—go ahead and embrace Composables with confidence. ↩︎
https://developer.android.com/distribute/marketing-tools/brand-guidelines#android_robot ↩︎
関連記事 | Related Posts
We are hiring!
【UI/UXデザイナー】クリエイティブ室/東京・大阪・福岡
クリエイティブGについてKINTOやトヨタが抱えている課題やサービスの状況に応じて、色々なプロジェクトが発生しそれにクリエイティブ力で応えるグループです。所属しているメンバーはそれぞれ異なる技術や経験を持っているので、クリエイティブの側面からサービスの改善案を出し、周りを巻き込みながらプロジェクトを進めています。
【QAエンジニア(リーダークラス)】QAG/東京・大阪・福岡
QAグループについて QAグループでは、自社サービスである『KINTO』サービスサイトをはじめ、提供する各種サービスにおいて、リリース前の品質保証、およびサービス品質の向上に向けたQA業務を行なっております。QAグループはまだ成⾧途中の組織ですが、テスト管理ツールの導入や自動化の一部導入など、QAプロセスの最適化に向けて、積極的な取り組みを行っています。

