[iOS]マップアプリで検索したルートを「経路アプリ」として受け取る方法
![Cover Image for [iOS]マップアプリで検索したルートを「経路アプリ」として受け取る方法](/assets/common/thumbnail_default_×2.png)
はじめに
モバイルアプリ開発グループでアシスタントマネージャーをしているK.Kaneです。
普段は my route PJでPLをしたり、iOSエンジニアをしたりしております。
先日、my route iOSアプリを経路アプリとして、iPhoneにプリインストールされているマップアプリ(以下、標準マップ)から起動できるようにしたリリースを行いました。
実は地図アプリなどを中心に経路アプリ設定されているアプリは結構あるのですが、この辺りの設定方法について日本語で説明しているサイトは意外となさそうでしたので、今回記事にしてみました。
ShareExtensionとの違い
iOSにおいて他アプリとデータを伴った連携を行う場合、ShareExtensionを利用するのが一般的です。ShareExtensionを利用すると、他のアプリが対応したファーマットに合致するデータを共有メニュー経由で連携しようとすると、共有先のアプリ一覧に候補として表示されるようになります。
標準マップの場合、スポット検索の結果は「https://maps.app/com/?」で始まるユニバーサルリンクとなっており、通常の共有メニューを利用して共有されますので、対応するShareExtensionを用意すれば受け取ることができます。
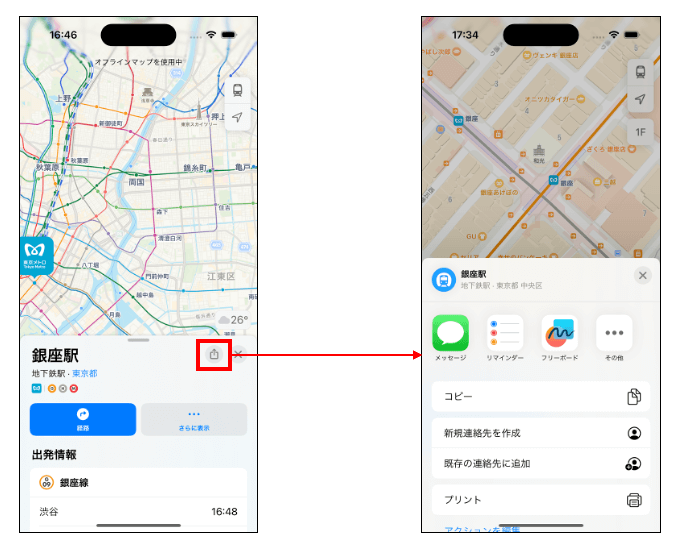
一方、経路の共有は出発地、目的地データの共有となるため、通常の共有メニューは表示されず、経路アプリとして設定されたアプリにのみ共有することができます。
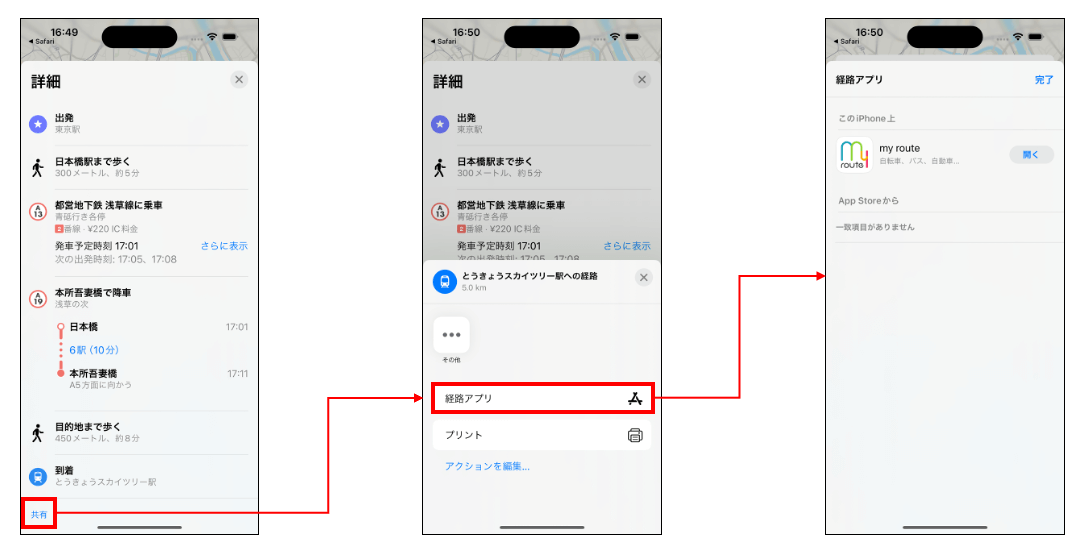
経路アプリとして設定する方法
経路アプリとしての設定は、Capabilityの追加のみで、ShareExtensionのようなロジックの実装は不要です(後述しますが、受け取ったデータに対する処理については実装が必要です)。
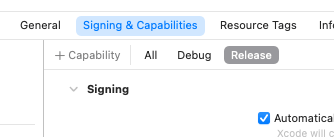
プロジェクトにおいてアプリのTARGETSを選び、「Signing & Capabilities」を選んで、左上の「+Capability」を選択します。
※画像のXcodeバージョン:15.4
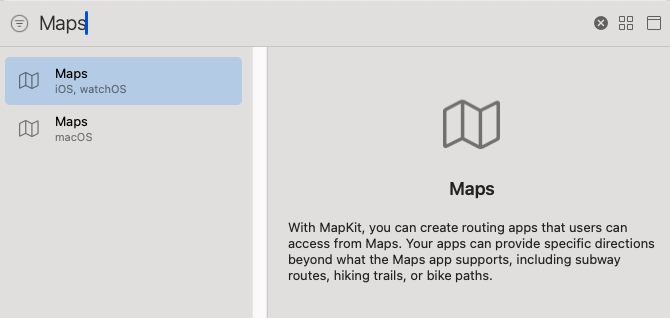
表示された別ウインドウ上でMapsと入力し、表示された2つのうち、「iOS, watchOS」のほうをダブルクリックし、追加します。
「Signing & Capabilities」の下の方に「Maps」が追加されているため、経路を受け取る交通手段を選択します。

以上の設定を行うことで経路アプリの一覧に表示されるようになります。
なお、こちらの設定後のInfo.plistには以下の画像の項目が追加されます。

受け取ったデータの抽出方法
次に経路アプリの一覧経由で起動された際に渡されるデータの受け取り方法について説明します。
受け取りはSceneDelegateクラスで行います。
SceneDelegateクラスがプロジェクト内に存在しない場合は追加してください。ここでは詳しくは触れませんが、追加したクラスをInfo.plistの「Delegate Class Name」にて指定するか、SwiftUIアプリの場合はApp継承のstruct内で@UIApplicationDelegateAdaptorで指定したAppDelegateクラス内から設定することもできます。
import UIKit
import MapKit

class SceneDelegate: UIResponder, UIWindowSceneDelegate {
  func scene(_ scene: UIScene,
             willConnectTo session: UISceneSession,
             options connectionOptions: UIScene.ConnectionOptions) {
    if let context = connectionOptions.urlContexts.first,
       MKDirections.Request.isDirectionsRequest(context.url) {
      printMKDirectionsData(context.url)
    }
  }

  func scene(_ scene: UIScene, openURLContexts URLContexts: Set<UIOpenURLContext>) {
    if let url = URLContexts.first?.url,
       MKDirections.Request.isDirectionsRequest(url) {
      printMKDirectionsData(url)
    }
  }

  private func printMKDirectionsData(_ url: URL?) {
    guard let url else { return }
    let request = MKDirections.Request(contentsOf: url)
    if let source = request.source,
       let destination = request.destination {
      if !source.isCurrentLocation {
        print("dep_lat: " + String(source.placemark.coordinate.latitude))
        print("dep_lng: " + String(source.placemark.coordinate.longitude))
        print("dep_name: " + (source.name ?? ""))
      }
      if !destination.isCurrentLocation {
        print("des_lat: " + String(destination.placemark.coordinate.latitude))
        print("des_lng: " + String(destination.placemark.coordinate.longitude))
        print("des_name: " + (destination.name ?? ""))
      }
    }
  }
}
標準マップからはMKDirections.Requestクラスのデータとして渡されます。
MKDirections.Requestクラスの詳細はこちらを参照していただければと思いますが、departureDateなど他にもプロパティはあるのですが、標準マップから渡されるデータには設定されていないようです。
今回は便宜上データの抽出までをSceneDelegateクラス内で行なっていますが、実際にはそのデータを利用する画面にデータを渡して処理する形になるかと思います。
Apple審査時の追加対応
経路アプリとしてApple審査に出す場合は、App Store Connectの配信タブにある「ルーティングアプリカバレッジファイル」にそのアプリがサポートするエリアを示すgeojsonファイルを追加する必要があります。geojsonファイルの詳細については「ルーティングアプリカバレッジファイル」の項目横の?ボタンを押して表示されるリンク先のページを確認してください。

正しいフォーマットのgeojsonファイルを登録すると以下のようにファイル名が表示されますので、この状態になれば審査に出すことができます。

無事リリース。。?
実際にmy route iOSアプリは以上の設定を行った時点で審査に出し、無事承認されましたのでこの状態で公開しました。
公開したアプリでも無事に連携することができましたので、「以上が経路アプリとしてデータを受け取る方法です。」と言って終わりたいところではありますが、実は後日談がございます。。
見慣れない警告が表示されるようになっている。。
つい先日Privacy Manifestsの対応のため、App Store Connectにアプリをアップロードすると送られてくるメールを確認すると、Privacy Manifestsとは関係ない警告が出ているではありませんか!
以下が実際に送られてきたメールでの警告内容です。

それぞれの警告にあるとおり、Info.plistに以下の設定を追加で行う必要がありました。
- MKDirectionsRequestの設定にHandler rankの設定
- Supports opening documents in placeの設定
設定後のInfo.plistの内容は以下の画像のようになります。
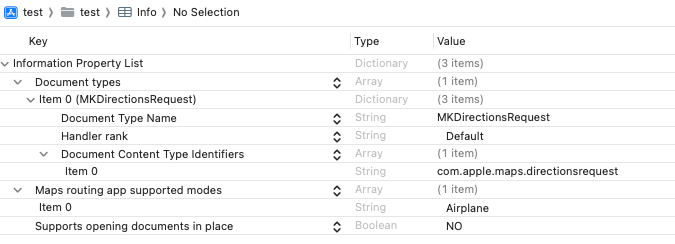
これらの追加後、上記の警告は出なくなりました。
おわりに
my route iOSアプリでは標準マップから出発地、目的地を受け取って、改めてmy route内でそのルートを検索するために使っています。
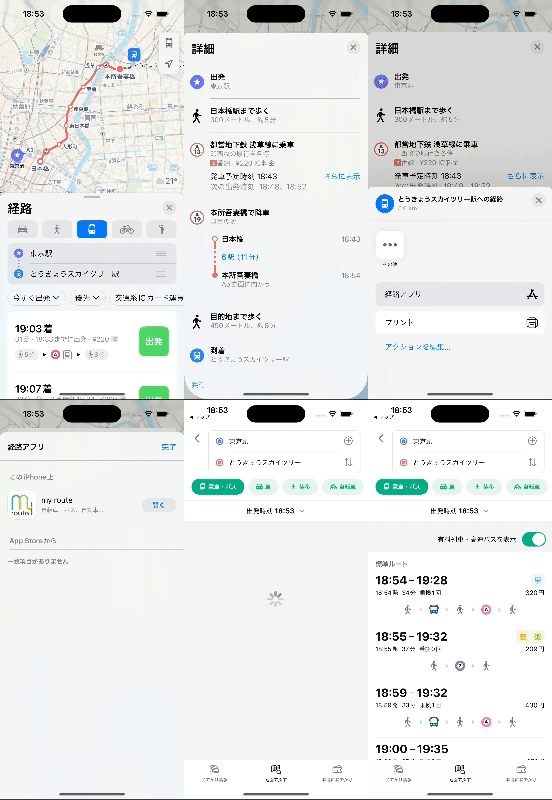
地図アプリは他のアプリも似たような利用方法が多い印象ですが、地図機能を持たないアプリでも経路アプリとして登録すれば、標準マップとの連携によって出発地、目的地のデータを使うことができますので、アプリの可能性が広がるかもしれないですね。
経路アプリ対応してみようと思っている方にこちらの記事が参考になれば幸いです。
関連記事 | Related Posts
We are hiring!
【バックエンドエンジニア】my route開発G/東京
my routeについてmy routeの概要 my routeは、移動需要を創出するために「魅力ある地域情報の発信」、「最適な移動手段の提案」、「交通機関や施設利用のスムーズな予約・決済」をワンストップで提供する、スマートフォン向けマルチモーダルモビリティサービスです。
【大阪拠点】オープンポジション(エンジニア)
やっていること国内サービスでは、トヨタのクルマのサブスクリプションサービスである『 KINTO ONE 』を中心に、移動のよろこびを提供する『 モビリティーマーケット 』、MaaSサービスの『 my route(マイルート) 』など、トヨタグループが展開する各種サービスの開発・運営を担っています。


