my routeアプリにスナップショットテストを導入しました
KINTOテクノロジーズで my route(iOS) を開発しているRyommです。
同じく開発メンバーの保坂さんと張さん、そしてパートナー1名の計4名でスナップショットテストを導入・実装しました。
はじめに
my routeアプリには現在SwiftUI化を進めていこうという流れがあり、そのための布石としてスナップショットテストを導入することにしました。
my routeにおけるSwiftUI化は、土台はUIViewControllerのまま、中のコンテンツだけをまずSwiftUIに置き換える形で進めるため、ここで実装したスナップショットテストはそのまま利用できる想定です。
ここでは、スナップショットテストをUIKitで構築されたアプリに適用するにあたって試行錯誤したテクニックを紹介します。
Snapshot Testとは
コードの改修前と改修後のスクリーンショットに差分が出ていないかを確認できるテストです。
ライブラリは、Point-Freeの https://github.com/pointfreeco/swift-snapshot-testing を使用しています。
my routeでは、以下のようにXCTestCaseを拡張してassertSnapshotsをラップしたメソッドを作成しています。
閾値が98.5%になっているのは、非常に細かい許容範囲の差異が成功になるように色々試して出た値です。
extension XCTestCase {
  var precision: Float { 0.985 }
  func testSnapshot(vc: UIViewController, record: Bool = false,
                    file: StaticString, function: String, line: UInt) {
    assert(UIDevice.current.name == "iPhone 15", "Please run the test by iPhone 15")
    // SnapshotConfigはテストする端末一覧のenum
    SnapshotConfig.allCases.forEach {
      assertSnapshots(matching: vc, as: [.image(on: $0.viewImageConfig, precision: precision)],
                      record: record, file: file, testName: function + $0.rawValue, line: line)
    }
  }
}
画面ごとのスナップショットテストは以下のように書いています。
final class SampleVCTests: XCTestCase {
  // snapshot test 録画モードか否か
  var record = false
  func testViewController() throws {
    let SampleVC = SampleVC(coder: coder)
    let navi = UINavigationController(rootViewController: SampleVC)
    navi.modalPresentationStyle = .fullScreen
    // ここでライフサイクルメソッドが一通り呼び出される
    UIApplication.shared.rootViewController = navi
    // viewDidLoad以降のライフサイクルメソッドが実行端末分呼ばれる
    testSnapshot(vc: navi, record: record, file: #file, function: #function, line: #line)
  }
}
Tips
viewWillAppear以降にAPIで取得したデータがViewに反映されるのを待ちたい
APIで取得したデータがViewに反映されてからスナップショットテストが実行されるようにしたいですが、画面に反映される前にスナップショットテストが実行されてしまい、インジケーターが表示されたままになってしまうなどの問題がありました。
素のままではAPI通信後のデータがViewに反映されたかどうかを判断するのが難しいため、判定用のデリゲートを用意します。
protocol BaseViewControllerDelegate: AnyObject {
  func viewDidDraw()
}
ViewControllerクラスで、上で用意したデリゲートに準拠したデリゲートプロパティを作成し、初期化時に特に指定されなかった場合はnilになるようにしておきます。
class SampleVC: BaseViewController {
  // ...
  weak var baseDelegate: BaseViewControllerDelegate?
  // ....
  init(baseDelegate: BaseViewControllerDelegate? = nil) {
    self.baseDelegate = baseDelegate
    super.init(nibName: nil, bundle: nil)
  }
  // ...
}
APIを呼び出して画面に反映している場面、例えばCombineで結果を受け取って画面に反映したあとに baseDelegate.viewDidDraw() を呼び出すことで、スナップショットテスト側に結果をViewに反映ができたことを教えられるようになります。
someAPIResult.receive(on: DispatchQueue.main)
  .sink(receiveValue: { [weak self] result in
    guard let self else { return }
    switch result {
    case .success(let item):
      self.hideIndicator()
      self.updateView(with: item)
      // データ反映完了のタイミング
      self.baseDelegate?.viewDidDraw()
    case .failure(let error):
      self.hideIndicator()
      self.showError(error: error)
    }
  })
  .store(in: &cancellables)
baseDelegate.viewDidDraw() が実行されるのを待ちたいため、スナップショットテストにXCTestExpectationを追加します。
final class SampleVCTests: XCTestCase {
  var record = false
  var expectation: XCTestExpectation!
  func testViewController() throws {
    let SampleVC =  SampleVC(coder: coder, baseDelegate: self)
    let navi = UINavigationController(rootViewController: SampleVC)
    navi.modalPresentationStyle = .fullScreen
    UIApplication.shared.rootViewController = navi
    expectation = expectation(description: "callSomeAPI finished")
    wait(for: [expectation], timeout: 5.0)
    viewController.baseViewControllerDelegate = nil
    testSnapshot(vc: navi, record: record, file: #file, function: #function, line: #line)
  }
  func viewDidDraw() {
    expectation.fulfill()
  }
}
反映したいAPIから取得するデータが複数あるとき(= baseDelegate.viewDidDraw() を複数箇所で呼びたいとき)は、 expectedFulfillmentCount や assertForOverFulfill を指定します。
final class SampleVCTests: XCTestCase {
  var record = false
  var expectation: XCTestExpectation!
  func testViewController() throws {
    let SampleVC = SampleVC(coder: coder, baseDelegate: self)
    let navi = UINavigationController(rootViewController: SampleVC)
    navi.modalPresentationStyle = .fullScreen
    UIApplication.shared.rootViewController = navi
    expectation = expectation(description: "callSomeAPI finished")
    // viewDidDraw()が2回呼ばれるとき
    expectation.expectedFulfillmentCount = 2
    // 指定した回数を超えてviewDidDraw()が呼ばれる可能性があるとき、超えた分は無視する
    expectation.assertForOverFulfill = false
    wait(for: [expectation], timeout: 5.0)
    viewController.baseViewControllerDelegate = nil
    testSnapshot(vc: navi, record: record, file: #file, function: #function, line: #line)
  }
  func viewDidDraw() {
      expectation.fulfill()
  }
}
前の画面のbaseViewControllerDelegateが残っていると、全画面を通してスナップショットテストを実行した際に testSnapshot() を呼び出したタイミングでviewDidLoad以降のライフサイクルメソッドが実行端末分呼ばれるため、APIも再度実行され、 viewDidDraw() も実行されてしまい、multiple calls エラーになります。
そのため、wait() の後にbaseViewControllerDelegateをクリアしています。
端末でframeがズレる
スナップショットテストでは複数端末のスナップショットを生成できますが、一部の端末でパーツの配置やサイズがズレてしまう問題がありました。
ずれとる
これは、スナップショットテストの実行のライフサイクルに起因しています。
スナップショットテストではある一つの端末で起動し、その後別の端末は再読み込みをせずにサイズを変えて再描画されます。つまり、 viewDidLoad() は最初の一度のみ実行され、その他の端末分は viewWillAppear() から実行されます。
対処法としては、テストしたいViewControllerをラップしたMockViewControllerを作成し、 viewDidLoad() で読んでいるメソッドを viewWillAppear() で呼ぶように上書きします。
import XCTest
@testable import App

final class SampleVCTests: XCTestCase {
  // snapshot test 録画モードか否か
  var record = false
  func testViewController() throws {
    // 画面を呼び出す時と同様に書く
    let storyboard = UIStoryboard(name: "Sample", bundle: nil)
    let SampleVC = storyboard.instantiateViewController(identifier: "Sample") { coder in
      // スナップショットテスト用にラップしたVC
      MockSampleVC(coder: coder, completeHander: nil)
    }
    let navi = UINavigationController(rootViewController: SampleVC)
    navi.modalPresentationStyle = .fullScreen
    UIApplication.shared.rootViewController = navi
    testSnapshot(vc: navi, record: record, file: #file, function: #function, line: #line)
  }
}
class MockSampleVC: SampleVC {
  required init?(coder: NSCoder) {
    fatalError("init(coder: \\(coder) has not been implemented")
  }
  override init?(coder: NSCoder,
                completeHander: ((_ readString: String?) -> Void)? = nil) {
    super.init(coder: coder, completeHander: completeHander)
  }
  override func viewWillAppear(_ animated: Bool) {
    super.viewWillAppear(animated)
    // 以下は本来viewDidLoad()で呼び出しているメソッド
    super.setNavigationBar()
    super.setCameraPreviewMask()
    super.cameraPreview()
    super.stopCamera()
  }
}

まだ直らない・・・
それでも描画がズレる場合、 layoutIfNeeded() メソッドを呼び出し、フレームを更新すると多くの場合で直りました。
import XCTest
@testable import App
final class SampleVCTests: XCTestCase {
  var record = false
  func testViewController() throws {
    let storyboard = UIStoryboard(name: "Sample", bundle: nil)
    let SampleVC = storyboard.instantiateViewController(identifier: "Sample") { coder in
      MockSampleVC(coder: coder, completeHander: nil)
    }
    let navi = UINavigationController(rootViewController: SampleVC)
    navi.modalPresentationStyle = .fullScreen
    UIApplication.shared.rootViewController = navi
    testSnapshot(vc: navi, record: record, file: #file, function: #function, line: #line)
  }
}
fileprivate class MockSampleVC: SampleVC {
  required init?(coder: NSCoder) {
    fatalError("init(coder: \\(coder) has not been implemented")
  }
  override init?(coder: NSCoder, completeHander: ((_ readString: String?) -> Void)? = nil) {
    super.init(coder: coder, completeHander: completeHander)
  }
  override func viewWillAppear(_ animated: Bool) {
    super.viewWillAppear(animated)
    // 描画系メソッドを呼ぶ前にframeを更新
    self.videoView.layoutIfNeeded()
    self.targetView.layoutIfNeeded()
    super.setNavigationBar()
    super.setCameraPreviewMask()
    super.cameraPreview()
    super.stopCamera()
  }
}

いい感じ
Webview画面のスナップショット
Webviewで表示している画面のコンテンツについては関知しないが、配置しているツールバーなどはスナップショットテストを適応したい、という場面があると思います。
そのような場合、WebViewをロードする部分をWebView自体の設定とは切り分け、テストで呼ばないようにモックすると良いです。
実装側で self.webview.load(urlRequest) などを呼んでWebViewのコンテンツを表示するメソッドと、WebView自体の設定をしているメソッドと切り分けています。
// VCの実装
class SampleWebviewVC: BaseViewController {
  // ...
  override func viewDidLoad() {
    super.viewDidLoad()
    self.setNavigationBar()
    **self.setWebView()**
    self.setToolBar()
  }
  override func viewDidAppear(_ animated: Bool) {
    super.viewDidAppear(animated)
    **self.setWebViewContent()**
  }
  // ...

  /**
    * WebViewの設定とコンテンツの設定をするメソッドを分ける
    */
  /// WebViewを設定する
  func setWebView() {
    self.webView.uiDelegate = self
    self.webView.navigationDelegate = self
    // Webページ読み込み状態の監視
    webViewObservers.append(self.webView.observe(\\.estimatedProgress, options: .new) { [weak self] _, change in
      guard let self = self else { return }
      if let newValue = change.newValue {
        self.loadingProgress.setProgress(Float(newValue), animated: true)
      }
    })
  }
  /// WebViewにコンテンツを設定する
  private func setWebViewContent() {
    let request = URLRequest(url: self.url,
                             cachePolicy: .reloadIgnoringLocalCacheData,
                             timeoutInterval: 60)
    self.webView.load(request)
  }
  // ...
}
そしてテスト対象のVCをラップしたモックではWebViewのコンテンツをロードするメソッドを呼ばないようにします。
import XCTest
@testable import App

final class SampleWebviewVCTests: XCTestCase {
  private let record = false
  func testViewController() throws {
    let storyboard = UIStoryboard(name: "SampleWebview", bundle: .main)
    let SampleWebviewVC = storyboard.instantiateViewController(identifier: "SampleWebview") { coder in
        MockSampleWebviewVC(coder: coder, url: URL(string: "<https://top.myroute.fun/>")!, linkType: .hoge)
    }
    let navi = UINavigationController(rootViewController: SampleWebviewVC)
    navi.modalPresentationStyle = .fullScreen
    UIApplication.shared.rootViewController = navi
    testSnapshot(vc: navi, record: record, file: #file, function: #function, line: #line)
  }
}
fileprivate class MockSampleWebviewVC: SampleWebviewVC {
  override init?(coder: NSCoder, url: URL, linkType: LinkNamesItem?) {
    super.init(coder: coder, url: url, linkType: linkType)
  }
  required init?(coder: NSCoder) {
    fatalError("init(coder:) has not been implemented")
  }
  override func viewWillAppear(_ animated: Bool) {
    // viewDidLoadで呼び出していたメソッドをviewWillAppearで呼ぶように変更
    self.setNavigationBar()
    self.setWebView()
    self.setToolBar()
    super.viewWillAppear(animated)
  }
  override func viewDidAppear(_ animated: Bool) {
    // Do nothing
    // WebViewのコンテンツ設定をするメソッドを呼ばないように上書き
  }
}
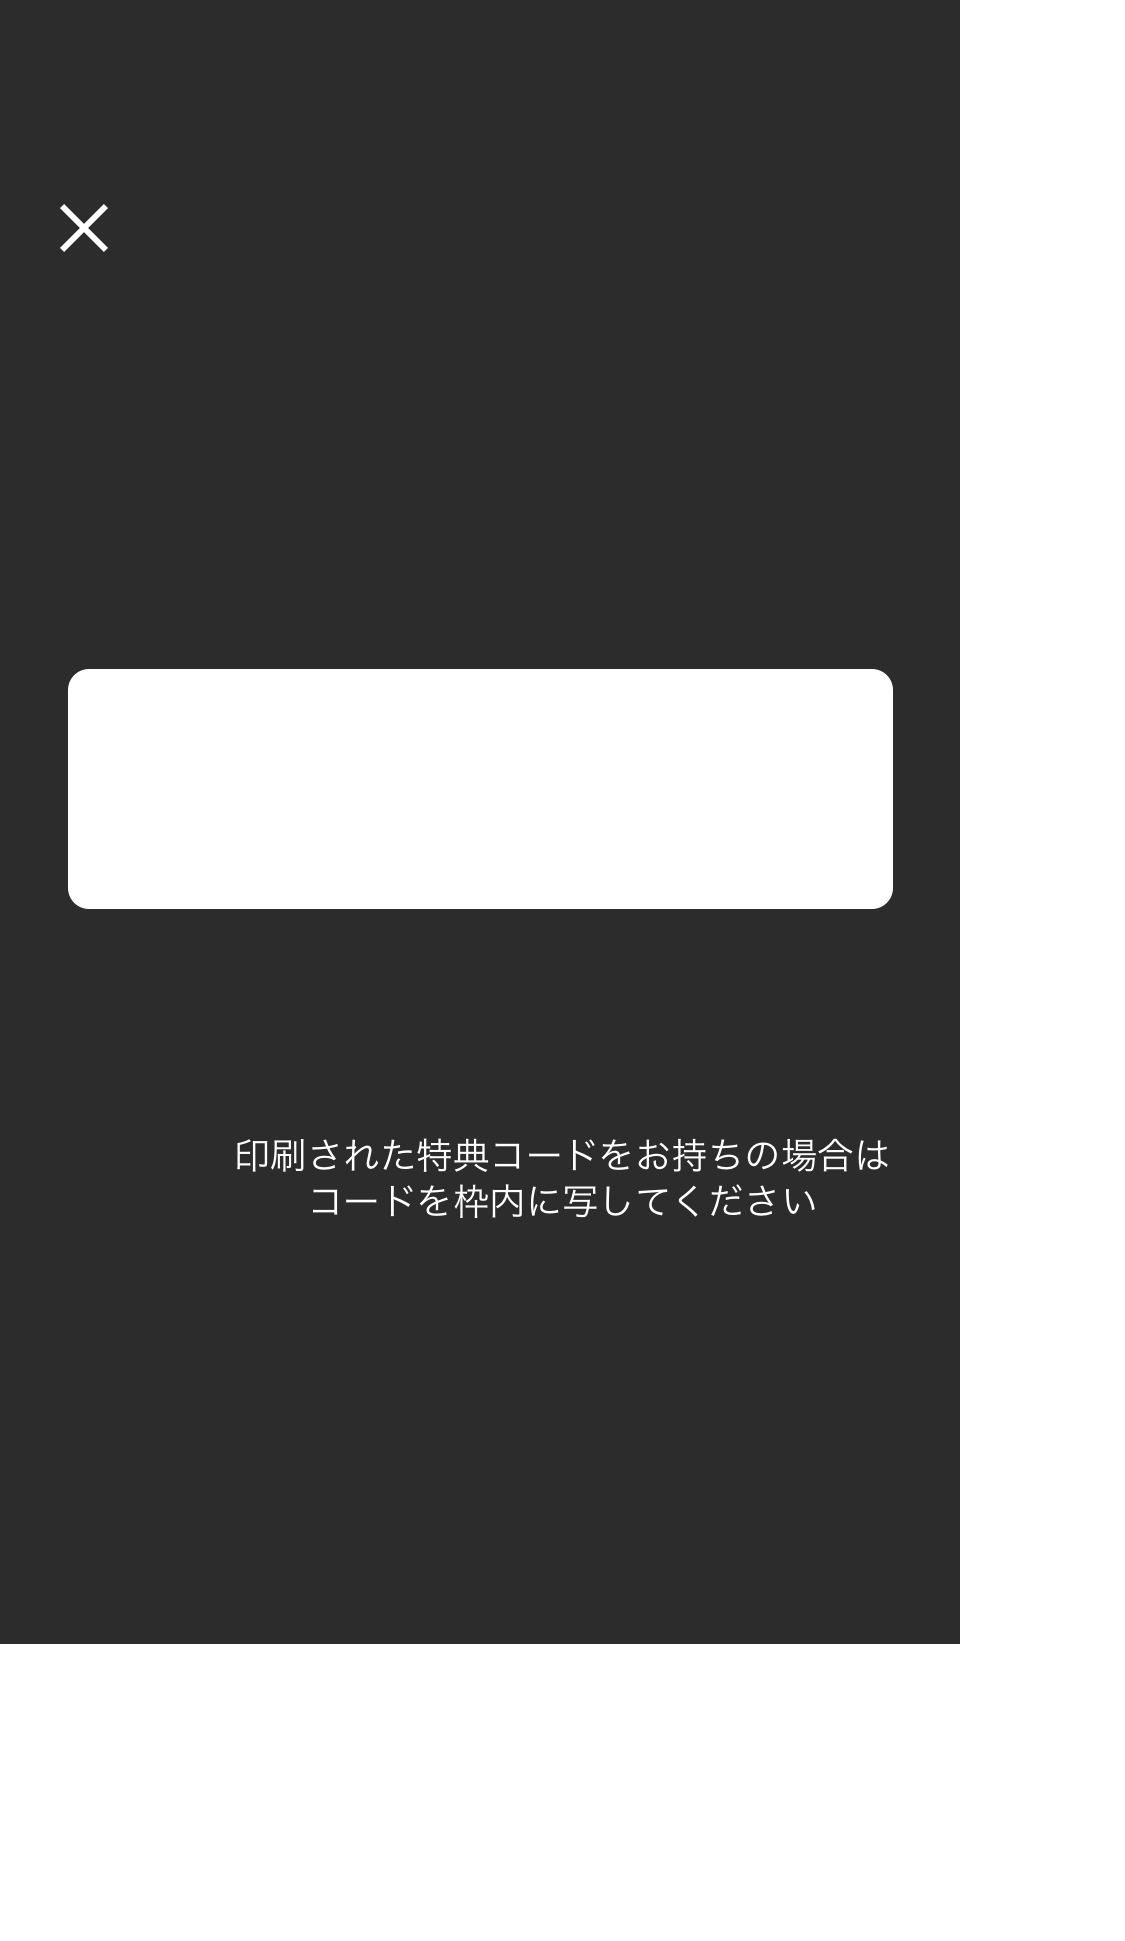
カメラを呼び出している画面のスナップショット
カメラを呼び出し、その上にカスタマイズしたViewを表示している画面もスナップショットしたいです。しかし、シミュレータ上ではカメラが動かないので、どうにかカメラ部分を無効化しつつオーバーレイ部分をテストできるようにする必要があります。
シミュレーター上でカメラ画像が動くようにダミー映像を差し込めるようにする案もありましたが、メインではない画面のスナップショットテストのためだけに導入するのもコストが見合わず悩みどころです。
myrouteのスナップショットテストでは、カメラ映像の入力を取り込んだり、AVCaptureVideoPreviewLayerで表示するキャプチャーを設定したりする部分を丸ごと呼ばないようにモックで上書きするようにしました。こうすることで、入力のないAVCaptureVideoPreviewLayerが真っ白な画面として表示され、その上にカスタマイズしたViewを表示することができます。
実際の実装では以下のように書かれているところを・・・
class UseCameraVC: BaseViewController {
  // ...
  override func viewDidLoad() {
    super.viewDidLoad()
    self.videoView.layoutIfNeeded()
    setNavigationBar()
    setCameraPreviewMask()
    do {
      guard let videoDevice = AVCaptureDevice.default(for: AVMediaType.video) else { return }
      let videoInput = try AVCaptureDeviceInput(device: videoDevice) as AVCaptureDeviceInput
      if captureSession.canAddInput(videoInput) {
        captureSession.addInput(videoInput)
        let videoOutput = AVCaptureVideoDataOutput()
        if captureSession.canAddOutput(videoOutput) {
          captureSession.addOutput(videoOutput)
          videoOutput.setSampleBufferDelegate(self, queue: DispatchQueue.main)
        }
      }
    } catch { return }
    cameraPreview()
  }

  override func viewWillAppear(_ animated: Bool) {
    super.viewWillAppear(animated)
    // シミュレータの時はカメラが使えないので、閉じる
    #if targetEnvironment(simulator)
    stopCamera()
    dismiss(animated: true)
    #else
    captureSession.startRunning()
    #endif
  }
}
以下のようにモックで上書きします。
frameがズレる問題で解説した理由から、 viewDidLoad() で呼び出していたメソッド群も viewWillAppear() で呼ぶようにしています。
class MockUseCameraVC: UseCameraVC {
  // ...
  override func viewWillAppear(_ animated: Bool) {
    super.viewWillAppear(animated)
    self.videoView.layoutIfNeeded()
    super.setNavigationBar()
    super.setCameraPreviewMask()
    super.cameraPreview()
    super.stopCamera()
  }
}
cameraPreview() メソッドはAVCaptureVideoPreviewLayerで captureSession からカメラ映像を画面に表示していますが、ここの入力がないように上書きしてあるので、白いViewで描画されます。
CI戦略
スナップショットテスト導入初期は、リファレンス画像を単一のS3バケットにアップロードし、レビューの際は都度リファレンス画像をダウンロードしてテストを実行していました。
しかし、あるViewを修正して同時にリファレンス画像を更新した場合に、そのPRがマージされるまでの間は他のPRのテストが通らなくなってしまうという問題がありました。
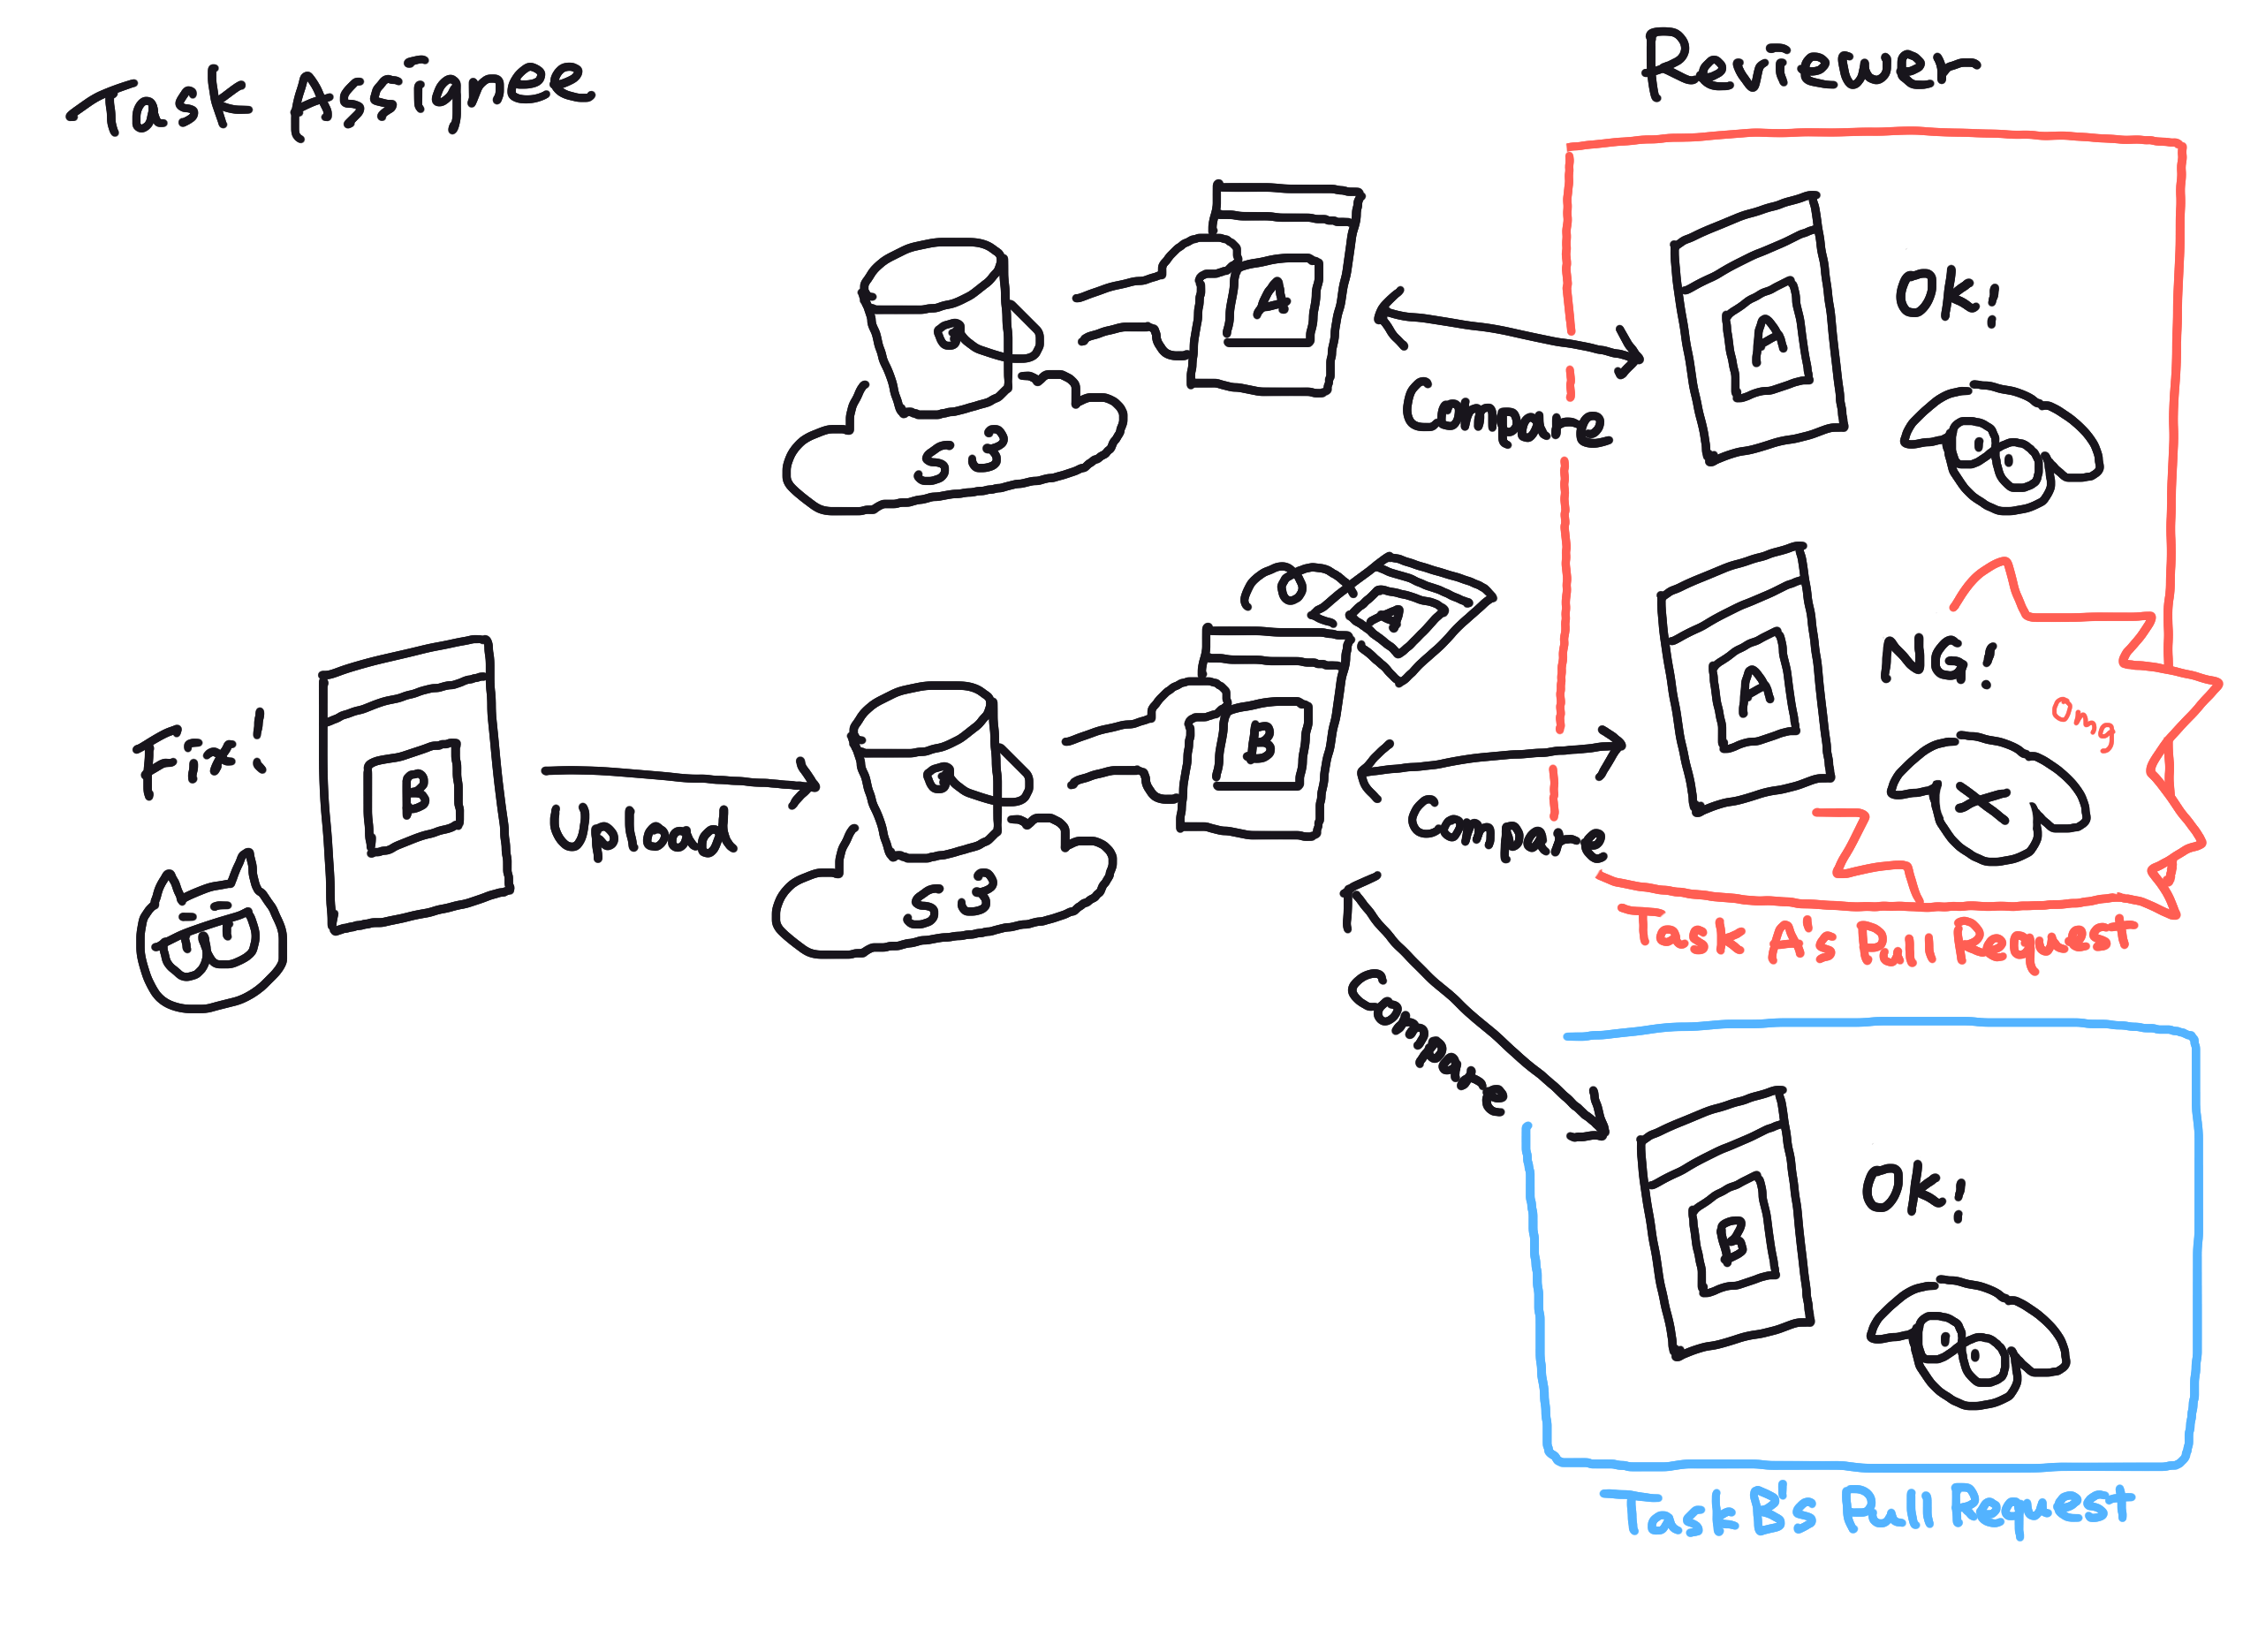
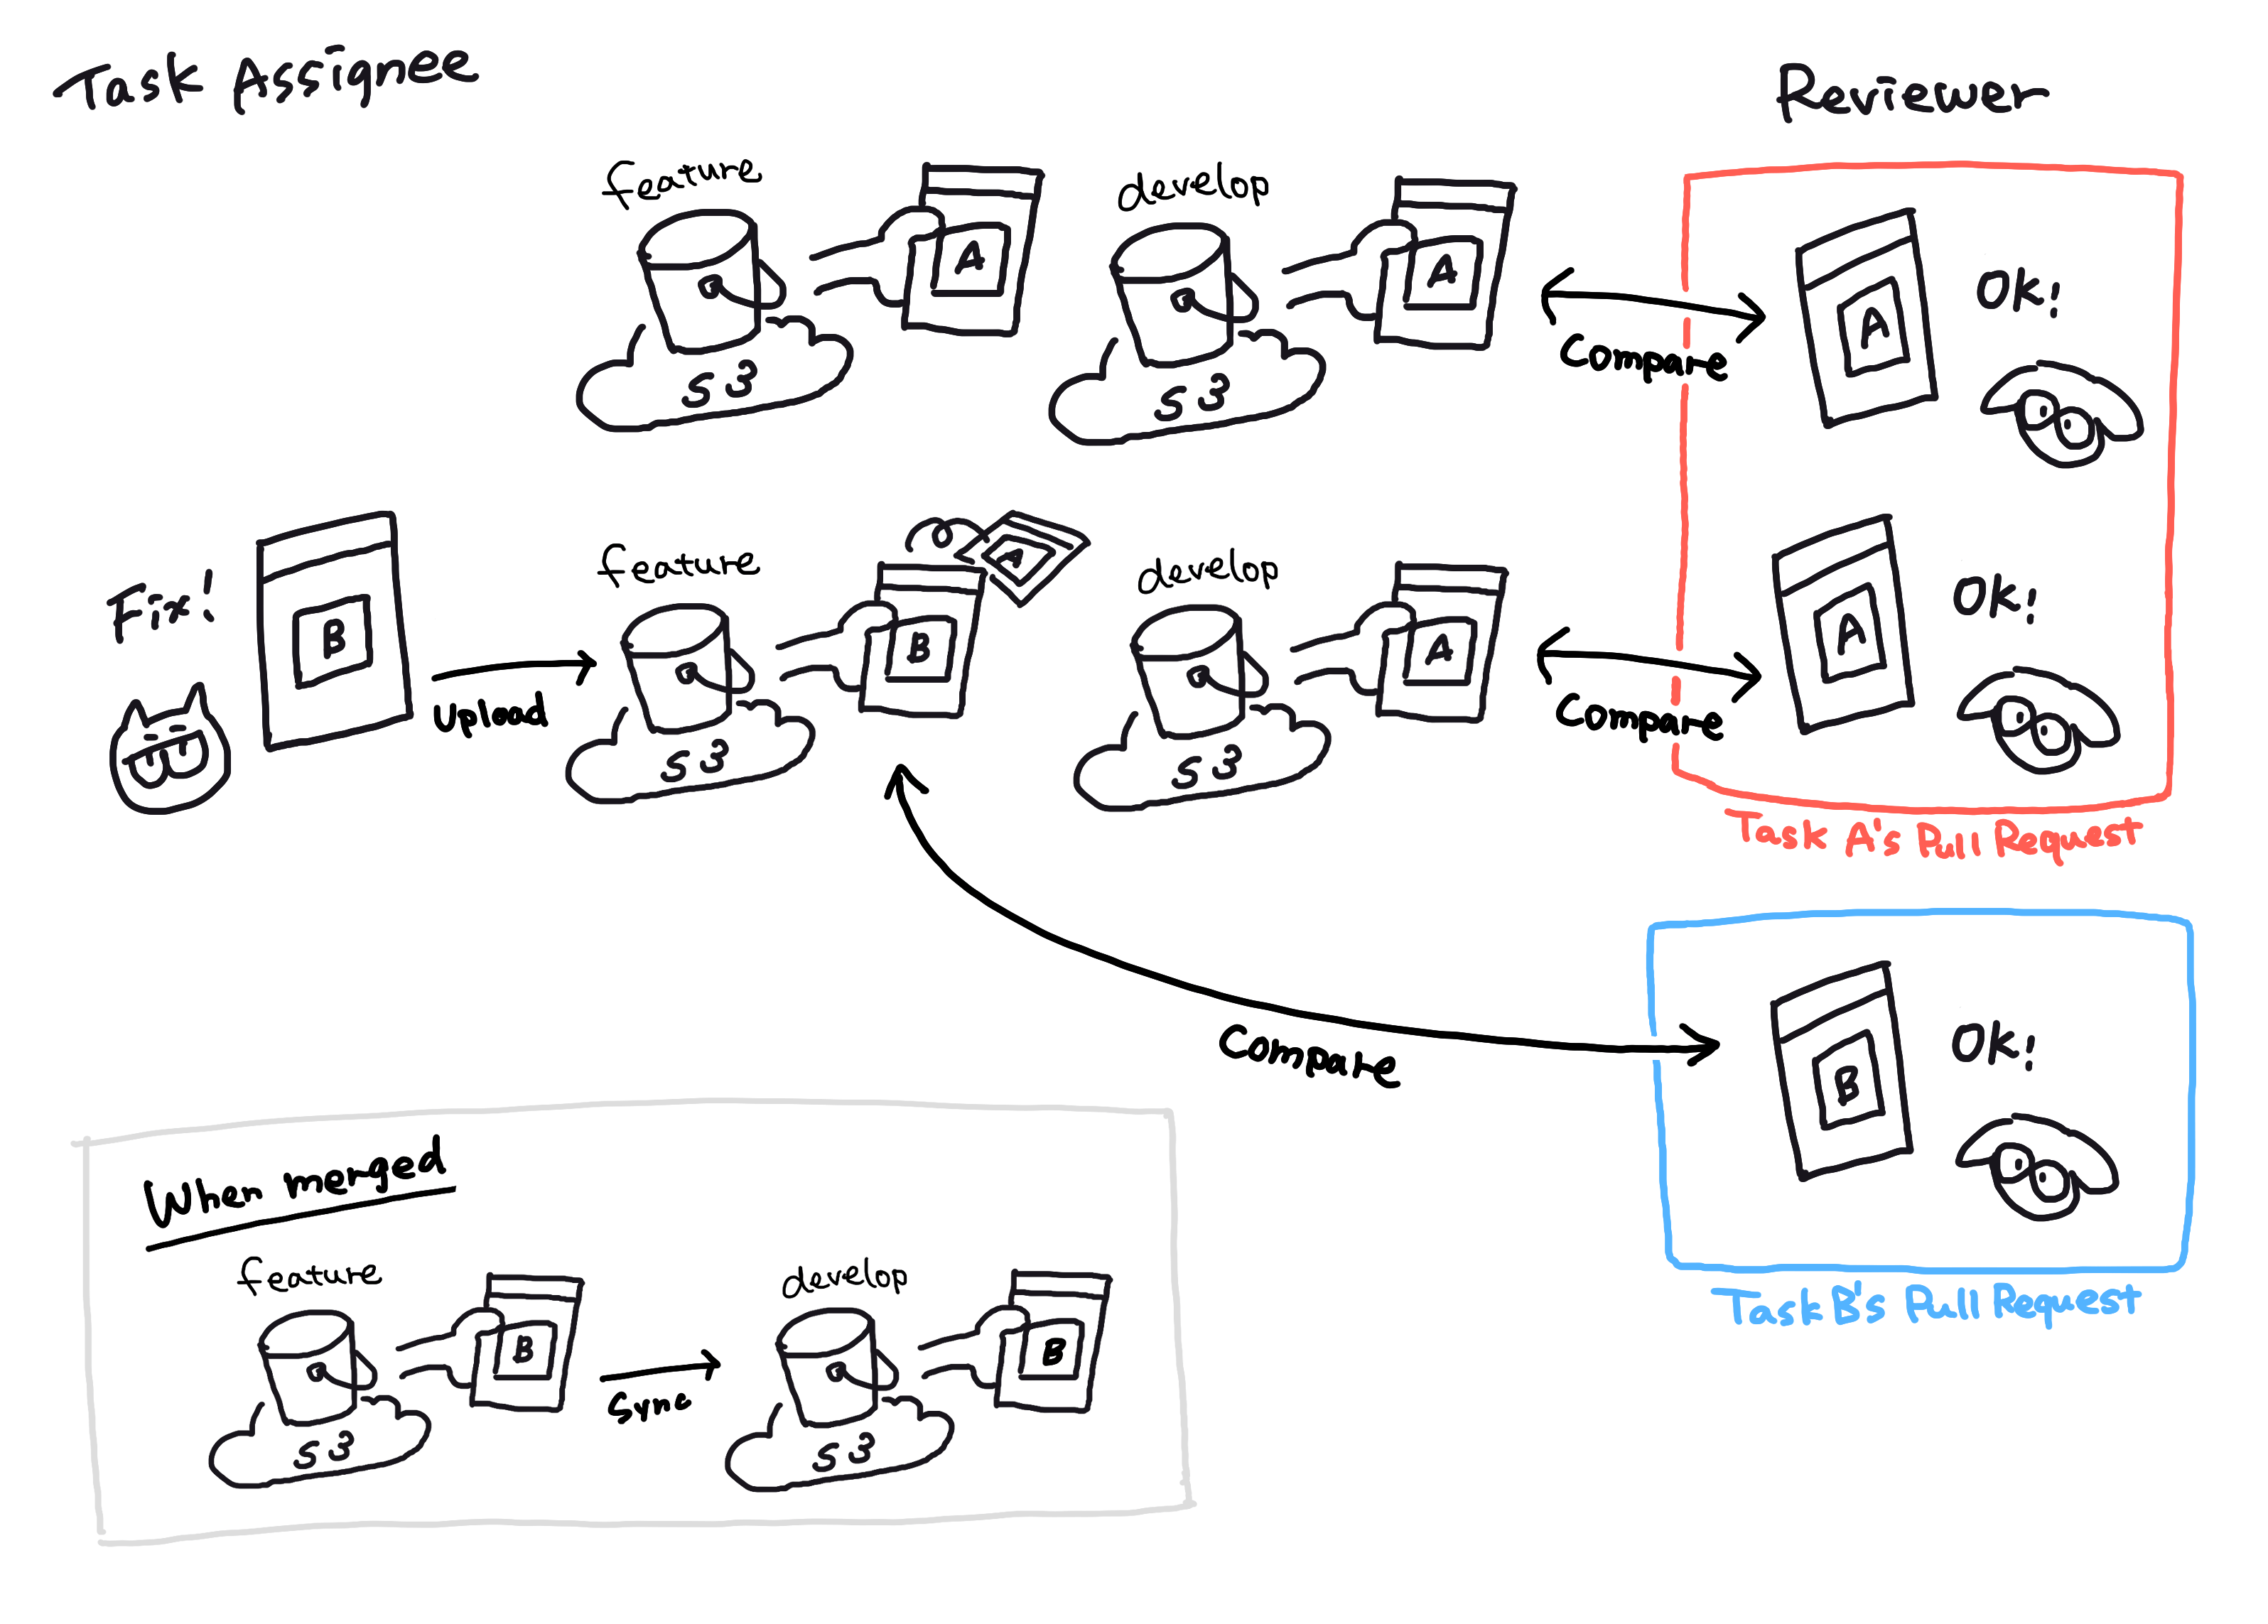
そこで、リファレンス画像をホストしているバケット内に2つディレクトリを作成しました。
片方はPRレビュー時の画像をホストしており、PRがマージされたらもう一方のディレクトリにコピーします。そうすることで、リファレンス画像の更新があっても他PRのテストの妨げにならないようにしました。
便利なシェルたち
my routeでは4つのスナップショット用のシェルを用意しています。
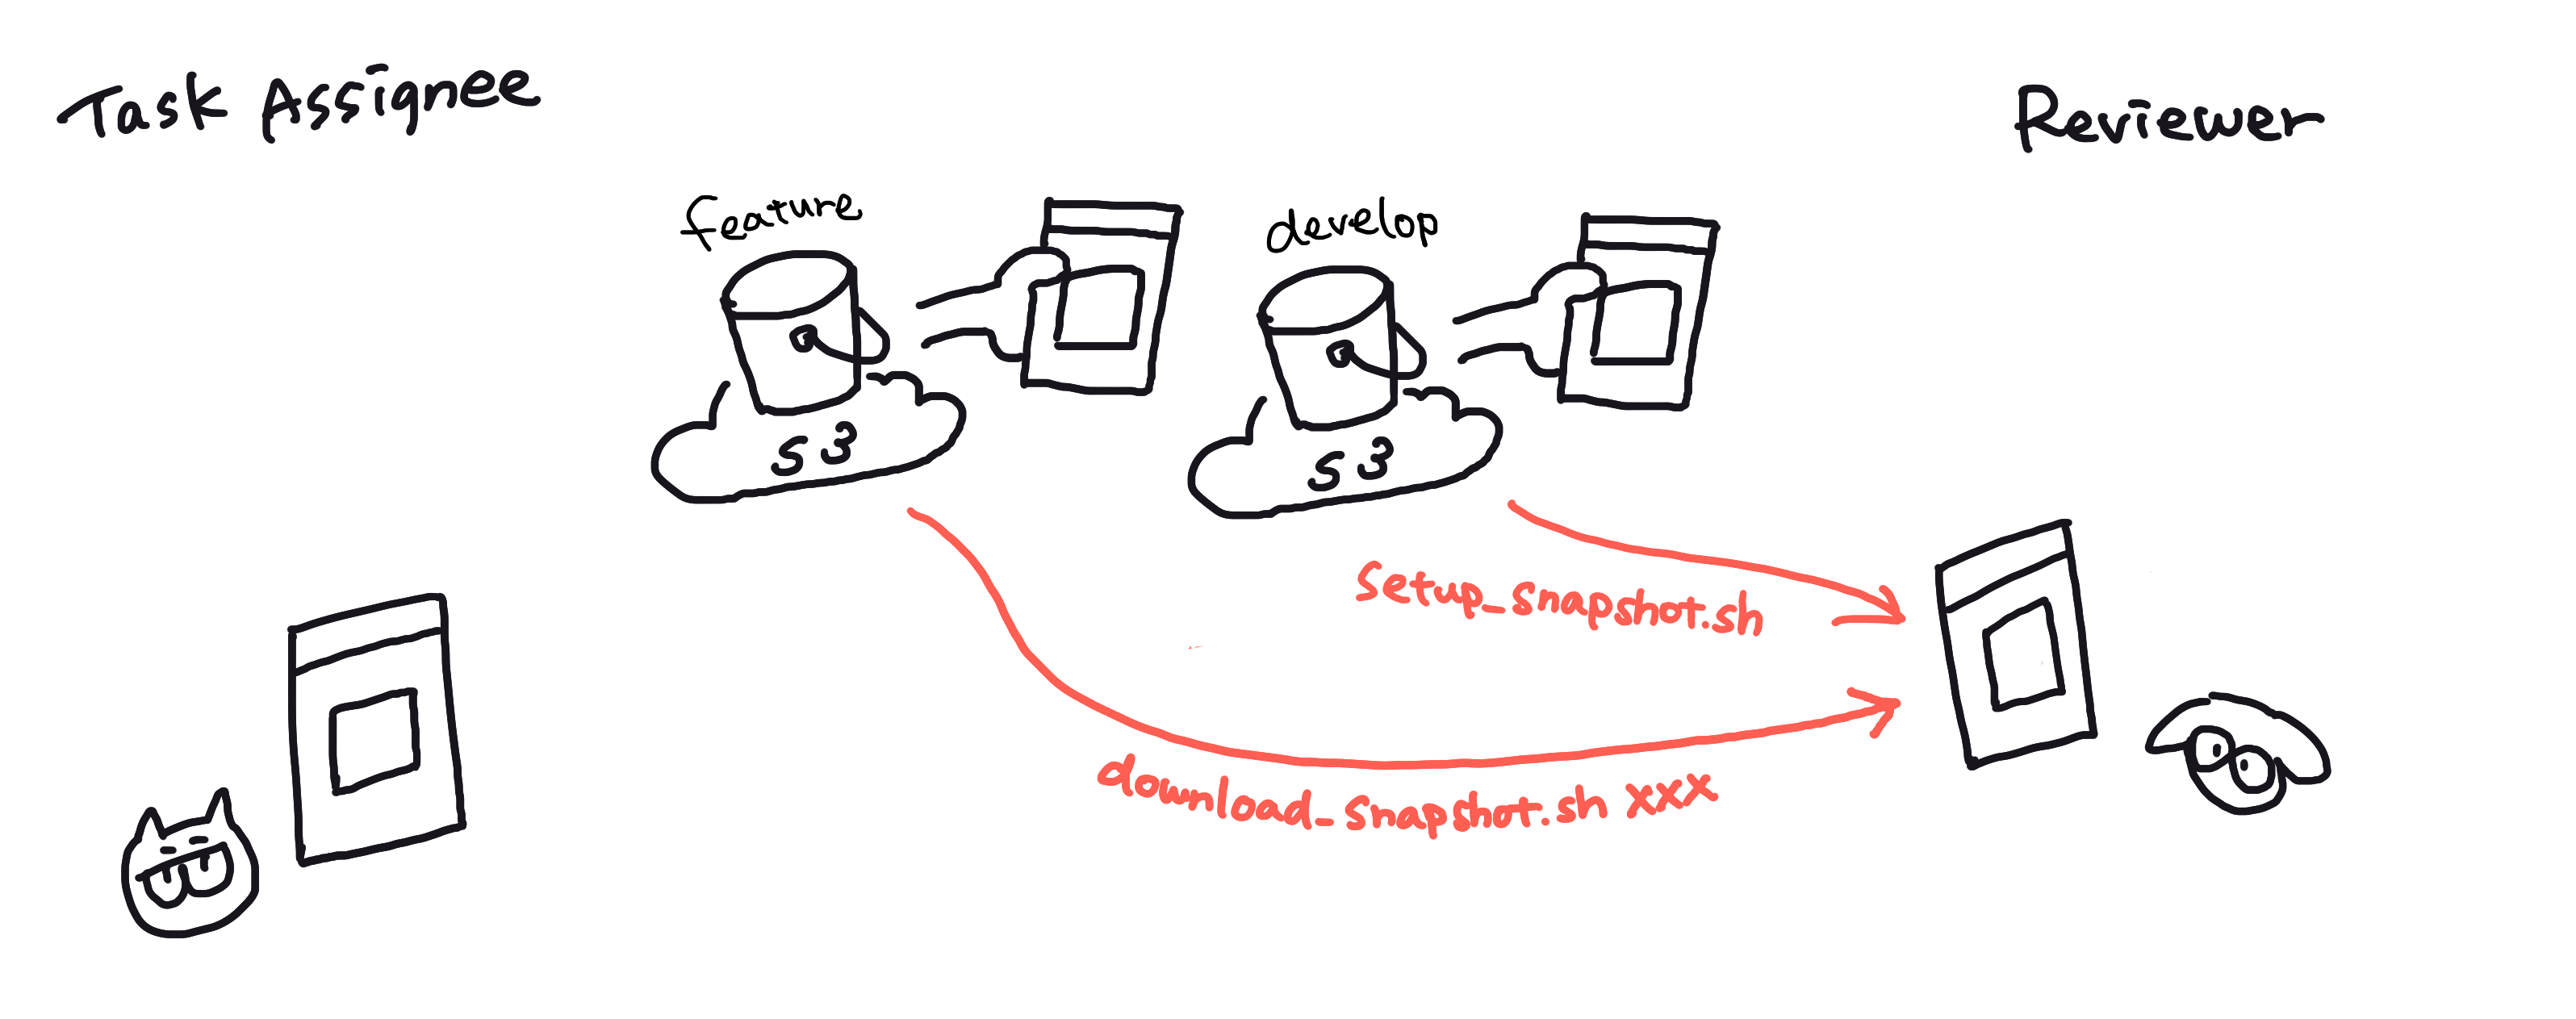
1つ目は現行の画面のリファレンス画像を一通りダウンロードするシェルです。
これにより、ローカルでテストが通るようになります。
# developブランチから切り替えたときに利用
# 例:sh setup_snapshot.sh
# リファレンス画像のディレクトリから古いものを掃除
rm -r AppTests/Snapshot/__Snapshots__/
# S3からリファレンス画像をダウンロード
aws s3 cp $awspath/AppTests/Snapshot/__Snapshots__ --recursive --profile user
2つ目はPull Requestを作成する際に、変更があるリファレンス画像をPRレビュー用のS3バケットにアップロードするシェルです。
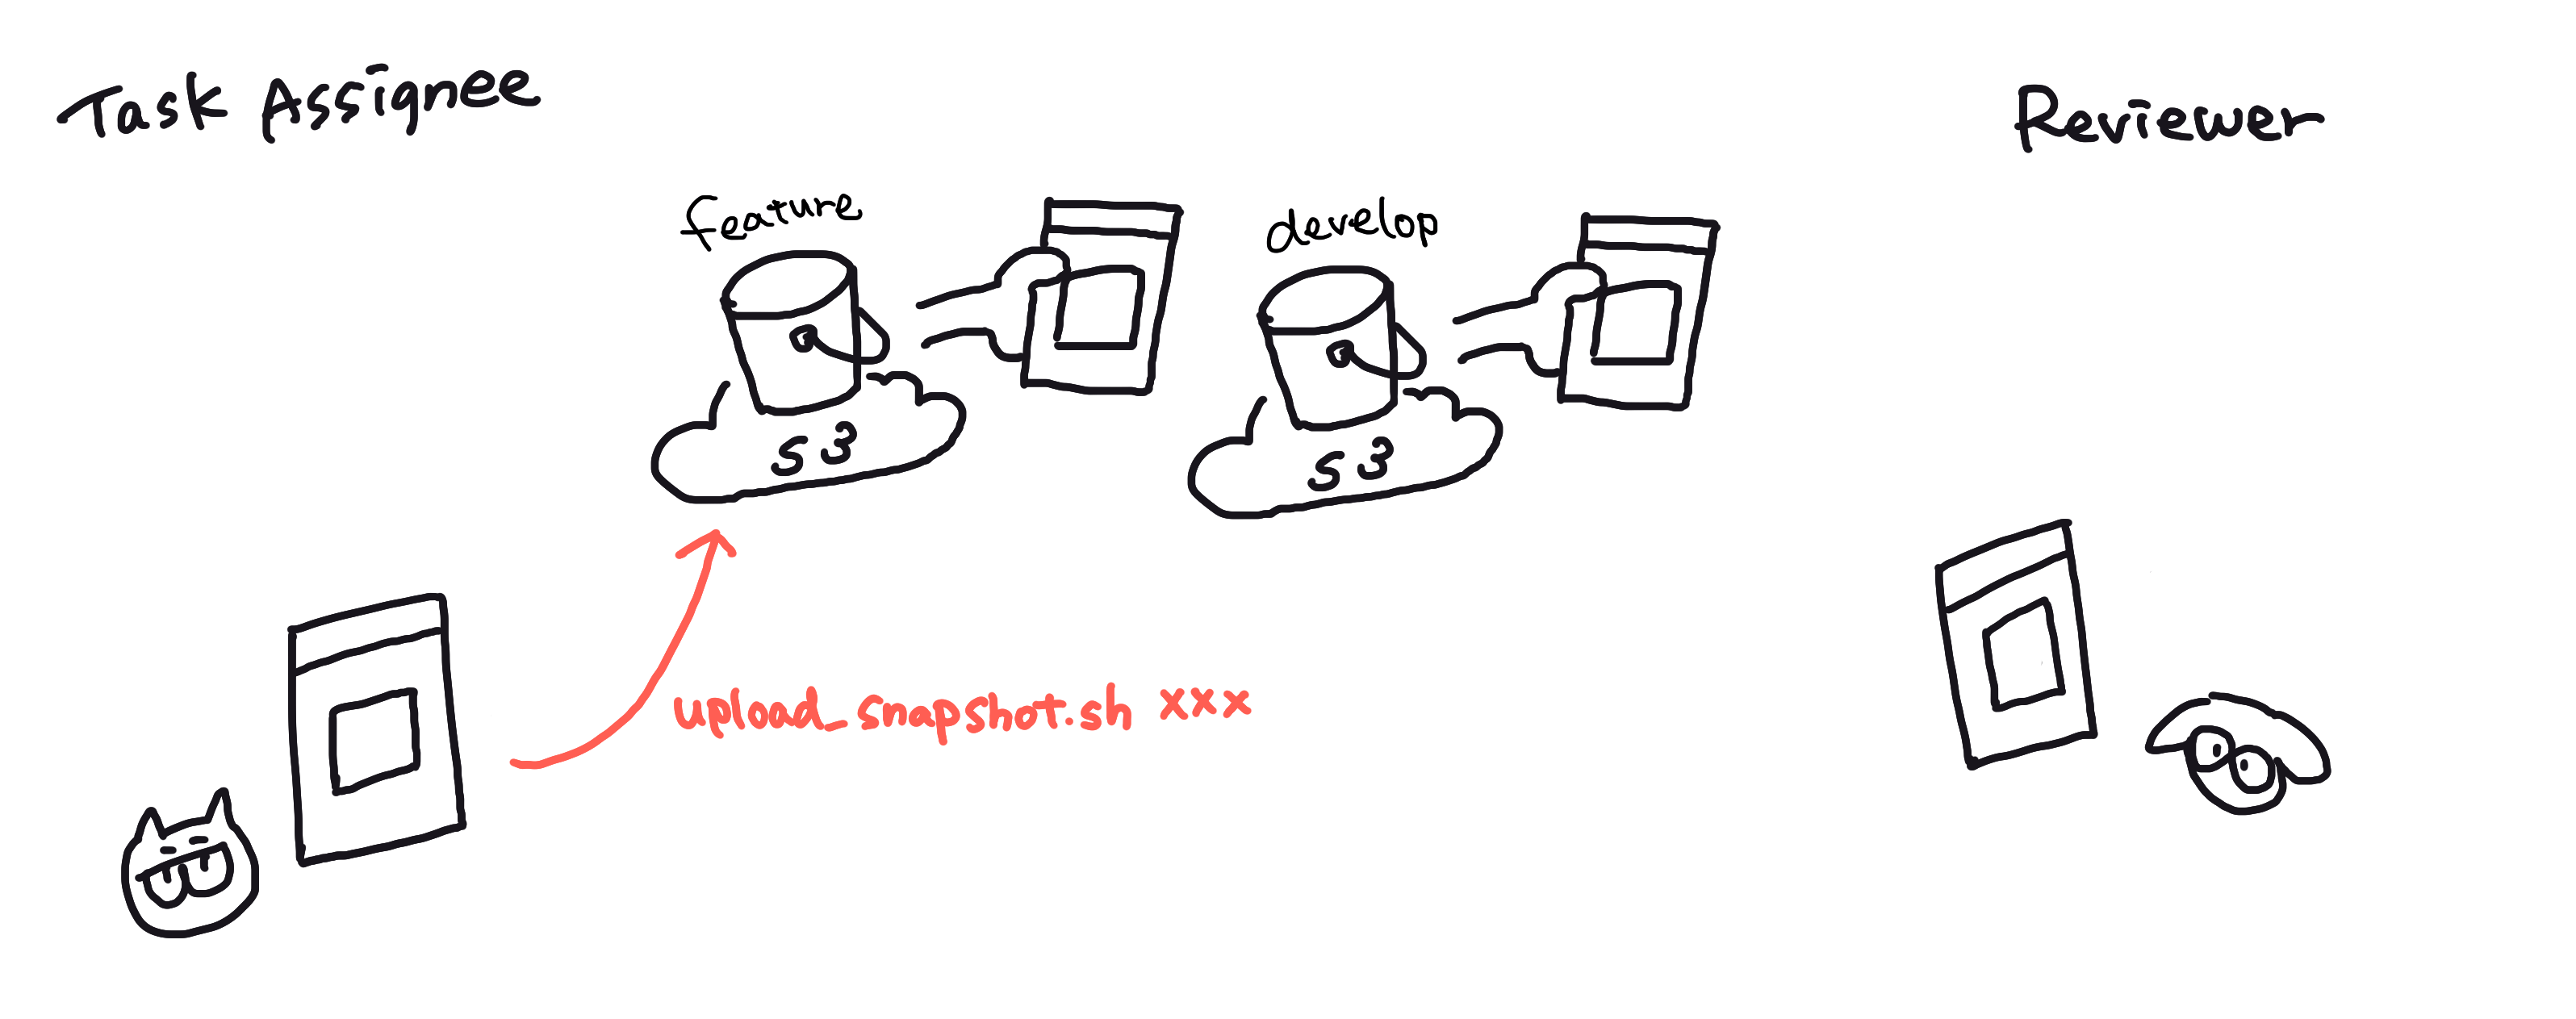
# PRを作成する際に、変更したテストを引数にしてアップロードしてください
# 例:sh upload_snapshot.sh ×××Tests
path="./SpotTests/Snapshot/__Snapshots__"
awspath="s3://strl-mrt-web-s3b-mat-001-jjkn32-e/mobile-app-test/ios/feature/__Snapshots__"
if [ $# = 0 ]; then
  echo "引数がありません"
else
  for testName in "${@}";
  do
  if [[ $testName == *"Tests"* ]]; then
    echo "$path/$testName"
    aws s3 cp "$path/$testName" "$awspath/$testName" --exclude ".DS_Store" --recursive --profile user
  else
    echo "($0testName) テストが存在しません"
  fi
  done
fi
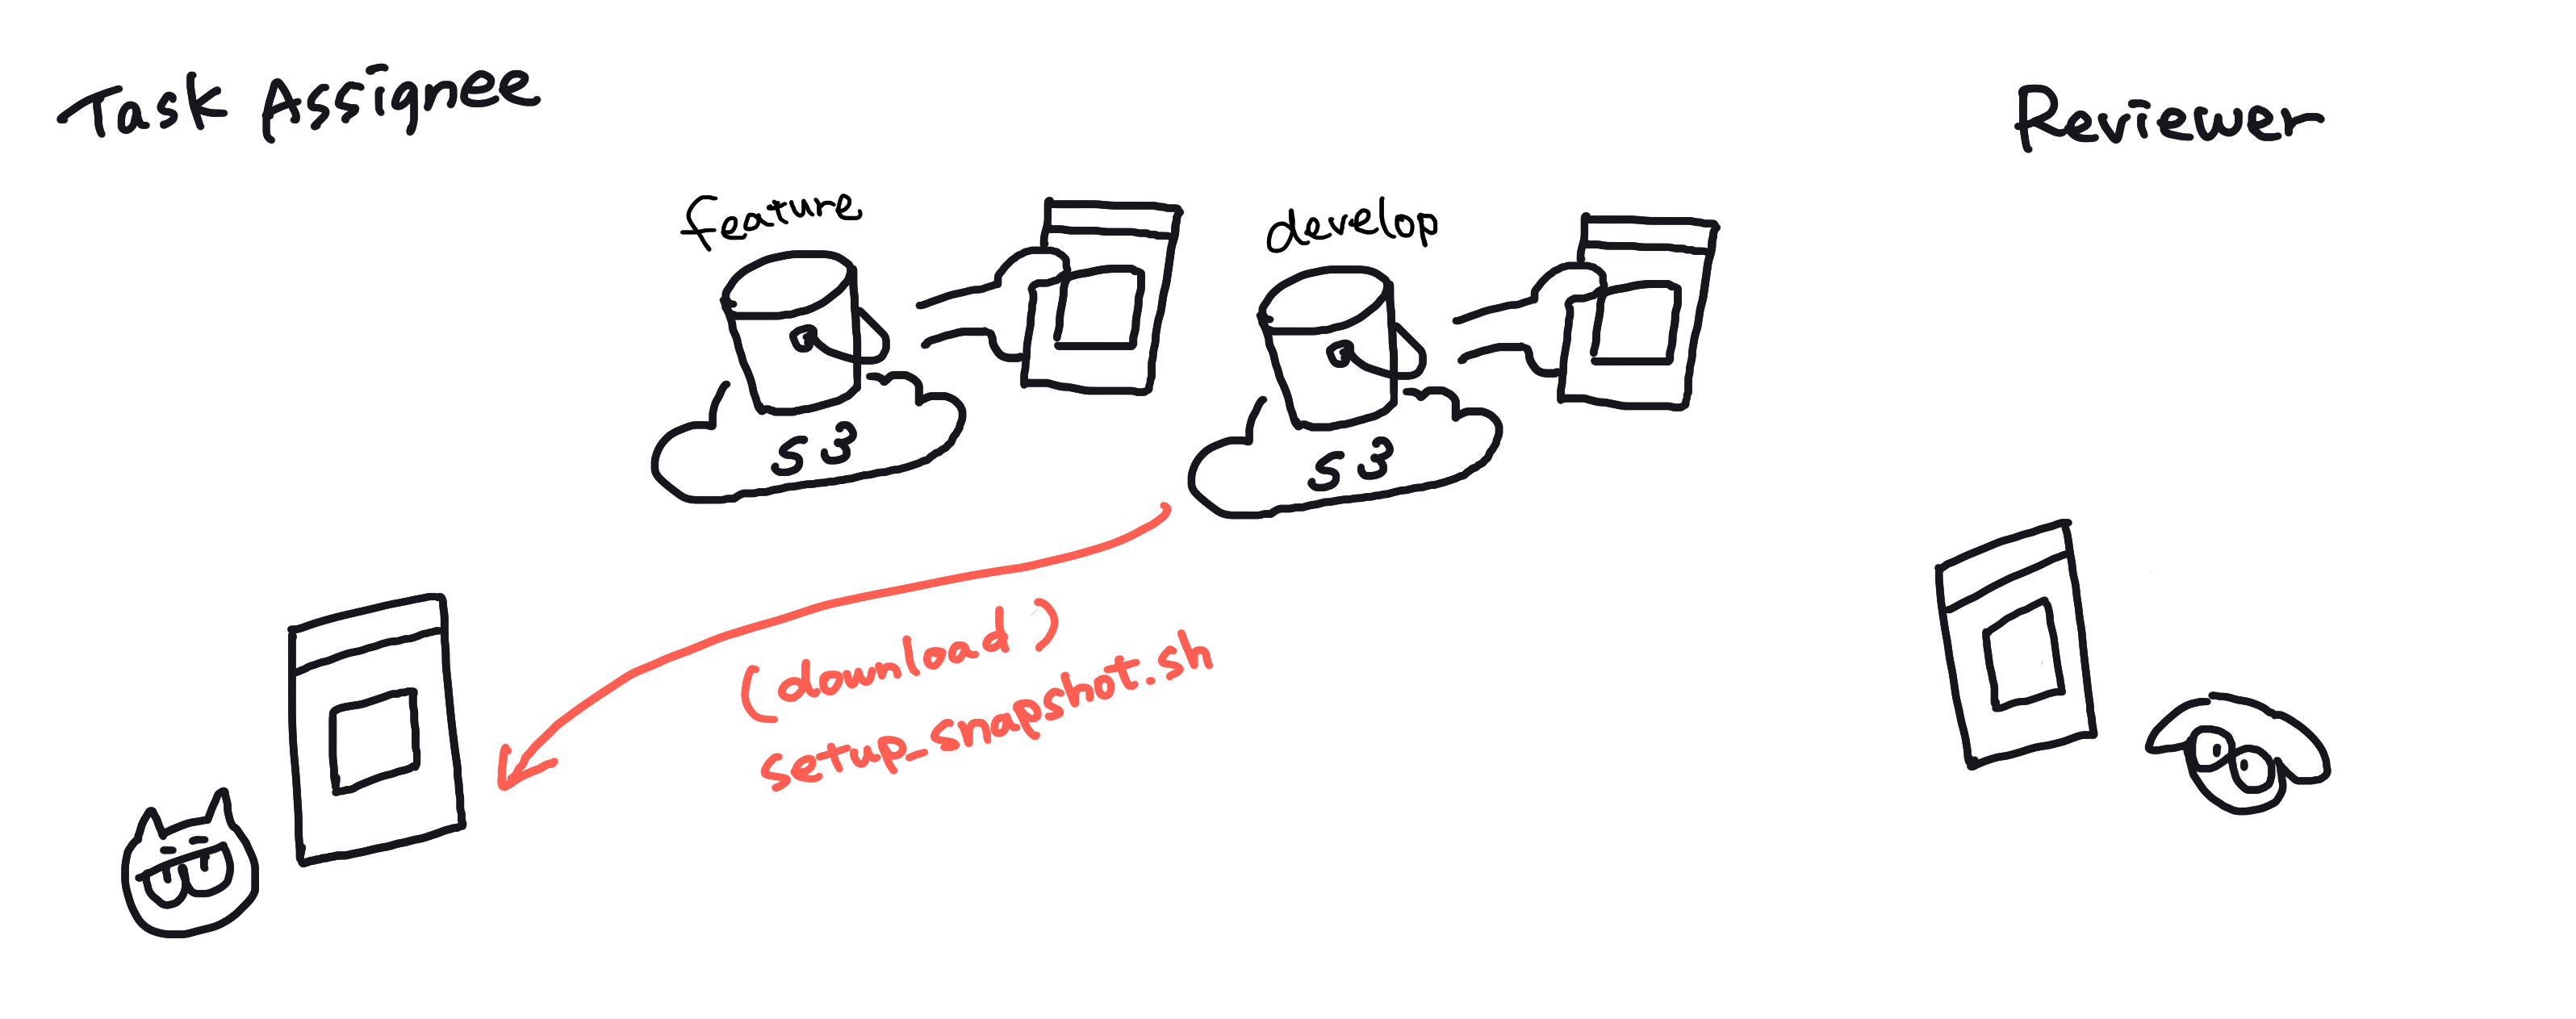
3つ目は改修が入った画面のリファレンス画像を個別にダウンロードするシェルです。
画面の変更があるPull Requestのレビュー時に使用します。
# テストレビューする際、対象のテストのリファレンス画像をダウンロードしてください
# 例:sh download_snapshot.sh ×××Tests
if [ $# = 0 ]; then
  echo "引数がありません"
else
  rm -r AppTests/Snapshot/__Snapshots__/
  for testName in "${@}";
  do
  if [[ $testName == *"Tests"* ]]; then
      echo "$localpath/$testName"
      aws s3 cp "$awspath/$testName" "$localpath/$testName" --recursive --profile user
  else
      echo "($0testName) テストが存在しません"
  fi
  done
fi
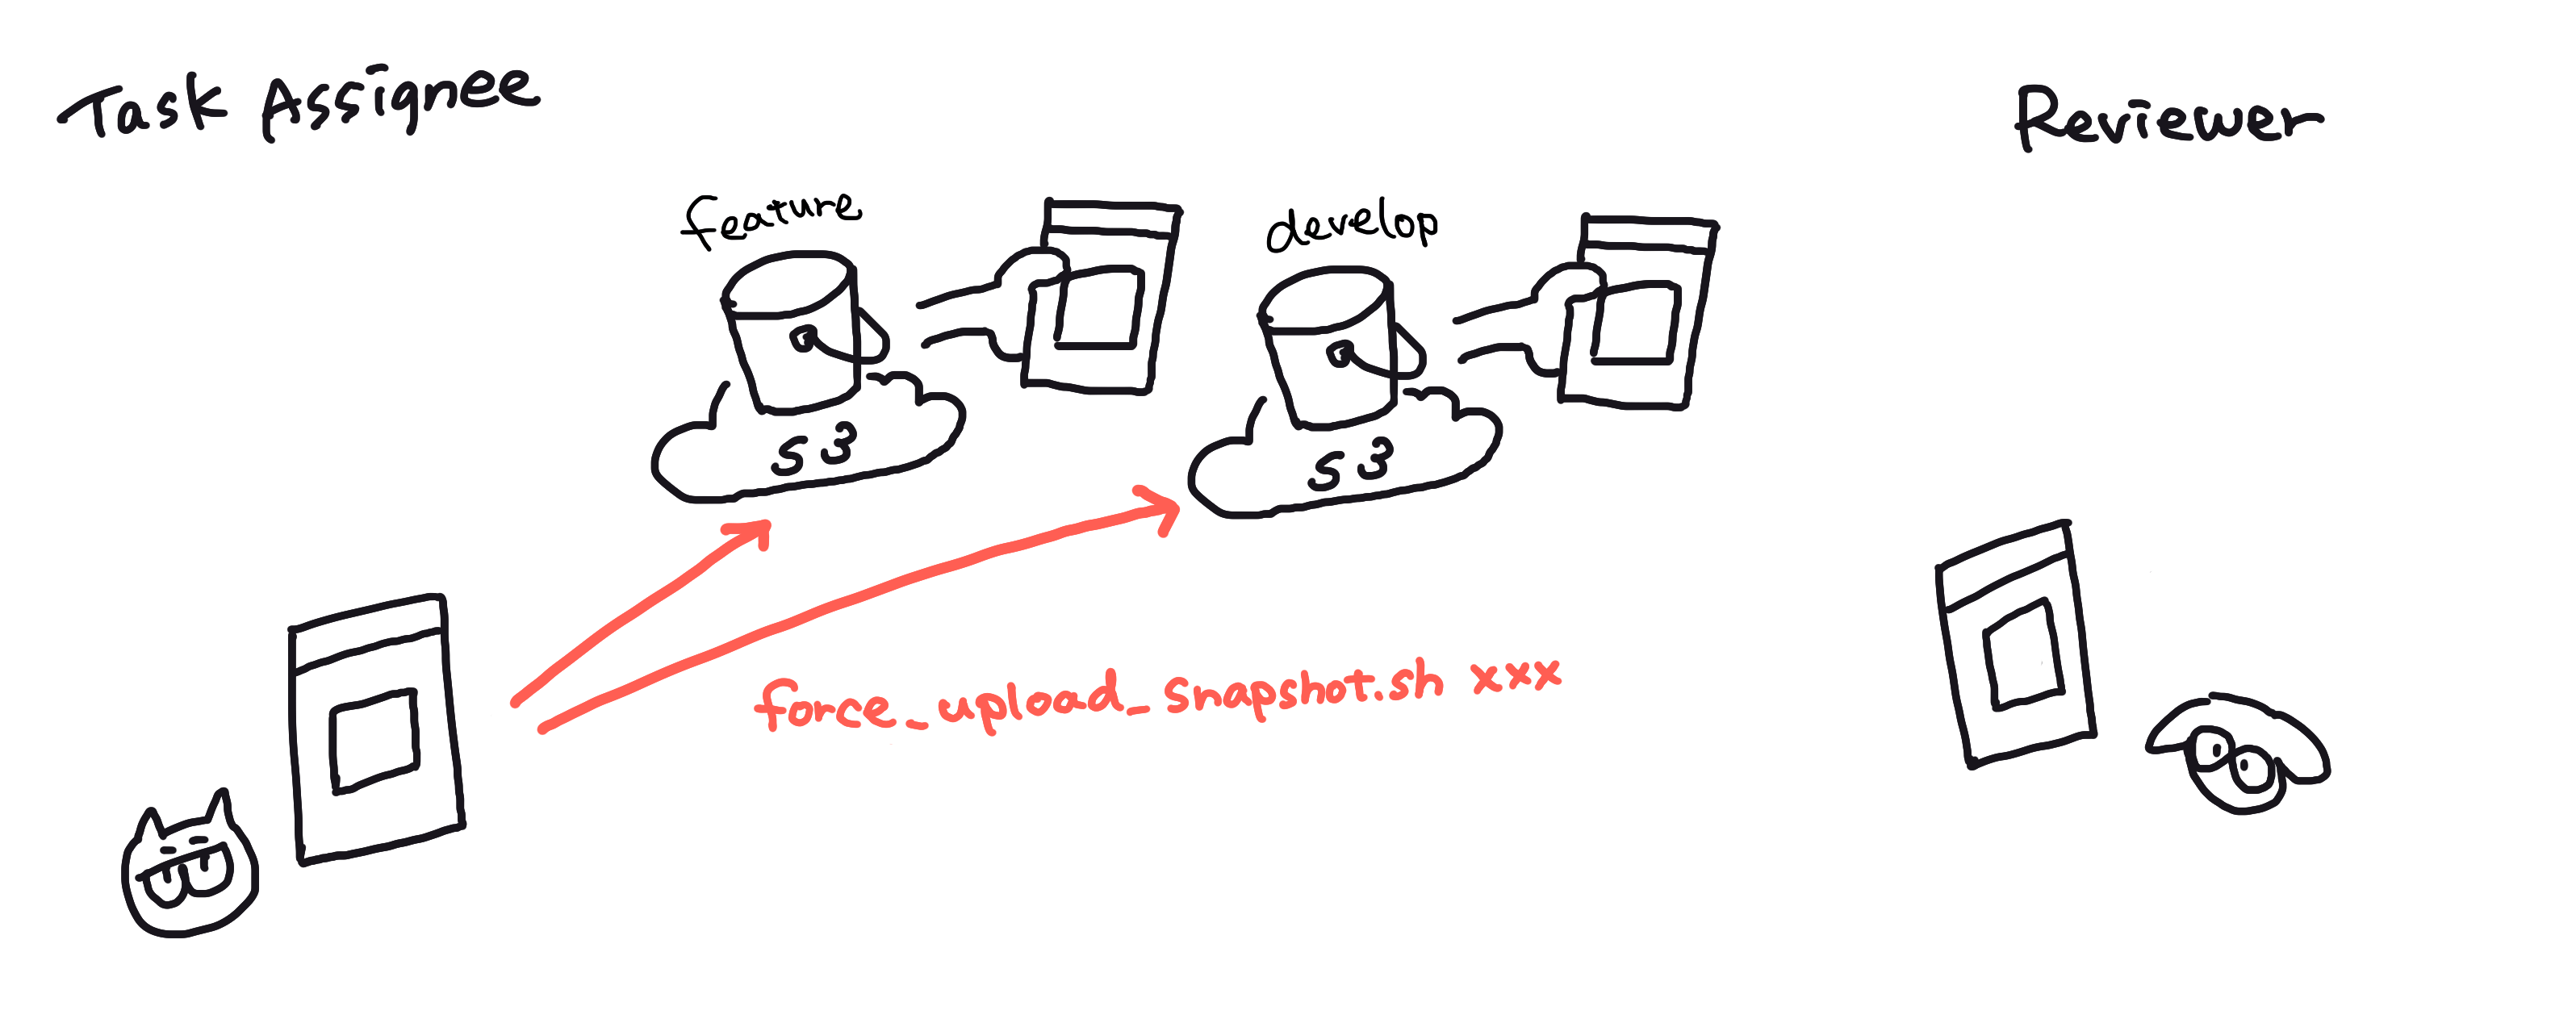
4つ目は強制的にリファレンス画像を更新するシェルです。
基本的にはテストファイルに修正があった画面のリファレンス画像を自動的にコピーするようにしているので不要ですが、共通部品を修正した場合など、テストファイルを変更せずにリファレンス画像に変更が入る際に有用です。
# 修正したテストファイル以外のリファレンス画像に影響がある場合(共通部品を修正した場合等)、
# 手動でアップロードしてください
# マージ後に利用してください
# 例:sh force_upload_snapshot.sh ×××Tests
if [ $# = 0 ]; then
  echo "引数がありません"
else
  echo "強制的にAWS S3のdevelopフォルダにアップロードしますか?【yes/no】"
  read question
  if [ $question = "yes" ]; then
    for testName in "${@}";
    do
    if [[ $testName == *"Tests"* ]]; then
        echo "$localpath/$testName"
        aws s3 cp "$localpath/$testName" "$awsFeaturePath/$testName" --exclude ".DS_Store" --recursive --profile user
        aws s3 cp "$localpath/$testName" "$awsDevelopPath/$testName" --exclude ".DS_Store" --recursive --profile user
    else
        echo "($testName) テストが存在しません"
    fi
    done
  else
    echo "終了"
  fi
fi
4つもあるとどれがいつ誰が使うのかわからなくなってしまうので、Taskfileにも定義し、説明をすぐ出せるようにしています。
実行時は、ファイル名の指定など引数を渡すときに -- をつけなくてはいけなかったり、若干長くなるのでシェルをそのまま呼ぶ事が多いですが、この説明のためだけに設定する価値があると思います。
% task
task: [default] task -l --sort none
task: Available tasks for this project:
* default:              show commands
* setup_snapshot:       [For Assignee] [ブランチ切替後] スナップショットテストの修正時など、developブランチから切り替えたときに利用
(例) task setup_snapshot または sh setup_snapshot.sh
* upload_snapshot:       [For Assignee] [PR作成時] 変更したテストを引数にして、PR確認用のS3へスナップショット画像をアップロード
(例) task upload_snapshot -- ×××Tests または sh upload_snapshot.sh ×××Tests
* download_snapshot:       [For Reviewer] [レビュー時] 対象のテストを引数にして、リファレンス画像をダウンロード
(例) task download_snapshot -- ×××Tests または sh download_snapshot.sh ×××Tests
* force_upload_snapshot:       [For Assignee] [マージ後] 修正したテストファイル以外のリファレンス画像に影響がある場合(共通部品を修正した場合等)に、変更があるテストを引数にして、手動でアップロード
(例) task force_upload_snapshot -- ×××Tests または sh force_upload_snapshot.sh ×××Tests
また、これはRyommが個人的に設定しているものですが、シェルにプロファイル名がベタ書きになっているのを自分の環境で設定しているプロファイルに書き換えるエイリアスも用意しておくと便利です。(プロファイル名にこだわりがある人向け)
ここでは、 user とベタ書きされているプロファイルを myroute-user に書き換えています。
alias sett="gsed -i 's/user/myroute-user/' setup_snapshot.sh && gsed -i 's/user/myroute-user/' upload_snapshot.sh && gsed -i 's/user/myroute-user/' download_snapshot.sh && gsed -i 's/user/myroute-user/' force_upload_snapshot.sh"
Bitrise
my routeではBitriseを利用してCIを行っています。
スナップショットテストの変更を含むPRがマージされたとき、Bitriseはスナップショットテストの修正があるかどうかを自動的に判断し、リファレンス画像をfeatureフォルダーからdevelopフォルダへコピーします。
これにより、すべての状況においてスナップショットテストが常に正常に動作することができます。
肉眼で判断できないリファレンス画像の差異を炙り出す
目視では違いが分からないものの、スナップショットテストがエラーを吐く時があります。
(3_3)?
そんなときは、ImageMagickを用いて重ね合わせて見ると違いを見つけやすいです。
以下のようにコマンドを実行すると・・・
convert Snapshot/refarence.png -color-matrix "6x3: 1 0 0 0 0 0.4  0 1 0 0 0 0  0 0 1 0 0 0" ~/changeColor.png \
  && magick Snapshot/failure.png ~/changeColor.png -compose dissolve -define compose:args='60,100' -composite ~/Desktop/blend.png \
  && rm ~/changeColor.png

画像を重ね合わせて見ることができます。
リファレンス画像の色相を赤っぽくしてから重ね合わせることで、若干見やすくなるかと思います。
さらに使いやすいように、.bashrcに登録しておくのがおすすめです。
compare() {
  convert $1 -color-matrix "6x3: 1 0 0 0 0 0.4  0 1 0 0 0 0  0 0 1 0 0 0" ~/Desktop/changeColor.png;
  magick $1 ~/Desktop/changeColor.png -compose dissolve -define compose:args='60,100' -composite ~/Desktop/blend.png;
  rm ~/Desktop/changeColor.png
}
ある程度置かれるファイルが同じ場合は、引数に取る値をパス全体ではなくテスト名のみにしても良いかもしれません。
オンライン上にホストされている画像も実行することができるので、レビュー時にも使えます。
さいごに突撃インタビュー!
さいごにスナップショットテストを導入してみた感想をインタビューしてきました!
張さん「最初の保坂さんの研究のおかげで、私たちも今はこんな便利な方法でスナップショットを対応できています。その後は、Ryommさんの協力で忘れないよう色々な実装方法がドキュメントとしてまとめて整理されました。本当に良かったと思います。感謝しております。🙇♂️」
保坂さん「全体テストするとすごい時間かかるのがネックなので、今後短縮できるような取り組みをしていきたい。」
Ryommとしては、ロジックが変わったときに画面には影響が出ないけどスナップショットテストには影響があることがあって、それの修正がつらいな〜という気持ちが最近芽生えてます。SwiftUI化を進める際には違いがないか確認しやすくて、その点はよかったと思います!
関連記事 | Related Posts
my routeアプリにスナップショットテストを導入しました
Create a Reference Image for Snapshot Testing in Any Directory on iOS
[iOS] Snapshot Test のリファレンス画像を任意のディレクトリに作成する
Swift Observation: A Cleaner and More Efficient Approach to Updating the UI
Swift Package Manager Is Now Available for the My Route App!
![Cover Image for [IOS] [SwiftUI] Converting the KINTO Kantan Moushikomi App to SwiftUI](/assets/blog/authors/nakaguchi/2024-12-04-swiftUI-conversion/top.png)
[IOS] [SwiftUI] Converting the KINTO Kantan Moushikomi App to SwiftUI
We are hiring!
【バックエンドエンジニア】my route開発G/東京
my routeについてmy routeの概要 my routeは、移動需要を創出するために「魅力ある地域情報の発信」、「最適な移動手段の提案」、「交通機関や施設利用のスムーズな予約・決済」をワンストップで提供する、スマートフォン向けマルチモーダルモビリティサービスです。
【オープンポジション】「気になる!」方はまずはこちらからご応募ください。/東京・名古屋・大阪・福岡
業務内容国内外のKINTOサービスや、トヨタグループの金融、モビリティサービスの内製開発組織である同社にて、ご経験・ご志向性に応じて配属を決定し、ご活躍いただきます。